JAC S2. Engine. Service Manual - part 14


  Index      JAC     JAC S2. Engine. Service Manual


Search            copyright infringement  


Content      ..     12      13      14      15     ..


JAC S2. Engine. Service Manual - part 14


Engine ignition system


Engine ignition system                                                                                                                                                                     186


very important input signal and the ignition system is not able to work when the ECM fails to receive 

this signal. 

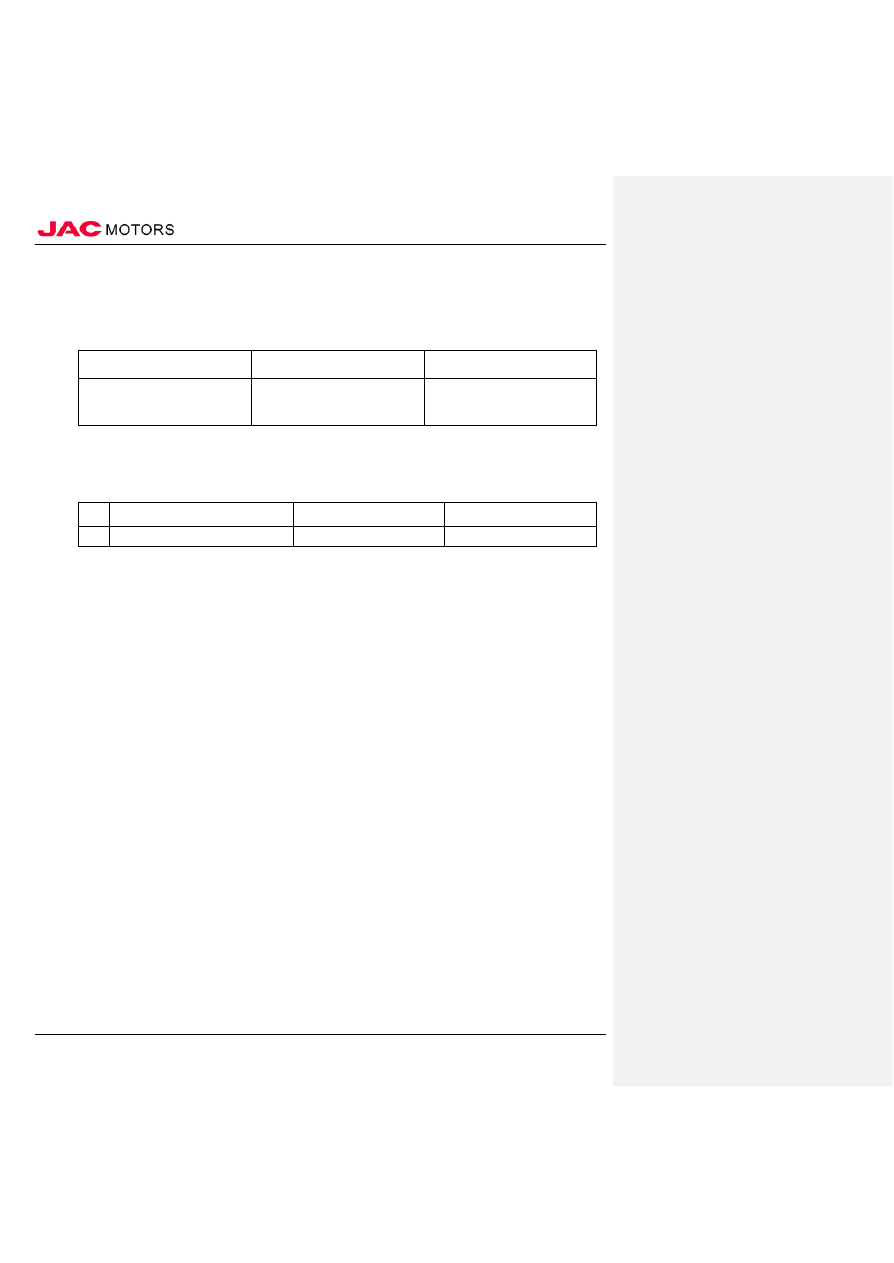
 (III) Technical and service data 


Service data 


Ignition 

wire 

Primary coil 
resistance 

0.77 ~ 0.95Ω 

Spark 

Ignition 

plug 

clearance 

0.7 ~ 0.8mm 


(IV) Torque data 


Important components torque table 


Item 

Torque  (N·m) 

Remarks 

1  Ignition plug 

25 ~ 30 

M1

-------------------------------------------------------------------------------------------------------------------------------------------------------------


Engine ignition system


Engine ignition system                                                                                                                                                                     187


II. Failure diagnosis 


(I) Diagnosis analysis table 


SN  Failure 

phenomenon 

Failure causes analysis 

Solution 

Remarks 

Engine can’t start 

or start difficultly 

Ignition coil or ignition 

switch failure 

Check or replace the ignition 

coil or ignition switch 


Ignition plug failure 

Check or replace the ignition 

plug 


High voltage wire breaks off 

or unconnected  

Check the high voltage wire 


Unstable idling 

High voltage wire or 

ignition plug failure 

Check or replace the high 

voltage wire or ignition plug 


Ignition coil failure 

Check or replace the ignition 

coil 


Engine in 

viberation or lack 

of power in 

acceleration 

High voltage wire failure 

Check or replace the high 

voltage wire 


Ignition plug failure 

Check or replace the ignition 

plug 


Poor fuel 

economy 

Ignition plug failure 

Check or replace the ignition 

plug 


(II) Diagnosis procedures table 

-------------------------------------------------------------------------------------------------------------------------------------------------------------


Engine ignition system


Engine ignition system                                                                                                                                                                     188


Withou high voltage ignition, engine can’t start 
 

The injector doesn’t work 


-------------------------------------------------------------------------------------------------------------------------------------------------------------


Engine ignition system


Engine ignition system                                                                                                                                                                     189


III. Ignition lock assy 


(I) Disassembly 


1. Open the engine hood 
2. Disconnect the cathode wire of battery 
3. Dismantle the driver’s airbag assy  
4. Dismantle the steering wheel assy 
5. Dismanlte the upper and down shell of steering column 
6. Dismantle the clock spring 
7. Dismantle the combination switch 
8. Dismantle the anti-theft coil 
9. Dismantle the ignition lock assy 
1). Disconnect the wires connector of the ignition lock assy 


2). Screw off the 2 nuts of 
ignition switch assy 
3). Take down the ignition 
lock and its base 


(II) Installation 


1. Install the ignition lock assy 

1). Screw into the 2 nuts of ignition lock and its 

base tightly 


-------------------------------------------------------------------------------------------------------------------------------------------------------------


Engine ignition system


Engine ignition system                                                                                                                                                                     190


-------------------------------------------------------------------------------------------------------------------------------------------------------------


Engine ignition system


Engine ignition system                                                                                                                                                                     191


2). Connect the wires connector of ignition lock assy. 


2. Install anti-theft coil 
3. Install combination switch 
4. Install clock spring 
5. Install the upper and down 
shell of steering column 
6. Install steering wheel assy 
7. Install the driver’s airbag 
8. Connect the cathode wires 
of battery 
9. Close the engine hood 


-------------------------------------------------------------------------------------------------------------------------------------------------------------


Engine ignition system


Engine ignition system                                                                                                                                                                     192


IV. Ignition coil 


(I.) Disassembly 


1. Open the enginie hood 
2. Disconnect the cathode wires of battery 
3. Dismantle the ignition coil 

1). Disconnect the wires connector of ignition coil 


2). Screw off the 4 fixed bolts of ignition coil 
and the wires bracket in engine compartment 
 

3). Take down the ignition coil 


(II.) Check 


1. Ignition coil 

Check the primary coil resistance between terminals, the value shall be 0.77~0.95Ω 


(III) Installation 


1. Install ignition coil 

1). Smear little insulation grease on the head of ignition coil and install ignition coil. 
2). Screw the fixed bolts of the ignition coil tightly 

Tighten torque: (8±2)N·


-------------------------------------------------------------------------------------------------------------------------------------------------------------


Engine ignition system


Engine ignition system                                                                                                                                                                     193


-------------------------------------------------------------------------------------------------------------------------------------------------------------


Engine ignition system


Engine ignition system                                                                                                                                                                     194


3). Connect the ignition coil wires connector 


2. Connect the cathode wires of battery 
3. Close the engine hood 

-------------------------------------------------------------------------------------------------------------------------------------------------------------


Engine ignition system


Engine ignition system                                                                                                                                                                     193


V. Ignition plug 


(I) Disassembly 


1. Open the engine hood 
2. Disconnect the cathode wires of battery 
3. Dismantle the ignition coil 
4. Dismantle the ignition plug 


1). Dismantle the ignition plug by the sleeve. 


(II) Check 


1. Check the ignition plug 

a. Check if the thread or insulation body of the ignition plug has damage or rupture 

b. Check if the ignition plug has carbod deposition or fuel/engine oil sediment. The normal 
porcelain small head of ignition plug is between the white/slight yellow and gray or brown. 

c. Check if the electrode of ignition plug has been damaged 
d. Check the ignition plug clearance by the ruler. The standard value: 0.7~0.8mm. 
e. Check the jump spark ability of ignition plug. Put the ignition plug on cylinder head and attach 
the high voltage wires to the binding posts of the ignition plug, if it gives out the “pa-pa” sound 
between the posts, it means the ignition plug works well and vice versa. 


(III) Installation 


1. Install ignition plug 

1). Insert the ignition plug and tighten to the regulated torque by the special tool. 
 

Tighten torque: 25~30Nm 


2. Install the ignition coil 
3. Connect the cathode wires of battery 
4. Close the engine hood. 


-------------------------------------------------------------------------------------------------------------------------------------------------------------


Engine auxiliary exhausts system


Engine Mounting system                                                                                                                                                                194


Engine auxiliary exhausts system   


I. Overview 


(I.) Structure overview 


System diagram 

Fuel evaporation and exhausts system 


ฏܷ  


-------------------------------------------------------------------------------------------------------------------------------------------------------------


Engine auxiliary exhausts system


Engine Mounting system                                                                                                                                                                195


Crankcase mandatory ventilation system 


4


6


8


7


1. Air filter 
2. Air inlet tube 

3. Throttle valve body 
4. Purification tank 

 
5. PVC valve 
6 Connection tube of PVC valve 

7. Air inlet manifold 
8. Injector 


System description 

Fuel evaporation and exhausts control system 


The fuel steam recycling device is to recycle the gasoline steam inside the fuel tank and transfer 

to air inlet tube of engine where mix with the fresh air and enter into cylinder for burning, by that 

prevent gasoline steam from exhausting into air and causing pollution. 

The fuel steam recycling device consists of the active carbon tank, solenoid valve of active 
carbon tank, one-way valve and the relative steam tubes and vacuum tubes. 


Crankcase mandatory ventilation system 


-------------------------------------------------------------------------------------------------------------------------------------------------------------


Engine auxiliary exhausts system


Engine Mounting system                                                                                                                                                                196


The crankcase mandatory ventilation system is to send the cylinder blowby back to air inlet 

manifold.      

The carankcase mandatory ventilation valve (PCV) sends the cylinder blowby back to the air inlet 

manifold. The air inlet manifold sucks into the crankcase blowby through PCV valve when the throttle 

is partially opened. While the normal ventilator capacity of PCV valve is enough to suck in the blow 

by and little ventilation air completely. The ventilation air is sucked into crankcase through air inlet 

tube. During this process, the air comes through the connection tube of air inlet tube and rocker arm 

cover.  When  the  throttle  is  fully  open,  the  vacuum  degree  of  air  inlet  manifold  is  not  enough  for 

opening PCV valve and sucking into crank blowby. The air will flow at a reverse direction through 

connection tube. The PCV valve is not capable on the serious crank blowby cars because part air flows 

into air inlet tube through connection tube under any circumstances. 


-------------------------------------------------------------------------------------------------------------------------------------------------------------


Engine auxiliary exhausts system


Engine Mounting system                                                                                                                                                                197


(II) System theory 


PCV valve working theory 


                   Air inlet 

manifold side without vacuum


S

2-w1179


A

ir inlet manifold side (High 
vacuum)


Engine 
Working conditions 

Not 

running 

Engine working 
conditions 

Idling or decelaration 

PCV valve 

Not 

workin

PCV valve 

Fully open 

Vacuum variation 

Restri

cted 


Slightly 


Air inlet 

manifold side 
with suitable 
vacuum 


≊䰞ᇚ ࠙ם 


Air inlet 

manifold 
side without 
vacuum


≊䰞ᇚ ࠙ם 


Engine 
Working conditions 

Normal 

Engine working 
conditions 

Acceleration and high 
speed poor performance 

PCV valve 

Normal 

PCV valve 

Work slowly 

Vacuum variation 

High 

variation 

Vacuum variation 

Extremely high 
variation 


(III) Torque parameters 


Key components torque table 
 

-------------------------------------------------------------------------------------------------------------------------------------------------------------


Engine auxiliary exhausts system


Engine Mounting system                                                                                                                                                                198


SN 

Item 

Torque  (N·m) 

Remarks 

1  M6×20 E10 bolt 

8.4±0.6 

M6×20 E10 

2  M6×12 E10  bolt 

8.4±0.6 

M6×12 E10 

3  M6×45 E10  bolt 

8.4±0.6 

M6×45 E10 

4  M6×25 E10   bolt 

8.4±0.6 

M6×25 E10 

5  M6×12 E8 bolt  

8.4±0.6 

M6×12 E8 

6  Oxygen sensor  

35±5 


-------------------------------------------------------------------------------------------------------------------------------------------------------------


Engine auxiliary exhausts system


Engine Mounting system                                                                                                                                                                199


Standard parts torque 


SN 

Item 

Torque  (N·m) 

Rem

arks 

M6 

9 ~ 11 


M8 

20 ~ 25 


M1

30 ~ 50 


M1

60 ~ 80 


(IV) Service attention matters 


Regular attention matters 

1. Discharging engine coolant attention matters 

1). after engine cooled down, then discharge the coolant. 

2. Disconnect fuel tube attention matters 

1). Before startring, make sure no flammable objects in the working area. 
2). Release the fuel pressure before disconnection or disassembly. 
3). Insert a plug in the front opening after disconnecting the joint. 

3. Disconnection and disassembly attention matters 

1). Work safely and follow the instructions and use the special tool according to the request. 

2). Be careful with matching face and sliding face protection. 

3). Use tape or something similar to seal the front opening of engine to prevent from impurities. 
4). Lable and sort out the parts in order and category for the trouble shooting and re-assembly. 

5). The principle for loosening bolts and nuts: Firstly loosen the one at the most outset then loosen 
the one at its diagonal end and goes one in this sequence. If it has the designated loose sequence, 
follow it. 

4. Check, repair and replace attention matters 

1). Check the part completely before repairing or replacing. Please change the part if necessary. 


5. Assembly attention matters 

1). Use the torque wrench to tighten nut and bolt. 
2). The principle for tightening bolt and nut: Firstly tighten the central one by multi steps at the 
same torque each time then tighten the ones at the inner and outer diagonal line. If it has 
designated sequence for tightening, please follow it. 

3). Replace with the new gasket, oil seal and O type ring. 
4). Flush and clean and dry eack parts completely. Check if the engine oil or coolant tubes have 
congestion. 
5). Do not damage the matching face or sliding face. Clean the dust or scraps completely. Smear 
the sliding face by engine oil before assembly. 
6). Release the tube air firstly for re-charging engine coolant. 

7).After repairing, running the engine and ratcheting up the RPM to check if the coolant, fuel, 
engine oil and air inlet and outlet had leakage. 

6. Parts needed to be tightened at a certain angle 


-------------------------------------------------------------------------------------------------------------------------------------------------------------


Content      ..     12      13      14      15     ..