Isuzu Trooper (1998-2002 year). Manual - part 542


  Index      Isuzu     Isuzu Trooper - service repair manual 1998-2002 year


Search            


Content   ..  540  541  542  543   ..


Isuzu Trooper (1998-2002 year). Manual - part 542


6F–4

ENGINE EXHAUST

Three Way Catalytic Converter LH

Removal

1. Disconnect battery ground cable.
2. Raise the vehicle and support with suitable safety

stands.

3. Disconnect front O

2

 sensor harness connector and

rear O

2

 sensor harness connector (3)(4).

4. Remove exhaust front pipe fixing three stud nuts (2)

from exhaust manifold side and two nuts (6)(7) from
rear end of exhaust front pipe (9).
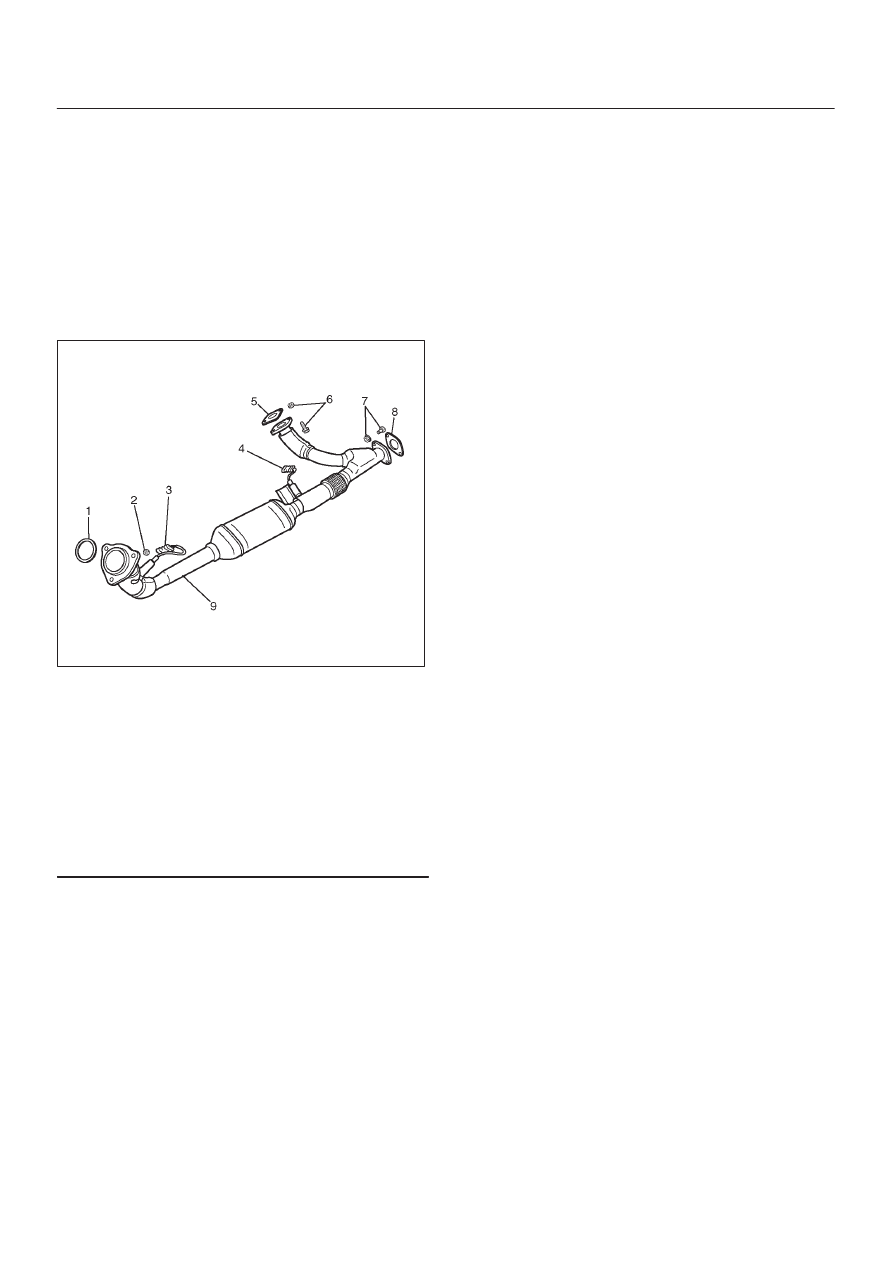
150R200006

Legend

(1) Gasket
(2) Front Exhaust Pipe Fixing Three Stud Nuts
(3) O

2

 Sensor Harness Connector

(4) O

2

 Sensor Harness Connector

(5) Gasket
(6) Front Exhaust Pipe RH Fixing Bolts and Nuts
(7) Front Exhaust Pipe Fixing Bolts and Nuts
(8) Gasket
(9) Front Exhaust Pipe LH

Installation

1. Install exhaust front pipe (9) and tighten three studs

nuts (2) and two nuts (6)(7) to the specified torque.

Torque
Stud nuts : 67 N·m (6.8 kg·m/49 lb ft)
Nuts(6) : 57 N·m (5.8 kg·m/42 lb ft)
Nuts(7) : 43 N·m (4.4 kg·m/32 lb ft)

2. Reconnect O

2

 sensor harness connector (3)(4).

6F–5

ENGINE EXHAUST

Three Way Catalytic Converter RH

Removal

1. Disconnect battery ground cable.
2. Raise the vehicle and support with suitable safety

stands.

3. Remove torsion bar. Refer to removal procedure in

Front Suspension section.

4. Disconnect front O

2

 sensor harness connector (6)

and rear O

2

 sensor harness connector (3).

5. Remove front exhaust pipe fixing bolts and nuts (4).
6. Remove three stud nuts (2) from exhaust manifold

then remove the exhaust front pipe (7).

150R200007

Legend

(1) Gasket
(2) Front Exhaust Pipe Fixing Three Stud Nuts
(3) O

2

 Sensor Harness Connector

(4) Front Exhaust Pipe Fixing Bolts and Nuts
(5) Gasket
(6) O

2

 Sensor Harness Connector

(7) Front Exhaust Pipe RH

Installation

1. Install front exhaust pipe (7) and tighten three stud

nuts (2) and two nuts (4) to the specified torque.

Torque
Stud nuts : 67 N·m (6.8 kg·m/49 lb ft)
Nuts : 57 N·m (5.8 kg·m/42 lb ft)

2. Install the torsion bar and readjust the vehicle height.

Refer to the installation and vehicle height adjustment
instructions in the Front Suspension Section.

6F–6

ENGINE EXHAUST

Exhaust Silencer

Exhaust Silencer and Associated Parts

150R200030

Legend

(1) Exhaust Silencer
(2) Mounting Rubber
(3) Rear Exhaust Pipe
(4) Rear Exhaust Pipe Nuts
(5) Gasket

(6) Rubber Support
(7) Nut
(8) Exhaust Silencer Fixing Bolts
(9) Gasket

(10) Exhaust Silencer Fixing Nuts

(11) Exhuast Front Pipe

Removal

1. Disconnect battery ground cable.
2. Raise the vehicle and support with suitable safety

stands.

3. Remove rear exhaust pipe (3). Refer to Rear Exhaust

Pipe in this section

4. Remove exhaust silencer fixing bolts (8) then

disconnect exhaust silencer from front exhaust pipe
(11).

6F–7

ENGINE EXHAUST

5. Remove exhaust silencer mounting nuts (7) from

rubber support (6) chassis side then remove exhaust
silencer (1).

Installation

1. Install the exhaust silencer (1) and tighten two nuts

(12) to the specified torque.

Nuts: 16 N·m (1.6 kg·m/12 lb ft)

2. Install the exhaust silencer and tighten two bolts (8)

on front exhaust pipe to specified torque.

Bolts: 43 N·m (4.4 kg·m/32 lb ft)

3. Install the rear exhaust pipe (3) and tighten on

exhaust silencer to specified torque.

Nuts: 43 N·m (4.4 kg·m/32 lb ft)


Content   ..  540  541  542  543   ..