Isuzu Trooper (1998-2002 year). Manual - part 1034


  Index      Isuzu     Isuzu Trooper - service repair manual 1998-2002 year


Search            


Content   ..  1032  1033  1034  1035   ..


Isuzu Trooper (1998-2002 year). Manual - part 1034


8F–64

BODY STRUCTURE

6. Remove sash division (2).

651RS008

7. Remove door fixed glass.

Installation

To install, follow the removal steps in the reverse order,
noting the following points.

1. Apply soap and water to the fixed glass.
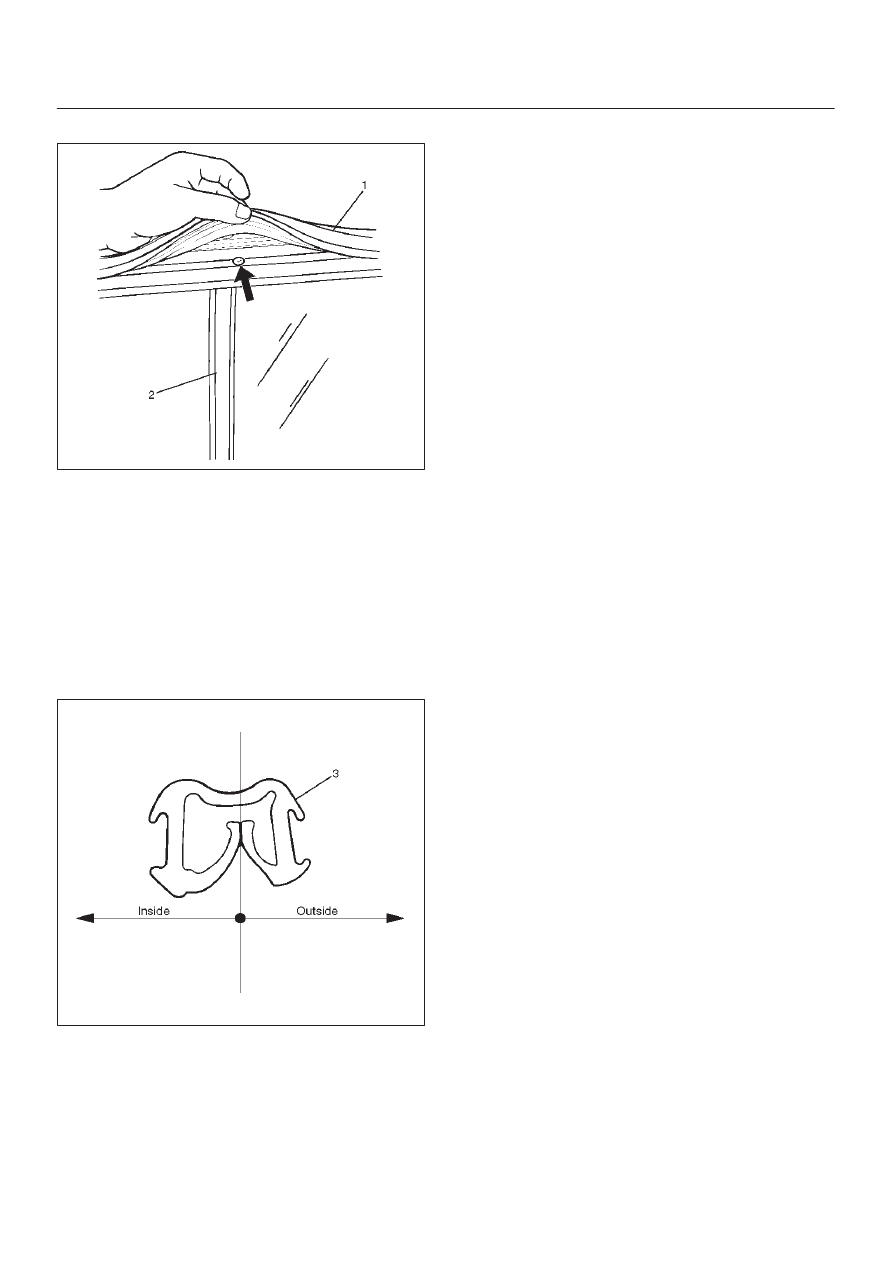
2. Apply soap and water to the door groove and insert

the glass run (3) to the frame from the corner in the
arrow-marked directions.

3. Be sure to install the glass run with its end pointed to

the inside of the vehicle.

A10RW019

8F–65

BODY STRUCTURE

Front Door Sash Moulding

Parts Location

645RS001

Legend

(1) Front Door Sash Moulding

Removal

1. Remove front door slash moulding.

D

To avoid the weatherstrip (1) and pry the door sash
moulding (2) out from the door panel.

645RS002

Installation

1. Install the front door sash moulding.

D

Assemble the edge portion (A portion) of the
moulding so that the clearance between the
moulding and the waist seal becomes 1 mm (0.04
in).

8F–66

BODY STRUCTURE

Rear Door Moulding

Parts Location

645RS003

Legend

(1) Rear Door Side Moulding

(2) Rear Door Corner Moulding
(3) Rear Door Upper Moulding

Removal

1. Disconnect the battery ground cable.
2. Remove rear door side moulding.
3. Remove rear door upper moulding.
4. Remove rear door corner moulding.

D

Avoiding the weatherstrip (3), pry the moulding (2)
out from the door frame (1).

645RS004

Installation

To install, follow the removal steps in the reverse order,
noting the following points.

1. Install each moulding with no clearance between

each piece of moulding.

2. Assemble the edge portion (A portion) of the

moulding so that the clearance between the rear side
moulding and the waist seal is 1 mm (0.04 in).

8F–67

BODY STRUCTURE

Front Door Waist Seal

Parts Location

631RS009

Legend

(1) Nylon Washer

(2) Door Mirror
(3) Front Door Waist Seal

Removal

1. Disconnect the battery ground cable.
2. Remove door mirror.

D

Refer to Door Mirror in Exterior / Interior Trim
section.

3. Remove front door waist seal.

D

Remove the fixing screw and pull out the waist seal
(1) from the door frame while prying it up.

631RS010

Installation

To install, follow the removal steps in the reverse order,
noting the following points.

1. Apply soap and water to the inside of the waist seal

and align the screw hole of the waist seal to the door
panel hole, and gently tap the seal with a rubber
hammer.
Be sure not to tap the seal hard. This may result in
deforming the seal.


Content   ..  1032  1033  1034  1035   ..