Isuzu Trooper (2000 year). Manual - part 36
 

  Index      Isuzu     Isuzu Trooper - service repair manual 2000 year


Search            


Content   ..  34  35  36  37   ..


Isuzu Trooper (2000 year). Manual - part 36


HEATING, VENTILATION AND AIR CONDITIONING (HVAC) 1A–113

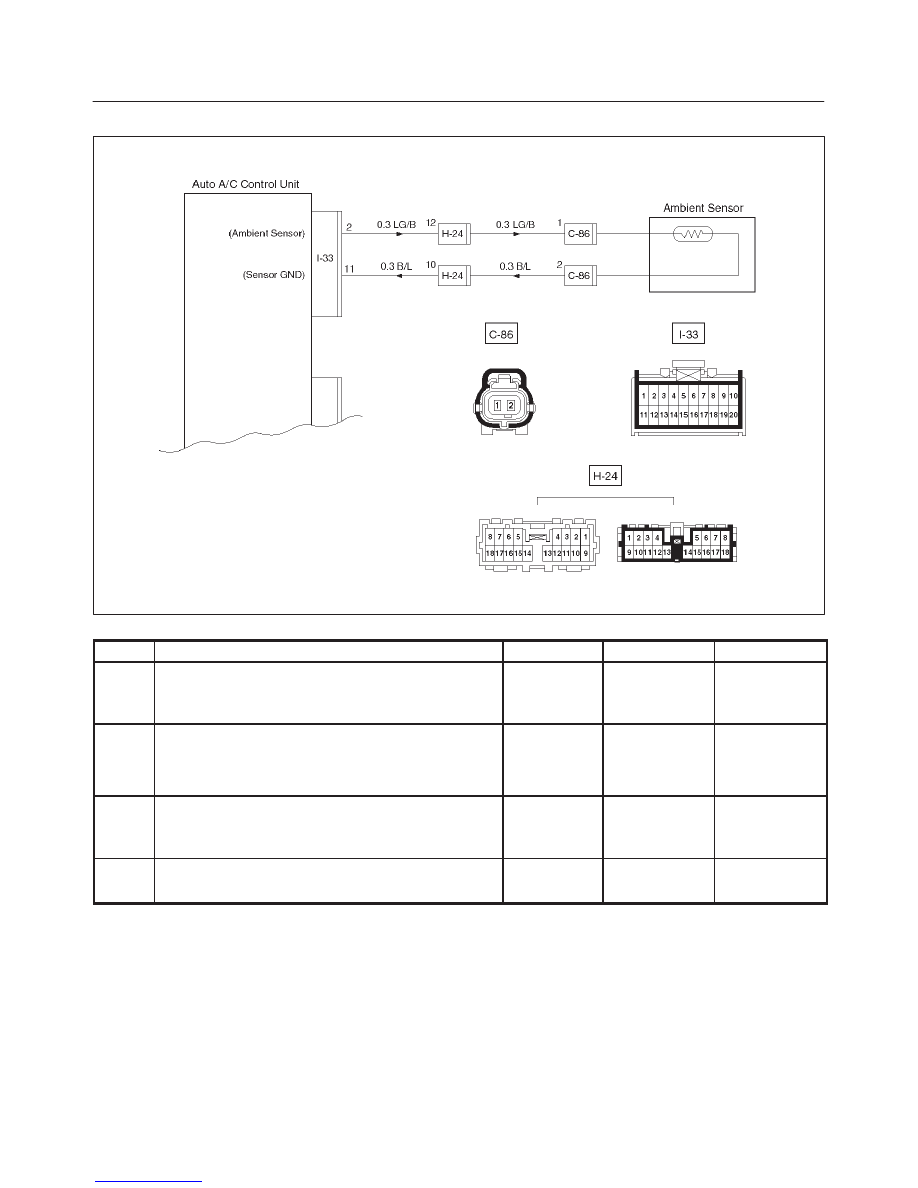
Chart 2: Ambient Sensor 

D08RY00140

Step

Action

Value(s)

Yes

No

1

Disconnect ambient sensor connector. (No.C–86)

Is performance of the ambient sensor normal? (Refer
to the later section on “Individual inspection”)

—

Go to Step 2

Replace the

ambient

sensor

2

Connect the ambient sensor connector.

Is resistance between the harness side connector
No.I33–2 and No.I33–11 normal?

Refer to the

later section

on “Individual

inspection”

Go to Step 4

Go to Step 3

3

Repair an open circuit between terminal No.I33–2 and
No.C86–1 or No.I33–11 and No.C86–2.

Is the action complete?

—

Verify repair

—

4

Replace the auto air conditioner control unit.

Is the action complete?

—

Verify repair

—

1A–114 HEATING, VENTILATION AND AIR CONDITIONING (HVAC)

Chart 3: Sun Sensor 

D08RY00139

Step

Action

Value(s)

Yes

No

1

Disconnect the sun sensor connector. (No.I–35)

Is performance of the sun sensor normal? (Refer to the
later section on individual inspection)

—

Go to Step 2

Replace the

sun sensor.

2

Is there continuity between the harness side connector
terminal No.I33–3 and No.I35–2?

—

Go to Step 4

Go to Step 4

3

Repair an open circuit between terminal No.I33–3 and
No.I35–2.

Is the action complete?

—

Go to Step 2

—

4

Is there continuity between the harness side connector
terminal No.I33–11 and No.I35–1?

—

Go to Step 6

Go to Step 5

5

Repair an open circuit between terminal No.I33–11 and
I35–1.

Is the action complete?

—

Go to Step 4

—

6

Replace the auto air conditioner control unit.

Is the action complete?

—

Verify repair

—

HEATING, VENTILATION AND AIR CONDITIONING (HVAC) 1A–115

Inspection of the Intake Actuator System 

D08RY00142

1A–116 HEATING, VENTILATION AND AIR CONDITIONING (HVAC)

Condition

Possible cause

Correction

Does not work at all

—

Refer to Chart A

Control failure

—

Refer to Chart B

Chart A: Does Not Work At All 

Step

Action

Value(s)

Yes

No

1

Is the fuse FL–1 normal?

—

Go to Step 2

Replace the

fuse

2

Is the fuse C–20 normal?

—

Go to Step 3

Replace the

fuse

3

Is the relay B–36 normal?

—

Go to Step 4

Replace the

relay

4

Turn on the ignition switch. (the engine is run.)

Is the battery voltage applied between the harness side
connector terminal No.I49–3 and ground?

Approx 12V

Go to Step 6

Go to Step 5

5

Repair an open circuit between terminal No.I49–3 and
No.B36–4.

Is the action complete?

—

Go to Step 4

—

6

Is the battery voltage applied between the harness side
connector terminal No.I49–4 and ground?

Approx 12V

Go to Step 8

Go to Step 7

7

Replace the intake actuator motor.

Is the action complete?

—

Go to Step 6

—

8

Is there continuity between the harness side connector
terminal No.I32–11 and No.B49–4?

—

Go to Step 10

Go to Step 9

9

Repair an open circuit between No.I32–11 and I49–4.

Is the action complete?

—

Verify repair

—

10

Replace the auto air conditioner control unit.

Is the action complete?

—

Verify repair

—


Content   ..  34  35  36  37   ..