Infiniti QX56 (2012 year). Manual - part 10


  Index      Infiniti     Infiniti QX56 (2012 year) - manual in english


Search            copyright infringement  


Content      ..     8      9      10      11     ..


Infiniti QX56 (2012 year). Manual - part 10


2-64

Instruments and controls

AUTOMATIC MOONROOF

The moonroof only operates when the
ignition switch is in the ON position.

The automatic moonroof is operational for
about 45 seconds, even if the ignition
switch is pushed to the OFF position. If the
driver

’s door or the passenger’s door is

opened during this period of about 45
seconds, power to the moonroof is can-
celed.

SIC3243

Sunshade

The sunshade will open automatically
when the moonroof is opened. However,
it must be closed manually.

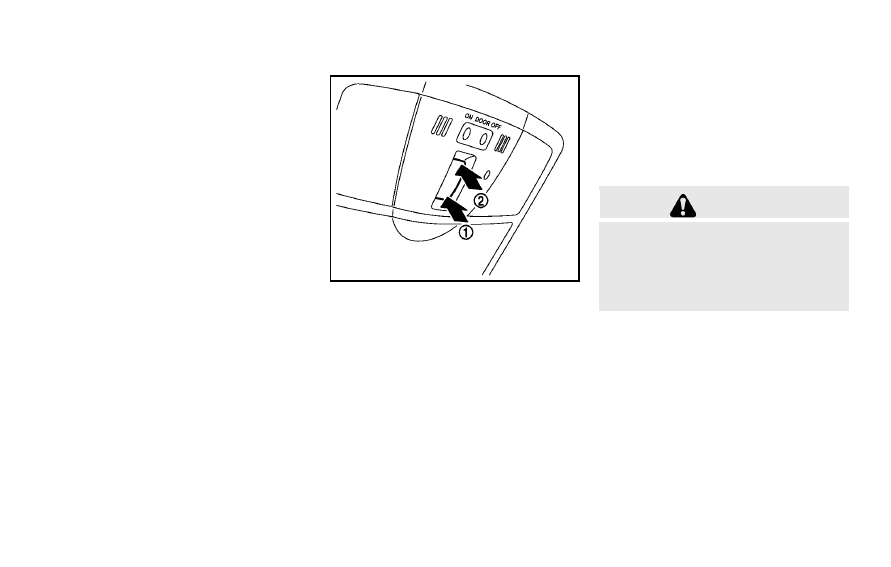
Tilting the moonroof

To tilt up, first close the moonroof, then
push the UP

*

1

side of the moonroof

switch and release it; it need not be held.
To tilt down the moonroof, push the DOWN

*

2

side.

Sliding the moonroof

To fully open or close the moonroof, push
the OPEN

*

2

or CLOSE

*

1

side of the

moonroof switch and release it; it need not
be held. The roof will automatically open or
close all the way. To stop the roof, push the
switch once more while it is opening or
closing.

Auto reverse function

WARNING

There are some small distances immediately
before the closed position which cannot be
detected. Make sure that all passengers
have their hands, etc., inside the vehicle
before closing the moonroof.

If the control unit detects something
caught in the moonroof when it is closing,
the moonroof will be immediately opened.

The auto reverse function can be activated
when the moonroof is closed by automatic
operation when the ignition switch is in the
ON position or for about 45 seconds after
the ignition switch is pushed to the OFF
position.

If the moonroof cannot be closed auto-
matically when the auto reverse function
activates due to a malfunction, push and
hold the CLOSE

*

1

side of the moonroof

-------------------------------------------------------------------------------------------------------------------------------------------------------------

switch.

Depending on the environment or driving
conditions, the auto reverse function may
be activated if an impact or load similar to
something being caught in the moonroof
occurs.

If the moonroof does not operate

If the moonroof does not operate properly,
perform the following procedure to initi-
alize the moonroof operation system.

1. If the moonroof is open, close it fully by

repeatedly pushing the CLOSE

*

1

side

of the moonroof switch.

2. Push and hold the CLOSE

*

1

side of

the moonroof switch to tilt the moon-
roof up.

3. Release the moonroof switch after the

moonroof moves slightly up and down.

4. Push and hold the OPEN

*

2

side of the

moonroof switch to fully tilt the moon-
roof down.

5. Check if the moonroof switch operates

normally.

If the moonroof does not operate properly
after performing the procedure above, have
your vehicle checked by an INFINITI retailer.

SIC3642

To activate or deactivate the welcome light
function, perform the following procedure.

1. Push the ignition switch to the ON

position.

2. Open the driver

’s side door.

3. Within 20 seconds after the ignition

switch is pushed to the ON position,
push the door open request switch on
the driver

’s side door handle for more

than 5 seconds with the driver

’s door

open.

4. A chime sounds when the setting is

completed.

Once the welcome light function is active,

the puddle light

*

A

and the passenger

cabin illumination will illuminate when you
approach the vehicle with the Intelligent
Key (within approximately 3.3 ft (1 m) of
the antenna built inside the door handles)
and the following conditions are met.
. All doors are closed and locked.
. The ignition switch is in the LOCK or OFF

position.

. The Intelligent Key is outside the

vehicle.

. The puddle light operates within a set

duration.

BATTERY SAVER SYSTEM

The welcome light function will be deacti-
vated automatically to prevent battery
discharge under the following conditions.
To activate the welcome light function
again, unlock any door.
. If the welcome light function does not

operate within a set duration. Note that
the duration is set to 9 days as the
factory default setting.

. If the welcome light function is acti-

vated 15 consecutive times when you
approach and leave the vehicle with the
Intelligent Key without the doors being
unlocked.

Instruments and controls

2-65

WELCOME LIGHT

-------------------------------------------------------------------------------------------------------------------------------------------------------------

2-66

Instruments and controls

SIC3249

MAP LIGHTS

Push the button as illustrated to turn the
light on or off.

SIC3250

REAR PERSONAL LIGHTS

Push the button as illustrated to turn the
light on or off.

SIC3251

INTERIOR LIGHT CONTROL SWITCH

The interior light control switch has three
positions: ON, DOOR and OFF.

ON position

When the switch is in the ON position

*

1

the map lights and rear personal lights will
illuminate.

DOOR position

When the switch is in the DOOR position

*

2

, the map lights and rear personal lights

will illuminate under the following condi-
tions:

INTERIOR LIGHTS

-------------------------------------------------------------------------------------------------------------------------------------------------------------

. ignition switch is switched to the LOCK

or OFF position
— remain on for about 15 seconds.

. doors are unlocked by pushing the

UNLOCK button on the Intelligent Key
or door handle request switch with the
ignition switch in the LOCK or OFF
position
— remain on for about 15 seconds.

. any door is opened and then closed

with the ignition switch in the LOCK or
OFF position
— remain on for about 15 seconds.

. any door is opened with the ignition

switch in the ACC or ON position
— remain on while the door is opened.

When the door is closed, the lights
go off.

The lights will also turn off after 15
minutes when the lights remain illumi-
nated after the ignition switch has been
pushed to the OFF or LOCK position to
prevent the battery from becoming dis-
charged.

When the auto interior illumination is set
to the OFF position (see

“Vehicle informa-

tion and settings

” in the “4. Monitor,

climate, audio, phone and voice recogni-

tion systems

” section), the lights will

illuminate under the following condition:
. any door is opened with the ignition

switch in any position
— remain on while the door is opened.

When the door is closed, the lights
go off.

OFF position

When the switch is in the OFF position

*

3

,

the lights will not illuminate, regardless of
the condition.

CAUTION

Do not use for extended periods of time with
the engine stopped. This could result in a
discharged battery.

SIC4448

The light on the vanity mirror will turn on
when the cover on the vanity mirror is
opened.

When the cover is closed, the light will turn
off.

The lights will also turn off after 15
minutes when the lights remain illumi-
nated to prevent the battery from becom-
ing discharged.

Instruments and controls

2-67

VANITY MIRROR LIGHTS

-------------------------------------------------------------------------------------------------------------------------------------------------------------

2-68

Instruments and controls

SIC4418

The cargo light switch has three positions:
ON

*

1

, center

*

2

and OFF

*

3

.

ON position

When the switch is in the ON position

*

1

,

the cargo light will illuminate.

Center position

When the switch is in the center position

*

2

, the cargo light will illuminate when the

lift gate is opened.

OFF position

When the switch is in the OFF position

*

3

,

the cargo light will not illuminate.

HomeLink

®

Universal Transceiver provides

a convenient way to consolidate the func-
tions of up to three individual hand-held
transmitters into one built-in device.

HomeLink

®

Universal Transceiver:

. Will operate most Radio Frequency (RF)

devices such as garage doors, gates,
home and office lighting, entry door
locks and security systems.

. Is powered by your vehicle’s battery. No

separate batteries are required. If the
vehicle

’s battery is discharged or is

disconnected, HomeLink

®

will retain all

programming.

Once HomeLink

®

Universal Transceiver is

programmed, retain the original transmit-
ter for future programming procedures
(Example: new vehicle purchases). Upon
sale of the vehicle, the programmed
HomeLink

®

Universal Transceiver buttons

should be erased for security purposes.
For additional information, see

“Program-

ming HomeLink

®

” later in this section.

WARNING

Do not use HomeLink

®

Universal Trans-

ceiver with any garage door opener that

lacks safety stop and reverse features as
required by federal safety standards.
(These standards became effective for
opener models manufactured after April
1, 1982.) A garage door opener which
cannot detect an object in the path of a
closing garage door and then automati-
cally stop and reverse, does not meet
current federal safety standards. Using a
garage door opener without these fea-
tures increases the risk of serious injury
or death.

During programming procedure, your

garage door or security gate may open
or close. Make sure that people and
objects are clear of the garage door,
gate, etc. that you are programming.

Your vehicles engine should be turned

off while programming HomeLink

®

Uni-

versal Transceiver.

CARGO LIGHT

HomeLink

®

UNIVERSAL TRANSCEIVER

-------------------------------------------------------------------------------------------------------------------------------------------------------------

PROGRAMMING HomeLink

®

To program your HomeLink

®

Universal

Transceiver to operate a garage door, gate,
or entry door opener, home or office
lighting, you need to be at the same
location as the device. Note: Garage door
openers (manufactured after 1996) have
“rolling code protection”. To program a
garage door opener equipped with

“rolling

code protection

”; you will need to use a

ladder to get up to the garage door opener
motor to be able to access the

“smart or

learn

” program button.

SIC3612

1. To begin, push and hold the 2 outer

HomeLink

®

buttons (to clear the mem-

ory) until the indicator light

*

A

blinks

(after 20 seconds). Release both but-
tons.

2. Position the end of the hand-held

transmitter 1-3 inches away from the
HomeLink

®

surface.

SIC3613

3. Using both hands, simultaneously push

and hold both the HomeLink

®

button

you want to program and the hand-held
transmitter button.

DO NOT release the buttons until step 4
has been completed.

4. Hold down both buttons until the

indicator light on HomeLink

®

flashes,

changing from a

“slow blink” to a

“rapid blink”. This could take up to 90
seconds. When the indicator light
blinks rapidly, both buttons may be
released. The rapidly flashing light
indicates successful programming. To
activate the garage door or other

Instruments and controls

2-69

-------------------------------------------------------------------------------------------------------------------------------------------------------------

2-70

Instruments and controls

programmed device, push and hold the
programmed HomeLink

®

button - re-

leasing when the device begins to
activate.

5. If the indicator light on HomeLink

®

blinks rapidly for two seconds and then
turns solid, HomeLink

®

has picked up a

“rolling code” garage door opener
signal. You will need to proceed with
the next steps to train HomeLink

®

,

completing the programming may re-
quire a ladder and another person for
convenience.

6. Push and release the program button

located on the garage door opener

’s

motor to activate the

“training mode”.

This button is usually located near the
antenna wire that hangs down from the
motor. If the wire originates from under
a light lens, you will need to remove the
lens to access the training button.

NOTE:
Once you have pushed and released
the training button on the garage door
opener

s motor and the training light

is lit, you have 30 seconds in which to
perform step 7. For convenience, use
the help of a second person to assist
when performing this step.

7. Quickly (within 30 seconds of pushing

and releasing the garage door opener
training button) and firmly push and
release the HomeLink

®

button you

’ve

just programmed. Push and release the
HomeLink

®

button up to three times to

complete the training.

8. Your HomeLink

®

button should now be

programmed. To program the remaining
HomeLink

®

buttons for additional door

or gate openers, follow steps 2 through
8 only.

NOTE:

Do not repeat step 1 unless you want to
clear” all previously programmed
HomeLink

®

buttons.

If you have any questions or are having
difficulty programming your HomeLink

®

buttons, please refer to the HomeLink

®

web site at: www.homelink.com or call 1-
800-355-3515.

PROGRAMMING HomeLink

®

FOR

CANADIAN CUSTOMERS

Prior to 1992, D.O.C. regulations required
hand-held transmitters to stop transmitting
after 2 seconds. To program your hand-
held transmitter to HomeLink

®

, continue to

push and hold the HomeLink

®

button (note

steps 2 through 4 under

“Programming

HomeLink

®

”) while you push and re-push

(

“cycle”) your hand-held transmitter every

2 seconds until the indicator light flashes
rapidly (indicating successful program-
ming).

NOTE:

If programming a garage door opener, etc.,
it is advised to unplug the device during
the

cycling” process to prevent possible

damage to the garage door opener com-
ponents.

OPERATING THE HomeLink

®

UNI-

VERSAL TRANSCEIVER

HomeLink

®

Universal Transceiver (once

programmed) may now be used to activate
the garage door, etc. To operate, simply
push

the

appropriate programmed

HomeLink

®

Universal Transceiver button.

The red indicator light will illuminate while
the signal is being transmitted.

-------------------------------------------------------------------------------------------------------------------------------------------------------------

PROGRAMMING TROUBLE-DIAGNO-
SIS

If HomeLink

®

does not quickly learn the

hand-held transmitter information:
. replace the hand-held transmitter bat-

teries with new batteries.

. position the hand-held transmitter with

its battery area facing away from the
HomeLink

®

surface.

. push and hold both the HomeLink

®

and

hand-held transmitter buttons without
interruption.

. position the hand-held transmitter 2 to

5 in (50 to 127 mm) away from the
HomeLink

®

surface. Hold the transmit-

ter in that position for up to 15
seconds. If HomeLink

®

is not pro-

grammed within that time, try holding
the transmitter in another position -
keeping the indicator light in view at all
times.

If you continue to have programming
difficulties, please contact the INFINITI
Consumer Affairs Department. The phone
numbers are located in the Foreword of
this Owner

’s Manual.

CLEARING THE PROGRAMMED IN-
FORMATION

Individual buttons cannot be cleared,
however to clear all programming, push
and hold the two outside buttons and
release when the indicator light begins to
flash (in approximately 20 seconds).

REPROGRAMMING A SINGLE
HomeLink

®

BUTTON

To reprogram a HomeLink

®

Universal

Transceiver button, complete the following.

1. Push and hold the desired HomeLink

®

button.

Do not release the button until

step 4 has been completed.

2. When the indicator light begins to flash

slowly (after 20 seconds), position the
hand-held transmitter 2 to 5 in (50 to
127 mm) away from the HomeLink

®

surface.

3. Push and hold the hand-held transmit-

ter button.

4. The HomeLink

®

indicator light will

flash, first slowly and then rapidly.
When the indicator light begins to flash
rapidly, release both buttons.

The HomeLink

®

Universal Transceiver but-

ton has now been reprogrammed. The new

device can be activated by pushing the
HomeLink

®

button that was just pro-

grammed. This procedure will not affect
any other programmed HomeLink

®

but-

tons.

IF YOUR VEHICLE IS STOLEN

If your vehicle is stolen, you should change
the codes of any non-rolling code device
t h a t

h a s

b e e n

p r o g r a m m e d

i n t o

HomeLink

®

. Consult the Owner

’s Manual

of each device or call the manufacturer or
retailer of those devices for additional
information.

When your vehicle is recovered, you will
need to reprogram the HomeLink

®

Uni-

versal Transceiver with your new transmit-
ter information.

FCC Notice:

For USA:

This device complies with part 15 of the
FCC rules. Operation is subject to the
following two conditions: (1) This device
may not cause harmful interference, and
(2) This device must accept any interfer-
ence received, including interference that
may cause undesired operation.

Instruments and controls

2-71

-------------------------------------------------------------------------------------------------------------------------------------------------------------

2-72

Instruments and controls

NOTE:

Changes or modifications not expressly
approved by the party responsible for
compliance could void the user

’s authority

to operate the equipment.

For Canada:

This device complies with RSS-210 of
Industry Canada. Operation is subject to
the following two conditions: (1) this
device may not cause interference, and
(2) this device must accept any interfer-
ence, including interference that may
cause undesired operation of the device.

-------------------------------------------------------------------------------------------------------------------------------------------------------------

3 Pre-driving checks and adjustments

Keys .................................................................... 3-2

Intelligent Key ................................................. 3-2
Valet hand-off.................................................. 3-3

Doors .................................................................. 3-4

Locking with mechanical key ........................... 3-4
Opening and closing windows with the
mechanical key................................................ 3-4
Locking with inside lock knob ......................... 3-5
Locking with power door lock switch ............... 3-5
Automatic door locks....................................... 3-5
Child safety rear door lock ............................. 3-6

Intelligent Key system ......................................... 3-6

Intelligent Key operating range........................ 3-8
Door locks/unlocks precaution ........................ 3-9
Intelligent Key operation ................................. 3-9
Battery saver system ..................................... 3-11
Warning signals............................................. 3-12
Troubleshooting guide ................................... 3-13

Remote keyless entry system............................. 3-15

How to use remote keyless entry system....... 3-15

Hood................................................................. 3-18
Lift gate ............................................................ 3-18

Operating manual lift gate ........................... 3-19
Operating power lift gate ............................. 3-19
Auto closure ............................................... 3-22
Lift gate release lever .................................. 3-23

Fuel-filler door................................................... 3-23

Opening the fuel-filler door.......................... 3-23
Fuel-filler cap............................................... 3-23

Tilt/telescopic steering ...................................... 3-26

Electric operation......................................... 3-26

Sun visors......................................................... 3-27
Mirrors.............................................................. 3-27

Inside mirror................................................ 3-27
Outside mirrors............................................ 3-28
Vanity mirror................................................ 3-30

Automatic drive positioner ................................ 3-30

Entry/exit function ....................................... 3-30
Memory storage........................................... 3-31
Setting memory function.............................. 3-32
System operation......................................... 3-32

-------------------------------------------------------------------------------------------------------------------------------------------------------------

3-2

Pre-driving checks and adjustments

A key number plate is supplied with your
keys. Record the key number and keep it in
a safe place (such as your wallet), not in
the vehicle. If you lose your keys, see an
INFINITI retailer for duplicates by using the
key number. INFINITI does not record any
key numbers so it is very important to keep
track of your key number plate.

A key number is only necessary when you
have lost all keys and do not have one to
duplicate from. If you still have a key, this
key can be duplicated by an INFINITI
retailer.

SPA2717

1.

Intelligent Key (2)

2.

Mechanical key (inside Intelligent Key)
(2)

3.

Key number plate (1)

INTELLIGENT KEY

Your vehicle can only be driven with the
Intelligent Keys which are registered to
your vehicle

’s Intelligent Key system com-

ponents and INFINITI Vehicle Immobilizer
System components. As many as 4 Intelli-
gent Keys can be registered and used with
one vehicle. The new keys must be
registered by an INFINITI retailer prior to
use with the Intelligent Key system and

INFINITI Vehicle Immobilizer System of your
vehicle. Since the registration process
requires erasing all memory in the Intelli-
gent Key components when registering
new keys, be sure to take all Intelligent
Keys that you have to the INFINITI retailer.

CAUTION

Be sure to carry the Intelligent Key with

you when driving. The Intelligent Key is a
precision device with a built-in transmit-
ter. To avoid damaging it, please note
the following.

— The Intelligent Key is water resis-

tant; however, wetting may damage
the Intelligent Key. If the Intelligent
Key gets wet, immediately wipe until
it is completely dry.

— Do not bend, drop or strike it

against another object.

— If the outside temperature is below

14

8F (−108C), the battery of the

Intelligent Key may not function
properly.

— Do not place the Intelligent Key for

an extended period in a place where
temperatures exceed 140

8F (608C).

KEYS

-------------------------------------------------------------------------------------------------------------------------------------------------------------

— Do not change or modify the In-

telligent Key.

— Do not use a magnet key holder.
— Do not place the Intelligent Key near

an electric appliance such as a
television set or personal computer.

— Do not allow the Intelligent Key to

come into contact with water or salt
water, and do not wash it in a
washing machine. This could affect
the system function.

If an Intelligent Key is lost or stolen,

INFINITI recommends erasing the ID code
of that Intelligent Key. This will prevent
the Intelligent Key from unauthorized
use to unlock the vehicle. For informa-
tion regarding the erasing procedure,
please contact an INFINITI retailer.

SPA2033

Mechanical key

To remove the mechanical key, release the
lock knob at the back of the Intelligent Key.

To install the mechanical key, firmly insert
it into the Intelligent Key until the lock
knob returns to the lock position.

Use the mechanical key to lock or unlock
the doors and the glove box.

See

“Doors” later in this section, “Storage”

in the

“2. Instruments and controls”

section.

CAUTION

Always carry the mechanical key installed in
the Intelligent Key.

VALET HAND-OFF

When you have to leave a key with a valet,
give them the Intelligent Key itself and
keep the mechanical key with you to
protect your belongings.

To prevent the glove box from being
opened during valet hand-off, follow the
procedures below.

1. Remove the mechanical key from the

Intelligent Key.

2. Lock the glove box with the mechanical

key.

3. Hand the Intelligent Key to the valet,

keeping the mechanical key in your
pocket or bag for insertion into the
Intelligent Key when you retrieve your
vehicle.

See

“Storage” in the “2. Instruments and

controls

” section.

Pre-driving checks and adjustments

3-3

-------------------------------------------------------------------------------------------------------------------------------------------------------------

3-4

Pre-driving checks and adjustments

WARNING

Always have the doors locked while

driving. Along with the use of seat belts,
this provides greater safety in the event
of an accident by helping to prevent
persons from being thrown from the
vehicle. This also helps keep children
and others from unintentionally opening
the doors, and will help keep out
intruders.

Before opening any door, always look for

and avoid oncoming traffic.

Do not leave children unattended inside

the vehicle. They could unknowingly
activate switches or controls. Unat-
tended children could become involved
in serious accidents.

SPA2457B

LOCKING WITH MECHANICAL KEY

The power door lock system allows you to
lock or unlock all doors simultaneously
using the mechanical key.
. Turning the driver’s door key cylinder to

the front of the vehicle

*

1

will lock all

doors.

. Turning the driver’s door key cylinder

once to the rear of the vehicle

*

2

will

unlock the driver

’s door. After returning

the key to the neutral position

*

3

,

turning it to the rear again within 5
seconds will unlock all doors.

. You can switch the lock system to the

mode that allows you to open all the
doors when the key is turned once.
(See

“How to use SETTING button” in

the

“4. Monitor, climate, audio, phone

and voice recognition systems

” sec-

tion.)

OPENING AND CLOSING WINDOWS
WITH THE MECHANICAL KEY

The driver

’s door key operation also allows

you to open and close all door windows.

To open the windows, turn the driver

’s door

key cylinder to the rear of the vehicle for
longer than 1 second. The door is unlocked
and the window keeps opening while
turning the key.

This function can also be performed by
pushing and holding the door UNLOCK
button of the Intelligent Key. (See

“Remote

keyless entry system

” later in this section.)

To close the windows, turn the driver

’s

door key cylinder to the front of the vehicle
for

longer than 1 second. The door is

locked and the window keeps closing while
turning the key.

DOORS

-------------------------------------------------------------------------------------------------------------------------------------------------------------

SPA2744

LOCKING WITH INSIDE LOCK KNOB

To lock the door individually, move the
inside lock knob to the lock position

*

1

.

To unlock, move the inside lock knob to the
unlock position

*

2

.

Be sure not to leave the Intelligent Key
inside the vehicle.

SPA2300

LOCKING WITH POWER DOOR LOCK
SWITCH

Operating the power door lock switch will
lock or unlock all the doors. The switches
are located on the driver

’s and front

passenger

’s door armrests.

To lock the doors, push the power door
lock switch to the lock position

*

1

.

Be sure not to leave the Intelligent Key
inside the vehicle.

To unlock the doors including the fuel-filler
door, push the power door lock switch to
the unlock position

*

2

.

Lockout protection

When the power door lock switch (driver or
front passenger) is moved to the lock
position with any door open, all doors will
lock and unlock automatically. With the
Intelligent Key left in the vehicle and any
door open, all doors will unlock automati-
cally and a chime will sound after the door
is closed.

These functions help to prevent the In-
telligent Key from being accidentally
locked inside the vehicle.

AUTOMATIC DOOR LOCKS

. All doors lock automatically when the

vehicle speed reaches 15 MPH (24
km/h).

. All doors unlock automatically when the

ignition switch is placed in the OFF
position.

The automatic unlock function can be
deactivated or activated. 
To deactivate or
activate the automatic door unlock system,
perform the following procedure:

1. Close all doors.

2. Place the ignition switch in the ON

position.

Pre-driving checks and adjustments

3-5

-------------------------------------------------------------------------------------------------------------------------------------------------------------

3-6

Pre-driving checks and adjustments

3. Within 20 seconds of performing Step

2, push and hold the power door lock
switch to the

position (UNLOCK) for

more than 5 seconds.

4. When activated, the hazard indicator

will flash twice. When deactivated, the
hazard indicator will flash once.

5. The ignition switch must be placed in

the OFF and ON position again between
each setting change.

When the automatic door unlock system is
deactivated, the doors do not unlock when
the ignition switch is placed in the OFF
position. To unlock the door manually, use
the inside lock knob or the power door lock
switch (driver

’s or front passenger’s side).

SPA2745

CHILD SAFETY REAR DOOR LOCK

Child safety rear door locks help prevent
doors from being opened accidentally,
especially when small children are in the
vehicle.

When the levers are in the lock position

*

1

, the rear doors can be opened only

from the outside.

To disengage, move the levers to the
unlock position

*

2

.

WARNING

Radio waves could adversely affect

electric medical equipment. Those who
use a pacemaker should contact the
electric medical equipment manufacturer
for the possible influences before use.

The Intelligent Key transmits radio

waves when the buttons are pushed.
The FAA advises that the radio waves
may affect aircraft navigation and com-
munication systems. Do not operate the
Intelligent Key while on an airplane.
Make sure the buttons are not operated
unintentionally when the unit is stored
during a flight.

The Intelligent Key system can operate all
the door locks using the remote controller
function or pushing the request switch on
the vehicle without taking the key out from
a pocket or purse. The operating environ-
ment and/or conditions may affect the
Intelligent Key system operation.

Be sure to read the following before using
the Intelligent Key system.

INTELLIGENT KEY SYSTEM

-------------------------------------------------------------------------------------------------------------------------------------------------------------

CAUTION

Be sure to carry the Intelligent Key with

you when operating the vehicle.

Never leave the Intelligent Key in the

vehicle when you leave the vehicle.

The Intelligent Key is always communicat-
ing with the vehicle as it receives radio
waves. The Intelligent Key system trans-
mits weak radio waves. Environmental
conditions may interfere with the operation
of the Intelligent Key system under the
following operating conditions.
. When operating near a location where

strong radio waves are transmitted,
such as a TV tower, power station and
broadcasting station.

. When in possession of wireless equip-

ment, such as a cellular telephone,
transceiver, and CB radio.

. When the Intelligent Key is in contact

with or covered by metallic materials.

. When any type of radio wave remote

control is used nearby.

. When the Intelligent Key is placed near

an electric appliance such as a perso-

nal computer.

. When the vehicle is parked near a

parking meter.

In such cases, correct the operating condi-
tions before using the Intelligent Key
function or use the mechanical key.

Although the life of the battery varies
depending on the operating conditions,
the battery

’s life is approximately 2 years.

If the battery is discharged, replace it with
a new one.

Since the Intelligent Key is continuously
receiving radio waves, if the key is left near
equipment which transmits strong radio
waves, such as signals from a TV and
personal computer, the battery life may
become shorter.

For information regarding replacement of a
battery, see

“Intelligent Key battery repla-

cement

” in the “8. Maintenance and do-it-

yourself

” section.

As many as 4 Intelligent Keys can be
registered and used with one vehicle. For
information about the purchase and use of
additional Intelligent Keys, contact an
INFINITI retailer.

CAUTION

Do not allow the Intelligent Key, which

contains electrical components, to come
into contact with water or salt water.
This could affect the system function.

Do not drop the Intelligent Key.
Do not strike the Intelligent Key sharply

against another object.

Do not change or modify the Intelligent

Key.

Wetting may damage the Intelligent Key.

If the Intelligent Key gets wet, immedi-
ately wipe until it is completely dry.

If the outside temperature is below 148F

(

−108C), the battery of the Intelligent

Key may not function properly.

Do not place the Intelligent Key for an

extended period in an area where
temperatures exceed 140

8F (608C).

Do not attach the Intelligent Key with a

key holder that contains a magnet.

Do not place the Intelligent Key near

equipment that produces a magnetic
field, such as a TV, audio equipment
and personal computers.

Pre-driving checks and adjustments

3-7

-------------------------------------------------------------------------------------------------------------------------------------------------------------


Content      ..     8      9      10      11     ..