Infiniti Q45. Manual - part 781


  Index      Infiniti     Infiniti Q45 - service repair manual 2006 year


Search            copyright infringement  


Content   ..  779  780  781  782   ..


Infiniti Q45. Manual - part 781


SEAT BELTS

SB-3

C

D

E

F

G

I

J

K

L

M

A

B

SB

SEAT BELTS

PFP:86884

System Description

NHS0003F

SEAT BELT WARNING CHIME

With ignition switch turned ON and seat belt unfastened (seat belt switch ON), warning chime will sound
for approximately 6 seconds.

If warning chime does not sound, refer to 

DI-67, "Seat Belt Buckle Switch Input Signal Inspection"

 .

SEAT BELT WARNING LAMP

Fasten driver's seat belt.

The seat belt warning lamp should go out.

If the seat belt warning lamp does not go out, refer to 

DI-31, "Wiring Diagram — WARN —"

 .

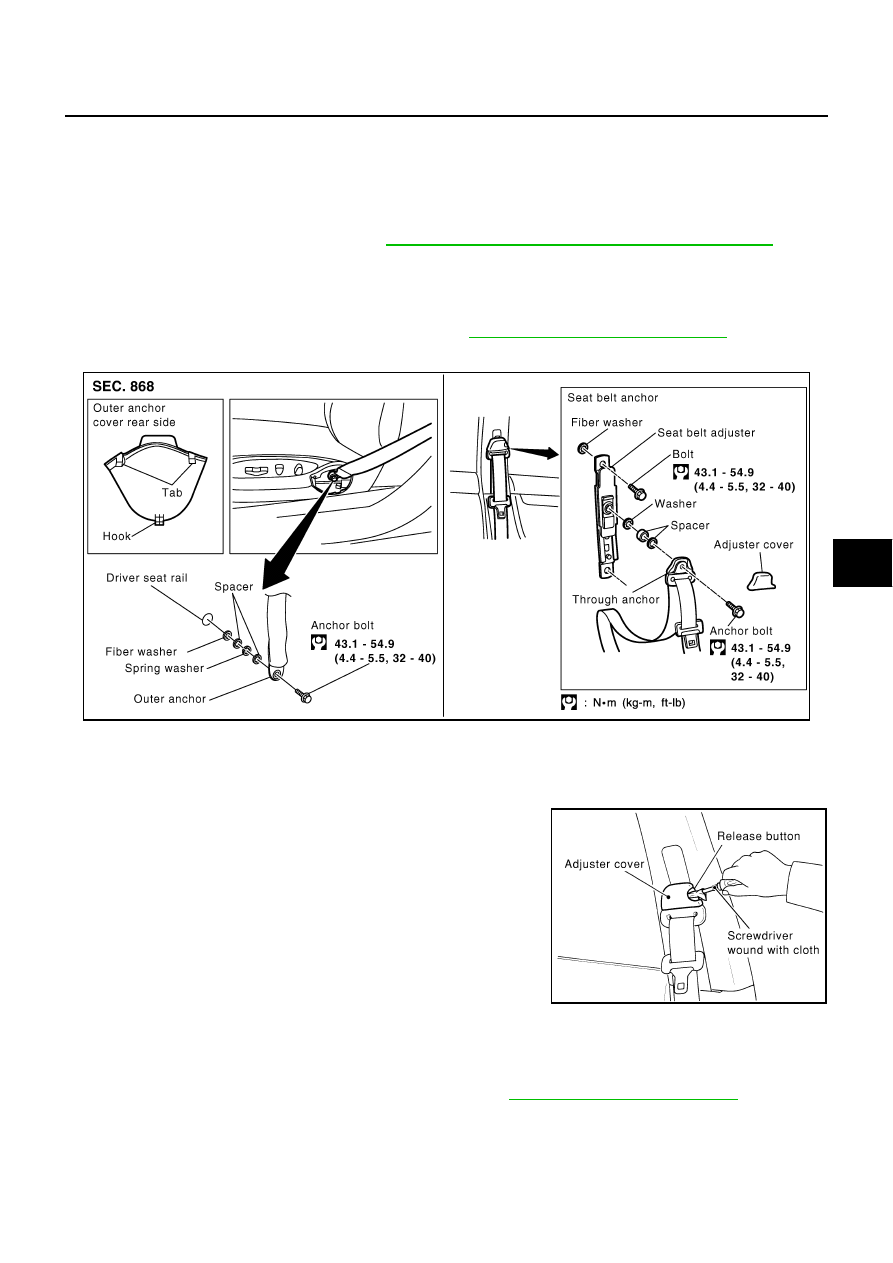
Removal and Installation of Front Seat Belt 

NHS0003G

CAUTION:

Before servicing SRS, turn the ignition switch off, disconnect both battery cables and wait at least 3
minutes.

REMOVAL OF SEAT BELT RETRACTOR 

1.

Remove the adjuster cover on the seat belt anchor.

NOTE:
Insert a screwdriver wound with cloth into the slot of the release
button to disengage the tab and remove the release button.

2.

Remove the anchor bolts.

3.

Remove the outer anchor cover, and remove the anchor bolts.

4.

Disconnect the belt tension sensor connector.(passenger side only)

5.

Remove the center pillar upper and lower garnish. Refer to 

EI-43, "Removal and Installation"

 .

PHIA0686E

SHIA0166E

SB-4

SEAT BELTS

6.

Disconnect the seat belt pre-tensioner connector.

CAUTION:

For installing/removing seat belt pre-tensioner connec-
tor, insert thin screwdriver wrapped in tape into notch, lift
lock and remove connector.

Install connector with lock raised, and push lock into
connector.

7.

Disconnect the tension reducer connector and the pre-crush
seat belt connector.

8.

Remove the seat belt pre-tensioner retractor fixing screw and
anchor bolt, and then remove the seat belt retractor.

INSTALLATION OF SEAT BELT RETRACTOR

Install in the reverse order of removal.

REMOVAL OF SEAT BELT BUCKLE

1.

Remove the front seat. Refer to 

SE-182, "Removal and Installation"

 .

2.

Remove the anchor bolt, and remove the buckle.

INSTALLATION OF SEAT BELT BUCKLE

Install in the reverse order of removal.

PHIA0341E

PHIA0773E

SHIA0168E

SEAT BELTS

SB-5

C

D

E

F

G

I

J

K

L

M

A

B

SB

Removal and Installation of Rear Seat Belt 

NHS0003H

REMOVAL

1.

Remove the rear seat cushion and seatback. Refer to 

SE-191, "Removal and Installation"

 .

2.

Remove the rear pillar finisher. Refer to 

EI-43, "Removal and Installation"

 .

3.

Remove the outer and inner anchor bolt.

4.

Remove the rear parcel shelf finisher. Refer to 

EI-48, "Removal and Installation"

 .

5.

Remove seat belt retractor mounting screw and anchor bolt, and remove the seat belt assembly.

INSTALLATION

Install in the reverse order of removal.

SHIA0169E

SB-6

SEAT BELTS

Seat Belt Inspection

NHS0003I

AFTER A COLLISION

WARNING:

Inspect all seat belt assemblies including retractors and attaching hardware after any collision.
NISSAN recommends that all seat belt assemblies in use during a collision be replaced unless the col-
lision was minor and the belts show no damage and continue to operate properly. Failure to do so
could result in serious personal injury in an accident. Seat belt assemblies not in use during a colli-
sion should also be replaced if either damage or improper operation is noted. Seat belt pre-tensioned
should be replaced even if the seat belts are not in use during a frontal collision in which the air bags
are deployed.
Replace any seat belt assembly (including anchor bolts) if:

The seat belt was in use at the time of a collision (except for minor collisions and the belts, retractors and
buckles show no damage and continue to operate properly).

The seat belt was damaged in an accident. (i.e. torn webbing, bent retractor or guide, etc.)

The seat belt attaching point was damaged in an accident. Inspect the seat belt attaching area for damage
or distortion and repair as necessary before installing a new seat belt assembly.

Anchor bolts are deformed or worn out.

The seat belt pre-tensioner should be replaced even if the seat belts are not in use during the collision in
which the air bags are deployed.

PRELIMINARY CHECKS

1.

Check the seat belt warning lamp/chime for proper operation as follows:

a.

Switch ignition ON. The seat belt warning lamp should illuminate. Also, the seat belt warning chime should
sound for about seven seconds.

b.

Fasten driver's seat belt. The seat belt warning lamp should go out and the chime (if sounding) should
stop.

2.

If the air bag warning lamp is blinking, conduct self-diagnosis using CONSULT-II, and air bag warning
lamp. Refer to 

SRS-21, "SRS Operation Check"

 .

3.

Check that the seat belt retractor, seat belt anchor and buckle bolts are securely attached.

4.

Check the shoulder seat belt guide and shoulder belt height adjuster for front seats. Ensure guide swivels
freely and that webbing lays flat and does not bind in guide. Ensure height adjuster operates properly and
holds securely.

5.

Check retractor operation:

a.

Fully extend the seat belt webbing and check for twists, tears or other damage.

b.

Allow the seat belt to retract. Ensure that webbing returns smoothly and completely into the retractor. If
the seat belt does not return smoothly, wipe the inside of the loops with a clean paper cloth. Because dirt
built up in the loops of the upper anchors can cause the seat belts to retract slowly.

c.

Fasten the seat belt. Check the seat belt returns smoothly and completely to the retractor. If the webbing
does not return smoothly, the cause may be an accumulation of dust or dirt. Use the “SEAT BELT TAPE
SET” and perform the following steps. 

Inspect the front seat belt though-anchor 

1. Pull the seat belt out to a length of 500 mm (19.69 in) or more.

2. Use a clip or other device to the fix the seat belt at the center pillar webbing oping.

3. Pass a thin wire though the though-anchor webbing opening. Hold both ends of the wire and pull taut

while moving it up and down several times along the webbing opening surface to move matter stuck
there. 

4. Any dirt that can not be removed with the wire can be removed by cleaning the opening with a clean

cloth.

5. Apply tape at the point where the webbing contacts the though-anchor webbing opening. 

NOTE:
Apply the tape so that there is no looseness or wrinkling.

6. Remove the clip fixing the seat belt and check that the webbing returns smoothly.

6.

Repeat steps above as necessary to check the other seat belts.


Content   ..  779  780  781  782   ..