Infiniti Q45. Manual - part 604


  Index      Infiniti     Infiniti Q45 - service repair manual 2006 year


Search            copyright infringement  


Content   ..  602  603  604  605   ..


Infiniti Q45. Manual - part 604


SQUEAK AND RATTLE TROUBLE DIAGNOSES

GW-9

C

D

E

F

G

H

J

K

L

M

A

B

GW

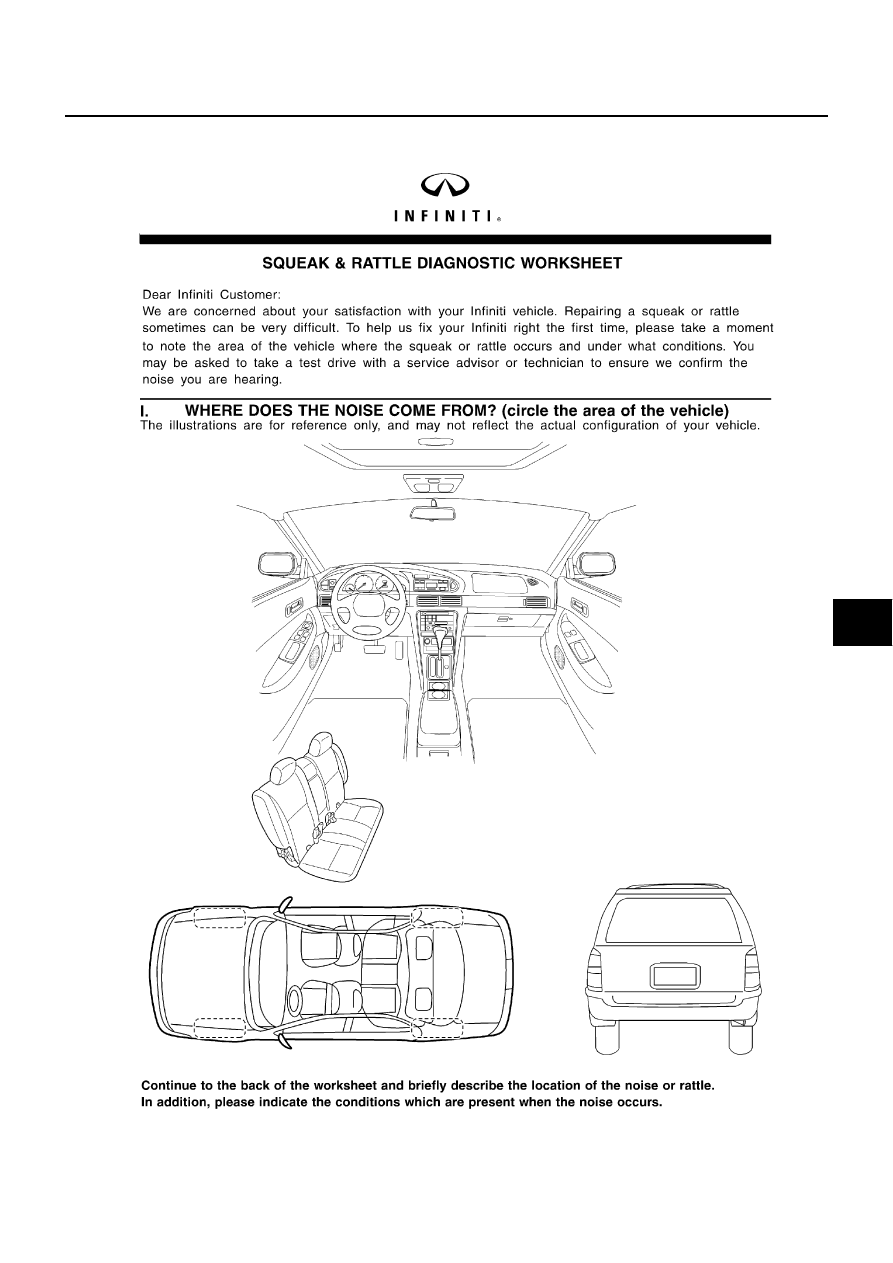
Diagnostic Worksheet

NIS000YI

SBT860

GW-10

SQUEAK AND RATTLE TROUBLE DIAGNOSES

SBT844

WINDSHIELD GLASS

GW-11

C

D

E

F

G

H

J

K

L

M

A

B

GW

WINDSHIELD GLASS

PFP:72712

Removal and Installation

NIS000YJ

REMOVAL

1.

Remove the body side welt on the front pillar. Refer to 

EI-43, "BODY SIDE TRIM"

 .

2.

Remove the front pillar garnish. Refer to 

EI-43, "BODY SIDE TRIM"

 .

3.

Remove the headlining. Refer to 

EI-58, "HEADLINING"

 .

4.

Remove the cowl top cover. Refer to 

EI-23, "COWL TOP"

 .

5.

Remove the side lower part of windshield molding from the fastener (lower) by disconnecting clips, and
then pull upper part of the molding to remove.

6.

Apply a protective tape around the windshield glass to protect the painted surface from damage.

7.

Remove glass using piano wire or power cutting tool and an inflatable pump bag.

1.

Windshield molding

2.

Joint

3.

Clip

4.

Windshield glass

5.

Open cell foam dam

6.

Insulator

7.

Spacer

8.

Fastener (upper)

9.

Rivet

10. Fastener (lower)

11.

Adhesive

12. Double-faced adhesive tape

13. Cowl top cover

PIIA9989E

GW-12

WINDSHIELD GLASS

NOTE:
If a windshield glass will be reused, mark the body and the glass with mating marks.

WARNING:

When cutting the glass from the vehicle, always wear safety glasses and heavy gloves to help prevent
glass splinters from entering your eyes or cutting your hands.

CAUTION:

When a windshield glass is reused, do not use a cutting knife or power cutting tool.

Be careful not to scratch the glass when removing.

Do not set or stand the glass on its edge. Small chips may develop into cracks.

8.

Remove the windshield glass, using suction lifter.

INSTALLATION

The open cell foam dam and the insulator should be installed in
position.

Use a genuine Nissan Urethane Adhesive Kit (if available) or equivalent and follow the instructions fur-
nished with it.

While the urethane adhesive is curing, open a door window. This will prevent the glass from being forced
out by passenger compartment air pressure when a door is closed.

The fastener and the molding must be installed securely so that it is in position and leaves no gap. Install
the moldings in order of lower to upper corner, connect joint, and then corner to center.

Inform the customer that the vehicle should remain stationary until the urethane adhesive has completely
cured (preferably 24 hours). Curing time varies with temperature and humidity.

WARNING:

Keep heat and open flames away as primers and adhesive are flammable.

The materials contained in the kit are harmful if swallowed, and may irritate skin and eyes. Avoid
contact with the skin and eyes.

Use in an open, well ventilated location. Avoid breathing the vapors. They can be harmful if
inhaled. If affected by vapor inhalation, immediately move to an area with fresh air.

Driving the vehicle before the urethane adhesive has completely cured may affect the perfor-
mance of the windshield in case of an accident.

CAUTION:

Do not use an adhesive which is past its usable term. Shelf life of this product is limited to six
months after the date of manufacture. Carefully adhere to the expiration or manufacture date
printed on the box.

Keep primers and adhesive in a cool, dry place. Ideally, they should be stored in a refrigerator.

PIIA0186E

PIIA9431E


Content   ..  602  603  604  605   ..