Infiniti M45 (Y34). Manual - part 666


  Index      Infiniti     Infiniti M45 (Y34) - service repair manual 2004 year


Search            copyright infringement  


Content   ..  664  665  666  667   ..


Infiniti M45 (Y34). Manual - part 666


STEP LAMP

LT-171

C

D

E

F

G

H

I

J

L

M

A

B

LT

5. 

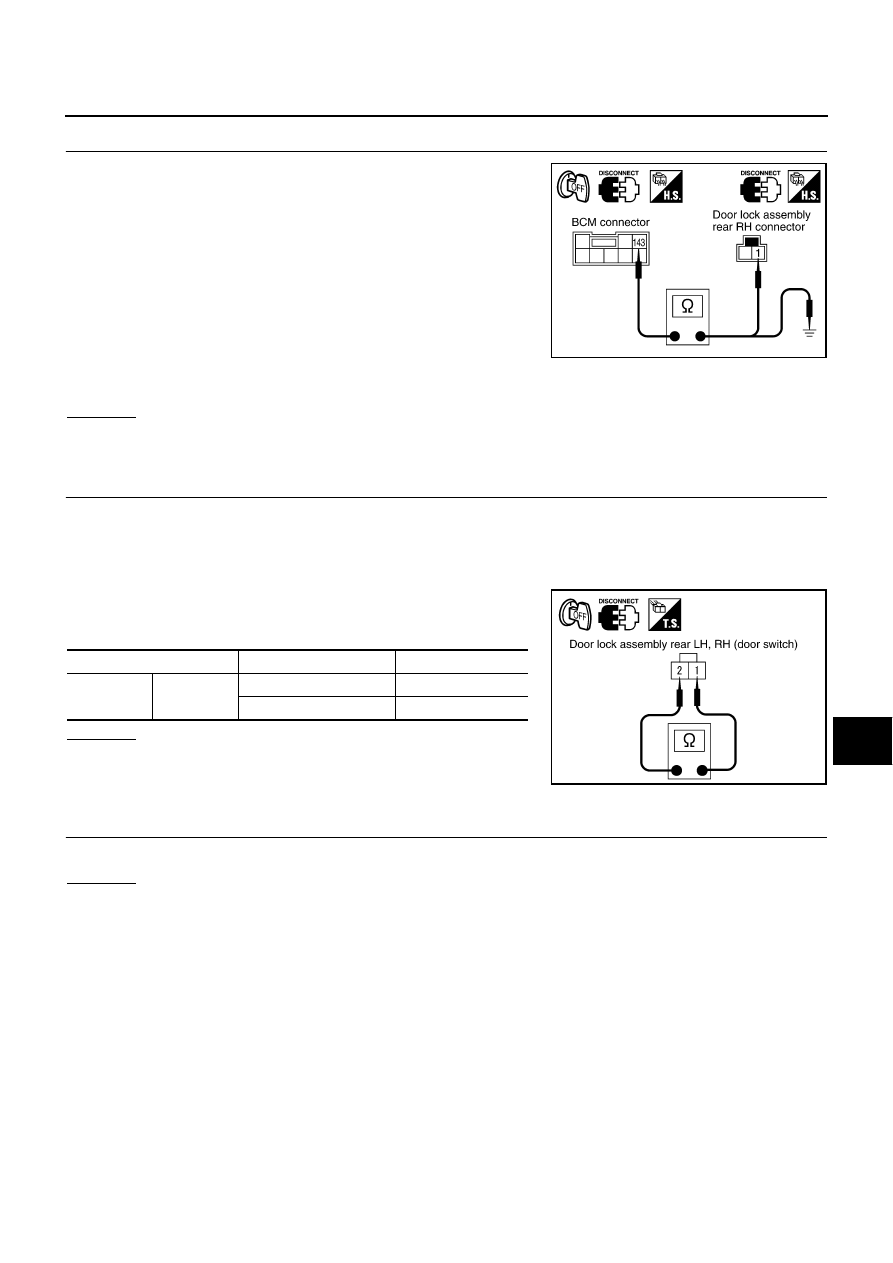
CHECK DOOR LOCK ASSEMBLY REAR RH (DOOR SWITCH) CIRCUIT

1.

Disconnect door lock assembly rear RH connector.

2.

Check continuity between BCM harness connector B4 terminal
143 (W/L) and door lock assembly rear RH harness connector
D82 terminal 1 (W).

3.

Check continuity between BCM harness connector B4 terminal
143 (W/L) and ground.

NOTE:
If door lock assembly rear RH (door switch) is normal, skip this pro-
cedure and go to 6.

OK or NG

OK

>> GO TO 6.

NG

>> Repair harness or connector.

6. 

CHECK DOOR SWITCH

1.

Check front door switch.

2.

Check continuity between door lock assembly rear LH, RH (door
switch) terminals 1 and 2 while turning the door switches ON
(open) and OFF (closed).

OK or NG

OK

>> Check front door switch case ground condition or door

lock assembly rear LH, RH (door switch) ground circuit.

NG

>> Replace door switch.

7. 

CHECK BULB

Check step lamp bulb.

OK or NG

OK

>> GO TO 8.

NG

>> Replace bulb.

143 (W/L) - 1 (W)

: Continuity should exist. 

143 (W/L) - Ground

: Continuity should not exist.

PKIA5976E

Switch released (ON)

: Continuity should exist.

Switch pressed (OFF)

: Continuity should not exist.

Terminal

Condition

Continuity

1

2

ON (Door open)

Yes

OFF (Door closed)

No

PKIA5964E

LT-172

STEP LAMP

8. 

CHECK POWER SUPPLY CIRCUIT

1.

Turn ignition switch OFF.

2.

Disconnect step lamp connector.

3.

Check voltage between step lamp connector D10, D40, D60 or
D80 terminal 1 (L) and ground.

OK or NG

OK

>> Check connector or harness for open or short between

step lamp and door control unit.

NG

>> Check the following.

10A fuse [No. 8, located in fuse block (J/B) No. 1]

Harness for open or short between fuse and step lamp

Bulb Replacement

AKS002H8

1.

Insert a screwdriver in the notch and remove lens.

2.

Remove bulb.

Removal and Installation

AKS002H9

1.

Using a clip driver or a suitable tool, press and remove metal clip
of the step lamp.

2.

Disconnect step lamp connector.

1 (L) - Ground

: Battery voltage should exist.

PKIA5979E

Step lamp

: 12V 2.7W

PKIA6946E

PKIA0076E

ILLUMINATION

LT-173

C

D

E

F

G

H

I

J

L

M

A

B

LT

ILLUMINATION

PFP:27545

System Description

AKS002HA

The illumination lamp operation is controlled by the lighting switch which is built into the spiral cable and head-
lamp battery saver control unit. The battery saver system is controlled by headlamp battery saver control unit
and BCM.
Power is supplied at all times

to tail lamp relay terminals 2 and 6

through 15A fuse [No. 54, located in fuse, fusible link and relay block (J/B)],

to headlamp battery saver control unit terminal 7

through 10A fuse [No. 6, located in fuse block (J/B) No. 1].

When ignition switch is in ON or START position,
power is supplied

to headlamp battery saver control unit terminal 1

through 10A fuse [No. 1, located in fuse block (J/B) No. 1].

Ground is supplied 

to headlamp battery saver control unit terminals 4 and 11

through grounds M25 and M115.

LIGHTING OPERATION BY LIGHTING SWITCH

When lighting switch is 1ST (or 2ND) position,
ground is supplied

to tail lamp relay terminal 1 from headlamp battery saver control unit terminals 6 and 14

through headlamp battery saver control unit terminals 5 and 13

through lighting switch and grounds M25 and M115.

Tail lamp relay is then energized and illumination lamps illuminate.
The lighting switch must be in the 1ST or 2ND position for illumination.
The illumination control switch that controls the amount of current to the illumination system. As the amount of
current increases, the illumination becomes brighter.
The ground for all of the components except for glove box lamp, front cigarette lighter, rear ashtray, AV and
NAVI control unit (with NAVI) and AV control unit (without NAVI) are controlled through illumination control
switch terminals 2 and 3 and grounds M25 and M115.

BATTERY SAVER CONTROL

When the ignition switch is turned from ON (or START) to OFF (or ACC) positions while illumination lamps are
illuminated, the RAP signal is supplied to terminal 10 of the headlamp battery saver control unit from BCM ter-
minal 135.
After counting 45 seconds by the RAP signal from the BCM to headlamp battery saver control unit, the ground
supply to the tail lamp relay terminal 1 from headlamp battery saver control unit terminals 6 and 14 is termi-
nated. 
Then illumination lamps are turned off.
Illumination lamps are turned off when driver or passenger side door is opened even if 45 seconds have not
passed after the ignition switch is turned from ON (or START) to OFF (or ACC) positions while illumination
lamps are illuminated.
When the lighting switch is turned from OFF to 1ST (or 2ND) after illumination lamps are turned off by the bat-
tery saver control,
ground is supplied

to headlamp battery saver control unit terminals 5 and 13 from lighting switch terminal 11, and 

to tail lamp relay terminal 1 from headlamp battery saver control unit terminals 6 and 14.

Then illumination lamps illuminate again.

LT-174

ILLUMINATION

Schematic

AKS002HB

TKWB0116E


Content   ..  664  665  666  667   ..