Infiniti M45 (Y34). Manual - part 585


  Index      Infiniti     Infiniti M45 (Y34) - service repair manual 2004 year


Search            copyright infringement  


Content   ..  583  584  585  586   ..


Infiniti M45 (Y34). Manual - part 585


FRONT DOOR GLASS AND REGULATOR

GW-51

C

D

E

F

G

H

J

K

L

M

A

B

GW

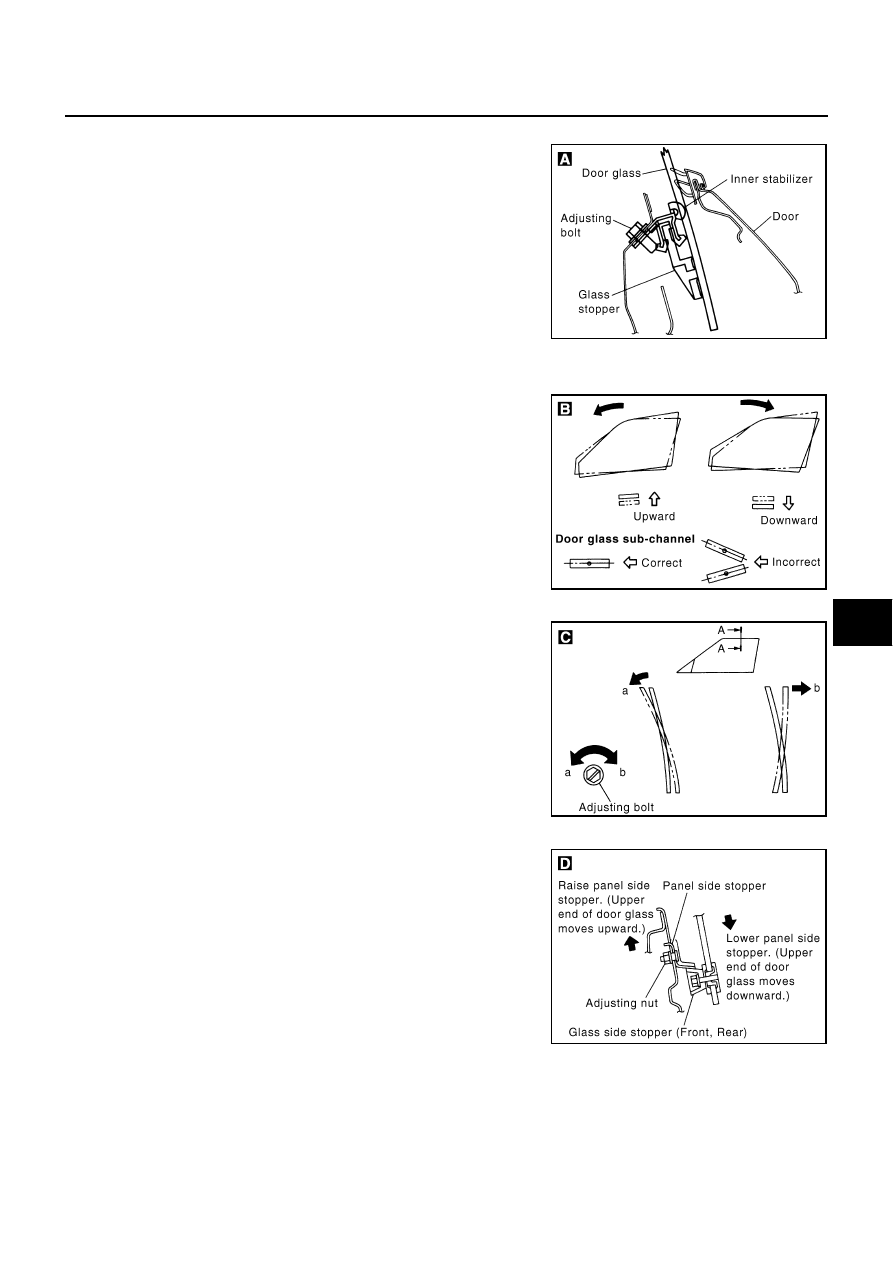
[A] IN-OUT ADJUSTMENT (AT THE GLASS WAIST)

1.

Raise door glass until glass stopper is in contact with inner stabi-
lizer, just before the window stops.

2.

Loosen adjusting bolts.

3.

Lightly press door glass upper end outward so that glass outer
surface contacts outer. With glass held in that position, press
inner stabilizer to glass inner surface and tighten adjusting bolt.

CAUTION:

Make sure nap portions of stabilizers are clean and free from
oil, grease, etc.

[B] FORE-AFT TILT ADJUSTMENT

Adjust front glass sub-channel at the glass and retainer holder/body side weatherstrip location.

For sub-channel adjustment procedures, refer to figure at right
as a guide.

CAUTION:

Make sure door glass sub-channel is horizontal.

The fore-aft tilt adjustment must be made at the same time
the fore-aft adjustment [E] is made.

[C] IN-OUT TILT ADJUSTMENT (AT GUIDE RAIL)

1.

Adjust door glass-to-holder clearance to 0 to 3.5 mm (0 to 0.138
in) with the adjusting bolts.

CAUTION:

Turn adjusting bolt clockwise to move door glass upper end
outward.

Turn adjusting bolt counterclockwise to move door glass
upper end inward.

[D] UP-STOP ADJUSTMENT

1.

Adjust panel side stopper location so that clearance at upper
edge of door is standard measurement to 0 to 3.5 mm (0 to
0.138 in). Make sure front and rear glass side stoppers lightly
contact front and rear panel side stoppers, then tighten adjusting
nuts.

2.

If stoppers do not contact each other, adjust sub-channel nut.
Refer to “[B] Fore-aft tilt adjustment”.

3.

Open and close doors to make sure upper end of door glass
does not contact holder.

PIIA3158E

PIIA3156E

PIIA3157E

PIIA3159E

GW-52

FRONT DOOR GLASS AND REGULATOR

[E] FORE-AFT ADJUSTMENT

1.

Lower the glass slightly until the glass side stopper comes off
the panel side stopper.

CAUTION:

Do not lower the glass excessively.

2.

Loosen lock nuts, and adjust guide rail in the fore-aft direction so
that clearance between upper edge of door glass and holder is
constant at the midpoint of holder specified dimension to 0 to 3.5
mm (0 to 0.138 in). Check that there is on interference between
glass and holder when door is closed or opened.

CAUTION:

While loosening and tightening lock nuts, hold adjusting
bolts using a standard screwdriver to prevent them from
turning.

3.

If outer perimeter of door glass interferes with holder when door
is opened or closed, refer to “[B] Fore-aft tilt adjustment” for pro-
cedures.

PIIA3161E

PIIA3160E

REAR DOOR GLASS AND REGULATOR

GW-53

C

D

E

F

G

H

J

K

L

M

A

B

GW

REAR DOOR GLASS AND REGULATOR

PFP:82300

Removal and Installation

AIS001GQ

REMOVAL

1.

Remove rear door finisher. Refer to 

EI-31, "DOOR FINISHER"

 .

2.

Remove rear door speaker. Refer to 

AV-30, "Removal and Installation of Door Speaker"

 .

3.

Remove sealing screen. 

4.

Remove rear door outside molding. Refer to 

EI-27, "DOOR OUTSIDE MOLDING"

 .

5.

Remove glass stopper and inner stabilizer.

6.

Operate power window sub-switch to raise/lower door window
until glass mounting bolts can be seen. 

7.

Remove glass mounting nuts.

PIIB1567E

1.

Glass stopper

2.

Guide channel

3.

Regulator assembly

4.

Sub-channel

5.

Glass guide

6.

Main channel

7.

Guide rail

8.

Door glass assembly (Rear)

9.

Inner stabilizer

PIIA3175E

GW-54

REAR DOOR GLASS AND REGULATOR

8.

Remove glass guide from guide channel while lifting the whole.

9.

Pull out back guide roller from guide rail and detach glass.

10. Remove bolt and nut of guide rail, then remove guide rail.

11. Remove the harness connector routed on the frame assembly, then remove the harness clip from the

back.

12. Remove bolt of sub-channel and regulator then remove regulator assembly.

13. Remove bolt and nut of guide channel, then remove guide chan-

nel.

INSTALLATION

Install in the reverse order of removal.

INSPECTION AFTER REMOVAL

Check the regulator assembly for the following items. If a malfunction is detected, replace or grease it.

Gear wear

Regulator deformation

Spring damage

Grease condition for each sliding part

FITTING INSPECTION

Check that the glass is securely fit into the body side weatherstrip.

Lower the glass slightly [approx. 10 to 20 mm (0.39 to 0.79 in)], and check that the clearance to the weath-
erstrip is parallel. If the clearance between the glass and weatherstrip is not parallel, adjust glass fitting.

PIIA3176E

PIIA3177E


Content   ..  583  584  585  586   ..