Infiniti G37 Coupe. Manual - part 291


  Index      Infiniti     Infiniti G37 Coupe - service repair manual 2008 year


Search            


Content   ..  289  290  291  292   ..


Infiniti G37 Coupe. Manual - part 291


REPLACEMENT OPERATIONS

BRM-33

< REMOVAL AND INSTALLATION >

C

D

E

F

G

H

I

J

L

M

A

B

BRM

N

O

P

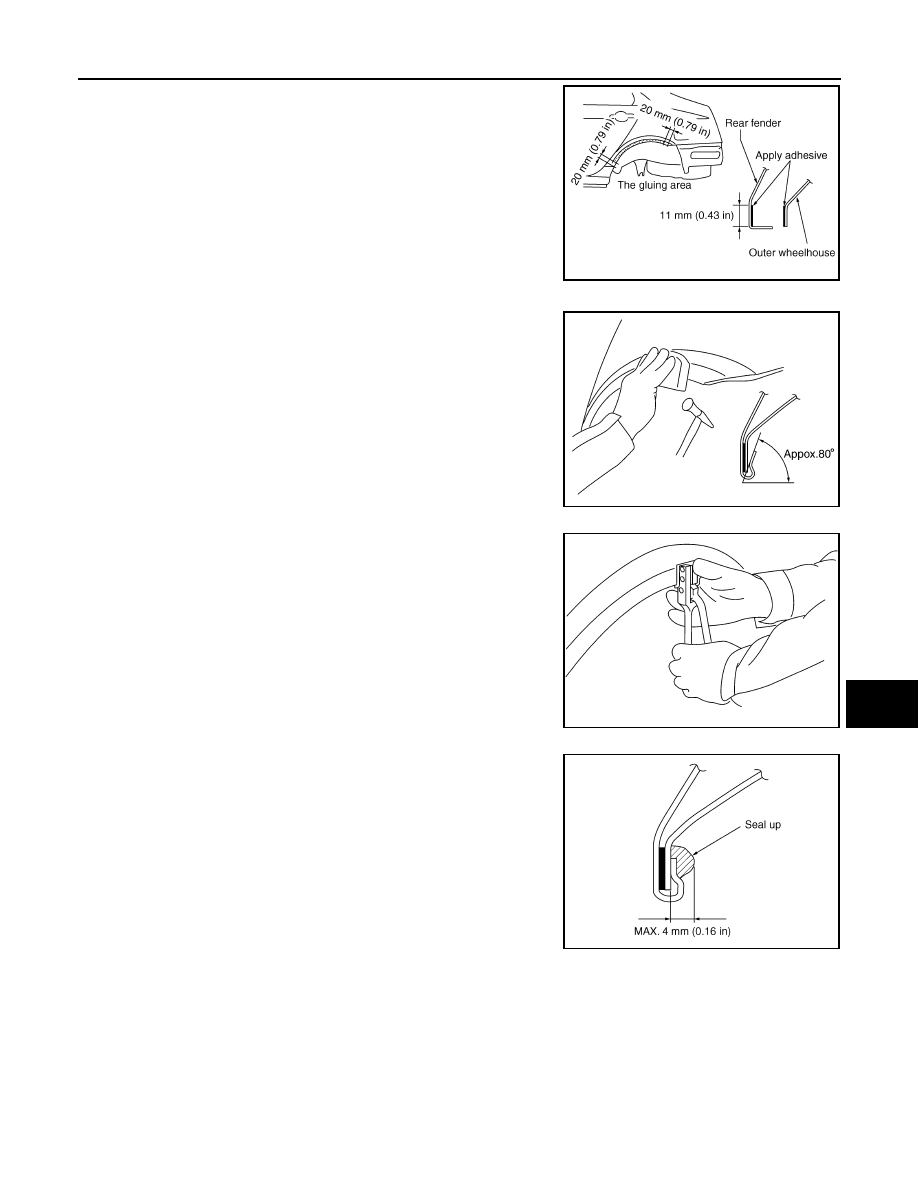
• Peel off old bonding material on the surface of outer wheelhouse

and clean thoroughly.

• Peel off a primer coat in the specified area where new adhesive is

to be applied on rear fender (the replacing part).

• Apply new adhesive to both specified areas of outer wheelhouse

and rear fender.

• Attach rear fender to the body of the car, and weld the required

part except the hemming part.

• Bend the welded part starting from the center of the wheel arch

gradually with a hammer and a dolly. (Also hem the end of the
flange.)

• Hemming with a hammer is conducted to an approximate angle of

80 degrees.

• Starting from the center, hem the wheel arch gradually, using slight

back and forth motion with a hemming tool.

• Seal up the area around the hemmed end of the flange.

FOAM REPAIR

During factory body assembly, foam insulators are installed in certain body panels and locations around the
vehicle. Use the following procedure (s) to replace any factory-installed foam insulators.

Urethane foam applications

Use commercially available spray foam for sealant (foam material) repair of material used on vehicle. Read
instructions on product for fill procedures.
1.

Fill procedures after installation of service part.

-

Remove foam material remaining on vehicle side.

-

Clean area in which foam was removed.

-

Install service part.

<Adhesive>

3M automix panel bond 8115,
or any equivalents

JSKIA0136GB

SIIA2245E

SIIA2246E

JSKIA0137GB

BRM-34

< REMOVAL AND INSTALLATION >

REPLACEMENT OPERATIONS

-

Insert nozzle into hole near fill area and fill foam material or fill in enough to close gap with the service
part.

2.

Fill procedures before installation of service part.

-

Remove foam material remaining on vehicle side.

-

Clean area in which foam was removed.

-

Fill foam material on wheelhouse outer side.

NOTE:
Fill in enough to close gap with service part while avoiding flange

area.

-

Install service part.

NOTE:
Refer to label for information on working times.

1.

Urethane foam

A.

Nozzle insert hole

: Vehicle front

1.

Urethane foam

A.

Fill while avoiding flange area

: Vehicle front

JSKIA0129GB

JSKIA0130GB

REPLACEMENT OPERATIONS

BRM-35

< REMOVAL AND INSTALLATION >

C

D

E

F

G

H

I

J

L

M

A

B

BRM

N

O

P

Radiator Core Support

INFOID:0000000001672404

Hoodledge

INFOID:0000000001672403

Work after radiator core support has been removed.
Remove the front side member center closing plate (reusable).

: Vehicle front

Replacement parts

Radiator core support assembly (LH)

Front side member connector as-
sembly (LH)

JSKIA0373GB

BRM-36

< REMOVAL AND INSTALLATION >

REPLACEMENT OPERATIONS

1.

Front side member center closing 
plate

: Vehicle front

Replacement parts

Upper front hoodledge (LH)

Hoodledge reinforcement (LH)

Front strut housing (LH)

JSKIA0374GB


Content   ..  289  290  291  292   ..