Infiniti G35 (V35) Sedan. Manual - part 823
 

  Index      Infiniti     Infiniti G35 (V35) Sedan - service repair manual 2007 year


Search            


Content   ..  821  822  823  824   ..


Infiniti G35 (V35) Sedan. Manual - part 823


INT-16

< ON-VEHICLE REPAIR >

BODY SIDE TRIM

3.

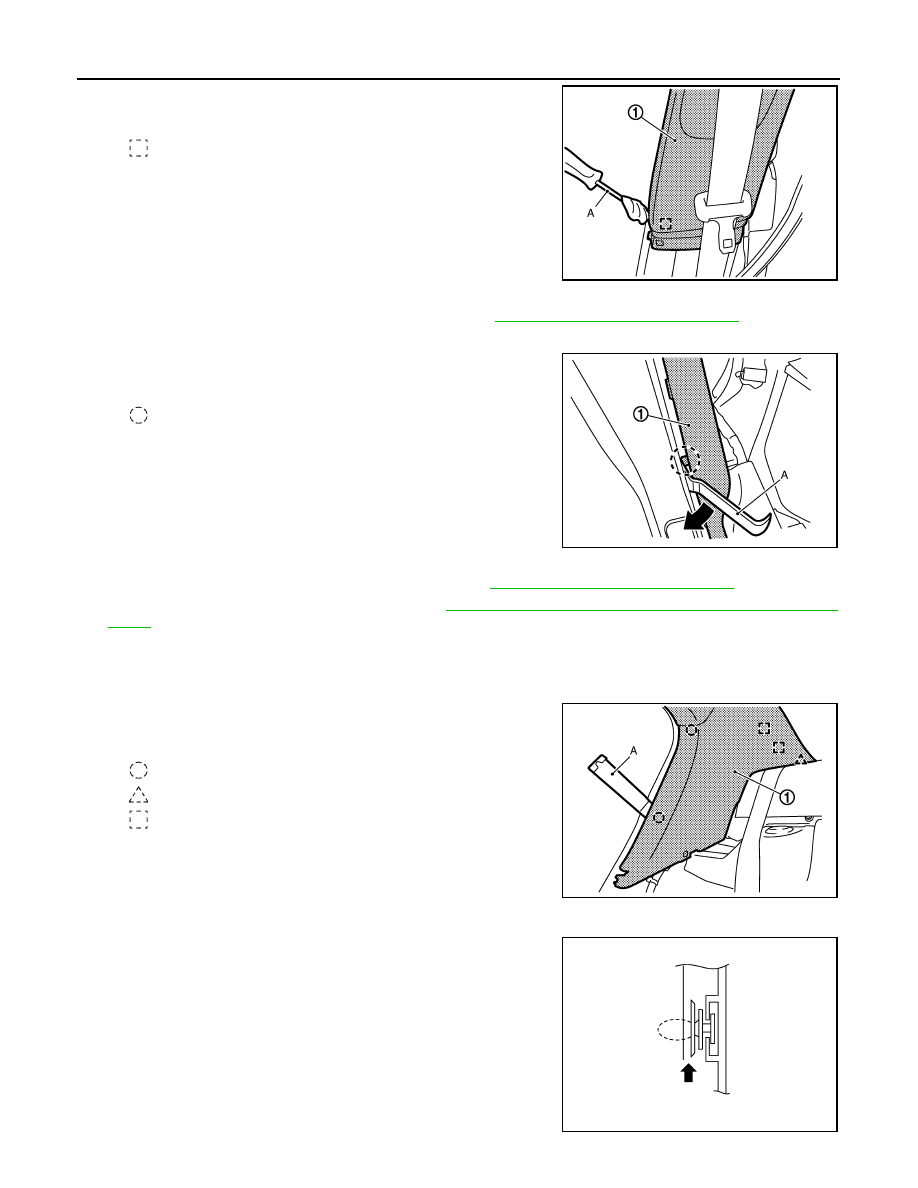
Remove center pillar upper garnish mounting metal clips with a
screwdriver (A), and then remove center pillar upper garnish (1).

REAR WHEEL HOUSE GARNISH

1.

Remove rear seat cushion and rear seat back. Refer to 

SE-105, "Removal and Installation"

.

2.

Remove rear body side welt.

3.

Remove rear wheel house garnish mounting clips using a
remover tool (A), and then remove rear wheel house garnish (1).

REAR PILLAR FINISHER

1.

Remove rear seat cushion and rear seatback. Refer to 

SE-105, "Removal and Installation"

.

2.

Remove rear seat belt floor anchor bolt. Refer to 

SB-10, "SEAT BELT RETRACTOR : Removal and Instal-

lation"

.

3.

Remove rear kicking plate inner.

4.

Remove rear body side welt.

5.

Remove rear wheel house garnish.

6.

Remove pillar finisher mounting clips and metal clips with a
remover tool (A), and then remove pillar finisher (1).

CAUTION:

Insert a clip clamp remover wrapped with a shop cloth or
remover tool into the part shown by the arrow (between the
clips and the body side panel). 

: Metal clip

JMJIA0087GB

: Clip

JMJIA0088GB

: Clip

: Pawl

: Metal clip

JMJIA0089GB

PIIB2768J

BODY SIDE TRIM

INT-17

< ON-VEHICLE REPAIR >

C

D

E

F

G

H

I

K

L

M

A

B

INT

N

O

P

INSTALLATION

Install in the reverse order of removal.

CAUTION:

Check that clips are securely fitted in panel holes on body when installing, and then press them in.

INT-18

< ON-VEHICLE REPAIR >

REAR PARCEL SHELF FINISHER

REAR PARCEL SHELF FINISHER

Exploded View

INFOID:0000000000960438

Removal and Installation

INFOID:0000000000960439

REMOVAL

1.

Remove trunk front finisher upper. Refer to 

INT-27, "Removal and Installation"

2.

Disconnect high-mounted stop lamp harness connector (A).
(without REAR SPOILER) 

1.

Rear parcel shelf finisher

2.

Rear parcel side cover (RH)

3.

Rear parcel side cover (LH)

4.

Woofer grille

5.

High-mounted stop lamp cover

6.

High-mounted stop lamp assembly

7.

Child anchor cover

8.

Rear seat belt finisher

9.

Seatback center finisher

10. Seatback finisher welt

11. Push on nut

Clip

Pawl

JMJIA0068GB

JMJIA0090GB

REAR PARCEL SHELF FINISHER

INT-19

< ON-VEHICLE REPAIR >

C

D

E

F

G

H

I

K

L

M

A

B

INT

N

O

P

3.

Remove rear seat cushion and rear seatback. Refer to 

SE-105, "Removal and Installation"

.

4.

Remove rear kicking plate inner, rear wheelhouse garnish, rear pillar finisher. Refer to 

INT-13, "Removal

and Installation"

.

5.

Remove seatback center finisher mounting clips, and then remove seatback center finisher.

6.

Remove rear seat belt floor anchor bolt and rear seat belt shoulder anchor bolt. Refer to 

SB-10, "SEAT

BELT RETRACTOR : Removal and Installation"

.

7.

Remove rear parcel shelf finisher mounting clips (A).

8.

Remove clips from rear of rear parcel shelf finisher, and then remove rear parcel shelf finisher.

9.

Remove the following parts after removing rear parcel shelf finisher.
• Child anchor cover.
• Woofer grille.
• High-mounted stop lamp. (without REAR SPOILER) Refer to 

EXL-199, "WITHOUT REAR SPOILER :

Removal and Installation"

.

INSTALLATION

Install in the reverse order of removal.

CAUTION:

Check that clips are securely fitted in panel holes on body when installing, and then press them in.

JMJIA0091GB


Content   ..  821  822  823  824   ..