Infiniti FX35 / FX45. Manual - part 976


  Index      Infiniti     Infiniti FX35 / FX45 (S50) - service repair manual 2008 year


Search            


Content   ..  974  975  976  977   ..


Infiniti FX35 / FX45. Manual - part 976


WW-26

< SERVICE INFORMATION >

FRONT WIPER AND WASHER SYSTEM

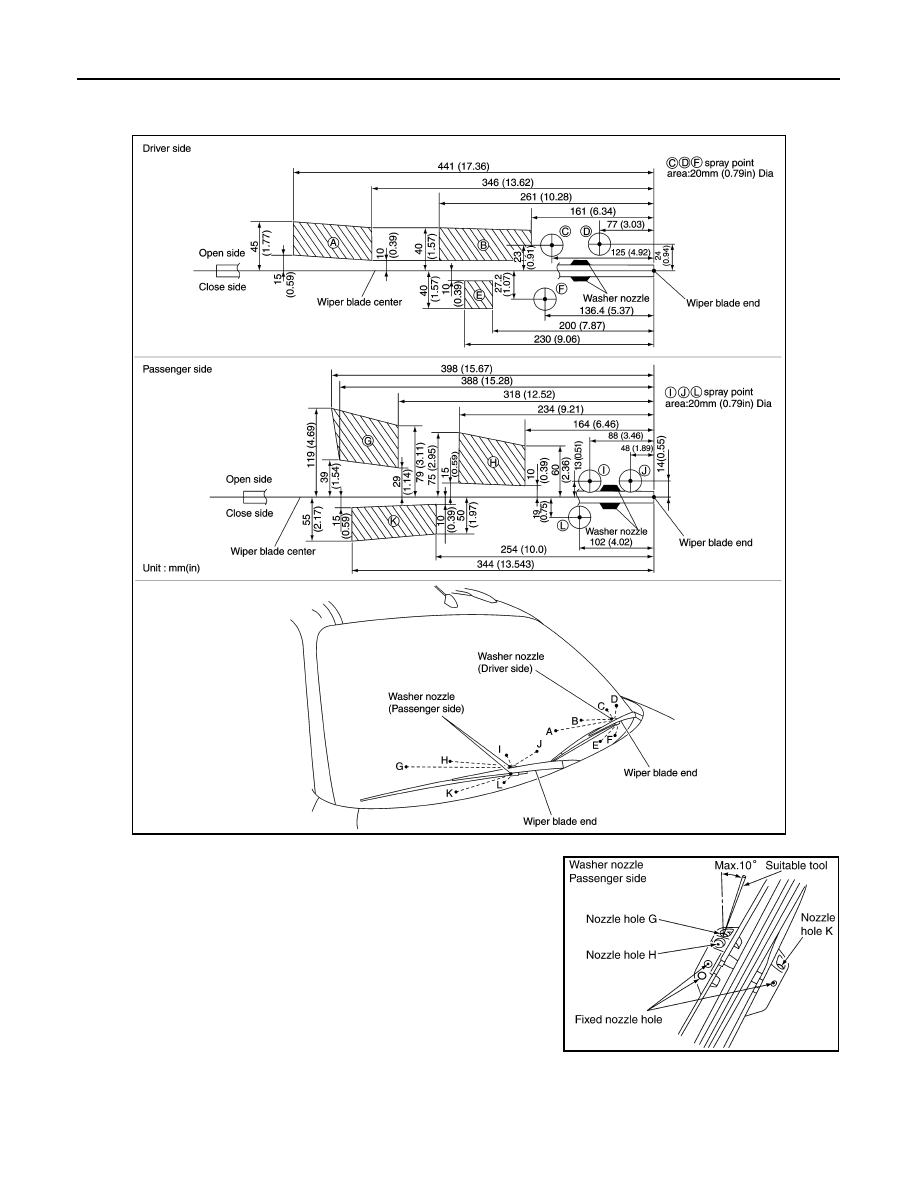
Only washer nozzles (A, B, E, G, H, and K) can be adjusted. Washer nozzles (C, D, F, I, J, and L)
cannot be adjusted because of fixed nozzles.

PKIB3558E

SKIA5073E

FRONT WIPER AND WASHER SYSTEM

WW-27

< SERVICE INFORMATION >

C

D

E

F

G

H

I

J

L

M

A

B

WW

N

O

P

Washer Tube Layout

INFOID:0000000001328568

Removal and Installation of Front Washer Nozzle

INFOID:0000000001328569

Replace wiper arm assembly. Refer to 

WW-23, "Removal and Installation of Front Wiper Arms, Adjustment of

Wiper Arms Stop Location"

.

CAUTION:

Removal/installation of the washer nozzle as a unit must not be done.

Removal and Installation of Front Washer Tube Joint

INFOID:0000000001328570

REMOVAL

1.

Remove upwards while pressing the pawls on reverse side.

2.

Remove washer tube.

INSTALLATION

Installation is the reverse order of removal.

Inspection of Washer Nozzle

INFOID:0000000001328571

CHECK VALVE

Blow check valve. Confirm that the air ventilates. Also confirm that
inhalation is impossible.

CAUTION:

A check valve is provided in the washer fluid line. Be careful not
to connect check valve to washer tube in the wrong direction.

PKID0570E

PKIA1159E

PKIA3131E

WW-28

< SERVICE INFORMATION >

FRONT WIPER AND WASHER SYSTEM

Inspection of Front Wiper and Washer Switch Circuit

INFOID:0000000001328572

Refer to 

LT-104, "Combination Switch Inspection"

.

Removal and Installation of Front Wiper and Washer Switch

INFOID:0000000001328573

REMOVAL

1.

Remove steering column upper cover. Refer to 

IP-10, "Compo-

nent Parts Location"

.

2.

Disconnect wiper and washer switch connector.

3.

Pull wiper and washer switch toward the passenger door while
pressing pawls in direction shown by the arrow in the figure, and
remove it from the base.

INSTALLATION

Installation is the reverse order of removal.

Removal and Installation of Washer Tank

INFOID:0000000001328574

REMOVAL

1.

Remove bolt and pull out washer tank inlet out of washer tank.

2.

Remove front fillet molding (RH). Refer to 

EI-14, "Component

Parts Location"

.

3.

Remove fender protector front (RH). Refer to 

EI-24, "Compo-

nent Parts Location"

.

4.

Remove front bumper fascia assembly. Refer to 

EI-14, "Compo-

nent Parts Location"

.

5.

Disconnect washer pump connector and wash fluid level sensor
connector.

6.

Remove washer tank mounting bolt and nuts.

PKIB6026E

SKIA5076E

PKIC9705E

FRONT WIPER AND WASHER SYSTEM

WW-29

< SERVICE INFORMATION >

C

D

E

F

G

H

I

J

L

M

A

B

WW

N

O

P

7.

Remove washer tube, and remove washer tank from the vehicle.

INSTALLATION

Installation is the reverse order of removal.
NOTE:
After installation, add water up to the upper level of the washer tank inlet, and check for water leaks.

Removal and Installation of Front and Rear Washer Pump

INFOID:0000000001328575

REMOVAL

1.

Remove fillet molding (RH). Refer to 

EI-14, "Component Parts Location"

.

2.

Remove fender protector (RH). Refer to 

EI-24, "Component Parts Location"

.

3.

Remove bumper fascia assembly. Refer to 

EI-14, "Component Parts Location"

.

4.

Disconnect washer pump connector and tube.

5.

Pull out front and rear washer pump in direction shown by the
arrow (

) in the figure. Remove front and rear washer pump

from washer tank.

INSTALLATION

Installation is the reverse order of removal.
NOTE:
When installing front and rear washer pump, there should be no packing twists, etc.

PKIC9707E

Washer tank mounting bolt

: 5.7 N·m (0.58 kg-m, 50 in-lb)

Washer tank mounting nut

: 5.7 N·m (0.58 kg-m, 50 in-lb)

Washer tank inlet mounting bolt

: 6.8 N·m (0.69 kg-m, 60 in-lb)

PKIC9706E


Content   ..  974  975  976  977   ..