Infiniti FX35 / FX45. Manual - part 631
 

  Index      Infiniti     Infiniti FX35 / FX45 (S50) - service repair manual 2008 year


Search            


Content   ..  629  630  631  632   ..


Infiniti FX35 / FX45. Manual - part 631


OIL PAN AND OIL STRAINER

EM-41

< SERVICE INFORMATION >

[VQ35DE]

C

D

E

F

G

H

I

J

K

L

M

A

EM

N

P

O

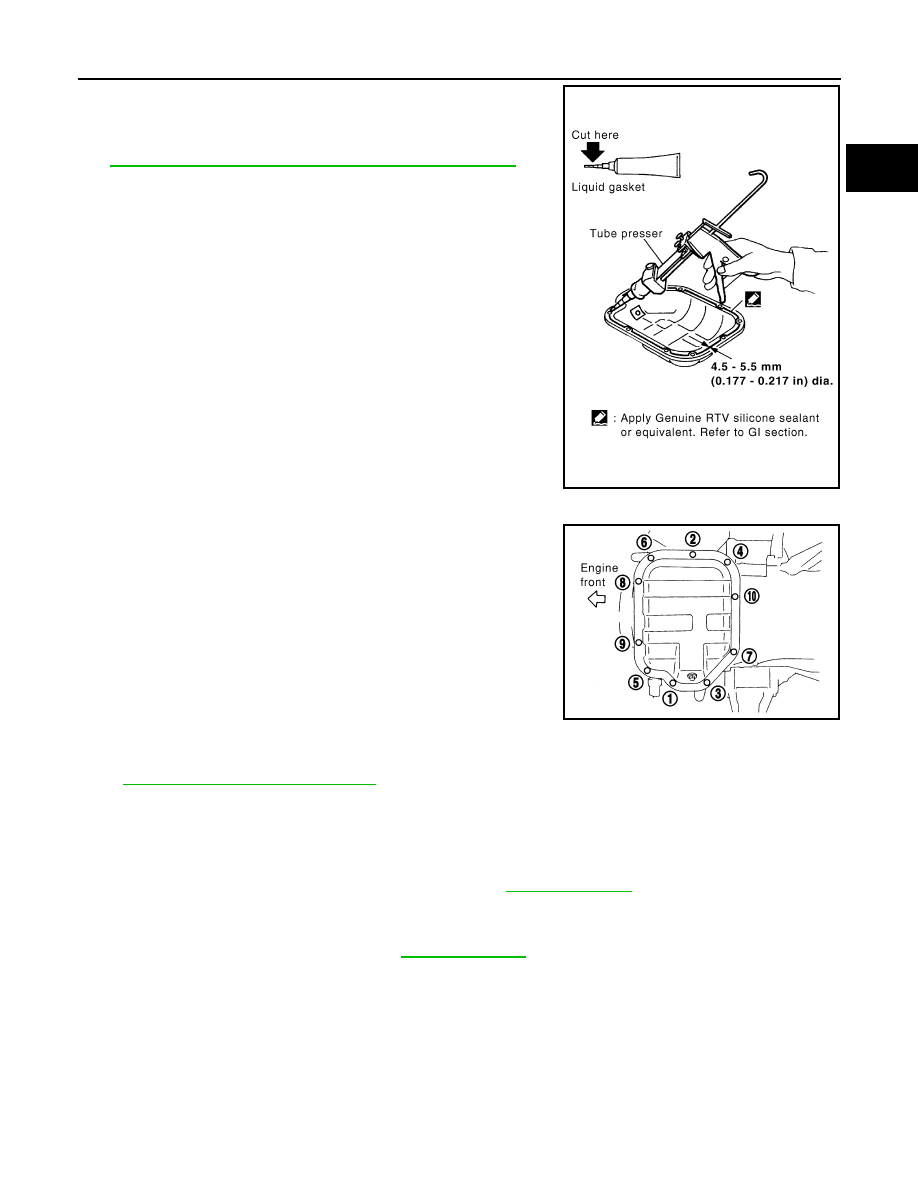
b.

Apply a continuous bead of liquid gasket with the tube presser
(commercial service tool) to the oil pan (lower) as shown in the
figure.
Use Genuine RTV Silicone Sealant or equivalent. Refer to

GI-44, "Recommended Chemical Product and Sealant"

.

CAUTION:

Attaching should be done within 5 minutes after coating.

c.

Install oil pan (lower).
• Tighten mounting bolts in numerical order as shown in the fig-

ure.

5.

Install oil pan drain plug.
• Refer to the figure of components of former page for installation direction of drain plug washer. Refer to

EM-35, "Component (AWD Models)"

.

6.

Install in the reverse order of removal after this step.
NOTE:
At least 30 minutes after oil pan is installed, pour engine oil.

INSPECTION AFTER INSTALLATION

1.

Check the engine oil level and adjust engine oil. Refer to 

LU-5, "Inspection"

.

2.

Start engine, and check there is no leak of engine oil.

3.

Stop engine and wait for 10 minutes.

4.

Check the engine oil level again. Refer to 

LU-5, "Inspection"

.

PBIC2657E

PBIC0782E

EM-42

< SERVICE INFORMATION >

[VQ35DE]

IGNITION COIL

IGNITION COIL

Component

INFOID:0000000001325720

Removal and Installation

INFOID:0000000001325721

REMOVAL

1.

Remove engine cover with power tool. Refer to 

EM-19, "Component"

.

2.

Remove air duct (At the left bank side, remove ignition coil). Refer to 

EM-17, "Component"

.

3.

Move aside harness, harness bracket, and hoses located above ignition coil.

4.

Disconnect harness connector from ignition coil.

5.

Remove ignition coil.

CAUTION:

Do not shock it.

INSTALLATION

Installation is the reverse order of removal.

1.

Ignition coil

2.

Spark plug

3.

Rocker cover (left bank)

A.

Left bank

PBIC4359E

SPARK PLUG (PLATINUM-TIPPED TYPE)

EM-43

< SERVICE INFORMATION >

[VQ35DE]

C

D

E

F

G

H

I

J

K

L

M

A

EM

N

P

O

SPARK PLUG (PLATINUM-TIPPED TYPE)

Component

INFOID:0000000001325722

Removal and Installation

INFOID:0000000001325723

REMOVAL

1.

Remove engine cover with power tool. Refer to 

EM-19, "Component"

.

2.

Remove ignition coil. Refer to 

EM-42, "Component"

.

3.

Remove spark plug with a spark plug wrench (commercial ser-
vice tool).

INSPECTION AFTER REMOVAL

Use the standard type spark plug for normal condition.
The hot type spark plug is suitable when fouling occurs with the standard type spark plug under conditions
such as:
• Frequent engine starts
• Low ambient temperatures
The cold type spark plug is suitable when spark knock occurs with the standard type spark plug under condi-
tions such as:
• Extended highway driving
• Frequent high engine revolution

1.

Ignition coil

2.

Spark plug

3.

Rocker cover (left bank)

A.

Left bank

PBIC4359E

SEM294A

Make

NGK

Standard type

PLFR5A-11

EM-44

< SERVICE INFORMATION >

[VQ35DE]

SPARK PLUG (PLATINUM-TIPPED TYPE)

CAUTION:

• Do not drop or shock spark plug.
• Do not use a wire brush for cleaning.
• If plug tip is covered with carbon, spark plug cleaner may be

used.

• Checking and adjusting plug gap is not required between

change intervals.

INSTALLATION

Installation is the reverse order of removal.

Hot type

PLFR4A-11

Cold type

PLFR6A-11

Gap (Nominal)

: 1.1 mm (0.043 in)

Cleaner air pressure:

Less than 588 kPa (6 kg/cm

2

, 85 psi)

Cleaning time:

Less than 20 seconds

SMA773C

SMA806CA


Content   ..  629  630  631  632   ..