Honda S2000 (2008 year). Instruction - part 14


  Index      Honda     Honda S2000 - instruction 2008 year in english


Search            


Content   ..  12  13  14  15   ..


Honda S2000 (2008 year). Instruction - part 14


If you have a flat tire while driving,
stop in a safe place, set the parking
brake, and thoroughly examine the
tire for a puncture or other damage.

If a puncture is wider than 3/16ths
of an inch (4 mm), or outside of the
tire tread, do not attempt to repair
the tire. Have your vehicle towed to
a Honda service center.

If the damage is smaller than
3/16ths of an inch (4 mm) and
within the tire tread, proceed with
the following instructions.

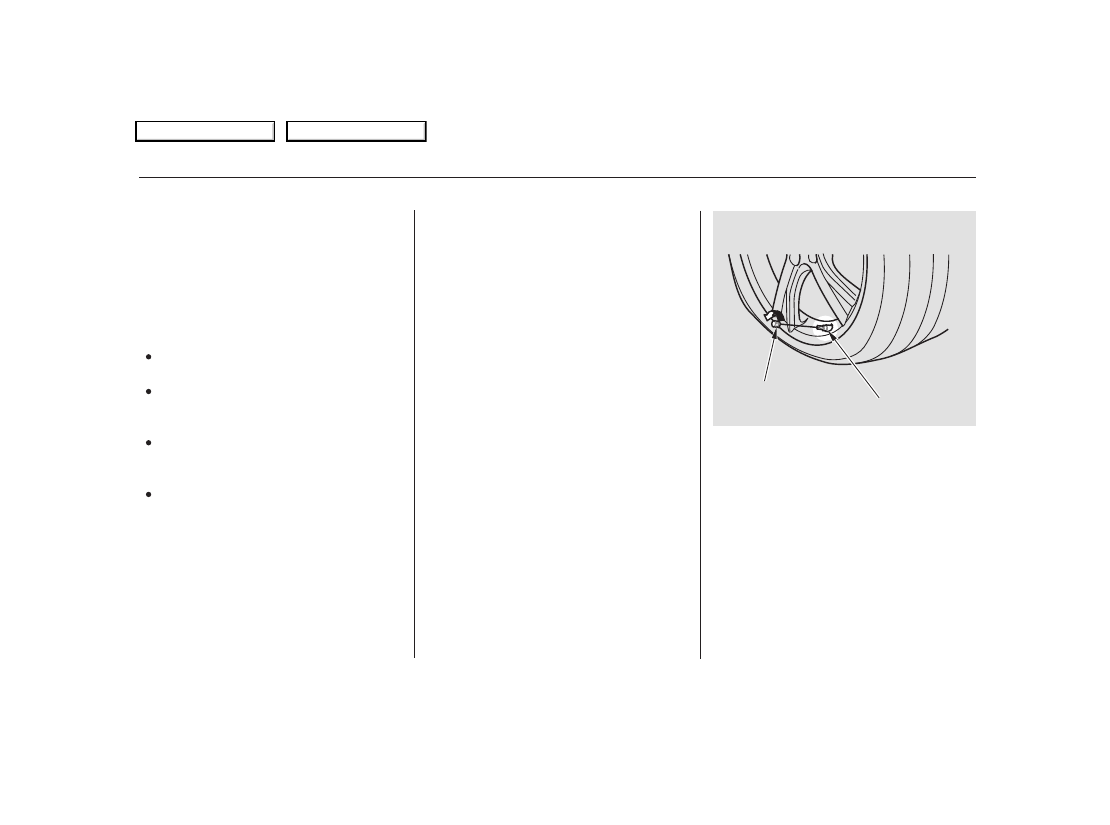
Position the vehicle so the tire
valve on the flat tire is at the
bottom of the wheel, then remove
the tire valve cap.

When making a temporary repair,
carefully follow all instructions in
this owner’s manual and in the
instructions that came with the kit.

The wheel rim is not damaged.

The puncture is located within the
tread.

The puncture is smaller than
3/16ths of an inch (4 mm).

Only one tire is flat.

To reduce weight, your vehicle is
equipped with a tire repair kit
instead of a spare tire. This kit will
allow you to temporarily repair a flat
tire under the following conditions:

1.

CR models only

Repairing a Flat Tire

How to Use the Tire Repair Kit

206

VALVE CAP

TIRE VALVE

07/07/25 17:54:45 31S2A680 0211 

 2008  S2000 

Table Of Contents

Main Menu

CONTINUED

Open the trunk and remove the
tire repair kit.

Your tire repair kit contains:

An air pump with a power cord
and an air hose attached.

Remove the sealant bottle and
check the expiration date on the
label. If the date has expired, do
not continue. Have your vehicle
towed to the nearest Honda
service center.

If the date has not expired, shake
the bottle thoroughly and proceed
to step 4.

A bottle of sealant with a filler
hose attached.

An instruction sheet.

Two labels, one for the tire wheel
and one for the instrument panel.

3.

2.

Repairing a Flat Tire

T

a

k

ing
Ca
re

of
th

e

U

ne
x

p

e

c

te

d

207

TOOL BOX LID

TIRE REPAIR KIT

EXPIRATION DATE

07/07/25 17:54:55 31S2A680 0212 

 2008  S2000 

Table Of Contents

Main Menu

Screw the sealant filler hose onto
the tire valve. Make sure the
bottle remains upright to ensure
all of the sealant flows into the tire.

Unscrew the bottle cap from the
bottle adapter.

Remove the air pump from the
repair kit, then screw the air pump
hose onto the bottle adapter.
Make sure the hose is secure.

Route the power cord into the
vehicle, and insert the plug into
the accessory power socket.

Turn the ignition switch to the
ACCESSORY (I) position.

4.

5.

6.

7.

8.

Repairing a Flat Tire

208

TIRE VALVE

BOTTLE HOSE

BOTTLE CAP ADAPTER

AIR PUMP

PLUG

ACCESSORY SOCKET

BOTTLE
CAP

AIR PUMP HOSE

07/07/25 17:55:04 31S2A680 0213 

 2008  S2000 

Table Of Contents

Main Menu

CONTINUED

Turn the air pump switch ON. The
air pressure gauge will show 40 to
60 psi for the first few minutes,
then the pressure will go down to
about 10 to 20 psi.

Inflate the tire to 32 psi, then turn
the air pump switch OFF. If the air
pressure exceeds 32 psi, push the
deflate button until the pressure
reaches the recommended level.
Do not use the air pump for more
than 15 minutes, or the pump may

overheat.

Turn the ignition switch to the
LOCK (0) position.

Remove the sealant bottle hose
from the tire valve, then reinstall
the tire valve cap.

Push the deflate button on the air
pump until the air pressure gauge
shows 0 psi.

9.

10.

11.

12.

13.

Repairing a Flat Tire

T

a

k

ing
Ca
re

of
th

e

U

ne
x

p

e

c

te

d

209

AIR PUMP SWITCH

ON

DEFLATE BUTTON

AIR PRESSURE GAUGE

OFF

07/07/25 17:55:11 31S2A680 0214 

 2008  S2000 

Table Of Contents

Main Menu

Remove the wheel label from the
repair kit and attach it to the
center of the wheel.

Remove the instrument panel label
from the repair kit and place it as
shown above.

Remove the power plug from the
accessory power socket.

Return all items except the air
pump to the repair kit, and store
the kit in the tool box. Keep the air
pump handy as you will need it
soon.

Begin driving at no more than 50
mph (80 km/h).

After 10 minutes, stop safely and
use the air pump to check the
pressure in the tire (see page

).

Your vehicle’s tire has a tire
pressure monitoring system
sensor. To repair a tire with the
tire repair kit, refer to

(see page

).

14.

15.

16.

17.

19.

18.

207

20.

156

Repairing a Flat Tire

Repairing

a Tire with TPMS

210

WHEEL LABEL

LABEL

07/07/25 17:55:20 31S2A680 0215 

 2008  S2000 

Table Of Contents

Main Menu

Remove the tire valve cap, screw the
air pump hose onto the tire valve,
and check the air gauge. (You do not
need to attach the power cord or
turn the air pump switch on.)

If the pressure is at 32 psi, continue
driving to the nearest service station.

In any case, be sure to have the
damaged tire permanently repaired
or replaced as soon as possible.

Remember to return the tire sealant
bottle to your Honda service center
for proper disposal.

If the pressure is lower than 32 psi
and higher than 19 psi, use the air
pump to bring air to the desired level
as described in step 10. Then drive
to the nearest service station.

If the pressure is below 19 psi, do not
continue. Have the vehicle towed
(see page

).

228

Repairing a Flat Tire

T

a

k

ing
Ca
re

of
th

e

U

ne
x

p

e

c

te

d

211

AIR PUMP HOSE

TIRE VALVE

VALVE CAP

07/07/25 17:55:27 31S2A680 0216 

 2008  S2000 

Table Of Contents

Main Menu

Diagnosing why the engine won’t
start falls into two areas, depending
on what you hear when you press
the ENGINE START button.

You hear nothing, or almost
nothing. The engine’s starter
motor does not operate at all, or
operates very slowly.

You can hear the starter motor
operating normally, or the starter
motor sounds like it is spinning
faster than normal, but the engine
does not start up and run.

When you press the ENGINE
START button, you do not hear the
normal noise of the engine trying to
start. You may hear a clicking sound
or series of clicks, or nothing at all.
Check these things:

Check the transmission interlock.
The clutch pedal must be pushed
all the way to the floor or the
starter will not operate.

Turn the ignition switch to the ON
(II) position. Turn on the
headlights, and check their
brightness. If the headlights are
very dim or do not come on at all,
the battery is discharged. See

on page

.

Press the ENGINE START button,
then release it. If the headlights do
not dim, check the condition of the
fuses. If the fuses are OK, there is
probably something wrong with
the electrical circuit for the
ignition switch or starter motor.
You will need a qualified mechanic
to determine the problem. (See

on page

.)

214

228

Nothing Happens or the Starter
Motor Operates Very Slowly

Jump Starting

Emergency Towing

If the Engine Won’t Start

212

07/07/25 17:55:34 31S2A680 0217 

 2008  S2000 

Table Of Contents

Main Menu

If the headlights dim noticeably or
go out when you try to start the
engine, either the battery is
discharged or the connections are
corroded. Check the condition of the
battery and terminal connections
(see page

). You can then try

jump starting the vehicle from a
booster battery (see page

).

In this case, the starter motor’s
speed sounds normal, or even faster
than normal, when you press the
ENGINE START button, but the
engine does not run.

There may be an electrical
problem, such as no power to the
fuel pump. Check all the fuses
(see page

).

Are you using a properly coded
key? An improperly coded key will
cause the immobilizer system
indicator in the instrument panel
to blink rapidly (see page

).

Are you using the proper starting
procedure? Refer to

on page

.

Do you have fuel? Check the fuel
gauge; the low fuel indicator may
not be working.

If you find nothing wrong, you will
need a qualified mechanic to find the
problem. See
on page

.

63

146

196

214

228

222

The Starter Operates Normally

Starting the

Engine

Emergency Towing

If the Engine Won’t Start

T

a

k

ing
Ca
re

of
th

e

U

ne
x

p

e

c

te

d

213

07/07/25 17:55:41 31S2A680 0218 

 2008  S2000 

Table Of Contents

Main Menu

Although this seems like a simple
procedure, you should take several
precautions.

Open the hood, and check the
physical condition of the battery.
In very cold weather, check the
condition of the electrolyte. If it
seems slushy or frozen, do not try
jump starting until it thaws.

To jump start your vehicle:

Connect one jumper cable to the
positive (

) terminal on your

battery. Connect the other end to
the positive (

) terminal on the

booster battery.

Turn off all the electrical
accessories: heater, A/C, audio
system, lights, etc. Put the
transmission in neutral, and set
the parking brake.

The numbers in the illustrations
show you the order to connect the
jumper cables.

3.

1.

2.

Jump Starting

214

A battery can explode if you do
not follow the correct procedure,
seriously injuring anyone
nearby.

Keep all sparks, open flames,
and smoking materials away
from the battery.

If a battery sits in extreme cold, the
electrolyte inside can f reeze.
Attempting to jump start with a f rozen
battery can cause it to rupture.

07/07/25 17:55:49 31S2A680 0219 

 2008  S2000 

Table Of Contents

Main Menu

The reading on your vehicle’s
temperature gauge should stay in
the midrange under most conditions.
If it reaches the red mark, you
should determine the reason (hot
day, driving up a steep hill, etc.).

If your vehicle overheats, you should
take immediate action. The only
indication may be the temperature
gauge reading reaching the red
mark. Or you may see steam or
spray coming from under the hood.

Connect the second jumper cable
to the negative (

) terminal on

the booster battery. Connect the
other end to the grounding strap
as shown. Do not connect this
jumper cable to any other part of
the engine.

Keep the ends of the jumper
cables away from each other and
any metal on the vehicle until
everything is disconnected.
Otherwise, you may cause an
electrical short.

Once your vehicle is running,
disconnect the negative cable from
your vehicle, then from the
booster battery. Disconnect the
positive cable from your vehicle,
then from the booster battery.

Start your vehicle. If the starter
motor still operates slowly, check
that the jumper cables have good
metal-to-metal contact.

If the booster battery is in another
vehicle, have an assistant start
that vehicle and run it at a fast idle.

6.

7.

5.

4.

CONTINUED

Jump Starting, If the Engine Overheats

If the Engine Overheats

T

a

k

ing
Ca
re

of
th

e

U

ne
x

p

e

c

te

d

215

Driving with the temperature gauge
reading at the red mark can cause
serious damage to your engine.

07/07/25 17:55:58 31S2A680 0220 

 2008  S2000 

Table Of Contents

Main Menu

Look for any obvious coolant leaks,
such as a split radiator hose.
Everything is still extremely hot,
so use caution. If you find a leak, it
must be repaired before you
continue driving (see

on page

).

If the temperature gauge stays at
the red mark, turn off the engine.

If you do not see steam or spray,
leave the engine running and
watch the temperature gauge. If
the high heat is due to overloading,
the engine should start to cool
down almost immediately. If it
does, wait until the temperature
gauge comes down to the midpoint,
then continue driving.

If you see steam and/or spray
coming from under the hood, turn
off the engine. Wait until you see
no more signs of steam or spray,
then open the hood.

Safely pull to the side of the road.
Put the transmission in neutral,
and set the parking brake. Turn
off the all accessories, and turn on
the hazard warning indicators.

If you don’t find an obvious leak,
check the coolant level in the
radiator reserve tank. Add coolant
if the level is below the MIN mark
(see

on

page

).

2.

1.

3.

4.

5.

6.

173

228

Emergency

Towing

Adding Engine Coolant

If the Engine Overheats

216

Steam and spray from an
overheated engine can
seriously scald you.

Do not open the hood if steam
is coming out.

07/07/25 17:56:05 31S2A680 0221 

 2008  S2000 

Table Of Contents

Main Menu

If there was no coolant in the
reserve tank, you may need to add
coolant to the radiator. Let the
engine cool down until the reading
reaches the middle of the
temperature gauge or lower
before checking the radiator.

Using gloves or a large heavy
cloth, turn the radiator cap
counterclockwise, without pushing
down, to the first stop. After the
pressure releases, push down on
the cap, and turn it until it comes
off.

Put the radiator cap back on
tightly. Run the engine, and check
the temperature gauge. If it goes
back to the red mark, the engine
needs repair (see

on page

).

If the temperature stays normal,
check the coolant level in the
radiator reserve tank. If it has
gone down, add coolant to the
MAX mark. Put the cap back on
tightly.

Start the engine, and set the
temperature control dial to
maximum heat. Add coolant to the
radiator up to the base of the filler
neck. If you do not have the
proper coolant mixture available,
you can add plain water.
Remember to have the cooling
system drained and refilled with
the proper mixture as soon as you
can.

9.

8.

7.

10.

11.

228

Emergency

Towing

If the Engine Overheats

T

a

k

ing
Ca
re

of
th

e

U

ne
x

p

e

c

te

d

217

Removing the radiator cap
while the engine is hot can
cause the coolant to spray out,
seriously scalding you.

Always let the engine and
radiator cool down before
removing the radiator cap.

07/07/25 17:56:11 31S2A680 0222 

 2008  S2000 

Table Of Contents

Main Menu

Safely pull off the road, and shut
off the engine. Turn on the hazard
warning indicators.

Let the vehicle sit for a minute.
Open the hood, and check the oil
level (see page

). An engine

very low on oil can lose pressure
during cornering and other driving
maneuvers.

If necessary, add oil to bring the
level back to the full mark on the
dipstick (see page

).

Start the engine, and watch the oil
pressure indicator. If it does not go
out within 10 seconds, turn off the
engine. There is a mechanical
problem that needs to be repaired
before you can continue driving
(see

on page

).

This indicator should never come on
when the engine is running. If it
starts flashing or stays on, the oil
pressure has dropped very low or
lost pressure. Serious engine
damage is possible, and you should
take immediate action.

If the charging system indicator
comes on brightly when the engine
is running, the battery is not being
charged.

Go to a service station or garage
where you can get technical
assistance.

Immediately turn off all electrical
accessories. Try not to use other
electrically operated controls such as
the power windows. Keep the engine
running; starting the engine will
discharge the battery rapidly.

1.

2.

3.

4.

170

131

228

Low Oil Pressure Indicator, Charging System Indicator

Emergency Towing

Low Oil Pressure
Indicator

Charging System
Indicator

218

Running the engine with low oil
pressure can cause serious mechanical
damage almost immediately. Turn of f
the engine as soon as you can saf ely get
the vehicle stopped.

07/07/25 17:56:21 31S2A680 0223 

 2008  S2000 

Table Of Contents

Main Menu

If the indicator comes on repeatedly,
even though it may go off as you
continue driving, have your vehicle
checked by a dealer as soon as
possible.

If this indicator comes on
while driving, it means one

of the engine’s emissions control
systems may have a problem. Even
though you may feel no difference in
your vehicle’s performance, it can
reduce your fuel economy and cause
increased emissions. Continued
operation may cause serious damage.

Your vehicle has certain ‘‘readiness
codes’’ that are part of the on-board
diagnostics for the emissions
systems. In some states, part of the
emissions testing is to make sure
these codes are set. If they are not
set, the test cannot be completed.

If you have recently refueled your
vehicle, the indicator coming on
could be due to a loose or missing
fuel fill cap. You will also see a
‘‘CHECK FUEL CAP’’ message on
the information display. Tighten the
cap until it clicks at least once.
Tightening the cap will not turn the
indicator off immediately; it can take
several days of normal driving.

If your vehicle’s battery has been
disconnected or gone dead, these
codes are erased. It can take several
days of driving under various
conditions to set the codes again.

To check if they are set, turn the
ignition switch to the ON (II)
position, without starting the engine.
The malfunction indicator lamp will
come on for 20 seconds. If it then
goes off, the readiness codes are set.
If it blinks five times, the readiness
codes are not set. If possible, do not
take your vehicle for an emissions
test until the readiness codes are set.
Refer to

for

more information (see page

).

245

Malfunction Indicator Lamp

Readiness Codes

Emissions Testing

T

a

k

ing
Ca
re

of
th

e

U

ne
x

p

e

c

te

d

219

If you keep driving with the
malf unction indicator lamp on, you can
damage your vehicle’s emissions
controls and engine. Those repairs may
not be covered by your vehicle’s
warranties.

07/07/25 17:56:28 31S2A680 0224 

 2008  S2000 

Table Of Contents

Main Menu

If the brake system indicator comes
on while driving, the brake fluid level
is probably low. Press lightly on the
brake pedal to see if it feels normal.
If it does, check the brake fluid level
the next time you stop at a service
station (see page

).

If the fluid level is low, take your
vehicle to a dealer, and have the
brake system inspected for leaks or
worn brake pads.

However, if the brake pedal does not
feel normal, you should take
immediate action. A problem in one
part of the system’s dual circuit
design will still give you braking at
two wheels. You will feel the brake
pedal go down much farther before
the vehicle begins to slow down, and
you will have to press harder on the
pedal.

Slow down by shifting to a lower
gear, and pull to the side of the road
when it is safe. Because of the long
distance needed to stop, it is
hazardous to drive the vehicle. You
should have it towed and repaired as
soon as possible (see

on page

).

If you must drive the vehicle a short
distance in this condition, drive
slowly and carefully.

The brake system
indicator normally
comes on when

you turn the ignition switch to the
ON (II) position, and as a reminder
to check the parking brake. It will
stay on if you do not fully release the
parking brake.

178

228

Emergency

Towing

Brake System Indicator

220

Canada

U.S.

07/07/25 17:56:34 31S2A680 0225 

 2008  S2000 

Table Of Contents

Main Menu

Locate the electrical connector for
the convertible top motor.
It is under the lower corner of the
dashboard on the passenger’s side.
Disconnect the connector by
pushing the tab and pulling the
connector down.

Holding each corner of the
convertible top, raise the top and
push it forward as far as it will go.

Follow steps 4 through 6 of the
closing procedure on page

.

Try closing the convertible top. If
the new fuse blows immediately or
the convertible top still does not
operate, you can close it manually.

Check the fuse for the convertible
top motor (see page

). If the

fuse is blown, replace it with one
of the same or lower rating.

If the electric motor will not close
the convertible top, do the following.

3.

1.

2.

4.

5.

76

222

Except CR models

Closing the Convertible Top

T

a

k

ing
Ca
re

of
th

e

U

ne
x

p

e

c

te

d

221

CONNECTOR

07/07/25 17:56:42 31S2A680 0226 

 2008  S2000 

Table Of Contents

Main Menu


Content   ..  12  13  14  15   ..