Honda Odyssey 2004. Manual - part 183


  Index      Honda     Honda Odyssey 2004 - service repair manual 2004 year


Search            


Content   ..  181  182  183  184   ..


Honda Odyssey 2004. Manual - part 183


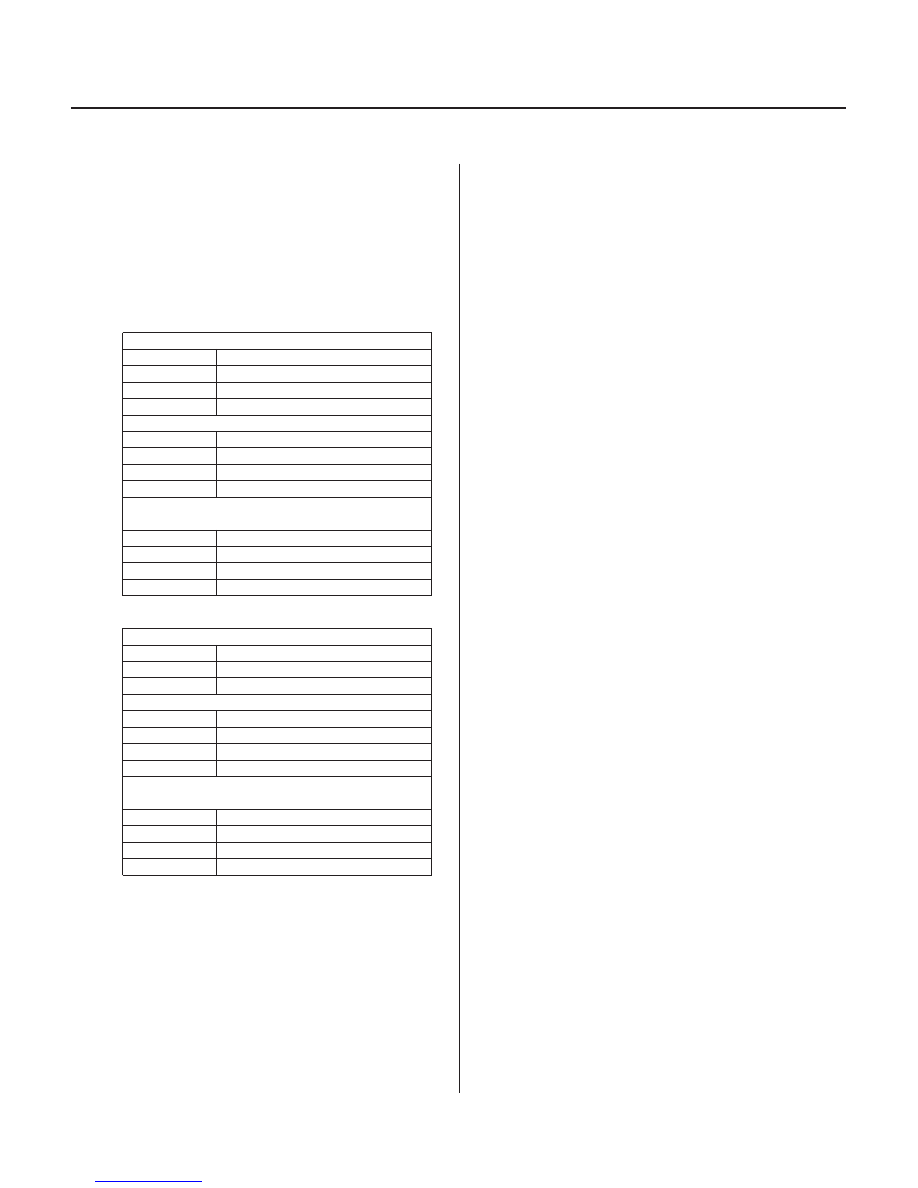
Upshift: D4 position

Throttle position sensor voltage: 0.7 V

Throttle position sensor voltage: 2.25 V

Fully-opened throttle
Throttle position sensor voltage: 4.5 V

Downshift: D4 position

Throttle position sensor voltage: 0.8 V

Throttle position sensor voltage: 2.25 V

Fully-opened throttle
Throttle position sensor voltage: 4.5 V

14-126

Automatic Transmission

Road Test (cont’d)

9. Test-drive the vehicle on a flat road in the D4

position. Check for abnormal noise and clutch
slippage. While driving, check that the shift points
occur at the proper speeds by monitoring the
throttle position sensor voltage and comparing
your shift point speeds and voltage to those in the
table. (The throttle position sensor voltage
represents the throttle opening.)

1st

2nd

12

14 mph (20

24 km/h)

2nd

3rd

21

24 mph (34

38 km/h)

3rd

4th

36

40 mph (57

63 km/h)

Lock-up ON

46

50 mph (74

80 km/h)

1st

2nd

30

33 mph (48

52 km/h)

2nd

3rd

52

56 mph (83

89 km/h)

3rd

4th

74

78 mph (119

125 km/h)

Lock-up ON

83

87 mph (133

139 km/h)

1st

2nd

46

50 mph (74

80 km/h)

2nd

3rd

83

87 mph (133

139 km/h)

3rd

4th

116

120 mph (185

191 km/h)

Lock-up ON

116

120 mph (184

192 km/h)

Lock-up OFF

45

49 mph (72

78 km/h)

4th

3rd

19

21 mph (30

34 km/h)

3rd

1st

7

9 mph (10

14 km/h)

Lock-up OFF

70

74 mph (112

118 km/h)

4th

3rd

48

52 mph (77

83 km/h)

3rd

2nd

27

29 mph (43

47 km/h)

2nd

1st

7

9 mph (10

14 km/h)

Lock-up OFF

102

107 mph (165

171 km/h)

4th

3rd

101

105 mph (162

168 km/h)

3rd

2nd

68

72 mph (109

115 km/h)

2nd

1st

37

41 mph (59

60 km/h)

10. Accelerate to about 35 mph (57 km/h) so the

transmission is in 4th or 5th, then shift from the D4
position to the 2 position. The vehicle should
immediately begin slowing down from engine
braking.

11. Check for abnormal noise and clutch slippage in

the following positions.

1 (1st Gear) Position
Accelerate from a stop at full throttle. Check that
there is no abnormal noise or clutch slippage.
Upshifts should not occur with the shift lever in this
position.

2 (2nd Gear) Position
Accelerate from a stop at full throttle. Check that
there is no abnormal noise or clutch slippage.
Upshifts and downshifts should not occur with the
shift lever in this position.

R (Reverse) Position
Accelerate from a stop at full throttle, and check for
abnormal noise and clutch slippage.

12. Test in P (Park) Position.

Park the vehicle on a slope (about 16°), apply the
brake, and shift into the P position. Release the
brake; the vehicle should not move.

03/07/29 09:32:35 61S0X050_140_0129

S0X4AA0E10474059548FEAT01

Stall Speed rpm:

Specification:

2,400 rpm

Service Limit:

2,250

2,550 rpm

Problem

Probable causes

14-127

Stall Speed Test

1. Engage the parking brake, and block all four wheels.

2. Connect a tachometer to the engine, and start the

engine.

3. Make sure the A/C switch is OFF.

4. After the engine has warmed up to normal

operating temperature (the radiator fan comes on),
shift to the 2 position.

5. Fully press the brake pedal and accelerator pedal

for 6 to 8 seconds, and note the engine speed. Do
not move the shift lever while raising the engine
speed.

6. Allow 2 minutes for cooling, then repeat the test in

the D4, 1, and R positions.

NOTE:

• Do not test stall speed for more than 10 seconds

at a time.

• Stall speed tests should be used for diagnostic

purposes only.

• Stall speed should be the same in D4, 2, 1, and R

positions.

• Do not test stall speed with the A/T pressure

gauges installed.

7. If the measurements are out of the service limit,

problems and probable causes are listed in the
table below:


Stall speed rpm
high in the D4, 2, 1,
and R positions

Low fluid level
ATF pump output low
Clogged ATF strainer
Regulator valve stuck
Slipping clutch

Stall speed rpm
high in the 1
position

Slippage of 1st clutch

Stall speed rpm
high in the 2
position

Slippage of 2nd clutch

Stall speed rpm
high in the R
position

Slippage of 4th clutch

Stall speed low in
the D4, 2, 1, and R
positions

Engine output low
Torque converter one-
way clutch slipping

03/07/29 09:32:35 61S0X050_140_0130

*01

*02

*03

*04

S0X4AA0E10410800000FEAT00

Special Tools Required

14-128

Automatic Transmission

Pressure Test

A/T OIL PRESSURE GAUGE SET W/PANEL
07406-0020400 or 07406-0020401

A/T PRESSURE
HOSE, 2,210 mm
07MAJ-PY4011A
(4 Required)

A/T PRESSURE
HOSE ADAPTER
07MAJ-PY40120
(4 Required)

A

B

D

E

C

• A/T oil pressure gauge set 07406-0020400 or

07406-0020401

• A/T pressure hose, 2,210 mm 07MAJ-PY4011A
• A/T pressure hose adapter 07MAJ-PY40120

1. Before testing, be sure the transmission fluid is

filled to the proper level.

2. Raise the vehicle, and make sure it is securely

supported.

3. Allow all four wheels to rotate freely.

4. Warm up the engine (the radiator fan comes on),

then stop it and connect a tachometer.

5. Connect the oil pressure gauges to the line

pressure inspection hole (A). Do not allow dust or
other foreign particles to enter the holes while
connecting the gauges.

6. Connect the oil pressure gauges to the 1st clutch

pressure inspection hole (B), 3rd clutch pressure
inspection hole (D), and 4th clutch pressure
inspection hole (E).

7. Connect the oil pressure gauge to the 2nd clutch

pressure inspection hole (C).

03/07/29 09:32:36 61S0X050_140_0131

Pressure

Fluid Pressure
Standard

Service Limit

Pressure

Fluid Pressure
Standard

Service Limit

Problem

Probable causes

Torque: 18 N·m (1.8 kgf·m, 13 lbf·ft)

14-129

8. Start the engine, and run it at 2,000 rpm in the N or

P position.

9. Measure line pressure at the line pressure

inspection hole (A) in the N or P position.

NOTE: Higher pressure may be indicated if
measurements are made in shift lever position
other than N or P.

Line (A)

850

910 kPa

(8.7

9.3 kgf/cm ,

120

130 psi)

800 kPa
(8.2 kgf/cm ,
120 psi)

10. Shift to the 1 position, and measure 1st clutch

pressure at the 1st clutch pressure inspection hole
(B).

11. Shift to the 2 position, and measure 2nd clutch

pressure at the 2nd clutch pressure inspection hole
(B).

12. Shift to the P position, then press the brake pedal

and hold it.

13. Shift to the D4 position, and release the brake pedal

(the transmission should be in 1st gear).

14. Accelerate the engine to 2,500 rpm (the

transmission will shift to 2nd gear).

15. Release the accelerator for more than 5 seconds

after the transmission is shifted to 2nd gear (the
engine will come down to about 1,000 rpm).

16. Press the accelerator very slowly to increase

engine speed to 2,000 rpm gradually over 5
seconds, then hold it at 2,000 rpm.

17. Measure 3rd and 4th clutch pressure at 3rd clutch

pressure inspection hole (D), and 4th clutch
pressure inspection hole (E) (the transmission will
shift from 2nd gear to 3rd gear, and then 4th gear).

18. Bring the engine back to an idle, then apply the

brake to stop the wheels from rotating.

19. Shift to the R position. Raise the engine rpm to

2,000 rpm, and measure 4th clutch pressure at the
4th clutch pressure inspection hole (E).

1st clutch
(B)
2nd clutch
(C)
3rd clutch
(D)
4th clutch
(B)

840

920 kPa

(8.6

9.4 kgf/cm ,

120

130 psi)

790 kPa
(8.1 kgf/cm ,
120 psi)

20. If the measurements are out service limit, problems

and probable causes are listed in the table:


No or low line
pressure

Torque converter
ATF pump
Regulator valve
Torque converter check
valve

No or low 1st
clutch pressure

1st clutch
O-rings

No or low 2nd
clutch pressure

2nd clutch
O-rings

No or low 3rd
clutch pressure

3rd clutch
O-rings

No or low 4th
clutch pressure

4th clutch
O-rings

No or low 4th
clutch pressure
in the R position

Servo valve
5th clutch
O-rings

21. Install the sealing bolts with the new sealing

washers, and tighten the bolts to the specified
torque. Do not reuse old sealing washers.

2

2

2

2

03/07/29 09:32:37 61S0X050_140_0132


Content   ..  181  182  183  184   ..