Honda Civic. Manual - part 676


  Index      Honda     Honda Civic - service repair manual 2006-2009 year


Search            


Content   ..  674  675  676  677   ..


Honda Civic. Manual - part 676


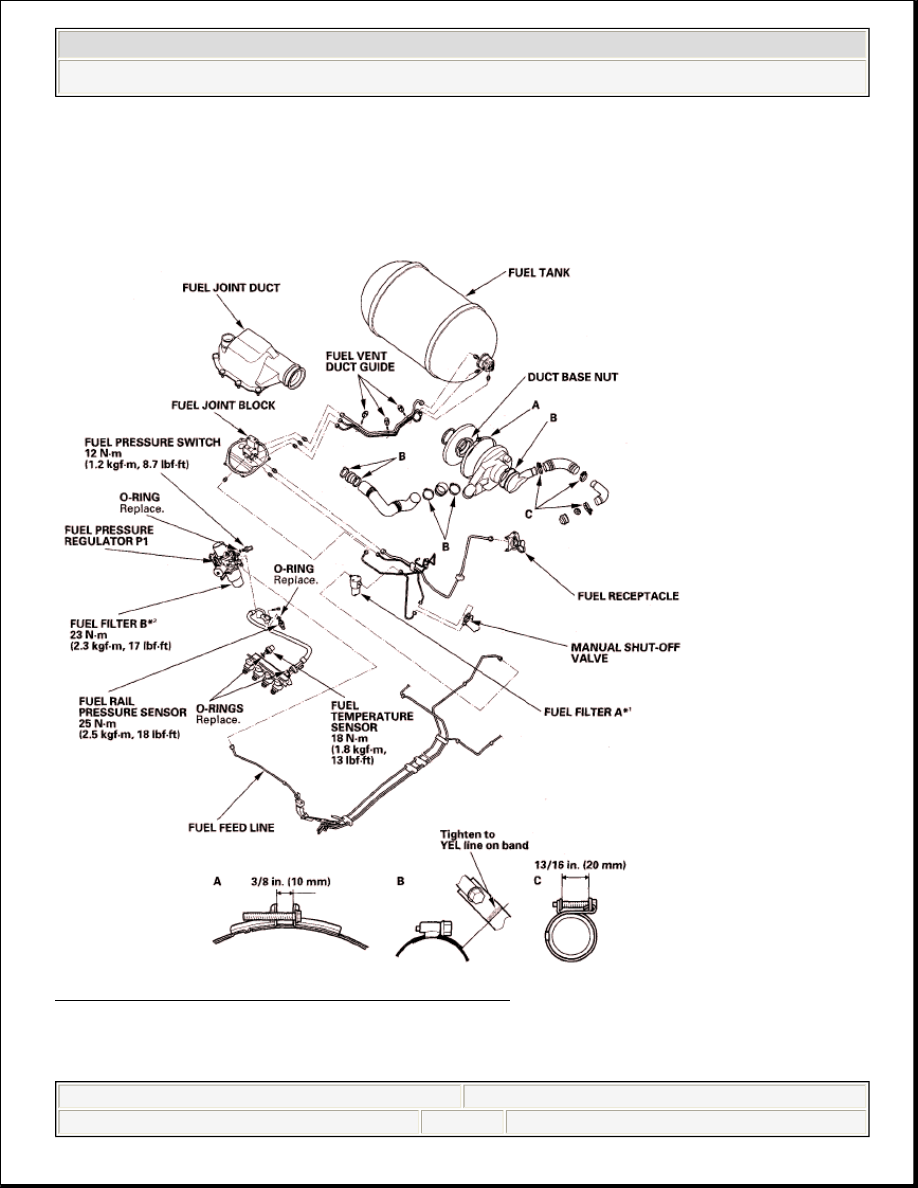
Fig. 80: Exploded View Of Fuel System Line 

FUEL FILTER A WATER BLEEDING 

* 2: Apply silicone oil silicone grease (Shinetsu silicone GR 
10M) to a new rubber seal, and carefully install it into its 
proper position. 


2008 Honda Civic GX 

2006-08 ENGINE PERFORMANCE Fuel Supply System - Civic GX


1. Relieve the fuel pressure (between the engine and the manual shut-off valve) 

(see FUEL PRESSURE RELIEVING ).  

2. Lift the vehicle and support it with jackstands.  
3. Remove the under-floor cover (see step 3 on page 11-147).  
4. Loosen the drain plug (A) on fuel filter A slowly, and bleed the water from fuel 

filter A. Hold the fuel filter housing (B) when loosening the drain plug. 

Fig. 81: Loosening Drain Plug 

5. Apply silicone grease (PARKER CHRISTO-LUBE) to a new O-ring (C), and 

carefully install it into its proper position (see FUEL TANK SCRAPPING ).  

6. Install parts in reverse order of removal.  
7. Do the leak inspection procedure (see LEAK INSPECTION ).  

FUEL RECEPTACLE INSPECTION 

1. Check the nozzle O-ring (A), and replace it if it is damaged. 

WARNING:

Compressed natural gas is flammable and highly 
explosive. You could be killed or seriously injured if 
leaking natural gas is ignited. 
Stop the engine, and keep heat, sparks and flames 
away.


2008 Honda Civic GX 

2006-08 ENGINE PERFORMANCE Fuel Supply System - Civic GX


Fig. 82: Identifying Nozzle O-Ring, Filter And Dust Cap 

2. Check the filter (B) for contamination, and clean it if it is dirty.  
3. Check the dust cap (C), and replace it if it is damaged.  
4. If you detect a leak at the fuel receptacle valve (A) after fuel filling, blow fuel 

on the valve from the nozzle to remove the contamination. 

Fig. 83: Identifying Receptacle Valve 

FUEL TANK INSPECTION 

1. Remove the rear seat (see REAR SEAT REMOVAL/INSTALLATION ).  
2. Remove the trunk lid from and the trunk partition (see TRIM 

NOTE:


You must be an SCI-certified technician to do fuel tank 
inspection or replacement work.  


You do not need to remove the fuel tank for the 
inspection.  


2008 Honda Civic GX 

2006-08 ENGINE PERFORMANCE Fuel Supply System - Civic GX


REMOVAL/INSTALLATION - TRUNK AREA ).  

3. Check the fuel tank's expiration date at the label (A). If the tank is expired, 

replace the tank (see FUEL TANK REMOVAL/INSTALLATION ). 

Fig. 84: Identifying Fuel Tank Expiration Date Label 

4. Using a flashlight and an inspection mirror, thoroughly check the exterior of 

the fuel tank for any of these problems: 


Excessive rust on the bands or the mounting frame  


Abrasions  


Cuts  


Dents  


Expansion or deformation  


Evidence of overheating  


Loose fuel tank frame bolts, and loose fuel tank band bolts and nuts  


Incorrect alignment of the tank and bands  

NOTE:

The horizontal alignment of marks (A) on the tank (B) 
and the bands (C) do not need to be perfectly aligned.


2008 Honda Civic GX 

2006-08 ENGINE PERFORMANCE Fuel Supply System - Civic GX


Content   ..  674  675  676  677   ..