Honda Civic. Manual - part 404


  Index      Honda     Honda Civic - service repair manual 2006-2009 year


Search            


Content   ..  402  403  404  405   ..


Honda Civic. Manual - part 404


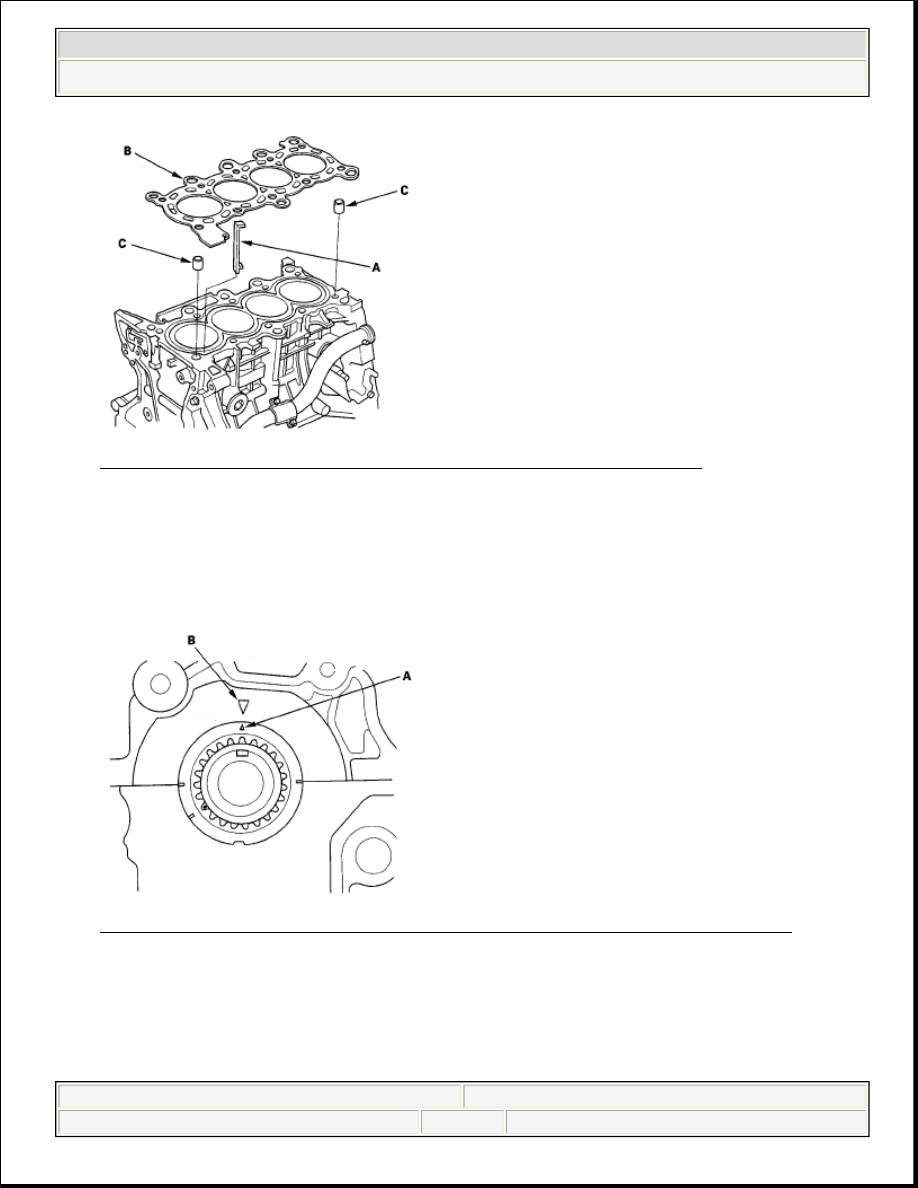
Fig. 19: Identifying Cylinder Head Gasket And Dowel Pins 

3. Install the new cylinder head gasket (B) and dowel pins (C) on the engine 

block. Always use a new cylinder head gasket.  

4. Set the crankshaft to top dead center (TDC). Align the TDC mark (A) on the 

crankshaft sprocket with the pointer (B) on the engine block. 

Fig. 20: Aligning TDC Mark On Crankshaft Sprocket With Pointer 

5. Set the camshaft TDC. The "UP" mark (A) on the camshaft sprocket should be 

at the top, and the TDC grooves (B) on the camshaft sprocket should line up 
with the top edge of the head. 


2008 Honda Civic GX 

2006-08 ENGINE Cylinder Head - Civic GX


Fig. 21: Identifying Camshaft TDC Up Mark On Camshaft Sprocket 

6. Install the cylinder head on the block.  
7. Measure the diameter of each cylinder head bolt at point A and point B. 

Fig. 22: Measuring Diameter Of Cylinder Head Bolt 

8. If either diameter is less than 10.6 mm (0.42 in.), replace the cylinder head 

bolt.  

9. Apply new engine oil to the threads and under the bolt heads of all cylinder 

head bolts.  

10. Tighten the cylinder head bolts in sequence to 39 N.m (4.0 kgf-m, 29 Ibf-ft). 

Use a beam-type torque wrench. When using a preset-type torque wrench, be 


2008 Honda Civic GX 

2006-08 ENGINE Cylinder Head - Civic GX


sure to tighten slowly and do not overtighten. If a bolt makes any noise while 
you are torquing it, loosen the bolt and retighten it from the first step. 

Fig. 23: Identifying Tightening Sequence Of Cylinder Head Bolts 

11. After torquing, tighten all cylinder head bolts in two steps (90° per step). If you 

are using a new cylinder head bolt, tighten the bolt an extra 60°. 

Fig. 24: Identifying Cylinder Head Bolt Tightening Steps 

12. Install the cam chain, refer to the CAM CHAIN INSTALLATION .  
13. Adjust the valve clearance, refer to the VALVE CLEARANCE 

ADJUSTMENT .  

NOTE:

Remove the cylinder head bolt if you tightened it 
beyond the specified angle, and go back to step 7 of the 
procedure. Do not loosen it back to the specified angle.


2008 Honda Civic GX 

2006-08 ENGINE Cylinder Head - Civic GX


14. Install the cylinder head cover, refer to the CYLINDER HEAD COVER 

INSTALLATION .  

15. Install the thermostat housing (see INSTALLATION ).  
16. Install the three way catalytic converter (TWC) (see CATALYTIC 

CONVERTER REMOVAL/INSTALLATION ).  

17. Connect the engine wire harness connectors, and install the wire harness 

clamps to the cylinder head. 


Four fuel injector connectors  


Engine coolant temperature (ECT) sensor 1 connector  


Air fuel ratio (A/F) sensor connector  


Secondary heated oxygen sensor (secondary HO2S) connector  


Rocker arm oil control solenoid connector  


Rocker arm oil pressure switch connector  

18. Install the upper radiator hose (A), heater hose (B), and water bypass hose (C). 

Fig. 25: Identifying Upper Radiator Hose, Heater Hose And Water Bypass 
Hose
 

19. Install the harness holder (A) on the cylinder head, then Install the air cleaner 

housing bracket (B). 


2008 Honda Civic GX 

2006-08 ENGINE Cylinder Head - Civic GX


Content   ..  402  403  404  405   ..