Honda Civic. Manual - part 341


  Index      Honda     Honda Civic - service repair manual 2006-2009 year


Search            


Content   ..  339  340  341  342   ..


Honda Civic. Manual - part 341


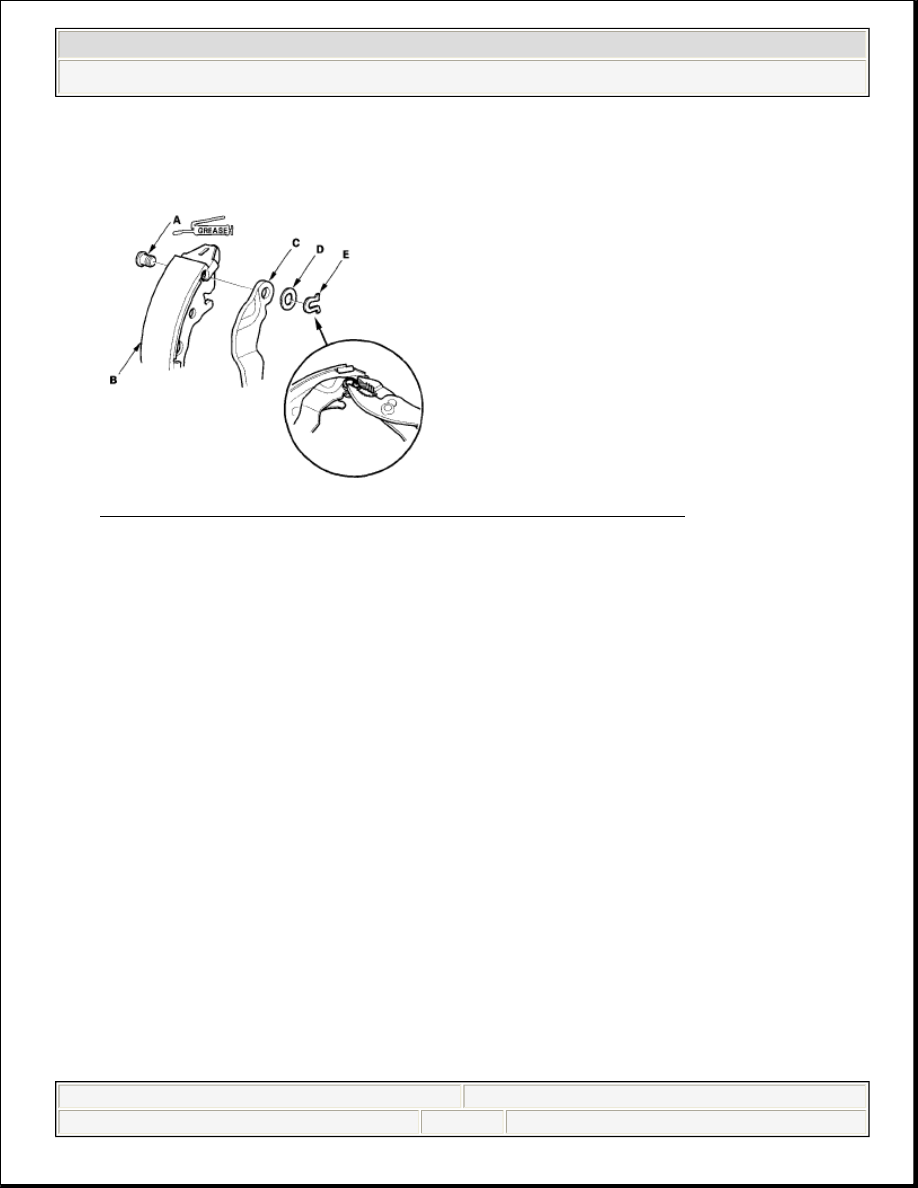
1. Apply rubber grease to the sliding surface of the pivot pin (A) for the rearward 

brake shoe (B). 

Fig. 69: Applying Grease To Sliding Surface Of Pivot Pin 

2. Install the parking brake lever (C) and the wave washer (D) on the pivot pin, 

and secure with a new U-clip (E). 

3. Connect the parking brake cable to the parking brake lever.  
4. Apply a thin coat of rubber grease to the connecting rod ends (A), and the 

sliding surfaces (B) as shown. Wipe off any excess. Keep grease off the brake 
linings. 

NOTE:

Pinch the U-clip securely to prevent the parking brake 
lever from coming out of the brake shoe.


2008 Honda Civic GX 

2006-08 BRAKES Conventional Brake Components - Civic (Except Hybrid)


Fig. 70: Applying Coat Of Rubber Grease To Connecting Rod Ends 

5. Apply a thin coat of Molykote 44MA grease to the shoe ends (A) and to the 

edge of the shoe surfaces (B) that make contact the backing plate as shown. 
Wipe off any excess. Keep grease off the brake linings. 

Fig. 71: Applying Grease To Shoe Ends And Edge Of Shoe Surfaces 

6. Install connecting rods A and B on the adjuster bolt (C). 

NOTE:


Clean the threaded portions of connecting rod A 
and the sliding surface of connecting rod B, then 
coat them with rubber grease.  


Shorten connecting rod A by fully turning the 


2008 Honda Civic GX 

2006-08 BRAKES Conventional Brake Components - Civic (Except Hybrid)


7. Assemble the brake shoes, the upper return spring (D), and the connecting rods 

with the adjuster bolt against the backing plate, then install the self-adjuster 
lever (E) and the self-adjuster spring (F) on the forward brake shoe (G).  

8. Install the tension pins (A) and the retainer springs (B) by pushing in respective 

spring and turning each pin. 

Fig. 73: Installing Tension Pins And Retainer Springs 

9. Install the lower return spring. 

adjuster bolt. 

Fig. 72: Installing Connecting Rods A And B On 
Adjuster Bolt 


2008 Honda Civic GX 

2006-08 BRAKES Conventional Brake Components - Civic (Except Hybrid)


10. Install the brake drum. 

11. Install the rear wheels.  
12. Press the brake pedal several times to make sure the brakes work and to set the 

self-adjusting brake. 

13. Do the parking brake adjustment (see PARKING BRAKE INSPECTION 

AND ADJUSTMENT ).  

REAR WHEEL CYLINDER REPLACEMENT 

1. Remove the brake shoes (see REAR BRAKE SHOE REPLACEMENT ).  
2. Disconnect the brake line (A) from the wheel cylinder (B). 

NOTE:

Make sure the brake shoes positioning on the brake 
shoe bosses of the backing plate, and fitting the top of 
the brake shoes onto the wheel cylinder pistons.

NOTE:

Before installing the brake drum, clean the mating 
surface of the rear hub and the inside of the brake 
drum.

NOTE:

Engagement of the brakes may require a greater pedal 
stroke immediately after the brake shoes have been 
replaced as a set. Several applications of the brake 
pedal will restore the normal pedal stroke.

NOTE:


Do not spill brake fluid on the vehicle; it may damage 
the paint; if brake fluid does contact the paint, wash it 
off immediately with water.  


To prevent spills, cover the hose joints with rags or 
shop towels.  


2008 Honda Civic GX 

2006-08 BRAKES Conventional Brake Components - Civic (Except Hybrid)


Content   ..  339  340  341  342   ..