Great Wall Florid. Manual - part 2


  Index      Great Wall     Great Wall Florid - service repair manual 2008 year


Search            copyright infringement  


Content   ..  1  2  3   ..


Great Wall Florid. Manual - part 2


GWFLORID Maintenance Manual

6

2.  Inspection procedures for related fuses or fuses in re-

  Inspection procedures for related fuses or fuses in re-

Inspection procedures for related fuses or fuses in re-

lay boxes. Inspect the battery for damage, the battery's 

charging state, cleanness, and tightening with the 

connectors.


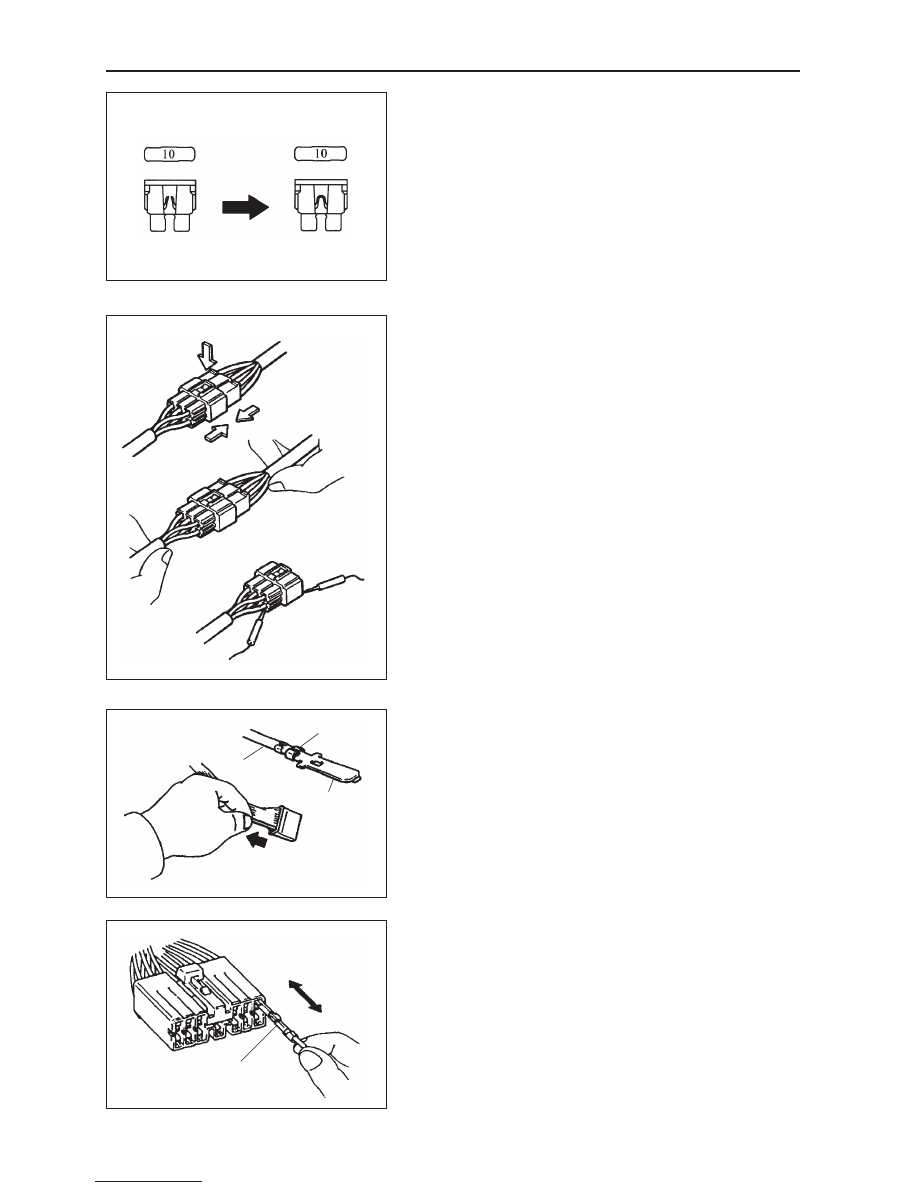
Before changing a fuse, make sure to check if the fuse's cur-

rent rating meets the required standards. You must not use a 

fuse with a current rate that is higher or lower than required 

standards.

Same current rating

3.  Binding wire harness connectors.

(a)  When disconnecting the connections, first press the two 

ends of the connectors together, then loosen the lock 

and press the lock pawl to release the connector.

(b)  When disconnecting the connector, do not pull on its 

wire harness. Grasp the joint directly.

(c)  Check if the joint is deformed, damaged, or port lost   

before connecting the connector.

(d)  The connector is not successfully connected until it 

makes a click sound.

4.  Wire harness connector inspection.

(a)  Check while connecting the connectors.


Squeeze both ends of the connectors to make sure it is com-

pletely plugged in and tightly locked.

(b)  Check when disconnecting the connectors.


Check by lightly pulling the wire harness behind the connec-

tor's joint. Look for any unconnected or dropped terminals, 

loose clamps, or broken wires.


Visually inspect for instances of corrosion, metal fragments, 

oddities, and water, as well as bending, rust, overheating, 

pollution or deformed terminals, etc.

(c)  Check the contact pressure of the terminals.


Prepare a plug that matches the connector's port, plug it into 

the socket, then check for the proper rate of tension after 

they are fully engaged.

Loosen crimp

Core

Deformed terminal

Pull lightly

The terminal is similar to a plug

Incorrect

7

Overview

Protection band

Screwdriver

5.  Maintenance methods for wire harness connector ter-

Maintenance methods for wire harness connector ter-

 for wire harness connector ter-

minals.

(a)  Use an airgun or rag to clean the contact points if the 

terminals become dusty. Do not use sandpaper to clean 

it, as that could damage the electroplated layer.

(b)  If the contact pressure seems unusual, change it to a 

socket of the same type.

(c)  Any terminal that has been damaged, deformed, or 

corroded must be changed. If the terminal is not locked 

to the case, then the case needs to be replaced too.

Correct

Incorrect

6.  Clip removal and installation.


Methods for removal and installation of the vehicle's body part clips are shown in the table below. 


Remark: If the clip is damaged during operation, it must be replaced with a new one.

Shape

Removal / Installation

Vise

Clip extractor

Protection band

Screwdriver

GWFLORID Maintenance Manual

8

Shape

Removal / Installation

Continued table

Removal

Screwdriver

Installation

Press

Clip extractor

Push out the king pin, remove it, 

and pry the kingpin bush.

Screw off the king pin and pry the shell.

Pry out the king pin, remove the rivet, 

and then pry off the shell.

Removal

Screwdriver

Clip extractor

Press

Installation 

Removal

Screwdriver

Press

Small clip extractor 

Installation 

Clip extractor 

9

Overview

General Repair Methods and Operations

1.   If a jack is needed, please kindly comply to the safety procedures listed below.

2.   Park the vehicle on a flat surface, stablize the front and the back wheels using any fixed object or tool, 

jack up the vehicle, support it with the chassis, and then start the maintenance.

3.   Disconnect the battery's negative cable before maintenance, in order to reduce the possibility of 

damaging and burning out the cable due to a short circuit.

4.   Cover the vehicle body, seats, and floor to prevent them from being damaged and polluted.

5.   Handle brake fluid and antifreeze fluid carefully, because it may damage the vehicle's surface paint 

and its surroundings.

6.  Using the proper tools or basic tools that have been recommended and are purchasable is very 

important in guaranteeing an effective and reliable maintenance result.

7.   Dispose the used dowel pins, gaskets, O-rings, oil seals, lock washers, and self-locking nuts. Prepare 

new parts for installation. Normal functions are not guaranteed if these parts are reused.

8.   Store the removed parts in order and in groups to make reassembly more convenient.

9.  Store bolts and nuts separately, because their hardness levels and designs are different according to 

the installation locations.

10. Clean parts before they are inspected or reassembled. In addition, parts that come in contact with 

engine oil also need to be cleaned, as well as checked for blockage by using compressed air.

11. Before installation, use engine oil or grease to lubricate the rotating and sliding sides of the necessary 

parts.

12. When necessary, use sealant on gaskets to avoid leakage.

13. Please carefully comply to all tightening torque specifications of bolts and nuts.

14. After maintenance, check to make sure whether the repairs were performed correctly and whether the 

malfunctions have been fixed.

Vehicle Lifting/Lowering Procedures


When lifting the vehicle, the lifter must be placed at the indicated spots. Using these indicated spots 

incorrrectly can lead to permanent deformation of the vehicle body. Many vehicle service stations 

have autolifts that raise vehicles by supporting certain vehicle parts. If using other types of lifts, be 

careful to prevent damages to the fuel tank,  oil filler, or the base of the vehicle body.

Frame contact lifting device and basic hand jack
Floor arch jack

Lifting points (left/right) of central threshold


Content   ..  1  2  3   ..