Mercury Cougar (2002 year). Manual - part 4
 

  Index      Mercury     Mercury Cougar (2002 year) - manual in english


Search            copyright infringement  


Content      ..     2      3      4      5     ..


Mercury Cougar (2002 year). Manual - part 4


AIMING THE HEADLAMPS

The headlamps on your vehicle are properly aimed at the assembly plant.

If your vehicle has been aimed in an accident the alignment of your
headlamps should be checked by a qualified service technician.

Each headlmap may be properly aimed in the vertical (up/down)
direction only. THE HORIZONTAL (left/right) AIM IS PRESET BY THE
HEADLAMP MANUFACTURER AND DOES NOT NEED TO BE
RE-AIMED.

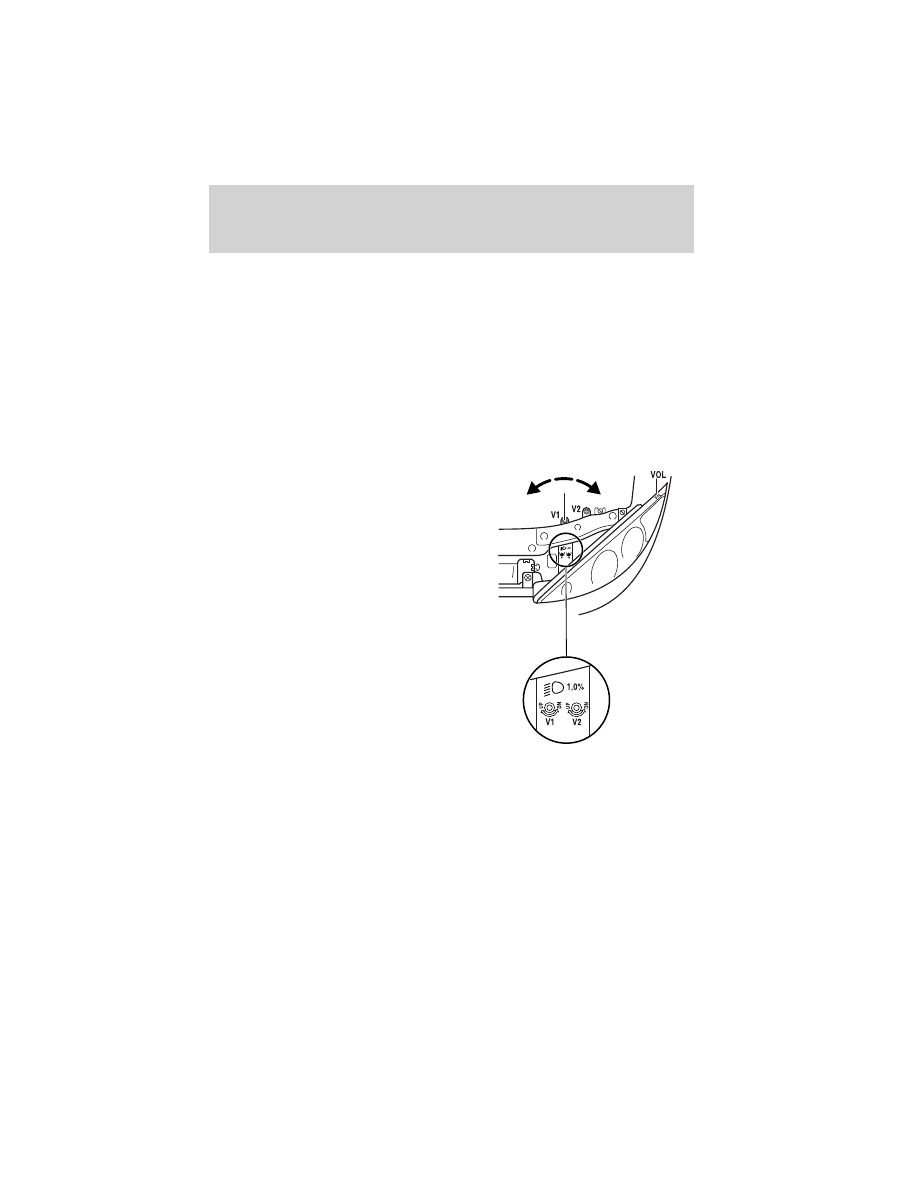
Adjusting the vertical aim

1. Park the vehicle on a level
surface.

2. The vertical indicator is located
on top of the headlamp assembly;
the adjusting screw is located
behind the headlamp assembly.

3. Turn the vertical adjusting screw
until the bubble aligns with the “0”
reference mark when viewed from
directly above. The “0” reference
mark is the middle of the three (3)
bold graduation marks.

Lights

49

-------------------------------------------------------------------------------------------------------------------------------------------------------------

TURN SIGNAL CONTROL

• Push down to activate the left

turn signal.

• Push up to activate the right turn

signal.

• In vehicles equipped with daytime

running lights, use of the turn
signals will shut off the
highbeams in daytime driving.

INTERIOR LAMPS

The interior lamps have three
switch positions: door delay, off and
on.

When the control is switched to
door delay, the interior light stays
on for 12 seconds after the doors
are closed with the ignition off.

Reading lamps (if equipped)

The reading lamps are operated by
separate on/off switches and can be
adjusted to point in the desired
direction.

Lights

50

-------------------------------------------------------------------------------------------------------------------------------------------------------------

BULBS

Replacing exterior bulbs

Check the operation of the following lamps frequently:
• Headlamps
• Tail lamps
• Brakelamps
• High-mount brakelamp
• Turn signal lamps
• Backup lamps
• License plate lamp
Do not remove lamp bulbs unless they will be replaced immediately. If a
bulb is removed for an extended period of time, contaminants may enter
the lamp housings and affect performance.

Using the right bulbs

Replacement bulbs are specified in the chart below. Headlamp bulbs
must be marked with an authorized “D.O.T.” for North America to assure
lamp performance, light brightness and pattern and safe visibility. The
correct bulbs will not damage the lamp assembly or void the lamp
assembly warranty and will provide quality bulb burn time.

Function

Number of

bulbs

Trade number

Front park/turn lamps

2

3157 NA

Headlamps (high)

2

9005

Headlamps (high)

2

9006

Foglamps

2

893

Rear tail/turn/brake lamp

2

1157

Backup lamp

2

1156

High-mount brakelamp

1

2825/W5W

License plate lamp

2

168

Signal mirror lamp (if equipped)

2

194

All replacement bulbs are clear in color except where noted.

To replace all instrument panel lights - see your dealer

Lights

51

-------------------------------------------------------------------------------------------------------------------------------------------------------------

Replacing headlamp bulbs

Make sure the headlamp switch is in the OFF position.

To remove the high or low beam headlamp bulb:

1. Lift the hood and release the wire
clip on the rear of the headlamp
assembly and remove the cover.

2. Disconnect the electrical
connector by turning the bulb
holder counterclockwise.

3. Pull the bulb holder straight out
to remove the bulb.

To install the new bulb:

Handle a halogen headlamp bulb carefully and keep out of
children’s reach. Grasp the bulb by only its plastic base and do

not touch the glass. The oil from your hand could cause the bulb to
break the next time the headlamps are operated.

Note: If the bulb is accidentally touched, it should be cleaned with
rubbing alcohol before being used.

1. Install the new bulb in the lamp assembly by pushing it straight in and
turning to lock it in position. You may need to turn the bulb slightly to
align the grooves in the plastic base with the tabs in the lamp assembly.

Lights

52

-------------------------------------------------------------------------------------------------------------------------------------------------------------

2. Connect the electrical connector to the bulb.

3. Install the protective cover and secure it with the wire clips.

4. Turn the headlamps on and make sure they work properly. if the
headlamp was correctly aligned before you changed the bulb, you need
to align it again.

Replacing front parking lamp/turn signal bulbs

1. Remove the headlamp assembly
cover.

2. Turn the bulb holder counter
clockwise.

3. Remove the bulb socket by
pulling it straight out from the lamp
assembly.

4. Pull the bulb straight out of the
socket and press in the new bulb.

5. Install the bulb socket into the
lamp assembly by turning clockwise.

Replacing side marker lamps

1. Push the complete light assembly
to the front and pull it out.

2. Remove the socket from the
assembly by turning it counter
clockwise.

3. Pull the bulb straight out and
replace it.

4. Install the bulb socket into the
assembly by turning it clockwise.

Replacing brake/turn signal/tail/backup lamps

The brake, turn signal, tail and backup lamps bulbs are located in the
same portion of the tail lamp assembly. Follow the same steps to replace
either bulb.

Lights

53

-------------------------------------------------------------------------------------------------------------------------------------------------------------

1. From the trunk, remove the
carpet cover from the lamp
assembly.

2. Remove the three retainer nuts
and pull the lamp assembly out.

3. Turn the bulb counterclockwise
and pull it out.

4. Replace the defective bulb.

5. Replace the lamp assembly and
turn it clockwise to secure it in
place.

Replacing the rear parking lamps

1. From the trunk, locate the
parking lamp on the trunk wall near
the tail lamp.

2. Turn the bulb socket
counterclockwise and pull it out.

3. Pull the bulb straight out and
replace it.

4. Add a bulb by pushing it straight
in to the bulb socket.

5. Replace the bulb socket and turn
it clockwise to secure it in place.

Replacing foglamp bulbs (if equipped)

For bulb replacement, see a dealer or qualified technician.

Lights

54

-------------------------------------------------------------------------------------------------------------------------------------------------------------

Replacing high-mount brake
lamp bulbs

1. Remove the push pins and cover
from the liftgate. (To remove the
push pins, press the two tabs of the
push pin insert inward and pull the
insert out.)

2. Turn the bulb socket
counterclockwise.

3. Pull the bulb straight out of the
socket and push in the new bulb.

To install the lamp assembly:

1. Install the bulb into the lamp assembly and turn it clockwise

2. Replace the cover and the push pins.

Replacing the luggage compartment lamp

1. Remove the light assembly from
the underside of the liftgate.

2. Turn the spherical bulb (with
slight pressure) counterclockwise to
remove.

3. To replace the bulb, insert bulb
and turn it clockwise to secure in
place.

Lights

55

-------------------------------------------------------------------------------------------------------------------------------------------------------------

Replacing interior lamps

1. Switch off the interior lamps
(middle switch position).

2. Open the lamp assembly.

3. Release the reflector at the side.

4. Pull out and replace the bulb.

Replacing reading bulbs (if equipped)

1. Open the reading lamp assembly.

2. Pull the bulb straight out and
replace it.

3. After the bulb has been replaced,
close the lamp assembly.

Lights

56

-------------------------------------------------------------------------------------------------------------------------------------------------------------

WINDSHIELD WIPER/WASHER CONTROLS

Lift the windshield wiper control to
the desired interval.
• Intermittent: push lever up to the

first position.

• Low: push lever up to the second

position.

• High: push lever up to the third

position.

For a single wipe, push the lever
downward.

Intermittent wiper control

Rotate the variable intermittent
wiper control to the desired speed.
• 1 = Short time interval
• 6 = Extended time interval

Washer

Pull the lever toward the steering
wheel. The washer operates in
conjunction with the windshield
wipers.

REAR WINDOW WIPER/WASHER (IF EQUIPPED)

Wiper

To turn it on, push the wiper
control inward. Push the control in
again to turn it off.

Washer

Push the lever away from the
steering wheel.

Driver Controls

57

-------------------------------------------------------------------------------------------------------------------------------------------------------------

WINDSHIELD WIPER BLADES

Check the wiper blades for wear at least twice a year or when they seem
less effective. Substances such as tree sap and some hot wax treatments
used by commercial car washes reduce the effectiveness of wiper blades.

CHECKING WIPER BLADES

Check the wiper blades on your
vehicle for roughness by running the
tip of your fingers over the edge of
the blade.

Traces of grease, silicone and fuel
also prevent wiper blades from
functioning properly. Clean the
blades regularly using a damp cloth
or sponge soaked with diluted
windscreen or car wash detergent.

Change the wiper blades on your vehicle at least once a year.

CHANGING THE WIPER BLADES

To replace the wiper blades:

1. Pull the wiper arm away from the
windshield and lock into the service
position.

2. Turn the blade at an angle from
the wiper arm. Push the lock pin
manually to release the blade and
pull the wiper blade down toward
the windshield to remove it from the
arm.

3. Attach the new wiper to the
wiper arm and press it into place
until a click is heard.

Driver Controls

58

-------------------------------------------------------------------------------------------------------------------------------------------------------------

TILT STEERING WHEEL

Pull the locking lever on the
steering column cover up to adjust
the steering column position. Secure
the wheel by releasing the locking
lever.

Never adjust the steering
wheel when the vehicle is

moving.

HORN

Press the pad in the middle of the
steering wheel.

Driver Controls

59

-------------------------------------------------------------------------------------------------------------------------------------------------------------

CLOCK

The clock can be set to either a 12 hour or a 24 hour format.

Press the CLOCK button until it
flashes.

Press the UNITS button once to
display 12HR. Press the RESET
button to toggle between 12 and 24
HR.

Press the UNITS button until the
hour flashes. Press the RESET
button to set the hour.

Press the UNITS button until the
minutes flash. Press the RESET button to set the minutes.

Press the CLOCK button to store the time.

POWER WINDOWS

Press and hold the rocker switches to open and close windows.
• Press the top portion of the

rocker switch to close.

• Press the bottom portion of the

rocker switch to open.

POWER SIDE VIEW MIRRORS

The power mirrors can be operated at any time.

Driver Controls

60

-------------------------------------------------------------------------------------------------------------------------------------------------------------

1. The control can be swiveled and
turned. Turn the control clockwise
to adjust the driver’s side mirror,
counterclockwise to adjust the
passenger side mirror.

2. Adjust the selected mirror by
moving the center control in the
desired direction. Then turn the
control back to the center position.

Heated mirrors (if equipped)

The heated mirrors are activated by turning on the rear window
defroster.

SPEED CONTROL (IF EQUIPPED)

To turn speed control on

• Press ON.
Vehicle speed cannot be controlled
until the vehicle is traveling at or
above 48 km/h (30 mph).

Do not shift the gearshift lever
into N (Neutral) with the speed
control on.

Driver Controls

61

-------------------------------------------------------------------------------------------------------------------------------------------------------------

Do not use the speed control in heavy traffic or on roads that
are winding, slippery, or unpaved.

To turn speed control off

• Press OFF or
• Turn off the vehicle ignition.
Once speed control is switched off,
the previously programmed set
speed will be erased.

To set a speed

• Press + and release. For speed

control to operate, the speed
control must be ON and the
vehicle speed must be greater
than 48 km/h (30 mph).

If you drive up or down a steep hill,
your vehicle speed may vary
momentarily slower or faster than
the set speed. This is normal.

Speed control cannot reduce the vehicle speed if it increases above the
set speed on a downhill. If your vehicle speed is faster than the set
speed while driving on a downhill, you may want to shift to the next
lower gear or apply the brakes to reduce your vehicle speed.

Driver Controls

62

-------------------------------------------------------------------------------------------------------------------------------------------------------------

If your vehicle slows down more
than 16 km/h (10 mph) below your
set speed on an uphill, your speed
control will disengage. This is
normal. Pressing = will re-engage it.

Do not use the speed
control in heavy traffic or

on roads that are winding,
slippery, or unpaved.

To set a higher set speed

• Press and hold +. Release the

control when the desired vehicle
speed is reached or

• Press and release + to operate

the Tap-Up function. Each press
will increase the set speed by 1.6
km/h (1 mph) or

• Accelerate with your accelerator

pedal. When the desired vehicle
speed is reached, press and
release +.

You can accelerate with the accelerator pedal at any time during speed
control usage. Releasing the accelerator pedal will return your vehicle to
the previously programmed set speed.

Driver Controls

63

-------------------------------------------------------------------------------------------------------------------------------------------------------------

To set a lower set speed

• Press and hold −. Release the

control when the desired speed is
reached or

• Press and release − to operate

the Tap-Down function. Each
press will decrease the set speed
by 1.6 km/h (1 mph) or

• Depress the brake pedal. When

the desired vehicle speed is
reached, press +.

To disengage speed control

• depress the brake pedal, or
Disengaging the speed control will
not erase the previously
programmed set speed.

• Press the OFF control.
Pressing OFF will erase the
previously programmed set speed.

Driver Controls

64

-------------------------------------------------------------------------------------------------------------------------------------------------------------


Content      ..     2      3      4      5     ..