Fiat 124 Spider (2019 year). Manual - part 4


  Index      Fiat     Fiat 124 Spider (2019 year) - manual in english


Search            


Content      ..     2      3      4      5     ..


Fiat 124 Spider (2019 year). Manual - part 4


Note: When the power window lock
switch is in the locked position, the light
on the passenger power window switch
turns off. The light may be difficult to
see depending on the surrounding
brightness.

CONVERTIBLE TOP
(SOFT TOP)

Lowering The
Convertible Top

Warning!

Do not sit on the folded convertible top,
otherwise the convertible top could be
damaged or you may fall off and be injured.

To lower the convertible top, proceed
as follows:

1. Make sure the parking brake is
applied and the engine is OFF.

2. Make sure there are no objects
which have been placed in the area
where the convertible top is to be
retracted.

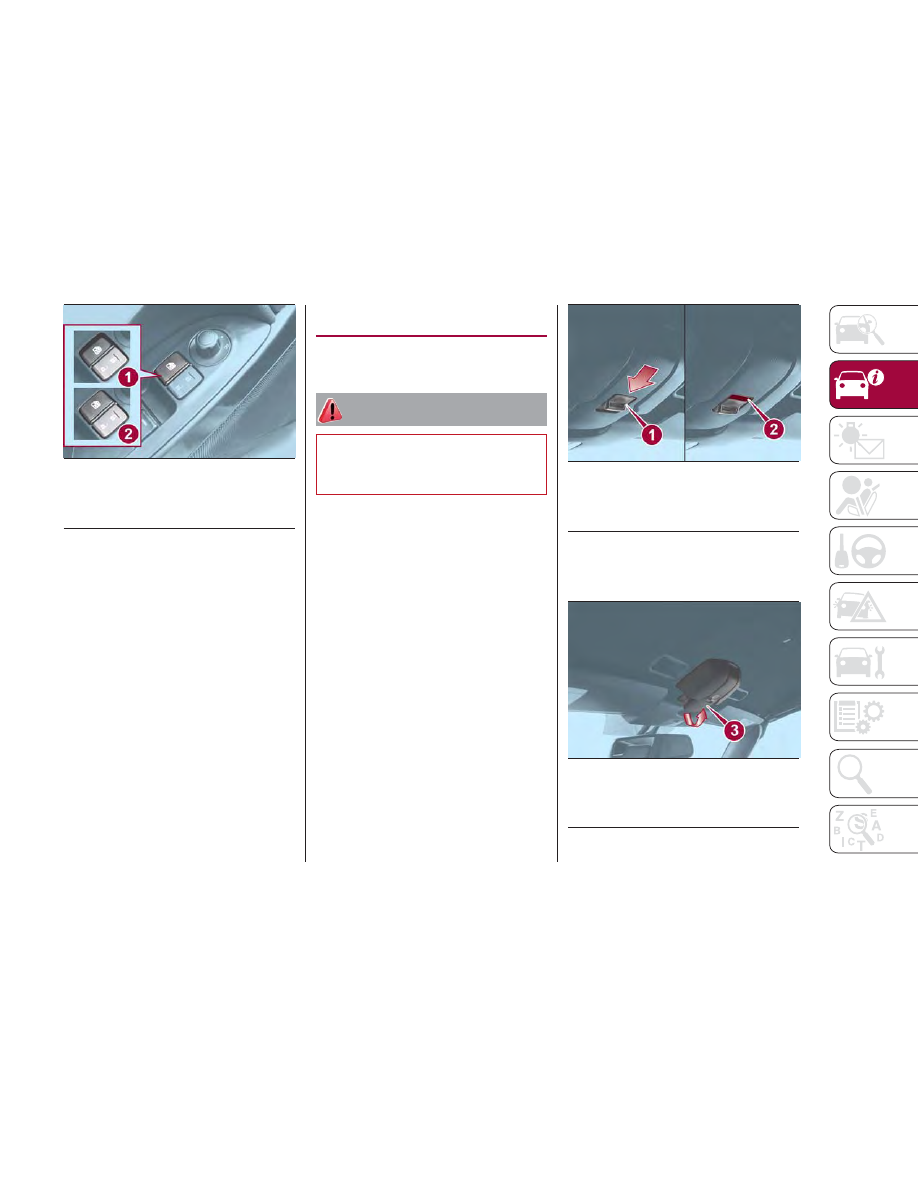
3. Push forward on the release latch.
There is a red indicator showing that
the latch is open.

4. With the lock release latch pushed
forward (red indicator visible), pull the
top latch handle rearward to unlock it.

04070104-L12-001

Power Window Lockout Switch

1 — Locked Position
2 — Unlocked Position

04110102-L36-006

Lock Release Latch

1 — Release Latch Closed
2 — Release Latch Open

04110102-L21-001

Pulling The Top Latch Handle

Rearward

3 — Latch Release Handle

57

-------------------------------------------------------------------------------------------------------------------------------------------------------------

5. Remove the striker from the anchor.

Note:

The power windows will go

down automatically when the
convertible top is opened. If the power
windows do not go down automatically,
fully open the windows using the power
window switch located on the doors.

6. Standing outside of the vehicle, hold
the convertible top along the front edge
and pull it toward the rear of the vehicle.
To lower the convertible top from inside
the vehicle, use the convertible top
handles.

7. Move the convertible top rearward
while pushing the rear glass lightly with
your hand.

8. With the back end of the convertible
top pushed down, push the front end
until a latching sound is heard. Lightly
rock the retracted convertible top to
make sure it is securely locked.

Warning!

Always keep your hands and fingers

away from the fastening mechanisms
when moving the convertible top: it is
dangerous to place your hands or fingers
near the fastening mechanisms. Your
hands or fingers could be caught and
injured by the mechanism.

04110102-L22-002

Removing Striker From Anchor

4 — Striker
5 — Anchor

04110102-123-002AB

Convertible Top Handles

6 — Handles

04110102-126-001AB

Retracted Convertible Top

58

GETTING

TO

KNOW

YOUR

VEHICLE

-------------------------------------------------------------------------------------------------------------------------------------------------------------

Sit in the seat with the seat belt correctly

fastened when the vehicle is moving:
standing in the vehicle, or sitting on the
convertible top storage area or center
console when the vehicle is moving is a
dangerous way to ride. During a sudden
maneuver or collision you could be
seriously injured or even killed.

Raising The Convertible
Top

To raise the convertible top, proceed as
follows:

1. Make sure the parking brake is
applied and the engine is OFF.

2. Pull the unlock lever upward to
disengage the lock.

3. Standing outside of the vehicle, hold
the convertible top along the front edge
and pull it towards the vehicle front. To
raise the convertible top from inside the
vehicle, use the convertible top
handles.

4. While sitting in a seat, grasp the
convertible top handles, and push the
convertible top against the windshield.
Make sure the striker engages with the
anchor, move the top latch slowly, and
then push the top latch upward until a
latching sound is heard.

5. If the red indicator is visible on the
lock release button, the convertible top
is not locked. After locking the
convertible top, verify that the red
indicator is not visible.

04110103-121-004

Unlock Lever Location

1 — Unlock Lever

04110103-L23-002

Convertible Handle Location

2 — Convertible Top Handles

04110103-L24-003

Convertible Top Components

4 — Closing Release Latch
5 — Striker
6 — Anchor

59

-------------------------------------------------------------------------------------------------------------------------------------------------------------

Caution!

Driving with the convertible top not fully
locked could damage the convertible top.

Note:

Do not spray water directly near the

seam of the window and convertible
top when flushing away dirt on the soft
top with water. Otherwise, water may
enter the vehicle (refer to “Convertible
Top Maintenance” in “Servicing And
Maintenance”).

The convertible top may be

constricted if it is left retracted for a
long period. Therefore, if the top has
become constricted, it may be difficult
to hook the top latch striker to the
anchor.

Make sure the convertible top is

securely locked by pushing up on it. If
it still sounds loose (rattles) after being
locked by the top latch, contact an
authorized dealer.

Convertible Top
Precautions

Remove leaves or other debris that

may accumulate on and around the
convertible top. If leaves or other debris
block the drain filter, water may enter
the vehicle. Clean the drain filter at least
once a year.

Before lowering or raising the

convertible top, stop in a safe place off
of the road and park on a level surface.

When lowering the convertible top,

make sure objects inside the vehicle are
not blown away by the wind.

Secure all loose objects inside before

driving with the convertible top down.

To help prevent theft or vandalism

and to ensure that the passenger
compartment stays dry, close the
convertible top securely and lock both
doors when leaving the vehicle.

The soft top is made of high quality

material and if it is not maintained
correctly, the material could harden,
becomes stained, or have an uneven
gloss.

Lowering the convertible top while

it's wet can also cause water to drip
into the cabin.

The power windows go down

automatically in conjunction with the
convertible top opening/closing.
However, this is a function for improving
the operability, and it does not mean
there is a problem. If the vehicle battery
is disconnected for vehicle maintenance
or other reasons, the power windows
will not go down automatically. If the
power windows do not go down, the
automatic open/close mechanism for
the windows must be reset.

The windblocker reduces the amount

of wind coming into the cabin from
behind when driving with the
convertible top opened.

Before starting the vehicle make sure

the convertible top is correctly locked.

04110103-124-001

Lock Release Button

6 — Red Indicator
7 — Release Latch Locked
8 — Release Latch Unlocked

60

GETTING

TO

KNOW

YOUR

VEHICLE

-------------------------------------------------------------------------------------------------------------------------------------------------------------

Caution!

Before opening the convertible top,

make sure the rear window defroster
switch is turned off. Otherwise the heat
generated from the window defroster
could damage the convertible top and the
internal material.

Make sure nothing is on the convertible

top or near the back window when raising
or lowering the convertible top. Even small
objects may interfere and cause damage.

Do not drive through an automatic car

wash; it may damage the convertible top.

Do not raise or lower the convertible top

when the temperature is below 41 °F
(5 °C); this will damage the convertible top
material.

Do not lower the convertible top when

it's wet. If the convertible top dries while
folded, it will deteriorate and mold.

Do not raise or lower the convertible top

in a strong wind as it could damage the
convertible top or cause an unexpected
accident.

HOOD

Opening The Hood

To open the hood, proceed as follows:

1. With the vehicle in PARK, pull the
release handle located to the left of the
steering wheel, below the instrument
panel.

2. Move to the outside of the vehicle
and insert your hand into the hood
opening, then slide the latch lever to the
right, and lift up the hood.

3. Pull up the support rod from the clip,
and insert it into the support rod hole
indicated by the arrow to hold the hood
open.

07030201-L12-001

Releasing The Hood Latch

1 — Hood Release Handle

07030201-122-001AB

Sliding The Latch Lever To The

Right

2 — Latch Lever

07030201-130-888

Support Rod Location

3 — Support Rod

61

-------------------------------------------------------------------------------------------------------------------------------------------------------------

Closing The Hood

To close the hood, proceed as follows:

1. Check under the hood area to make
certain all filler caps are in place and all
loose items (e.g. tools, oil containers,
etc.) have been removed.

2. Lift the hood with one hand, and
with the other hand grasp the padded
area on the support rod.

3. Secure the support rod into the rod
clip.

4. Verify that the support rod is
secured in the clip before closing the
hood.

5. Lower the hood slowly to a height of
about 8 inches (20 cm) above its closed
position and then let it drop.

Warning!

Be sure the hood is fully latched before
driving your vehicle. If the hood is not fully
latched, it could open when the vehicle is
in motion and block your vision. Failure to
follow this warning could result in serious
injury or death.

Caution!

To prevent possible damage, do not slam
the hood to close it. Lower hood to
approximately 8 inches (20 cm) and drop
the hood to close. Make sure hood is fully
closed for both latches. Never drive vehicle
unless hood is fully closed, with both
latches engaged.

TRUNK LID

Opening

Warning!

Before opening the trunk lid, remove any

snow and ice accumulation on it.
Otherwise, the trunk lid could close under
the weight of the snow and ice resulting in
injury.

Be careful when opening/closing the

trunk lid during strong winds. If a strong
gust blows against the trunk lid, it could
close suddenly resulting in injury.

Fully open the trunk lid and make sure

that it stays open. If the trunk lid is only
opened partially, it could slam shut by
vibration or wind gusts resulting in injury.

When loading or unloading luggage in

the trunk, turn off the engine. Otherwise,
you could get burned by the heat of the
exhaust gas.

07030201-123-002

Inserting Support Rod Into Hole

4 — Support Rod Hole

62

GETTING

TO

KNOW

YOUR

VEHICLE

-------------------------------------------------------------------------------------------------------------------------------------------------------------

Using The Remote Release Button
— If Equipped

The remote release button function can
be disabled by locking the doors using
the key fob, emergency key, or a
request switch on the exterior door
handle to prevent an intruder in the
vehicle from opening the trunk lid.
To enable the remote release button
operation, unlock the doors by using
the key fob, emergency key, request
switch on the exterior door handle, or
place the ignition in the ON position.
Note: The remote release button
cannot be disabled by locking the
doors using the door-lock
switch/door-lock knob.
Using The Electric Trunk Lid
Opener
With the remote release button, the
trunk lid can also be opened while the
key fob is being carried.

Push the electric trunk lid button and
raise the trunk lid when the latch
releases.

Without the remote release button,
unlock the doors and trunk lid, then
push the electric trunk lid opener and
raise it when the latch releases.
With The Advanced Keyless Entry
Function
A locked trunk lid can also be opened
while the key fob is being carried. When
opening the trunk lid with the doors
locked, it may require a few seconds for
the trunk lid latch to release after the
electric trunk lid opener is pushed.
The trunk lid can be closed when the
doors are locked with the key fob left in
the vehicle. However, to prevent locking
the key fob in the vehicle, the trunk lid
can be opened by pushing the electric
trunk lid opener. If the trunk lid cannot
be opened despite doing this
procedure, push the electric trunk lid

opener to fully open the trunk lid after
pushing the trunk lid completely closed.
If the vehicle battery is discharged or
there is a malfunction in the electrical
system and the trunk lid cannot be
unlocked, the trunk lid can be opened
by performing the emergency
procedure.

When Trunk Lid Cannot
Be Opened

If the battery is discharged, the trunk lid
cannot be unlocked and opened.
If the trunk lid cannot be unlocked even
if the discharged battery situation has
been resolved, the electrical system
may have a malfunction.
Proceed as follows:

1. Close the convertible top and
remove the windblocker.

04030201-R12-001

Interior Trunk Lid Release Button

04030201-12A-001

Electric Trunk Release Button

08080100-125-002

Remove Windblocker

63

-------------------------------------------------------------------------------------------------------------------------------------------------------------

2. Remove the fasteners on the right
side of the vehicle.

3. Partially peel back the cover on the
right side of the vehicle.

4. Turn and loosen the cap screws until
the screws start to spin free.

Note: Do not pull the screw when
pulling the cap. Otherwise, the screw
may fall off and become lost.
Refer to “Trunk Emergency Release”
located in “Getting To Know Your
Vehicle” for further information.

Closing

1. Use both hands to push the trunk lid
down until the lock snaps shut. Do not
slam it.

2. Pull up on the trunk lid to check if it
is secure.

TRUNK EMERGENCY
RELEASE

As a security measure, a emergency
release lever is built into the rear tail
panel of the trunk. In the event of an
adult or child being locked inside the
trunk, the trunk can be simply opened
by pulling down the lever and open the
trunk lid. After performing this
emergency measure, contact an
authorized dealer as soon as possible.

08080100-121-004

Remove Fasteners

08080100-122-001

Cover Removal

08080100-123-004

Trunk Emergency Release

64

GETTING

TO

KNOW

YOUR

VEHICLE

-------------------------------------------------------------------------------------------------------------------------------------------------------------

Trunk Safety Warning

Warning!

Do not allow children to have access to the
trunk, either by climbing into the trunk from
outside, or through the inside of the
vehicle. Always close the trunk lid when
your vehicle is unattended. Once in the
trunk, young children may not be able to
escape, even if they entered through the
rear seat. If trapped in the trunk, children
can die from suffocation or heat stroke.

HOMELINK — IF
EQUIPPED

General Information

The HomeLink system replaces up to
three hand-held transmitters with a
single built-in component in the
auto-dimming mirror. Pushing the
HomeLink button on the auto-dimming
mirror activates garage doors, gates
and other devices surrounding your
home.
Note: HomeLink and HomeLink house
icon are registered trademarks of
Gentex Corporation.
FCC Rules and with Industry Canada
license-exempt RSS standard(s).
Operation is subject to the following
two conditions:

1. This device may not cause harmful
interference, and

2. This device must accept any
interference received, including
interference that may cause undesired
operation.

Note: Changes or modifications not
expressly approved by the party
responsible for compliance could void
the user’s authority to operate the
equipment.

Warning!

Vehicle exhaust contains carbon

monoxide, a dangerous gas. Do not run
your vehicle in the garage while
programming the transceiver. Exhaust gas
can cause serious injury or death.

Your motorized door or gate will open

and close while you are programming the
universal transceiver. Do not program the
transceiver if people, pets or other objects
are in the path of the door or gate. Only
use this transceiver with a garage door
opener that has a “stop and reverse”
feature as required by Federal safety
standards. This includes most garage door
opener models manufactured after 1982.
Do not use a garage door opener without
these safety features. Call toll-free
1-800-355-3515 or, on the Internet at
HomeLink.com 
for safety information or
assistance.

Pre-Programming The
System

Note: It is recommended that a new
battery be placed in the hand-held
transmitter of the device being
programmed to HomeLink for quicker
training and accurate transmission of
the radio-frequency signal.

65

-------------------------------------------------------------------------------------------------------------------------------------------------------------

Proceed as follows:
1. Verify that there is a remote control
transmitter available for the device you
would like to program.
2. Disconnect the power to the device.

Programming The
System

Note: When programming a garage
door opener or a gate, disconnect the
power to these devices before
programming. Continuous operation of
the devices could damage the motor.

The HomeLink system provides three
buttons which can be individually
selected and programmed using the
transmitters for current, on-market
devices as follows:
1. Disconnect power to the device
being programmed.
2. Position the end of your handheld
transmitter one to three inches (2.5 -
7.5 cm) away from the HomeLink
button you wish to program while
keeping the indicator light in view.
3. Simultaneously press and hold both
the chosen HomeLink and hand-held
transmitter buttons. Do not release
the buttons until step four has been
completed.

4. After the HomeLink indicator light
changes from a slow to a rapidly
blinking light, release both the
HomeLink and hand-held transmitter
buttons.
5. Connect power to the device being
programmed.
6. Firmly press and hold the
programmed HomeLink button for five
seconds, and then release it. Perform
this operation two times to activate the
door or gate. If the door or gate does
not activate, press and hold the
just-trained HomeLink button and
observe the indicator light. If the
indicator light stays on constantly,
programming is complete and your

device should activate when the
HomeLink button is pressed and
released.
Note: To program the remaining two
HomeLink buttons, begin with step
one.
7. If the indicator light blinks rapidly for
two seconds and then turns to a
constant light, continue with
“Programming” steps (see below) 
to
complete the programming of a rolling
code equipped device (most commonly
a garage door opener).
8. At the garage door opener receiver
(motor-head unit) in the garage, locate
the “learn” or “smart” button. This can
usually be found where the hanging
antenna wire is attached to the
motorhead unit.
9. Press and release the “learn” or
“smart” button (the name and color of
the button may vary by manufacturer).
Note: Complete the programming
within 30 seconds.
10. Return to the vehicle and firmly
press, hold for two seconds and
release 
the programmed HomeLink
button. Repeat the “ press/hold/
release
” sequence a second time, and,
depending on the brand of the garage
door opener (or other rolling code
equipped device), repeat this sequence
a third time to complete the
programming process. HomeLink
should now activate your rolling code
equipped device.

04060102-121-999

HomeLink Buttons

1 — First HomeLink Button
2 — Second HomeLink Button
3 — Third HomeLink Button

66

GETTING

TO

KNOW

YOUR

VEHICLE

-------------------------------------------------------------------------------------------------------------------------------------------------------------

Note: To program the remaining two
HomeLink buttons, begin with step
one.
For questions or comments, please
contact HomeLink at
www.homelink.com or
1-800-355-3515.

Gate Operator/Canadian
Programming

Canadian radio-frequency laws require
transmitter signals to “time-out” (or quit)
after several seconds of transmission -
which may not be long enough for
HomeLink to pick up the signal during
programming.
Similar to this Canadian law, some U.S.
gate operators are designed to
“time-out” in the same manner.
If you live in Canada or you are having
difficulties programming a gate operator
by using the “Programming”
procedures (regardless of where you
live), replace “Programming The
System” step three with the following:
Note: If programming a garage door
opener or gate operator, it is advised to
unplug the device during the “cycling”
process to prevent possible
overheating.
1. Continue to press and hold the
HomeLink button while you press and
release 
every two seconds (“cycle”)
your hand-held transmitter until the
frequency signal has successfully been

accepted by HomeLink (the indicator
light will flash slowly and then rapidly).
2. Proceed with the “Programming”
steps to complete.

Operating The System

Push the programmed HomeLink
button to operate a programmed
device.
The code will continue being
transmitted for a maximum of
20 seconds.

Reprogramming The
System

To program a device to HomeLink using
a HomeLink button previously trained,
follow these steps:
1. Push and hold the desired HomeLink
button. DO NOT release the button;
2. The indicator light will begin to flash
after 20 seconds. Without releasing the
HomeLink button, proceed with
“Programming The System” step one.

Erasing Programmed
HomeLink Buttons

To erase the existing programming from
all three operating channels, push and
hold the two outside buttons 1 and
3 on the auto-dimming mirror until the
HomeLink indicator light begins to flash
after approximately ten seconds.
Verify that the programming has been
erased when you resell the vehicle.

INTERNAL
EQUIPMENT

Storage Compartments

Center Console
The center console is located between
the driver’s and passenger’s seats.

Warning!

Keep storage compartments closed
when driving. Driving with the storage
compartments open is dangerous.
To reduce the possibility of injury in an
accident or a sudden stop, keep the
storage compartments closed when
driving.

Caution!

Do not leave lighters or eyeglasses in the
storage compartments while parked under
the sun. A lighter could explode or the
plastic material in eyeglasses could deform
and crack from high temperature.

67

-------------------------------------------------------------------------------------------------------------------------------------------------------------

Seat Side Compartment
The seat side compartment is located
between the seats above the
cupholders.

To open, push the release handle down
to open the seat side compartment.

Insert the emergency key in the lock
and turn it clockwise to lock, counter
clockwise to unlock.
Note: When using the rear console
cup holders, remove any cups before
opening the seat side compartment. If
the seat side compartment is opened
with a cup present, the lid will hit the
cups and may cause the contents to
spill.

Back Trim Storage Compartment
Small items can be stored in the back
trim storage compartment which is
located behind the seats.

To use the back trim storage
compartment, slide the seat all the way
forward and fold the seat back forward,
then open the compartment.
When finished, close the compartment
and return the seat to its original
position and secure it.
After returning the seat to its original
position, make sure the seat is secured
by attempting to lightly move it forward
and rearward.

Caution!

Do not forcefully push objects into the rear
storage compartment. Otherwise, the box
could be damaged.

Sun Visors

The sun visors are located at the sides
of the interior rear view mirror. They can
be adjusted forward toward the
windshield, and sideways toward the
side windows, to block sunlight.

06040706-12A-001AB

Center Console Lid

06040717-121-001AB

Seat Side Compartment

1 — Release Handle
2 — Key Hole

06040718-12A-002AB

Back Trim Storage Compartment

68

GETTING

TO

KNOW

YOUR

VEHICLE

-------------------------------------------------------------------------------------------------------------------------------------------------------------

Vanity Mirrors
To access the vanity mirror, fold the sun
visor down and lift the cover toward the
seats.

Interior Lights

Overhead Light
The interior light is located in the
headliner in between the sun visors.
The interior light can be set to three
different positions.

Light switch positions:

On : Light is on at all times.

Door : Light is on when any door is

open. Light is on or off when the
illuminated entry system is on.

Off : Light is off at all times.

Trunk Light
The trunk light comes on when the lid is
open and turns off when closed.

Note: To prevent the battery from
being discharged, do not leave the
trunk open for a long period when the
engine is not running.

Illuminated Entry System
The overhead light turns on when any
of the following operations occurs with
the overhead light switch in the door
position and the ignition is OFF:

Turns on for about 30 seconds when

the driver's door is unlocked.

Turns on for about 15 seconds when

a door is opened while a key fob is left
in the vehicle and then the door is
closed.

06040100-L12-001AB

Sun Visor

06040200-12A-002AB

Overhead Light Switch

1 — On
2 — Door
3 — Off

06040200-T12-003

Trunk Light Location

1 — Trunk Light Switch

69

-------------------------------------------------------------------------------------------------------------------------------------------------------------

Turns on for about five seconds

when a door is opened from the outside
with a key fob being carried and then
the door is closed.

The overhead light turns on for about
15 seconds when the ignition is cycled
OFF with the overhead light switch in
the door position.
The overhead light turns off immediately
in the following cases:

The ignition is cycled ON and both

doors are closed.

The driver's door is locked.

Battery Saver
If any door is left open with the
overhead light switch in the door
position or the trunk lid is left open, the
overhead light or trunk light turns off
after about 30 minutes to prevent
discharge of the battery.
To prevent discharge of the battery, if
the interior lights remain on (the interior
light switch is in the on position), they
will turn off automatically under the
following conditions:

No operations are done for about

30 minutes after the ignition is cycled
OFF.

The

(lock) button on the key fob is

pushed, or the request switch located
on the exterior door handle is pushed to
lock the doors (vehicles with the

advanced keyless function) after the
ignition is cycled OFF.

In addition, if the following operations
are performed after turning the interior
lights off, they will turn on again if:

The ignition is cycled to a position

other than OFF.

A door is opened.

A door is unlocked.

The operation of the illuminated entry
system can be changed through the
Connect system.

Accessory Socket

The accessory socket is located deep
in the back of the footwell on the
passenger side.

Only use genuine FCA accessories or
the equivalent requiring no greater than
12V (120 W, 10A).

The ignition must be placed in ACC or
ON.
To prevent accessory socket damage
or electrical failure, pay attention to the
following:

Do not use accessories that require

more than 12V (120 W, 10A).

Do not use accessories that are not

genuine FCA accessories or the
equivalent.

Close the cover when the accessory

socket is not in use to prevent foreign
objects and liquids from getting into the
accessory socket.

Correctly insert the plug into the

accessory socket.

Do not insert the cigarette lighter into

the accessory socket.

Noise may occur on the audio

playback depending on the device
connected to the accessory socket.

Depending on the device connected

to the accessory socket, the vehicle's
electrical system may be affected,
which could cause the warning light to
illuminate. Disconnect the connected
device and make sure that the problem
is resolved. If the problem is resolved,
disconnect the device from the socket
and switch the ignition off. If the
problem is not resolved, contact an
authorized dealer.

06040400-L12-002AB1

Accessory Socket

70

GETTING

TO

KNOW

YOUR

VEHICLE

-------------------------------------------------------------------------------------------------------------------------------------------------------------

Note: To prevent discharging of the
battery, do not use the socket for long
periods with the engine off or idling.

Warning!

To avoid serious injury or death:

Only devices designed for use in this

type of outlet should be inserted into any
12 Volt outlet.

Do not touch with wet hands.

Close the lid when not in use and while

driving the vehicle.

If this outlet is mishandled, it may cause

an electric shock and failure.

Cupholders — If
Equipped

Cupholders are available and can be
inserted in the center console on the
passenger side and the rear area of the
center console.

Warning!

Never use a cup holder to hold hot liquids
while the vehicle is moving. Using a cup
holder to hold hot liquids while the vehicle
is moving is dangerous. If the contents
spill, you could be burned.

Caution!

Do not place plastic bottles without

caps in the cup holders. Otherwise, the
contents may spill while the vehicle is
being driven.

Do not place excessive weight on the

cup holders such as by resting your hands
or elbows on them. Otherwise, the cup
holders could be damaged.

If a passenger is present, install the front

cup holder to the rear console. Otherwise,
a knee might hit it and cause the contents
to spill.

Removing Cup Holders
Use both hands when removing the
cup holder.

06040500L21002

Cupholders

1 — Front Cup Holder
2 — Rear Cup Holder (If Equipped)

06040500-J12AEC1-001

Removing Cupholders

71

-------------------------------------------------------------------------------------------------------------------------------------------------------------

Installing Cupholders
When installing a cupholder, insert it
firmly into the installation hole and make
sure that it is secured in place.

The front cupholder can be removed
and installed to the rear console.

The rear cupholder is designed for use
on the rear console and cannot be
installed to the front side.

Windblocker

The Windblocker reduces rear wind
coming into the cabin while driving with
the convertible top in the lowered
position.

06040500-J12AEC2-001

Installing Cupholders

06040500-L25-002

Correct Cupholder Placement

06040500-L26-001

Incorrect Cupholder Placement

06041000-12A-003AB

Windblocker

72

GETTING

TO

KNOW

YOUR

VEHICLE

-------------------------------------------------------------------------------------------------------------------------------------------------------------


Content      ..     2      3      4      5     ..