Dodge Grand Caravan (2019 year). Manual - part 12


  Index      Dodge     Dodge Grand Caravan (2019 year) - manual in english


Search            copyright infringement  


Content      ..     10      11      12      13     ..


Dodge Grand Caravan (2019 year). Manual - part 12


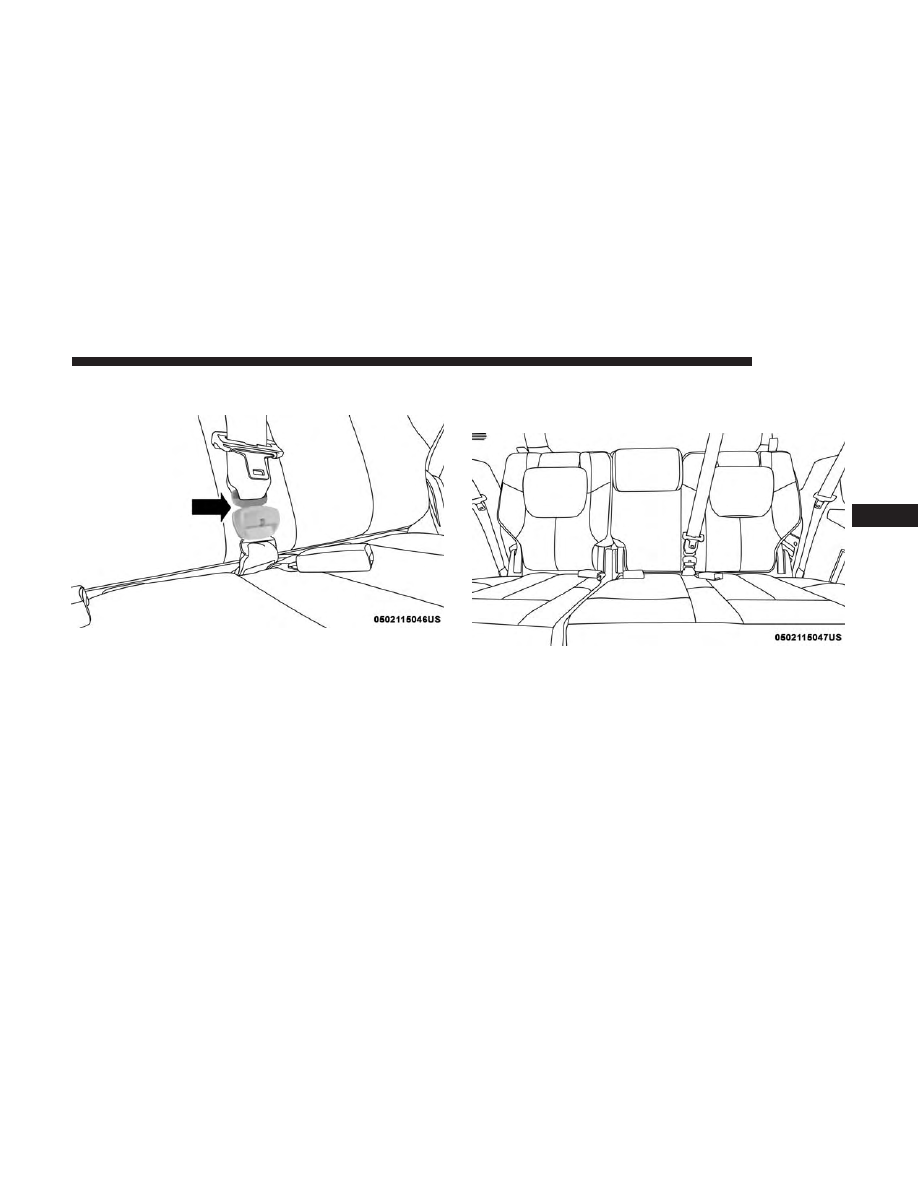
3. Route the shoulder belt to the inside of the left head

restraint.

4. When the seat belt is long enough to fit, insert the

mini-latch plate into the mini-buckle until you hear a
“click.”

Connect Second Row Mini-Latch To Buckle

Second Row Mini-Latch And Buckle Connected

5

SAFETY

189

5. Sit back in seat. Slide the regular latch plate up the

webbing as far as necessary to allow the seat belt to go
around your lap.

6. When the seat belt is long enough to fit, insert the latch

plate into the buckle until you hear a “click.”

7. Position the lap belt so that it is snug and lies low across

your hips, below your abdomen. To remove slack in the
lap belt portion, pull up on the shoulder belt. To loosen
the lap belt if it is too tight, pull on the lap belt. A snug
seat belt reduces the risk of sliding under the seat belt in
a collision.

8. Position the shoulder belt on your chest so that it is

comfortable and not resting on your neck. The retractor
will withdraw any slack in the seat belt.

9. To release the seat belt, push the red button on the

buckle.

Rear Center Seat Belt Buckled

Rear Center Seat Belt Buckled

190

SAFETY

10. To disengage the mini-latch plate from the mini-buckle

for storage, insert the regular latch plate into the center
red slot on the mini-buckle. The seat belt will automati-
cally retract to its stowed position. If necessary, slide
the latch plate down the webbing to allow the seat belt
to retract fully. Insert the mini-latch plate and regular
latch plate into its stowed position.

WARNING!

• If the mini-latch plate and mini-buckle are not prop-

erly connected when the seat belt is used by an
occupant, the seat belt will not be able to provide
proper restraint and will increase the risk of injury in
a collision.

• When reattaching the mini-latch plate and mini-

buckle, ensure the seat belt webbing is not twisted.
If the webbing is twisted, follow the preceding
procedure to detach the mini-latch plate and mini-
buckle, untwist the webbing, and reattach the mini-
latch plate and mini-buckle.

Seat Belt Extender

If a seat belt is not long enough to fit properly, even when
the webbing is fully extended and the adjustable upper
shoulder belt anchorage (if equipped) is in its lowest
position, an authorized dealer can provide you with a Seat
Belt Extender. The Seat Belt Extender should be used only
if the existing seat belt is not long enough. When the Seat
Belt Extender is not required for a different occupant, it
must be removed.

WARNING!

• ONLY use a Seat Belt Extender if it is physically

required in order to properly fit the original seat belt
system. DO NOT USE the Seat Belt Extender if,
when worn, the distance between the front edge of
the Seat Belt Extender buckle and the center of the
occupant’s body is LESS than 6 inches.

• Using a Seat Belt Extender when not needed can

increase the risk of serious injury or death in a
collision. Only use the Seat Belt Extender when the
lap belt is not long enough and only use in the
recommended seating positions. Remove and store
the Seat Belt Extender when not needed.

5

SAFETY

191

Seat Belts And Pregnant Women

Seat belts must be worn by all occupants including preg-
nant women: the risk of injury in the event of an accident
is reduced for the mother and the unborn child if they are
wearing a seat belt.

Position the lap belt snug and low below the abdomen and
across the strong bones of the hips. Place the shoulder belt
across the chest and away from the neck. Never place the
shoulder belt behind the back or under the arm.

Seat Belt Pretensioner

The front outboard seat belt system is equipped with
pretensioning devices that are designed to remove slack
from the seat belt in the event of a collision. These devices
may improve the performance of the seat belt by removing
slack from the seat belt early in a collision. Pretensioners
work for all size occupants, including those in child
restraints.

NOTE:

These devices are not a substitute for proper seat

belt placement by the occupant. The seat belt still must be
worn snugly and positioned properly.

The pretensioners are triggered by the Occupant Restraint
Controller (ORC). Like the air bags, the pretensioners are
single use items. A deployed pretensioner or a deployed air
bag must be replaced immediately.

Energy Management Feature

The front outboard seat belt system is equipped with an
Energy Management feature that may help further reduce
the risk of injury in the event of a collision. The seat belt
system has a retractor assembly that is designed to release
webbing in a controlled manner.

Pregnant Women And Seat Belts

192

SAFETY

Switchable Automatic Locking Retractors (ALR) (If
Equipped)

The seat belts in the passenger seating positions may be
equipped with a Switchable Automatic Locking Retractor
(ALR) which is used to secure a child restraint system. For
additional information, refer to “Installing Child Restraints
Using The Vehicle Seat Belt” under the “Child Restraints”
section of this manual. The figure below illustrates the
locking feature for each seating position.

If the passenger seating position is equipped with an ALR
and is being used for normal usage, only pull the seat belt
webbing out far enough to comfortably wrap around the
occupant’s mid-section so as to not activate the ALR. If the
ALR is activated, you will hear a clicking sound as the seat
belt retracts. Allow the webbing to retract completely in
this case and then carefully pull out only the amount of
webbing necessary to comfortably wrap around the occu-
pant’s mid-section. Slide the latch plate into the buckle
until you hear a

⬙click.⬙

ALR — Switchable Automatic Locking Retractor (2nd Row

Bench Seat )

ALR — Switchable Automatic Locking Retractor (2nd Row

Stow ‘n Go Seating)

5

SAFETY

193

In Automatic Locking Mode, the shoulder belt is automati-
cally pre-locked. The seat belt will still retract to remove
any slack in the shoulder belt. Use the Automatic Locking
Mode anytime a child restraint is installed in a seating
position that has a seat belt with this feature. Children 12
years old and under should always be properly restrained
in the rear seat of a vehicle with a rear seat.

WARNING!

• Never place a rear-facing child restraint in front of an

air bag. A deploying passenger front air bag can
cause death or serious injury to a child 12 years or
younger, including a child in a rear-facing child
restraint.

• Never install a rear-facing child restraint in the front

seat of a vehicle. Only use a rear-facing child re-
straint in the rear seat. If the vehicle does not have a
rear seat, do not transport a rear-facing child restraint
in that vehicle.

How To Engage The Automatic Locking Mode

1. Buckle the combination lap and shoulder belt.

2. Grasp the shoulder portion and pull downward until

the entire seat belt is extracted.

3. Allow the seat belt to retract. As the seat belt retracts,

you will hear a clicking sound. This indicates the seat
belt is now in the Automatic Locking Mode.

How To Disengage The Automatic Locking Mode

Unbuckle the combination lap/shoulder belt and allow it
to retract completely to disengage the Automatic Locking
Mode and activate the vehicle sensitive (emergency) lock-
ing mode.

WARNING!

• The seat belt assembly must be replaced if the

switchable Automatic Locking Retractor (ALR) fea-
ture or any other seat belt function is not working
properly when checked according to the procedures
in the Service Manual.

• Failure to replace the seat belt assembly could in-

crease the risk of injury in collisions.

• Do not use the Automatic Locking Mode to restrain

occupants who are wearing the seat belt or children
who are using booster seats. The locked mode is only
used to install rear-facing or forward-facing child
restraints that have a harness for restraining the
child.

194

SAFETY

Supplemental Active Head Restraints (AHR)

These head restraints are passive, deployable components,
and vehicles with this equipment cannot be readily iden-
tified by any markings, only through visual inspection of
the head restraint. The head restraint will be split in two
halves, with the front half being soft foam and trim, the
back half being decorative plastic.

How The Active Head Restraints (AHR) Work

The Occupant Restraint Controller (ORC) determines
whether the severity or type of rear impact will require the
Active Head Restraints (AHR) to deploy. If a rear impact
requires deployment, both the driver and front passenger
seat AHRs will be deployed.

When AHRs deploy during a rear impact, the front half of
the head restraint extends forward to minimize the gap
between the back of the occupant’s head and the AHR. This
system is designed to help prevent or reduce the extent of
injuries to the driver and front passenger in certain types of
rear impacts.

NOTE:

The Active Head Restraints (AHR) may or may not

deploy in the event of a front or side impact. However, if
during a front impact, a secondary rear impact occurs, the
AHR may deploy based on the severity and type of the
impact.

Active Head Restraint (AHR) Components:

Active Head Restraint (AHR) Components

1 — Head Restraint Front Half (Soft Foam And Trim)
2 — Head Restraint Back Half (Decorative Plastic Rear Cover)
3 — Head Restraint Guide Tubes
4 — Seat Back

5

SAFETY

195

WARNING!

• All occupants, including the driver, should not oper-

ate a vehicle or sit in a vehicle’s seat until the head
restraints are placed in their proper positions in
order to minimize the risk of neck injury in the event
of a collision.

• Do not place items over the top of the Active Head

Restraint, such as coats, seat covers or portable DVD
players. These items may interfere with the opera-
tion of the Active Head Restraint in the event of a
collision and could result in serious injury or death.

• Active Head Restraints may be deployed if they are

struck by an object such as a hand, foot or loose
cargo. To avoid accidental deployment of the Active
Head Restraint, ensure that all cargo is secured, as
loose cargo could contact the Active Head Restraint
during sudden stops. Failure to follow this warning
could cause personal injury if the Active Head Re-
straint is deployed.

NOTE:

For more information on properly adjusting and

positioning the head restraint, refer to “Head Restraints” in
“Getting To Know Your Vehicle.”

Resetting Active Head Restraints (AHR)

If the Active Head Restraints are triggered during a colli-
sion, the front half of the head restraint will be extended
forward and separated from the rear half of the head
restraint (See Image). Do not drive your vehicle after the
AHRs have deployed. The head restraint must be reset into
the original position to best protect the occupant for all
types of collisions. An authorized FCA US LLC dealer must
reset the AHRs on the driver’s and front passenger’s seat
before driving. Personally attempting to reset the AHRs

Active Head Restraint (AHR) Deployed

196

SAFETY

may result in damage to the AHRs that could impair their
function.

WARNING!

Deployed AHRs are not able to best protect you in all
types of collisions. Have deployed AHRs reset by an
authorized dealer immediately.

Supplemental Restraint Systems (SRS)

Some of the safety features described in this section may be
standard equipment on some models, or may be optional
equipment on others. If you are not sure, ask an authorized
dealer.

The air bag system must be ready to protect you in a
collision. The Occupant Restraint Controller (ORC) moni-
tors the internal circuits and interconnecting wiring asso-
ciated with the electrical Air Bag System Components.
Your vehicle may be equipped with the following Air Bag
System Components:

Air Bag System Components
• Occupant Restraint Controller (ORC)
• Air Bag Warning Light

• Steering Wheel and Column
• Instrument Panel
• Knee Impact Bolsters
• Driver and Front Passenger Air Bags
• Seat Belt Buckle Switch
• Supplemental Side Air Bags
• Supplemental Knee Air Bags
• Front and Side Impact Sensors
• Seat Belt Pretensioners
• Seat Track Position Sensors

Air Bag Warning Light

The ORC monitors the readiness of the electronic parts of

the air bag system whenever the ignition switch
is in the START or ON/RUN position. If the
ignition switch is in the OFF position or in the
ACC position, the air bag system is not on and

the air bags will not inflate.

The ORC contains a backup power supply system that may
deploy the air bag system even if the battery loses power or
it becomes disconnected prior to deployment.

5

SAFETY

197

The ORC turns on the Air Bag Warning Light in the
instrument panel for approximately four to eight seconds
for a self-check when the ignition switch is first in the
ON/RUN position. After the self-check, the Air Bag Warn-
ing Light will turn off. If the ORC detects a malfunction in
any part of the system, it turns on the Air Bag Warning
Light, either momentarily or continuously. A single chime
will sound to alert you if the light comes on again after
initial startup.

The ORC also includes diagnostics that will illuminate the
instrument panel Air Bag Warning Light if a malfunction is
detected that could affect the air bag system. The diagnos-
tics also record the nature of the malfunction. While the air
bag system is designed to be maintenance free, if any of the
following occurs, have an authorized dealer service the air
bag system immediately.
• The Air Bag Warning Light does not come on during the

four to eight seconds when the ignition switch is first in
the ON/RUN position.

• The Air Bag Warning Light remains on after the four to

eight-second interval.

• The Air Bag Warning Light comes on intermittently or

remains on while driving.

NOTE:

If the speedometer, tachometer, or any engine

related gauges are not working, the Occupant Restraint
Controller (ORC) may also be disabled. In this condition
the air bags may not be ready to inflate for your protection.
Have an authorized dealer service the air bag system
immediately.

WARNING!

Ignoring the Air Bag Warning Light in your instrument
panel could mean you won’t have the air bag system to
protect you in a collision. If the light does not come on
as a bulb check when the ignition is first turned on,
stays on after you start the vehicle, or if it comes on as
you drive, have an authorized dealer service the air bag
system immediately.

Front Air Bags

This vehicle has front air bags and lap/shoulder belts for
both the driver and front passenger. The front air bags are
a supplement to the seat belt restraint systems. The driver
front air bag is mounted in the center of the steering wheel.
The passenger front air bag is mounted in the instrument
panel, above the glove compartment. The words “SRS
AIRBAG” or “AIRBAG” are embossed on the air bag
covers.

198

SAFETY

WARNING!

• Being too close to the steering wheel or instrument

panel during front air bag deployment could cause
serious injury, including death. Air bags need room
to inflate. Sit back, comfortably extending your arms
to reach the steering wheel or instrument panel.

(Continued)

WARNING! (Continued)

• Never place a rear-facing child restraint in front of an

air bag. A deploying passenger front air bag can
cause death or serious injury to a child 12 years or
younger, including a child in a rear-facing child
restraint.

• Never install a rear-facing child restraint in the front

seat of a vehicle. Only use a rear-facing child re-
straint in the rear seat. If the vehicle does not have a
rear seat, do not transport a rear-facing child restraint
in that vehicle.

Driver And Passenger Front Air Bag Features

The Advanced Front Air Bag system has multistage driver
and front passenger air bags. This system provides output
appropriate to the severity and type of collision as deter-
mined by the Occupant Restraint Controller (ORC), which
may receive information from the front impact sensors (if
equipped) or other system components.

The first stage inflator is triggered immediately during an
impact that requires air bag deployment. A low energy
output is used in less severe collisions. A higher energy
output is used for more severe collisions.

Front Air Bag/Knee Impact Bolster Locations

1 — Driver And Passenger Front Air Bags
2 — Passenger Knee Impact Bolster
3 — Driver Knee Impact Bolster/Supplemental Driver Knee Air Bag

5

SAFETY

199

This vehicle may be equipped with a driver and/or front
passenger seat belt buckle switch that detects whether the
driver or front passenger seat belt is buckled. The seat belt
buckle switch may adjust the inflation rate of the Ad-
vanced Front Air Bags.

This vehicle may be equipped with driver and/or front
passenger seat track position sensors that may adjust the
inflation rate of the Advanced Front Air Bags based upon
seat position.

WARNING!

• No objects should be placed over or near the air bag

on the instrument panel or steering wheel because
any such objects could cause harm if the vehicle is in
a collision severe enough to cause the air bag to
inflate.

• Do not put anything on or around the air bag covers

or attempt to open them manually. You may damage
the air bags and you could be injured because the air
bags may no longer be functional. The protective
covers for the air bag cushions are designed to open
only when the air bags are inflating.

(Continued)

WARNING! (Continued)

• Relying on the air bags alone could lead to more

severe injuries in a collision. The air bags work with
your seat belt to restrain you properly. In some
collisions, air bags won’t deploy at all. Always wear
your seat belts even though you have air bags.

Front Air Bag Operation

Front Air Bags are designed to provide additional protec-
tion by supplementing the seat belts. Front air bags are not
expected to reduce the risk of injury in rear, side, or
rollover collisions. The front air bags will not deploy in all
frontal collisions, including some that may produce sub-
stantial vehicle damage — for example, some pole colli-
sions, truck underrides, and angle offset collisions.

On the other hand, depending on the type and location of
impact, front air bags may deploy in crashes with little
vehicle front-end damage but that produce a severe initial
deceleration.

Because air bag sensors measure vehicle deceleration over
time, vehicle speed and damage by themselves are not
good indicators of whether or not an air bag should have
deployed.

200

SAFETY

Seat belts are necessary for your protection in all collisions,
and also are needed to help keep you in position, away
from an inflating air bag.

When the ORC detects a collision requiring the front air
bags, it signals the inflator units. A large quantity of
non-toxic gas is generated to inflate the front air bags.

The steering wheel hub trim cover and the upper passen-
ger side of the instrument panel separate and fold out of
the way as the air bags inflate to their full size. The front air
bags fully inflate in less time than it takes to blink your
eyes. The front air bags then quickly deflate while helping
to restrain the driver and front passenger.

Knee Impact Bolsters

The Knee Impact Bolsters help protect the knees of the
driver and front passenger, and position the front occu-
pants for improved interaction with the front air bags.

WARNING!

• Do not drill, cut, or tamper with the knee impact

bolsters in any way.

• Do not mount any accessories to the knee impact

bolsters such as alarm lights, stereos, citizen band
radios, etc.

Supplemental Driver Knee Air Bag

This vehicle is equipped with a Supplemental Driver Knee
Air Bag mounted in the instrument panel below the
steering column. The Supplemental Driver Knee Air Bag
provides enhanced protection during a frontal impact by
working together with the seat belts, pretensioners, and
front air bags.

Supplemental Side Air Bags

Supplemental Seat-Mounted Side Air Bags (SABs)

This vehicle is equipped with Supplemental Seat-Mounted
Side Air Bags (SABs).

Supplemental Seat-Mounted Side Air Bags (SABs) are
located in the outboard side of the front seats. The SABs are
marked with “SRS AIRBAG” or “AIRBAG” on a label or on
the seat trim on the outboard side of the seats.

5

SAFETY

201

The SABs may help to reduce the risk of occupant injury
during certain side impacts, in addition to the injury
reduction potential provided by the seat belts and body
structure.

When the SAB deploys, it opens the seam on the outboard
side of the seatback’s trim cover. The inflating SAB deploys
through the seat seam into the space between the occupant
and the door. The SAB moves at a very high speed and
with such a high force that it could injure occupants if they
are not seated properly, or if items are positioned in the
area where the SAB inflates. Children are at an even greater
risk of injury from a deploying air bag.

WARNING!

Do not use accessory seat covers or place objects
between you and the Side Air Bags; the performance
could be adversely affected and/or objects could be
pushed into you, causing serious injury.

Front Supplemental Seat-Mounted Side Air Bag

202

SAFETY

Supplemental Side Air Bag Inflatable Curtains (SABICs)

This vehicle is equipped with Supplemental Side Air Bag
Inflatable Curtains (SABICs).

Supplemental Side Air Bag Inflatable Curtains (SABICs)
are located above the side windows. The trim covering the
SABICs is labeled “SRS AIRBAG” or “AIRBAG.”

SABICs may help reduce the risk of head and other injuries
to front and rear seat outboard occupants in certain side
impacts, in addition to the injury reduction potential
provided by the seat belts and body structure.

The SABIC deploys downward, covering the side windows.
An inflating SABIC pushes the outside edge of the headliner
out of the way and covers the window. The SABICs inflate
with enough force to injure occupants if they are not belted
and seated properly, or if items are positioned in the area
where the SABICs inflate. Children are at an even greater risk
of injury from a deploying air bag.

The SABICs may help reduce the risk of partial or complete
ejection of vehicle occupants through side windows in
certain side impact events.

WARNING!

• Do not mount equipment, or stack luggage or other

cargo up high enough to block the deployment of the
SABICs. The trim covering above the side windows
where the SABIC and its deployment path are lo-
cated should remain free from any obstructions.

• In order for the SABICs to work as intended, do not

install any accessory items in your vehicle which
could alter the roof. Do not add an aftermarket
sunroof to your vehicle. Do not add roof racks that
require permanent attachments (bolts or screws) for
installation on the vehicle roof. Do not drill into the
roof of the vehicle for any reason.

Supplemental Side Air Bag Inflatable Curtain (SABIC)

Label Location

5

SAFETY

203

Side Impacts

The Side Air Bags are designed to activate in certain side
impacts. The Occupant Restraint Controller (ORC) deter-
mines whether the deployment of the Side Air Bags in a
particular impact event is appropriate, based on the sever-
ity and type of collision. The side impact sensors aid the
ORC in determining the appropriate response to impact
events. The system is calibrated to deploy the Side Air Bags
on the impact side of the vehicle during impacts that
require Side Air Bag occupant protection. In side impacts,
the Side Air Bags deploy independently; a left side impact
deploys the left Side Air Bags only and a right-side impact
deploys the right Side Air Bags only. Vehicle damage by
itself is not a good indicator of whether or not Side Air
Bags should have deployed.

The Side Air Bags will not deploy in all side collisions,
including some collisions at certain angles, or some side
collisions that do not impact the area of the passenger
compartment. The Side Air Bags may deploy during
angled or offset frontal collisions where the front air bags
deploy.

Side Air Bags are a supplement to the seat belt restraint
system. Side Air Bags deploy in less time than it takes to
blink your eyes.

WARNING!

• Occupants, including children, who are up against or

very close to Side Air Bags can be seriously injured
or killed. Occupants, including children, should
never lean on or sleep against the door, side win-
dows, or area where the side air bags inflate, even if
they are in an infant or child restraint.

• Seat belts (and child restraints where appropriate)

are necessary for your protection in all collisions.
They also help keep you in position, away from an
inflating Side Air Bag. To get the best protection
from the Side Air Bags, occupants must wear their
seat belts properly and sit upright with their backs
against the seats. Children must be properly re-
strained in a child restraint or booster seat that is
appropriate for the size of the child.

204

SAFETY


Content      ..     10      11      12      13     ..