Dodge Neon (2005 year). Manual - part 1


  Index      Dodge     Dodge Neon (2005 year) - manual in english


Search            copyright infringement  


Content      ..       1      2      ..


Dodge Neon (2005 year). Manual - part 1


WARNINGS AND CAUTIONS

This manual contains WARNINGS against operating
procedures which could result in an accident or bodily
injury. It also contains CAUTIONS against procedures
which could result in damage to your vehicle. If you do
not read this entire manual you may miss important
information. Observe all Warnings and Cautions.

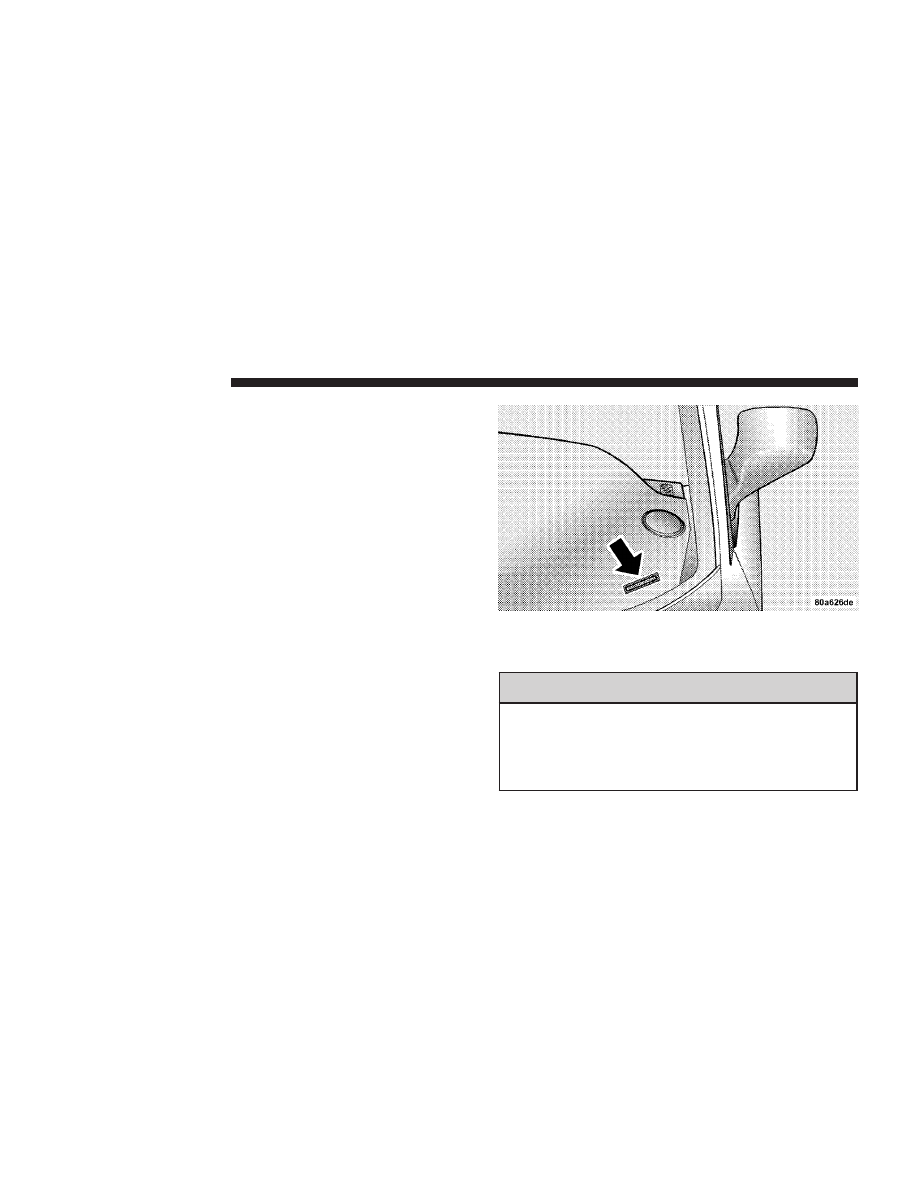
VEHICLE IDENTIFICATION NUMBER

Vehicle Identification Number (VIN) is found on a laser
etched plate, located on the left front corner of the
instrument panel, visible through the windshield. This
number also appears on the vehicle registration or title.

VEHICLE MODIFICATIONS / ALTERATIONS

WARNING!

Any modifications or alterations to this vehicle
could seriously affect its roadworthiness and safety
and may lead to an accident resulting in serious
injury or death.

Vehicle Identification Number

6

INTRODUCTION

THINGS TO KNOW BEFORE STARTING YOUR VEHICLE

CONTENTS

m A Word About Your Keys . . . . . . . . . . . . . . . . . 9

▫ Ignition Key Removal . . . . . . . . . . . . . . . . . . . 9
▫ Locking Doors With The Key . . . . . . . . . . . . . .10
▫ Key-In-Ignition Reminder . . . . . . . . . . . . . . . .11

m Sentry Key . . . . . . . . . . . . . . . . . . . . . . . . . . . .11

▫ Replacement Keys . . . . . . . . . . . . . . . . . . . . . .12
▫ Sentry Key Programming . . . . . . . . . . . . . . . . .12
▫ General Information . . . . . . . . . . . . . . . . . . . .13

m Steering Wheel Lock — If Equipped . . . . . . . . .13

▫ To Manually Lock The Steering Wheel . . . . . . .13
▫ To Release The Steering Wheel Lock . . . . . . . . .13

▫ Automatic Transaxle Ignition Interlock System . .14

m Door Locks . . . . . . . . . . . . . . . . . . . . . . . . . . .14

▫ Manual Door Locks . . . . . . . . . . . . . . . . . . . . .14
▫ Power Door Locks — If Equipped . . . . . . . . . .15
▫ Central Locking/Unlocking — If Equipped . . . .15
▫ Automatic Door Locks — If Equipped . . . . . . .16
▫ Child-Protection Door Lock System (Rear Doors) .17

m Internal Emergency Trunk Lid Release . . . . . . .18
m Remote Trunk Lid Release — If Equipped . . . . .18
m Remote Keyless Entry — If Equipped . . . . . . . .19

▫ To Unlock The Doors . . . . . . . . . . . . . . . . . . .19

2

▫ To Lock The Doors . . . . . . . . . . . . . . . . . . . . .19
▫ Horn Chirp Feature . . . . . . . . . . . . . . . . . . . . .19
▫ To Unlock The Trunk . . . . . . . . . . . . . . . . . . . .20
▫ Using The Panic Alarm . . . . . . . . . . . . . . . . . .20
▫ Programming Additional Transmitters . . . . . . . .20
▫ General Information . . . . . . . . . . . . . . . . . . . .21
▫ Transmitter Battery Service . . . . . . . . . . . . . . .21

m Vehicle Theft Alarm — If Equipped . . . . . . . . . .22

▫ To Set The Alarm . . . . . . . . . . . . . . . . . . . . . .22
▫ To Disarm The System . . . . . . . . . . . . . . . . . . .23
▫ Security System Manual Override . . . . . . . . . . .23

m Power Windows — If Equipped . . . . . . . . . . . .23
m Occupant Restraints . . . . . . . . . . . . . . . . . . . . .24

▫ Lap/Shoulder Belts . . . . . . . . . . . . . . . . . . . . .24

▫ Adjustable Upper Shoulder Belt Anchorage . . . .28
▫ Lap/Shoulder Belt Untwisting Procedure . . . . .29
▫ Seat Belts And Pregnant Women . . . . . . . . . . . .30
▫ Seat Belt Extender . . . . . . . . . . . . . . . . . . . . . .31
▫ Driver And Front Passenger Supplemental

Restraint System (SRS) - Airbags . . . . . . . . . . .31

▫ Child Restraint . . . . . . . . . . . . . . . . . . . . . . . .39
▫ Transporting Pets . . . . . . . . . . . . . . . . . . . . . .45

m Engine Break-In Recommendations . . . . . . . . . .46
m Safety Tips . . . . . . . . . . . . . . . . . . . . . . . . . . . .46

▫ Exhaust Gas . . . . . . . . . . . . . . . . . . . . . . . . . .46
▫ Safety Checks You Should Make Inside

The Vehicle . . . . . . . . . . . . . . . . . . . . . . . . . .47

▫ Periodic Safety Checks You Should Make

Outside The Vehicle . . . . . . . . . . . . . . . . . . . .47

8

THINGS TO KNOW BEFORE STARTING YOUR VEHICLE

A WORD ABOUT YOUR KEYS

The dealer that sold you your new vehicle has the key
code numbers for your vehicle locks. These numbers can
be used to order duplicate keys from your dealer. Ask
your dealer for these numbers and keep them in a safe
place.

The double sided keys
may be inserted into the
locks with either side up.

Ignition Key Removal

Automatic Transaxle
Place the shift lever in PARK and make sure that the shift
knob push button has returned to the out position. Turn
the key to the OFF position, turn to the lock position, and
remove the key.

NOTE:

If you try to remove the key before you place

the lever in PARK, the key may become trapped tempo-
rarily in the key cylinder. If this occurs, rotate the key
clockwise slightly, then remove the key as described. If a
malfunction occurs, the system will trap the key in the
ignition cylinder to warn you that this safety feature is
inoperable. The engine can be started and stopped but
the key cannot be removed until you obtain service.

Vehicle Key

Ignition Key Positions

THINGS TO KNOW BEFORE STARTING YOUR VEHICLE

9

2

Manual Transaxle
Depress and hold the release button located between the
ignition switch and the instrument panel. Turn the igni-
tion key to LOCK and remove the key.

WARNING!

Leaving children in a vehicle unattended is danger-
ous for a number of reasons. A child or others could
be injured. Children should be warned not to touch
the parking brake, brake pedal or the gear selector
lever. Don’t leave the keys in the ignition. A child
could operate power windows, other controls, or
move the vehicle.

CAUTION!

An unlocked car is an invitation to thieves. Always
remove key from the ignition and lock all doors
when leaving the vehicle unattended.

Locking Doors With The Key

You can insert the key with either side up. To lock the
door, turn the key rearward. To unlock the door, turn the
key forward. See Section 7, Body Mechanism Lubrication
of this manual for external lock lubrication.

Ignition Key Release Button

10

THINGS TO KNOW BEFORE STARTING YOUR VEHICLE

Key-In-Ignition Reminder

Opening the driver’s door when the key is in the ignition
switch, sounds a signal to remind you to remove the key.

NOTE:

With the driver’s door open, and the key in the

ignition, the power door locks will not lock via the
interior door lock switch.

SENTRY KEY

The Sentry Key Immobilizer System prevents unautho-
rized operation of the vehicle by disabling the engine.
The system will shut the engine off after 2 seconds of
running if an invalid key is used to start the vehicle. This
system utilizes ignition keys which have an electronic
chip (transponder) embedded into them. Only keys that
have been programmed to the vehicle can be used to start
and operate the vehicle.

The Sentry Key Immobilizer System does not need to be
armed or activated. Operation of the system is automatic
regardless of whether or not the vehicle is locked or
unlocked. During normal operation, the Theft Alarm/
Immobilizer Light will come on for three (3) seconds

immediately after the ignition switch is turned on for a
bulb check. Afterwards, if the bulb remains on, this
indicates a problem with the electronics.

If the bulb begins to flash after the bulb check, this
indicates that an invalid key has been used to start the
vehicle. Both of these conditions will result in the engine
being shut off after two (2) seconds of running.

Keep in mind that a key which has not been programmed
is also considered an invalid key even if it is cut to fit the
ignition lock cylinder for that vehicle.

If the Theft Alarm/Immobilizer Light comes on during
normal vehicle operation (vehicle has been running for
longer than 10 seconds), a fault has been detected in the
electronics and the vehicle should be serviced as soon as
possible.

NOTE:

• The Sentry Key Immobilizer System is not compatible

with remote starting systems. Use of these systems
may result in vehicle starting problems and loss of
security protection.

THINGS TO KNOW BEFORE STARTING YOUR VEHICLE

11

2

• Exxon/Mobil Speed Pass,™ additional Sentry Keys, or

any other transponder equipped components on the
same keychain will not cause a key-related (tran-
sponder) fault unless the additional part is physi-
cally held against the ignition key

being used

when starting the vehicle. Cell phones, pagers, or
other RF electronics will not cause interference with
this system.

All of the keys provided with your new vehicle have
been programmed to the vehicle electronics.

Replacement Keys

NOTE:

Only keys that have been programmed to the

vehicle electronics can be used to start the vehicle. Once
a Sentry Key has been programmed to a vehicle, it can
not be programmed to any other vehicle.

At the time of purchase, the original owner is provided
with a four digit PIN number. This number is required
for dealer replacement of keys. Duplication of keys may
be performed at an authorized dealer or by using the
Customer Key Programming procedure. This procedure

consists of programming a blank key to the vehicle
electronics. A blank key is one which has never been
programmed.

NOTE:

When having the Sentry Key Immobilizer

System serviced, bring all vehicle keys with you to the
dealer.

Sentry Key Programming

You can program new keys to the system if you have two
valid sentry keys by performing the following procedure:

1. Cut the additional Sentry Key Transponder blank(s) to
match the ignition switch lock cylinder key code.

2. Insert the first valid key into the ignition switch and
turn the ignition switch ON for at least 3 seconds but no
longer than 15 seconds. Turn the ignition switch OFF and
remove the first key.

3. Insert the second valid key and turn the ignition
switch ON within 15 seconds. After ten seconds a chime
will sound and the Theft Alarm Light will begin to flash.
Turn the ignition switch OFF and remove the second key.

12

THINGS TO KNOW BEFORE STARTING YOUR VEHICLE

4. Insert a blank Sentry Key into the ignition switch and
turn the ignition switch ON within 60 seconds. After 10
seconds a single chime will sound. The Theft Alarm Light
will stop flashing, turn on for 3 seconds; then turn off.

The new Sentry Key has been programmed.

Repeat this procedure to program up to a total of 8 keys.
If you do not have a programmed sentry key, contact
your dealer for details.

General Information

The Sentry Key system complies with FCC rules part 15
and with RSS-210 of Industry Canada. Operation is
subject to the following conditions:

• This device may not cause harmful interference.
• This device must accept any interference that may be

received, including interference that may cause undes-
ired operation.

STEERING WHEEL LOCK — IF EQUIPPED

Your vehicle may be equipped with a passive steering
wheel lock. This lock prevents steering the vehicle with-
out the ignition key. If the steering wheel is rotated no
more than 1/2 turn in either direction and the key is not
in the ignition switch, the steering wheel will lock.

To manually lock the steering wheel:

With the engine running, rotate the steering wheel 1/2
turn, turn off the engine and remove the key. Turn the
steering wheel slightly in either direction until the lock
engages.

To release the steering wheel lock:

Insert the key in the ignition switch and start the engine.
If the key is difficult to turn, rotate the wheel slightly to
the right or left to disengage the lock.

NOTE:

If you turned the wheel to the right to engage

the lock, you must turn the wheel slightly to the right to
disengage it. If you turned the wheel to the left to engage
the lock, turn the wheel slightly to the left to disengage it.

THINGS TO KNOW BEFORE STARTING YOUR VEHICLE

13

2

Automatic Transaxle Ignition Interlock System

This system prevents the key from being removed unless
the shift lever is in PARK and the shift knob push-button
is fully released. It also prevents shifting out of PARK
unless the key is in the ON/RUN or START positions and
you have depressed the brake pedal.

CAUTION!

An unlocked car is an invitation to thieves. Always
remove the key from the ignition and lock all the
doors when leaving the vehicle unattended.

DOOR LOCKS

Manual Door Locks

All doors are equipped with a rocker-type interior door
lock. To lock a door when leaving your vehicle, press the
rocker switch to the LOCK position and close the door.

NOTE:

To avoid accidentally locking your keys in the

vehicle, make sure you have them with you before
closing any door.

WARNING!

For personal security, and safety in the event of an
accident, lock the vehicle doors as you drive as well
as when you park and leave the vehicle.

14

THINGS TO KNOW BEFORE STARTING YOUR VEHICLE

WARNING!

When leaving the vehicle always remove the key
from the ignition lock, and lock your vehicle. Do not
leave children unattended in the vehicle, or with
access to an unlocked vehicle. Unsupervised use of
vehicle equipment may cause severe personal inju-
ries and death.

Power Door Locks — If Equipped

A power door lock switch is on each front door panel.
Press this switch to lock or unlock the doors.

Central Locking/Unlocking — If Equipped

All vehicle doors are locked with the first turn of the key
to the LOCK position. The double activation feature
requires you to turn the key in the cylinder lock two
times within five seconds to UNLOCK all vehicle doors
at once.

You may disable this feature and unlock all the doors
with one turn of the key by performing the following
procedure:

NOTE:

Steps 2 and 3 must be completed within 10

seconds.

1. Close all doors and place the key in the ignition
switch.

2. Cycle the ignition switch ON/OFF four times ending
in the OFF position.

3. Press the interior door lock switch to the UNLOCK
position.

Door Lock Switches

THINGS TO KNOW BEFORE STARTING YOUR VEHICLE

15

2

4. A single chime will sound to signify that you have
successfully disabled the double activation feature. You
can turn the feature back on by repeating the above
mentioned procedure.

You can turn the feature back on by repeating the above
mentioned procedure.

Automatic Door Locks — If Equipped

The doors will lock automatically if:

1. all doors are closed,

2. vehicle speed is above 15 mph (24 km/h),

3. the accelerator pedal is depressed.

The Automatic Door Locks can be enabled or disabled by
performing the following procedure:

NOTE:

Steps 2 and 3 must be completed within 10

seconds.

1. Close all doors and place the key in the ignition
switch.

2. Cycle the ignition switch ON/OFF four times ending
in the OFF position.

3. Press the interior door lock switch to the LOCK
position.

4. A single chime will sound to signify that you have
successfully completed the programming.

You can turn the feature back on by repeating the above
mentioned procedure.

16

THINGS TO KNOW BEFORE STARTING YOUR VEHICLE

Child-Protection Door Lock System (Rear Doors)

To provide a safer environment for children riding in the
rear seat, the rear doors of your vehicle have the child-
protection door lock system.

To use the system, open each rear door and slide the
control UP to engage the locks and DOWN to disengage
the child-protection locks. When the system on a door is
engaged, that door can only be opened by using the
outside door handle even if the inside door lock is in the
unlocked position.

WARNING!

Avoid trapping anyone in a vehicle in a collision.
Remember that the rear doors can only be opened
from the outside when the child protection locks are
engaged.

NOTE:

For emergency exit with the system engaged,

move the door lock rocker switch to the UNLOCK
position, roll down the window and open the door with
the outside door handle.

Child Lock Control

THINGS TO KNOW BEFORE STARTING YOUR VEHICLE

17

2

INTERNAL EMERGENCY TRUNK LID RELEASE

WARNING!

Do not allow children to have access to the trunk,
either by climbing into the trunk from outside, or
through the inside of the vehicle. Always close the
trunk lid when your vehicle is unattended. Once in
the trunk, young children may not be able to escape,
even if they entered through the rear seat. If trapped
in the trunk, children can die from suffocation or
heat stroke.

As a security measure, a Trunk Internal Emergency
Release lever is built into the trunk latching mechanism.
In the event of an individual being locked inside the
trunk, the trunk can be simply opened by pulling on the
glow-in-the-dark lever attached to the trunk latching
mechanism. See picture below.

REMOTE TRUNK LID RELEASE — IF EQUIPPED

You can open the trunk from inside the vehicle by
pressing a switch located inside the glove compartment.

NOTE:

The remote trunk release feature will operate

with the ignition switch in all positions. The remote trunk
release will not operate above 5 mph.

Emergency Release

18

THINGS TO KNOW BEFORE STARTING YOUR VEHICLE

REMOTE KEYLESS ENTRY — IF EQUIPPED

This system allows you to lock or unlock the doors and
trunk or activate the panic alarm from distances up to
about 23 feet (7 meters) using a hand held transmitter.

NOTE:

A slight delay of up to two seconds can occur

before the doors or trunk will unlock.

To Unlock the Doors

Press and release the UNLOCK button once to unlock the
driver’s door. Press the button twice within 5 seconds to
unlock all doors. The interior lights also come on and
remain on for about 30 seconds when you unlock the
doors.

NOTE:

You may turn off this feature and unlock all

doors with one press of the button by following the
procedure shown in the Central Locking/Unlocking
paragraph.

To Lock the Doors

Press and release the LOCK button to lock all doors. The
park/lamps will flash and the horn will chirp to ac-
knowledge the signal.

Horn Chirp Feature

The horn chirp that signals that the doors have been
locked can be toggled on or off by using the following
procedure:

1. Insert the ignition key and turn the switch to the
ON/RUN position.

2. Press and hold the UNLOCK button on the transmitter
for 4 to 10 seconds.

3. Continue to hold the UNLOCK button and press the
LOCK button.

4. Release both buttons.

Four Button Transmitter

THINGS TO KNOW BEFORE STARTING YOUR VEHICLE

19

2

A chime will sound to signify that the feature has been
successfully completed.

To Unlock the Trunk

Press the TRUNK button on the transmitter twice to
unlock the trunk.

NOTE:

A slight delay of up to two seconds can occur

before the trunk unlatches.

Using The Panic Alarm

To turn on the panic alarm feature, press and release the
PANIC button. When the panic alarm is on the headlights
and park/lamps will flash, the horn will pulse on and off
and the interior lights will turn on.

The panic alarm will stay on for 3 minutes unless you
press the PANIC button a second time, or until vehicle
speed reaches 15 mph (24 km/h).

NOTE:

When you turn off the panic alarm by pressing

the PANIC button a second time, you may have to be
closer to the vehicle due to the radio frequency noises of
the system.

Programming Additional Transmitters

Up to four transmitters can be programmed to your
vehicle. Your new vehicle was shipped with two trans-
mitters. See your dealer for additional transmitters.

Additional transmitters can be programmed to the sys-
tem by using the following procedure:

1. Insert the key into the ignition and turn the switch to
the RUN position.

2. Press and hold the UNLOCK button on the transmitter
for between four and ten seconds.

3. Continue to hold the UNLOCK button and press the
PANIC button. A chime will sound to indicate that the
transmitter programming mode has been entered.

4. Press a button on all transmitters to be programmed to
the system, including any previously programmed trans-
mitters. A chime will sound when each transmitter has
been programmed.

5. Turn the ignition switch off to exit the transmitter
programming mode.

20

THINGS TO KNOW BEFORE STARTING YOUR VEHICLE

General Information

This device complies with FCC rules part 15. Operation is
subject to the following two conditions: (1) This device
may not cause harmful interference and (2) This device
must accept any interference that may be received, in-
cluding interference that may cause undesired operation.

If your transmitter fails to operate from a normal dis-
tance, check for these two conditions.

1. Weak batteries in transmitter. The expected life of
batteries is from one to two years.

2. Closeness to a radio transmitter such as a radio station
tower, airport transmitter, and some mobile or CB radios.

Transmitter Battery Service

The recommended replacement battery is 2016 or its
equivalent.

NOTE:

Do not touch the battery terminals that are on

the back housing or the printed circuit board.

1. With the transmitter buttons facing down, use a thin
coin or similar object to pry the two halves of the
transmitter apart. Make sure not to damage the rubber
gasket during removal.

2. Remove and replace the batteries. Avoid touching the
new batteries with your fingers. Skin oils may cause
battery deterioration. If you touch a battery, clean it with
rubbing alcohol.

Separating Transmitter Halves

THINGS TO KNOW BEFORE STARTING YOUR VEHICLE

21

2


Content      ..       1      2     ..