Dodge Ram Truck 1500-2500-3500. Manual - part 1963


  Index      Dodge     Dodge Ram Truck 1500-2500-3500 - service repair manual 2005 year


Search            


Content   ..  1961  1962  1963  1964   ..


Dodge Ram Truck 1500-2500-3500. Manual - part 1963


15. Install the headliner (9) (Refer to 23 - BODY/IN-

TERIOR/HEADLINER - INSTALLATION).

BACKLITE VENT GLASS

REMOVAL

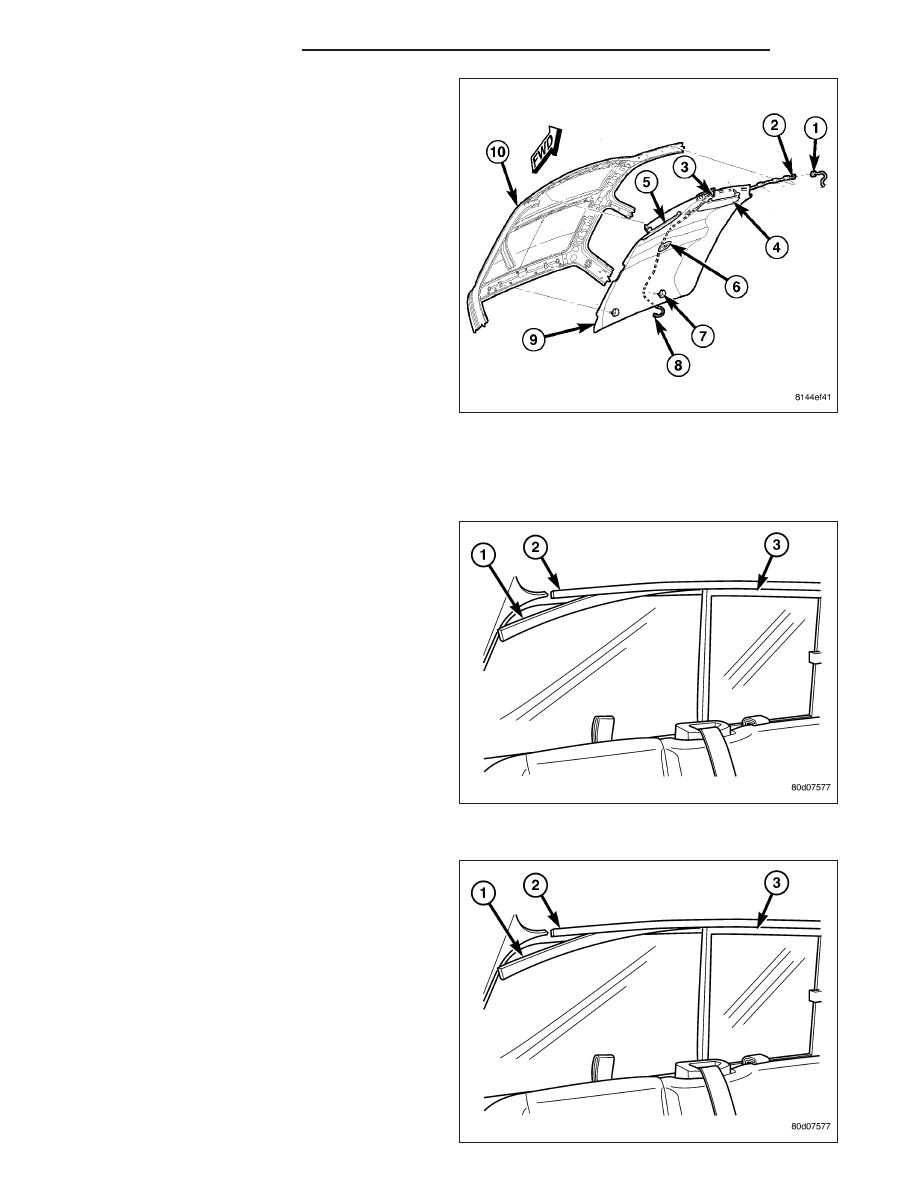
1. Slide the upper run channel (1) out of the window

frame (2).

2. Slide the vent glass (3) upward to remove from the

lower window frame (2).

3. Lower the glass (3) out of the upper window frame

(2) and remove.

INSTALLATION

1. Slide the vent glass (3) upper edge into window

frame (2) and insert the lower edge into the lower
molding.

2. Position the upper run channel (1) into the window

frame (2) and slide it into place.

3. Verify vent glass (3) operation.

23 - 206

STATIONARY GLASS

DR/DH

WINDSHIELD

WARNING

WINDSHIELD SAFETY PRECAUTIONS

Do not operate the vehicle within 24 hours of windshield installation. It takes at least 24 hours for urethane
adhesive to cure. If it is not cured, the windshield may not perform properly in an accident.

Urethane adhesives are applied as a system. Use glass cleaner, glass prep solvent, glass primer, PVC
(vinyl) primer and pinch weld (fence) primer provided by the adhesive manufacturer. If not, structural
integrity could be compromised.

DaimlerChrysler does not recommend glass adhesive by brand. Technicians should review product
labels and technical data sheets, and use only adhesives that their manufactures warranty and will
restore a vehicle to the requirements of fmvss 212. Technicians should also insure that primers and
cleaners are compatible with the particular adhesive used.

Be sure to refer to the urethane manufacturer’s directions for curing time specifications and do not
use adhesive after its expiration date.

Vapors that are emitted from the urethane adhesive or primer could cause personal injury or death.
Use them in a well-ventilated area.

Skin contact with urethane adhesive should be avoided. Personal injury or death may result.

Always wear eye and hand protection when working with glass.

Protect all painted and trimmed surfaces from coming in contact with urethane or primers.

Be careful not to damage painted surfaces when removing moldings or cutting urethane around windshield.

REMOVAL

1. Remove inside rear view mirror (3) (Refer to 23 -

BODY/INTERIOR/REAR

VIEW

MIRROR

-

REMOVAL).

2. Remove cowl grill (2) (Refer to 23 - BODY/EXTE-

RIOR/COWL GRILLE - REMOVAL).

DR/DH

STATIONARY GLASS

23 - 207

3. Remove the a-pillar weatherstrip retainer (1) (Refer

to 23 - BODY/WEATHERSTRIP/SEALS/A-PILLAR
WEATHERSTRIP RETAINER - REMOVAL).

4. Remove the a-pillar trim panels (2) (Refer to 23 -

BODY/INTERIOR/A-PILLAR TRIM - REMOVAL).

23 - 208

STATIONARY GLASS

DR/DH

5. Remove the headliner (9) and from the inside of

the vehicle, cut the upper urethane bonding from
around windshield upper edge using a suitable
sharp cold knife (C-4849). A pneumatic cutting
device can be used but is not recommended (Refer
to

23

-

BODY/INTERIOR/HEADLINER

-

REMOVAL).

6. From the outside of the vehicle, cut urethane bond-

ing from the remaining sides of the windshield
using a suitable sharp cold knife (C-4849). A pneu-
matic cutting device can be used but is not recom-
mended.

7. Separate windshield from vehicle.

INSTALLATION

WARNING: Allow the urethane at least 24 hours to
cure before returning the vehicle to use.

CAUTION: Roll down the left and right front door
glass and open the rear glass slider (if available)
before installing windshield. This is to avoid pres-
surizing the passenger compartment if a door is
slammed before the urethane is cured. The poten-
tial for water leaks can result.

The windshield fence should be cleaned of most of its
old urethane bonding material. A small amount of old
urethane, approximately 1-2 mm in height, should
remain on the fence. Do not grind off or completely
remove all old urethane from the fence, the paint fin-
ish and bonding strength will be adversely affected.

1. Place replacement windshield (1) into windshield opening and position glass in the center of the opening against

the support spacers (3). Mark the outside surface of the glass at the support spacers (3) with a grease pencil or
pieces of masking tape and ink pen to use as a reference (2) for installation. Remove replacement windshield
from windshield opening.

2. Position the windshield (1) inside up on a suitable

work surface with two padded, wood 10 cm by 10
cm by 50 cm (4 in. by 4 in. by 20 in.) blocks (3),
placed parallel 75 cm (2.5 ft.) apart.

3. Clean inside of windshield with MOPAR

T

Glass

Cleaner and lint-free cloth.

4. Apply clear glass primer 25 mm (1 in.) wide around

perimeter of windshield and wipe with a new clean
and dry lint- free cloth.

5. Apply black-out primer onto the glass using the

windshield molding as a guide. The primer should
be 15 mm (5/8 in.) wide on the top and sides of the
glass and 25 mm (1 in.) on the bottom of wind-
shield. Allow at least three minutes drying time.

DR/DH

STATIONARY GLASS

23 - 209


Content   ..  1961  1962  1963  1964   ..