Dodge Caliber. Manual - part 709


  Index      Dodge     Dodge Caliber - service repair manual 2007 year


Search            


Content   ..  707  708  709  710   ..


Dodge Caliber. Manual - part 709


6.

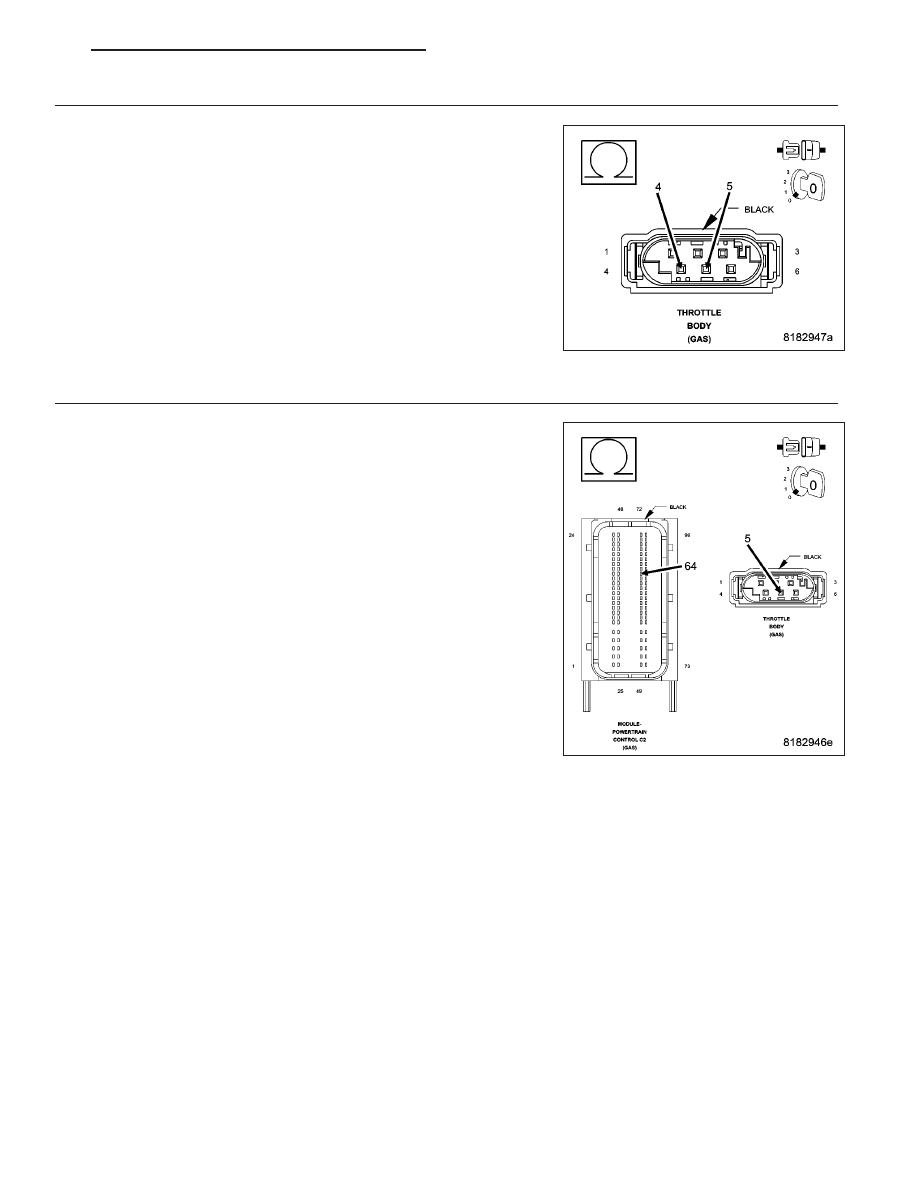
(K22) TP SIGNAL 1 CIRCUIT SHORTED TO THE (K126) ETC MOTOR (-) CIRCUIT

Measure the resistance between the (K22) TP Signal 1 circuit and the
(K126) ETC Motor (-) in the Throttle Body harness connector.

Is the resistance below 100 ohms?

Yes

>> Repair the (K22) TP Signal 1 circuit for a short to the

(K126) ETC Motor (-) circuit.

Perform the PCM Verification Test Ver. 1 (Refer to 9 -
ENGINE - DIAGNOSIS AND TESTING).

No

>> Go to 7

7.

(K22) TP SIGNAL 1 CIRCUIT OPEN OR HIGH RESISTANCE

Turn the ignition off.

Measure the resistance of the (K22) TP Signal 1 between the Throttle
Body harness connector and the Powertrain Control Module (PCM) har-
ness connector.

Is the resistance below 5.0 ohms?

Yes

>> Go to 8

No

>> Repair the (K22) TP Signal 1 for an open circuit or high

resistance.

Perform the PCM Verification Test Ver. 1 (Refer to 9 -
ENGINE - DIAGNOSIS AND TESTING).

PM

ENGINE ELECTRICAL DIAGNOSTICS - GPEC

9 - 123

8.

(K922) TP SENSOR GROUND CIRCUIT OPEN OR HIGH RESISTANCE

Measure the resistance of the (K922) TP Sensor Ground circuit
between the Throttle Body harness connector and the Powertrain Con-
trol Module (PCM) harness connector.

Is the resistance below 5.0 ohms?

Yes

>> Go to 9

No

>> Repair the (K922) TP Sensor Ground circuit for an open cir-

cuit or high resistance.

Perform the PCM Verification Test Ver. 1 (Refer to 9 -
ENGINE - DIAGNOSIS AND TESTING).

9.

THROTTLE BODY

Turn the ignition off.

Connect the Powertrain Control Module (PCM) connector.

Connect a jumper wire between the (K922) TP Sensor Ground circuit
and the (K22) TP Signal 1 circuit in the Throttle Body harness connec-
tor.

Turn the ignition on.

With the scan tool, read the TP Signal 1 circuit voltage.

Is the voltage below 1.0 volt with the jumper wire in place?

Yes

>> Replace the Throttle Body in accordance with the Service

Information.

Perform the PCM Verification Test Ver. 1 (Refer to 9 -
ENGINE - DIAGNOSIS AND TESTING).

No

>> Go to 10

10.

POWERTRAIN CONTROL MODULE (PCM)

Using the wiring diagram/schematic as a guide, inspect the wiring and connectors between the Throttle Body and
the Powertrain Control Module (PCM).

Look for any chafed, pierced, pinched, or partially broken wires.

Look for broken, bent, pushed out or corroded terminals.

Monitor the scan tool data relative to this circuit and wiggle test the wiring and connectors.

Look for the data to change or for the DTC to reset during the wiggle test.

Refer to any Technical Service Bulletins that may apply.

Were any problems found?

Yes

>> Repair as necessary.

Perform the PCM Verification Test Ver. 1 (Refer to 9 - ENGINE - DIAGNOSIS AND TESTING).

No

>> Replace and program the Powertrain Control Module (PCM) in accordance with the Service Information.

Perform the PCM Verification Test Ver. 1 (Refer to 9 - ENGINE - DIAGNOSIS AND TESTING).

9 - 124

ENGINE ELECTRICAL DIAGNOSTICS - GPEC

PM

P0125-INSUFFICIENT COOLANT TEMP FOR CLOSED-LOOP FUEL CONTROL

For a complete wiring diagram Refer to Section 8W.

When Monitored:
With the engine running and battery voltage greater than 10.4 volts.

Set Condition:
The PCM detects that the engine temperature necessary to allow closed loop fuel control has not been
reached within a set amount of time. The set time depends on start-up coolant temperature and ambient tem-
perature. Two Trip Fault. Three good trips to turn off the MIL.

Possible Causes

LOW COOLANT LEVEL

THERMOSTAT

ENGINE COOLANT TEMPERATURE SENSOR

Always perform the Pre-Diagnostic Troubleshooting procedure before proceeding. (Refer to 9 - ENGINE -
DIAGNOSIS AND TESTING).

Diagnostic Test

1.

LOW ENGINE COOLANT LEVEL

Ignition on, engine not running.

With a scan tool, select View DTCs.

NOTE: Diagnose and repair any Engine Coolant Temperature (ECT) sensor DTCs before proceeding with
this test.

NOTE: Inspect the ECT sensor and related PCM connector terminals for corrosion or damage.

NOTE: Extremely cold ambient temperatures may cause this DTC to set.

WARNING: Allow the engine to cool before opening the cooling system. The system may be under pressure.
Extreme burns or scalding may result. Failure to follow these instructions can result in personal injury or
death.
Inspect the cooling system for proper coolant level and condition.

Were any problems found?

Yes

>> Inspect the vehicle for a coolant leak. Repair as necessary in accordance with the Service Information.

Perform the PCM Verification Test Ver. 1 (Refer to 9 - ENGINE - DIAGNOSIS AND TESTING).

No

>> Go To 2

2.

ENGINE COOLANT TEMPERATURE

Ignition on, engine not running.

NOTE: Allow the engine to cool to ambient temperature before proceeding with this test.
Using the appropriate service information, determine the proper opening temperature of the thermostat.

With a scan tool, read the ECT sensor value. If the engine was allowed to cool completely, the value should be
approximately equal to the ambient temperature.

Start the engine and allow it to reach operating temperature while monitoring the ECT sensor value. The sensor
value change should be a smooth transition from start up to normal operating temperature. Also monitor the actual
coolant temperature with a thermometer.

NOTE: As the engine warms up to operating temperature, the actual coolant temperature (thermometer read-
ing) and the coolant temperature value on the scan tool should be relatively close. The thermostat should
not open until the engine reaches the temperature specified in the Service Information.

Were any problems found?

Yes

>> Repair as necessary.

Perform the PCM Verification Test Ver. 1 (Refer to 9 - ENGINE - DIAGNOSIS AND TESTING).

No

>> If no problems are found, the test is complete.

PM

ENGINE ELECTRICAL DIAGNOSTICS - GPEC

9 - 125

P0128-THERMOSTAT RATIONALITY

For a complete wiring diagram Refer to Section 8W.

When Monitored:
With the engine running and battery voltage greater than 10.4 volts.

Set Condition:
The PCM detects that the actual engine temperature is significantly different than the desired engine temper-
ature. Two Trip Fault. Three good trips to turn off the MIL.

Possible Causes

LOW COOLANT LEVEL

THERMOSTAT

ENGINE COOLANT TEMPERATURE SENSOR

Always perform the Pre-Diagnostic Troubleshooting procedure before proceeding. (Refer to 9 - ENGINE -
DIAGNOSIS AND TESTING).

Diagnostic Test

1.

LOW ENGINE COOLANT LEVEL

Ignition on, engine not running.

With a scan tool, select View DTCs.

NOTE: Diagnose and repair any temperature sensor DTCs set in the PCM or TIPM before proceeding with
this test.

NOTE: Inspect all temperature sensor and related PCM or TIPM connector terminals for corrosion or dam-
age.

NOTE: Extremely cold ambient temperatures may cause this DTC to set.

WARNING: Allow the engine to cool before opening the cooling system. The system may be under pressure.
Extreme burns or scalding may result. Failure to follow these instructions can result in personal injury or
death.
Inspect the cooling system for proper coolant level and condition.

Were any problems found?

Yes

>> Inspect the vehicle for a coolant leak. Repair as necessary in accordance with the Service Information.

Perform the PCM Verification Test Ver. 1 (Refer to 9 - ENGINE - DIAGNOSIS AND TESTING).

No

>> Go To 2

2.

ENGINE COOLANT TEMPERATURE

Ignition on, engine not running.

NOTE: Allow the engine to cool to ambient temperature before proceeding with this test.
Using the appropriate service information, determine the proper opening temperature of the thermostat.

With the scan tool, read the ECT sensor value. If the engine was allowed to cool completely, the value should be
approximately equal to the ambient temperature.

With the scan tool, read the Ambient Air Temperature (AAT) sensor value in the TIPM and the Intake Air Temper-
ature (IAT) sensor value in the PCM. With the engine at ambient temperature, all values should be approximately
the same.

NOTE: If the ambient temperature sensor value is found to be in question, be sure to drive the vehicle for
at least 5 minutes above 30 MPH to verify that the ambient temperature gets updated before continuing with
the diagnosis.
Start the engine and allow it to reach operating temperature while monitoring the temperature sensor values. The
value change for each sensor should be a smooth transition from start up to normal operating temperature. Also
monitor the actual coolant temperature with a thermometer.

9 - 126

ENGINE ELECTRICAL DIAGNOSTICS - GPEC

PM


Content   ..  707  708  709  710   ..