DAF 95XF. Manual - part 827


  Index      DAF     DAF 95XF Series - service repair manual


Search            


Content   ..  825  826  827  828   ..


DAF 95XF. Manual - part 827


1

EXTERNAL CAB COMPONENTS

Removal and installation

4-38

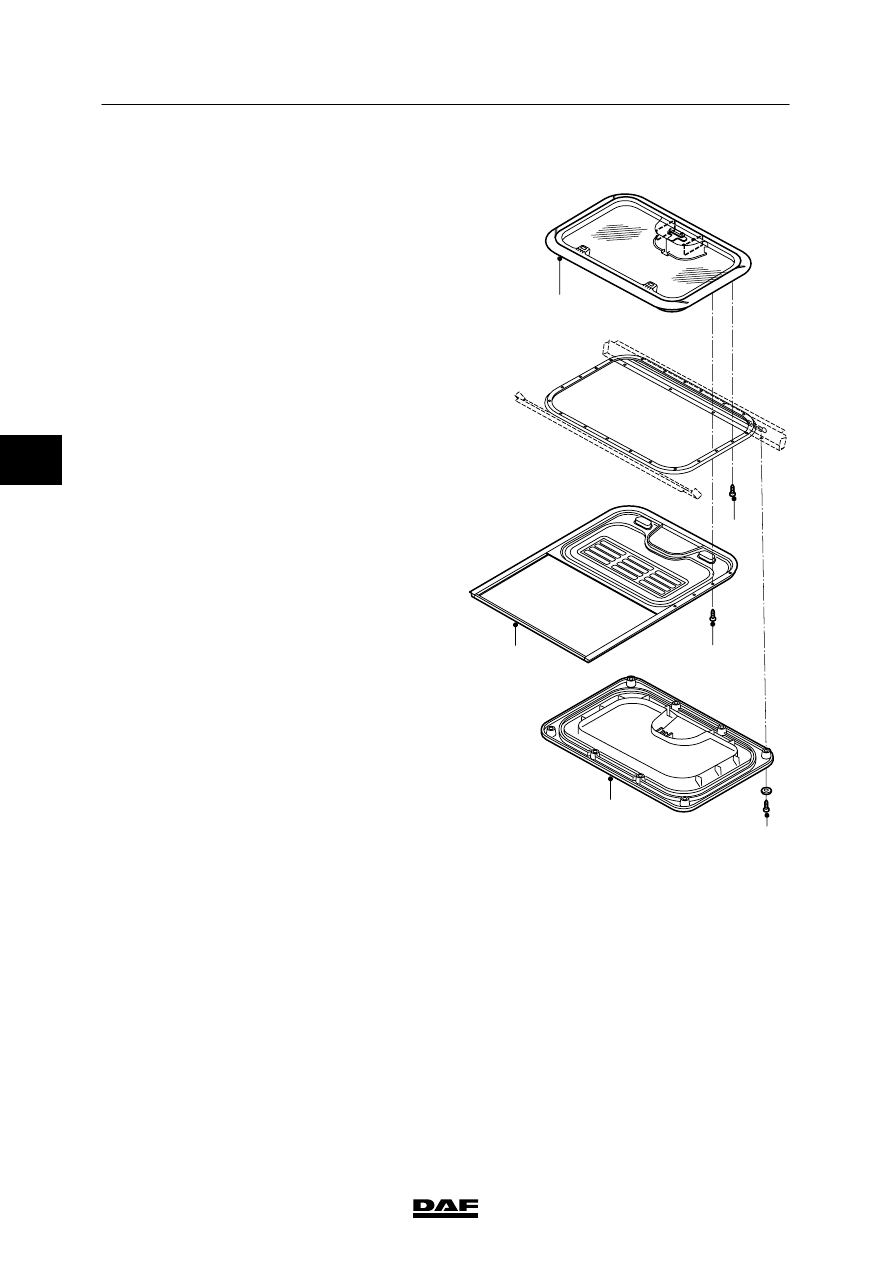
4.23 REMOVAL AND INSTALLATION, ROOF HATCH

Removing the roof hatch
1.

Remove the cover panel (2) from the roof
hatch.

2.

Remove the blind hatch (4).

3.

Remove the screws (5) on the inside of the
cab and remove the roof hatch (6).

Installing the roof hatch
1.

Install the roof hatch (6).

2.

Install the blind hatch (4) using attachment
screws (3).

3.

Install the cover panel (2) using attachment
screws (1).

K1 01 503

6

5

3

4

2

1

4

ᓻ 200345

1

Removal and installation

EXTERNAL CAB COMPONENTS

4-39

4.24 REMOVAL AND INSTALLATION, SUPER SPACE CAB ROOF

When using cleaning agents,
primers, glue removers and glues,
be sure to follow the applicable
safety instructions.

Excess cleaning agent, primer, glue
remover and glue which has not set
must be disposed of as chemical
waste. Glue which has set is not
classified as chemical waste.

Removing the Super Space Cab roof
1.

Remove the interior compartments and
interior upholstery.

2.

Disconnect the electrical connections
(wiring harnesses).

3.

Remove the electrical roof hatch.

4.

Saw off the polyester roof, approximately 10
cm from the bottom, and remove the roof
from the cab.

5.

Cut through the sealing compound between
this edge and the steel cab.

6.

Break off the polyester edge from the steel
cab in pieces.

7.

Cut away as much of the sealant remnants
as you can from the roof edge. A thin layer
may remain.

8.

Check that there is no gel coating (polyester
top coat) on the inside of the roof edge.

9.

Check that there is no finishing coat or
bitumen coating on the part to be glued.

4

ᓻ 200345

1

EXTERNAL CAB COMPONENTS

Removal and installation

4-40

Pre-treatment of cab front, cab drip channel
and polyester roof

Note:
The cab front is understood to mean the edge
above the windscreen.

1.

Clean the places to which glue is to be
applied with a clean, non-pilling cloth
moistened with the specified cleaning
agent, see ”Technical data”.

2.

Lightly sand the surface of the cab front
and polyester roof to be glued with the
specified abrasive, see ”Technical data”.

3.

Clean the sanded surface again with the
specified cleaning agent, see ”Technical
data”.

4.

Allow the cleaned surface to dry for at least
10 minutes at room temperature.

5.

Check that the surface to be glued is free of
abrasives and other impurities. If necessary,
repeat the cleaning operation.

6.

Using a brush, apply a thin, covering layer
of the specified primer to the surface of the
cab drip channel and polyester roof to
be glued, in accordance with the supplier’s
instructions, see ”Technical data”.

7.

Allow the primer layer to dry for at least 30
minutes but no more than 24 hours at room
temperature.

4

ᓻ 200345

1

Removal and installation

EXTERNAL CAB COMPONENTS

4-41

Gluing the roof to the cab
See ”Technical data” for the type of glue to be
used for the cab drip channel and the cab front
when gluing the roof onto the cab.

Pay attention to the following when installing the
roof onto the cab:
-

Depending on the space available, apply 2
triangular beads of glue to the neck of the
pre-treated cab drip channel. The beads
should measure about 8x12 mm (wxh).
Give the spraying nozzle the shape shown
in the drawing.

-

At approx. 10 mm from the top of the front
piece, apply a triangular bead of glue
measuring 8x12 mm (wxh). After positioning
the roof, apply a finishing bead of glue to
the front of the cab.

Setting:
It will take 2 days (48 hours) before
the glue is entirely set. Until then
the vehicle must not be driven.

12 mm

8 mm

K1 00 721

4

ᓻ 200345


Content   ..  825  826  827  828   ..