DAF 95XF. Manual - part 462


  Index      DAF     DAF 95XF Series - service repair manual


Search            


Content   ..  460  461  462  463   ..


DAF 95XF. Manual - part 462


3

MECHANICAL GEARBOX CONTROL (MGS)

Removal and installation

3-8

3.5 REMOVAL AND INSTALLATION, ROCKER
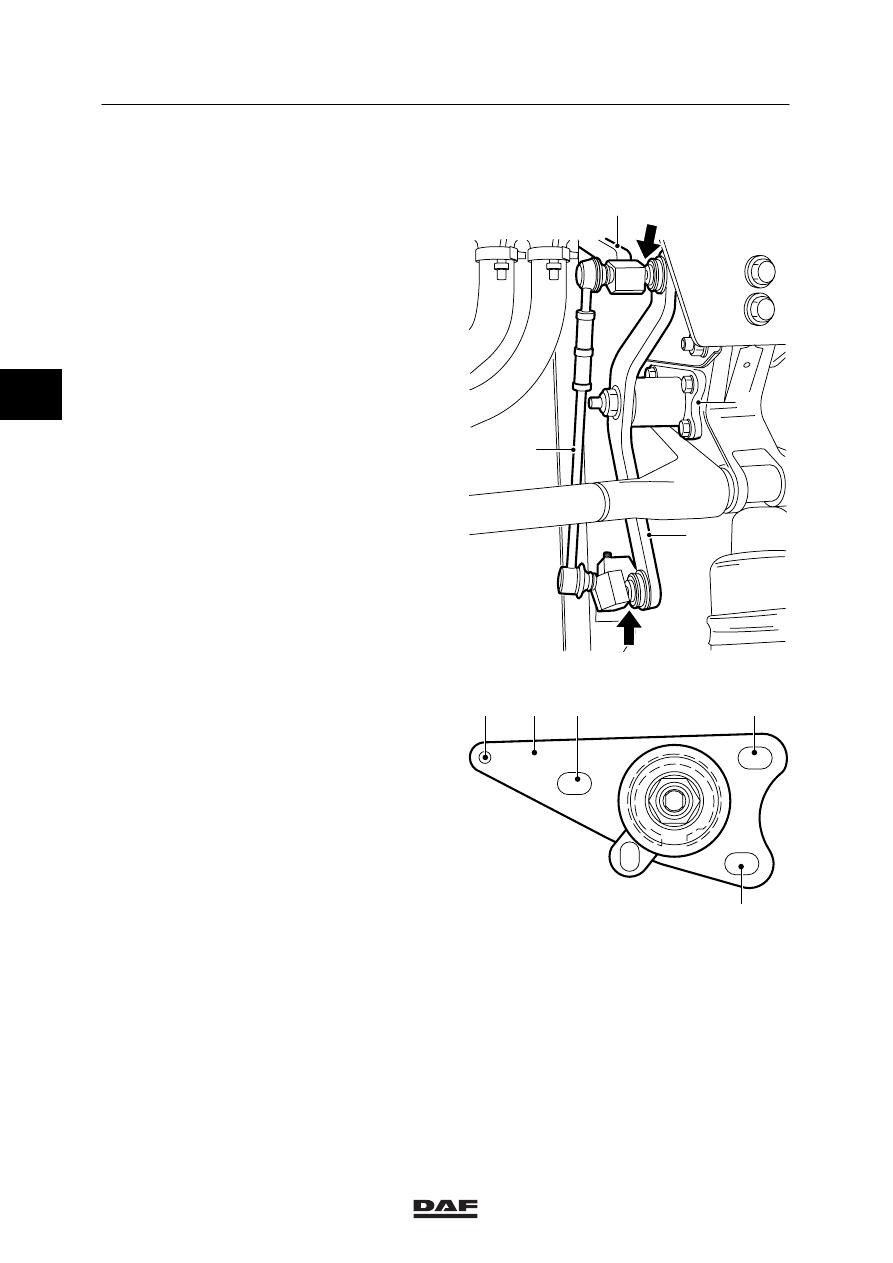
Removal, rocker
1.

Ensure that the gearbox is in neutral.

2.

Remove the lower grille.

3.

At the top, loosen the ball joint of the rocker
strip (3) on the control rod (1).

4.

At the bottom, loosen the ball joint of the
rocker strip (3) from the connection piece.

5.

Remove the fixing bolts (2) and the centring
bolt (1) from the rocker bracket (8). Remove
the entire rocker.

V300154

5

8

3

1

V300148

2

2

8

1

2

3

ǹ 0002

3

Removal and installation

MECHANICAL GEARBOX CONTROL (MGS)

3-9

6.

Remove the lock nut and remove the rocker
strip (3) from the rocker bracket (8).

Installation, rocker
1.

Install the rocker strip (3) onto the rocker
bracket (8) and tighten the lock nut to the
specified tightening torque, see main group
“Technical Data”.

2.

Install the rocker bracket assembly onto the
cab bracket.

3.

At the top, install the ball joint of the rocker
strip (3) in the control rod (1).

4.

At the bottom, install the ball joint of the
rocker strip (3) in the connection piece.

5.

Adjust the gearbox control, see chapter
“Checking and Adjusting”.

6.

Install the lower grille.

V300155

3

8

V300154

5

8

3

1

3

ǹ 0002

3

MECHANICAL GEARBOX CONTROL (MGS)

Removal and installation

3-10

3.6 REMOVAL AND INSTALLATION, CONTROL ROD

Removal, gearbox/rocker control rod
1.

Remove the lower grille.

2.

Remove the fixing bolts of the control rod on
the connection piece.

3.

Remove the castle nut from the ball joint
and disconnect the gearbox control from the
arm of the gearbox.

4.

Tilt the cab.

5.

Loosen the torque rod on the clutch
housing.

6.

Remove the control rod.

Installation, gearbox/rocker control rod
1.

Position the control rod.

2.

Install the fixing bolts of the control rod on
the connection piece.

3.

Install the ball joint in the control arm hole,
but do not fasten it yet. Install the torque rod
onto the clutch housing.

4.

Adjust the gearbox control, see chapter
“Checking and Adjusting”.

5.

Install the lower grille.

V300156

V300138

V300156

3

ǹ 0002

3

Removal and installation

MECHANICAL GEARBOX CONTROL (MGS)

3-11

Removal, gear lever/rocker control rod
1.

Loosen the ball joint of the torque rod at the
upper end of the rocker.

2.

Loosen the ball joint of the control rod on
the rocker.

3.

Tilt the cab.

4.

Loosen the engine encapsulation and lower
it onto the engine.

5.

Remove the clamping bolt (12) and remove
the control rod (1) from the gear lever.

Installation, gear lever/rocker control rod
1.

Install the control rod (1) onto the gear lever
and hand-tighten the clamping bolt (12).

2.

Install the control rod (1) onto the rocker
and hand-tighten the ball joint.

3.

Install the ball joint of the torque rod.

4.

Tighten the clamping bolt (12) to the
specified torque.

5.

Adjust the gearbox control, see chapter
“Checking and Adjusting”.

V300157

V300135

B

10

90

°

9

12

11

1

3

ǹ 0002


Content   ..  460  461  462  463   ..