Citroen C5 Dag (2010 year). Instruction - part 17
236
04
2
ABC
3
DEF
5
JKL
4
GHI
6
MNO
8
TUV
7
PQRS
9
WXYZ
0
*
#
1
RADIO
MEDIA
NAV
ESC
TRAFFIC
SETUP
ADDR
BOOK
2
ABC
3
DEF
5
JKL
4
GHI
6
MNO
8
TUV
7
PQRS
9
WXYZ
0
*
#
1
RADIO
MEDIA
NAV
ESC
TRAFFIC
SETUP
ADDR
BOOK
NAV
3
4
5
6
7
2
ABC
3
DEF
5
JKL
4
GHI
6
MNO
8
TUV
7
PQRS
9
WXYZ
0
*
#
1
RADIO
MEDIA
NAV
ESC
TRAFFIC
SETUP
ADDR
BOOK
2
ABC
3
DEF
5
JKL
4
GHI
6
MNO
8
TUV
7
PQRS
9
WXYZ
0
*
#
1
RADIO
MEDIA
NAV
ESC
TRAFFIC
SETUP
ADDR
BOOK
2
ABC
3
DEF
5
JKL
4
GHI
6
MNO
8
TUV
7
PQRS
9
WXYZ
0
*
#
1
RADIO
MEDIA
NAV
ESC
TRAFFIC
SETUP
ADDR
BOOK
2
ABC
3
DEF
5
JKL
4
GHI
6
MNO
8
TUV
7
PQRS
9
WXYZ
0
*
#
1
RADIO
MEDIA
NAV
ESC
TRAFFIC
SETUP
ADDR
BOOK
2
2
ABC
3
DEF
5
JKL
4
GHI
6
MNO
8
TUV
7
PQRS
9
WXYZ
0
*
#
1
RADIO
MEDIA
NAV
ESC
TRAFFIC
SETUP
ADDR
BOOK
8
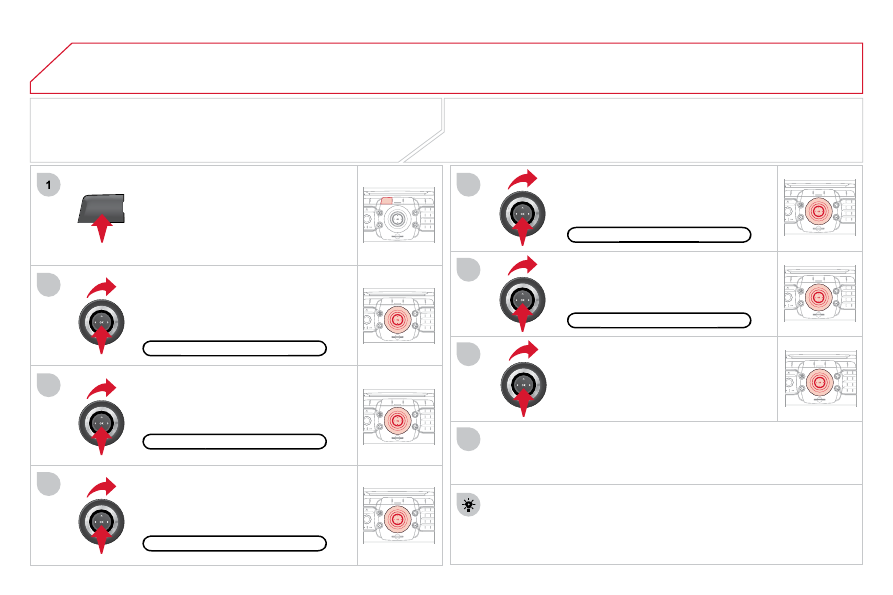
ADDING A STOPOVER
Enter a new address, for example.
Once the new address has been
entered, select "Start route guidance"
and press OK to confi rm.
Position the stopover on the list and
press OK to confi rm.
Press the NAV button.
Press the NAV button again or select
the "Navigation" Menu function and
press OK to confi rm.
Select the "Add stopover" function
(5 stopovers maximum) and press OK
to confi rm.
Select the "Stopovers" function and
press OK to confi rm.
"Navigation" Menu
"Navigation" Menu
Stopovers
Stopovers
Add stopover
Add stopover
Address input
Address input
To change the stopovers, repeat operations 1 to 3 and select
"Rearrange route" (select a stopover, delete it or move it on the list
using the ring to change the order, confi rm its new position and fi nish
with "Recalculate").
Stopovers can be added to or deleted from the route once the destination
has been selected.
Repeat operations 1 to 7 as many times as necessary then select
"Recalculate" and press OK to confi rm.
Start route guidance
Start route guidance
NAVIGATION - GUIDANCE