RAM C/V (2013 year). Manual - part 13


  Index      RAM     RAM C/V (2013 year) - manual in english


Search            copyright infringement  


Content      ..     11      12      13      14     ..


RAM C/V (2013 year). Manual - part 13


Head Restraints — Second Row Bench

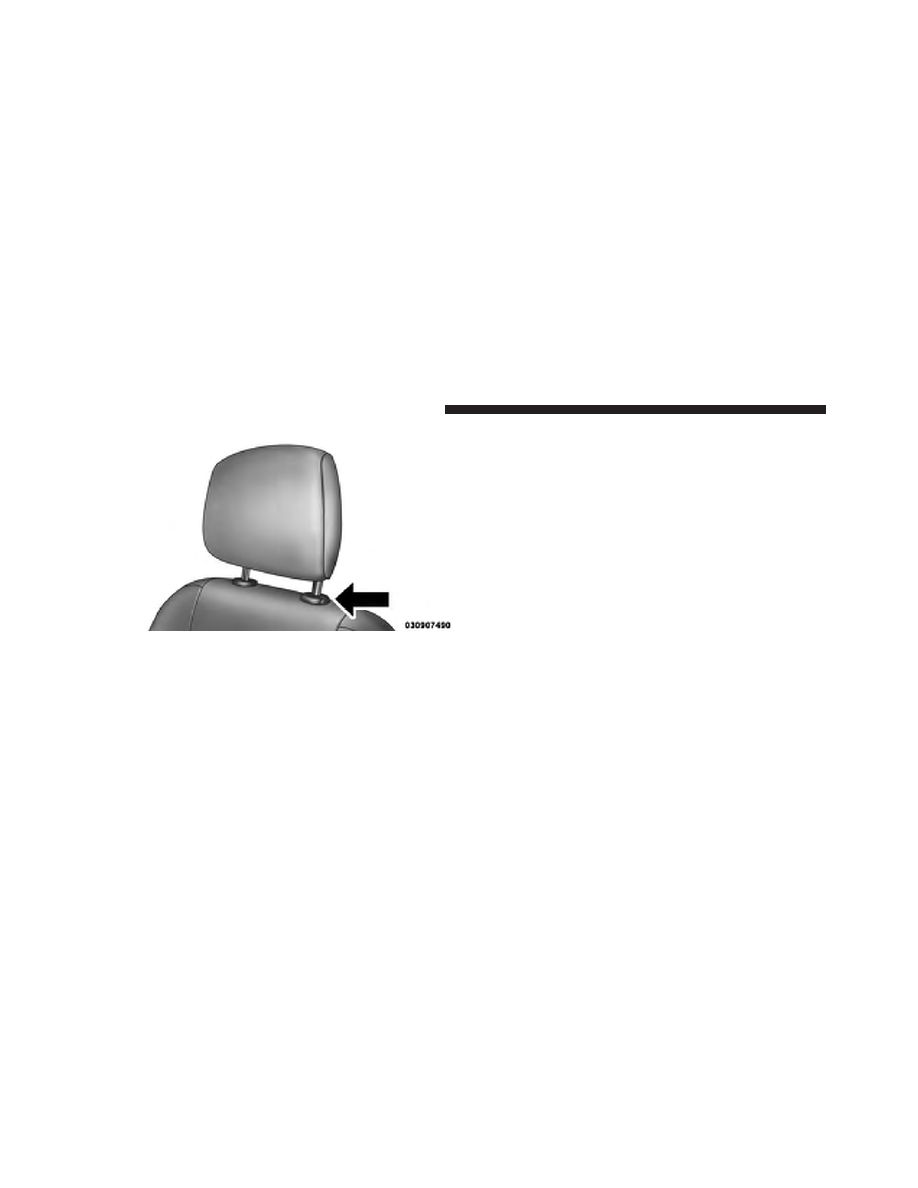
To raise the head restraint, pull upward on the head
restraint. To lower the head restraint, press the push
button, located at the base of the head restraint, and push
downward on the head restraint.

Head Restraints — Third Row

The head restraint in the center position can be raised and
lowered for tether routing. Refer to “Occupant Re-
straints” in “Things To Know Before Starting Your Ve-
hicle” for further information.

Stow ’n Go® Seating — If Equipped

On vehicles equipped with Stow ’n Go® seating, the
second and third row seats can be folded into the floor for
convenient storage.

Second Row Stow ’n Go®

On vehicles equipped with Stow ’n Go® seats, the seats
will fold and tumble in one motion.

1. Move the front seat fully forward.

2. Recline the front seatback fully forward.

3. Raise the armrests on the second row seat.

Push Button

196

UNDERSTANDING THE FEATURES OF YOUR VEHICLE

-------------------------------------------------------------------------------------------------------------------------------------------------------------

NOTE:

Seat will not stow in the storage bin unless the

armrests are raised.

4. Slide the storage bin locking mechanism to the

“LOCK” position and then pull up on the storage bin
latch to open the cover.

5. Pull upward on the seatback recliner lever located on

the outboard side of the seat.

The non-adjustable head restraint and seatback will fold
automatically during the seat tumble. No additional
actuation is necessary.

Storage Bin Cover Lock Release

Seatback Recliner Lever, Seat Tumble, And Head

Restraint Fold Lever

3

UNDERSTANDING THE FEATURES OF YOUR VEHICLE

197

-------------------------------------------------------------------------------------------------------------------------------------------------------------

The seat will automatically tumble into position for easy
storage.

Non-Adjustable Head Restraint

Automatic Folding Seatback

198

UNDERSTANDING THE FEATURES OF YOUR VEHICLE

-------------------------------------------------------------------------------------------------------------------------------------------------------------

6. Push the seat into the storage bin.

7. Close the storage bin cover.

CAUTION!

The storage bin cover must be locked and flat to
avoid damage from contact with the front seat tracks,
which have minimal clearance to the cover.

Tumbled Second Row Seat

Seat In Storage Bin

3

UNDERSTANDING THE FEATURES OF YOUR VEHICLE

199

-------------------------------------------------------------------------------------------------------------------------------------------------------------

WARNING!

In a collision, serious injury could result if the seat
storage bin covers are not properly latched.
• Do not drive the vehicle with the storage bin covers

open.

• Keep the storage bin covers closed and latched

while the vehicle is in motion.

• Do not use a storage bin latch as a tie down.

To Unstow Second Row Seats

1. Pull up on the storage bin latch to open the cover.

2. Pull up on the strap to lift the seat out of the storage

bin and push the seat rearward to latch the seat
anchors.

3. Lift the seatback to the full upright position.

4. Return the head restraint to its upright position, close

the storage bin cover and slide the storage bin locking
mechanism to the “Unlocked” position.

Stow ’n Go® Seat — Folded And Latched Position

To tumble or stow the seat from the folded and latched
position: return the seatback and head restraint to the
upright position. Then pull up on the seatback recliner
lever on the outboard side of the seat to fold head rest
and seatback and tumble seat forward.

1. Return the seatback to the upright position.

200

UNDERSTANDING THE FEATURES OF YOUR VEHICLE

-------------------------------------------------------------------------------------------------------------------------------------------------------------

2. Return the head restraint to the upright position.

3. Pull up on the seatback recliner lever on the outboard

side of the seat to fold head rest and seatback and
tumble seat forward.

Raising The Seatback

Raising The Head Restraint

3

UNDERSTANDING THE FEATURES OF YOUR VEHICLE

201

-------------------------------------------------------------------------------------------------------------------------------------------------------------

Easy Entry Second Row

The second row Stow ’n Go® seats allow easy entry to the
third row seat or rear cargo area.

Pull up on the seatback recliner lever on the outboard
side of the seat.

The seat will automatically fold into position for easy
entry into the third row.

WARNING!

In the event of a collision you could be injured if the
seat is not fully latched.

Quad Seats — If Equipped

Both Quad seats are adjustable forward or rearward. The
manual seat adjustment handle is located under the seat
cushion at the front edge of each seat.

Seatback Recliner Lever, Seat Tumble, And Head

Restraint Fold Lever

202

UNDERSTANDING THE FEATURES OF YOUR VEHICLE

-------------------------------------------------------------------------------------------------------------------------------------------------------------

While sitting in the seat, pull up on the handle and slide
the seat forward or rearward. Release the bar once you
have reached the desired position. Then, using body
pressure, move forward and rearward on the seat to be
sure that the seat adjusters have latched.

WARNING!

• Adjusting a seat while driving may be dangerous.

Moving a seat while driving could result in loss of
control which could cause a collision and serious
injury or death.

• Seats should be adjusted before fastening the seat

belts and while the vehicle is parked. Serious
injury or death could result from a poorly adjusted
seat belt.

Manual Recline

To recline, lean forward slightly, lift the lever, then push
back to the desired position and release the lever. Lean
forward and lift the lever to return the seatback to its
normal position. Using body pressure, lean forward and
rearward on the seat to be sure the seatback has latched.

Manual Seat Adjuster

3

UNDERSTANDING THE FEATURES OF YOUR VEHICLE

203

-------------------------------------------------------------------------------------------------------------------------------------------------------------

WARNING!

Do not ride with the seatback reclined so that the
shoulder belt is no longer resting against your chest.
In a collision you could slide under the seat belt,
which could result in serious injury or death.

Fold-Flat

To fold the seat, lift the recliner lever to the full upward
position and push the seatback forward until it rests on
the seat cushion.

Recline Lever

Fold-Flat Quad Seat

204

UNDERSTANDING THE FEATURES OF YOUR VEHICLE

-------------------------------------------------------------------------------------------------------------------------------------------------------------

Easy Entry

The Quad seats can be tilted forward for easy entry into
the third row. With the Quad seat in the fold-flat position,
lift up on the easy entry lever located near the bottom of
the seat and lift the seat forward.

For passengers seated in the third row, there is a pull
strap located on the outboard side of the seat near the
bottom of the seat back. Third row passengers can pull on
the strap and push the Quad seat forward for folding the
seatback and accessing the easy entry lever.

Easy Entry Lever

Pull Strap for Third Row Passengers

3

UNDERSTANDING THE FEATURES OF YOUR VEHICLE

205

-------------------------------------------------------------------------------------------------------------------------------------------------------------

Removal

The Quad seats can be removed if additional storage is
needed. With the seat in the easy entry position, lift the
cross beam forward and up to release the front anchor
latches.

Second Row Bench Seat — If Equipped

While the bench seat does not stow in the floor, it is
removable for added cargo space.

Release levers are located on the rear leg assemblies, near
the floor. To remove the seat, squeeze each release handle
and rotate downwards to deploy the wheels. A lock

Cross Beam For Seat Removal

Second Row Bench Seat

206

UNDERSTANDING THE FEATURES OF YOUR VEHICLE

-------------------------------------------------------------------------------------------------------------------------------------------------------------

indicator button pops up when the seat is unlocked. The
seat assembly can now be removed from the vehicle and
moved on its Easy Out® Rollers.

To reinstall the seat, align the seat into the detent posi-
tions on the floor. Squeeze the release handle and rotate

upward until the lock indicator button returns into the
handle.

WARNING!

If not properly latched, the bench seats could become
loose. Personal injuries could result. After reinstall-
ing these seats, be sure the red indicator button on
the release handles return into the handles.

Third Row Power Recline — If Equipped

The power recline feature, located on the side of the seat
cushion, adjusts the seatback angle forward/rearward
for occupant comfort.

Release Handles

3

UNDERSTANDING THE FEATURES OF YOUR VEHICLE

207

-------------------------------------------------------------------------------------------------------------------------------------------------------------

Third Row Power Folding Seat — If Equipped

A one-touch power folding seat switch is located in the
left rear trim panel as part of a switch bank.

NOTE:

Lower the head restraint by pulling on the

release strap marked “1” located on the outboard side of
the head restraint.

The switch is only functional when the liftgate is open
and the vehicle is in PARK.

Third Row Power Seat Switch

Head Restraint Release Strap “1”

208

UNDERSTANDING THE FEATURES OF YOUR VEHICLE

-------------------------------------------------------------------------------------------------------------------------------------------------------------

The rear switch bank allows multiple power folding and
unfolding positions for the third row seats.

Left and right third row seats can be folded individually
or together. The third row power folding seat adjusts to

the following positions using the switch bank located on
the left rear trim panel:

One Touch Folding Seat Third Row

Rear Panel Power Switch Bank

1 — Open to Normal

2 — Stow

3 — Tailgate/Fold Flat

4 — Right/Left Seats/Both
Seats

3

UNDERSTANDING THE FEATURES OF YOUR VEHICLE

209

-------------------------------------------------------------------------------------------------------------------------------------------------------------

NOTE:

• Disconnect the center shoulder belt from the small

buckle and lower the head restraints before attempting
to fold/stow the power third row seats.

• To abort seat operation while seat is in motion, press a

different seat position selector switch to stop the seat.
Once the seat stops moving, then the desired position
can be selected.

• The third row power seat system includes obstacle

detection for safe operation. When the system detects
an obstacle, the motors will stop and reverse the
motion a short distance to move the seat away from
the obstacle. Should this occur, remove the obstacle
and press the button again, for the desired position.

Manually Folding Third Row Seats — If Equipped

1. Lower the center head restraint down to the seatback

by pushing the button on the guide and pushing the
head restraint down.

2. Lower the outboard head restraints by pulling on the

release strap marked “1” located on the outboard side
of the head restraint.

210

UNDERSTANDING THE FEATURES OF YOUR VEHICLE

-------------------------------------------------------------------------------------------------------------------------------------------------------------

3. Pull release strap marked “2” located on the rear of the

seat to lower the seatback.

4. Pull release strap marked “3” to release the anchors.

Head Restraint Release Strap “1”

Release Strap “2”

3

UNDERSTANDING THE FEATURES OF YOUR VEHICLE

211

-------------------------------------------------------------------------------------------------------------------------------------------------------------


Content      ..     11      12      13      14     ..