Chrysler Pacifica (2019 year). Manual - part 29
 

  Index      Chrysler     Chrysler Pacifica (2019 year) - manual in english


Search            copyright infringement  


Content      ..     27      28      29      30     ..


Chrysler Pacifica (2019 year). Manual - part 29


Fuse Location

The fuses are grouped into a controller located in the
engine compartment.

Underhood Fuses

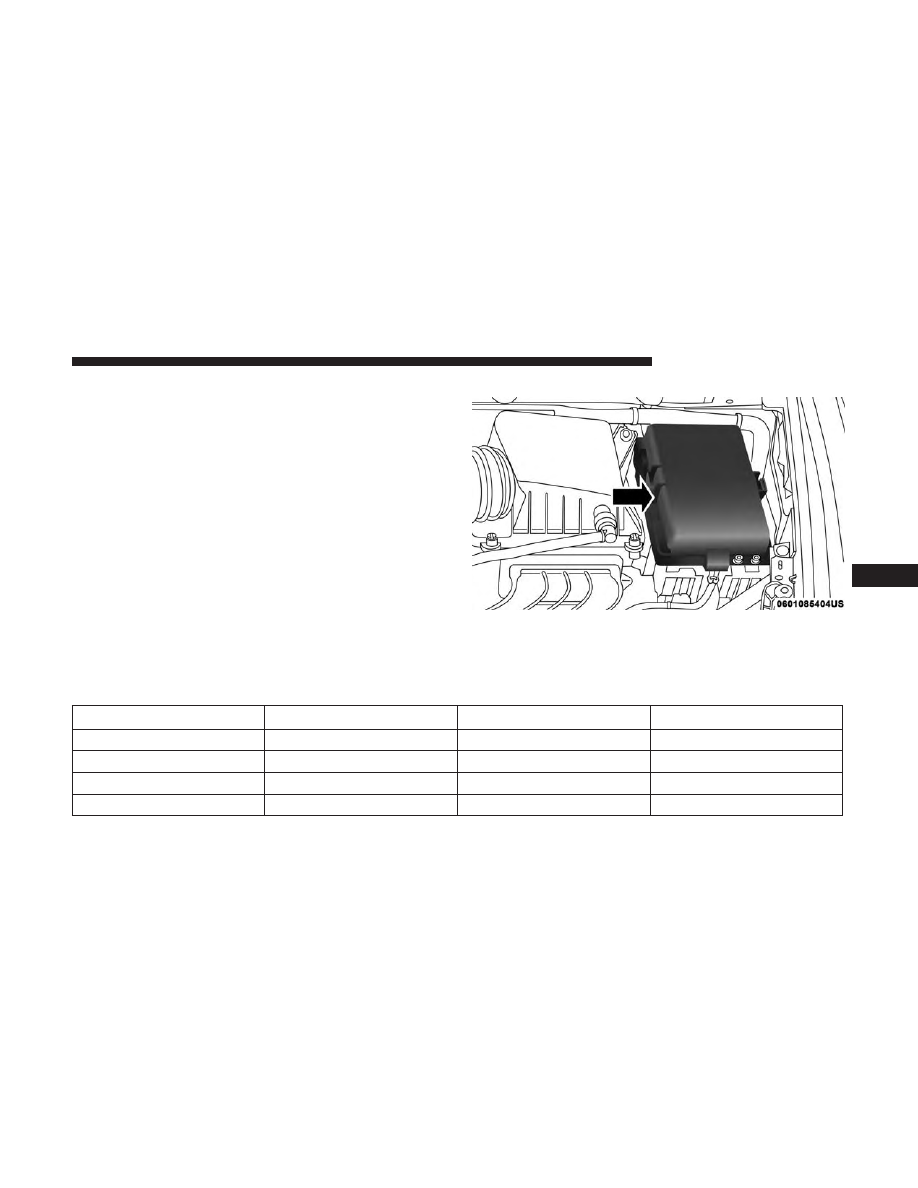
The Power Distribution Center is located in the engine
compartment near the battery. This center contains car-
tridge fuses, mini-fuses, micro-fuses, circuit breakers and
relays. A label that identifies each component is printed on
the inside of the cover.

Before any procedure is done on the PDC, make sure
engine is turned off.

Remove the cover by unlatching the two locks located at
each side of the PDC cover, avoid the usage of screw
drivers or any other tool to remove the cover, since they
may apply excessive force and result in a broken/damaged
part.

After service is done, secure the cover with its two locks.

Cavity

Cartridge Fuse

Blade Fuse

Description

F06

–

–

Not Used

F07

–

25 Amp Clear

Ignition Coil/Fuel Injector

F08

–

–

Not Used

F09

–

25 Amp Clear

Amplifier/ANC

Power Distribution Center

7

IN CASE OF EMERGENCY

457

-------------------------------------------------------------------------------------------------------------------------------------------------------------

Cavity

Cartridge Fuse

Blade Fuse

Description

F10

–

–

Not Used

F11

–

–

Not Used

F12

–

5 Amp Tan

Battery Sensor (IBS)

F13

–

10 Amp Red

ECM (ESS Only)

F14

–

10 Amp Red

ECM

F15

40 Amp Green

–

CBC Feed #3 (Power

Locks)

F16

–

20 Amp Yellow

ECM

F17

30 Amp Pink

–

Starter

F18

40 Amp Green

–

CBC Feed #4 (Exterior

Lighting #1)

F19

25 Amp Clear

–

2nd Row Folding Seats

Solenoid LT

F20

–

10 Amp Red

A/C Compressor Clutch

F21

25 Amp Clear

–

2nd Row Folding Seat

Solenoid RT

F22

–

–

Not Used

F23

–

–

Not used

F24

–

20 Amp Yellow

RR Wiper

458

IN CASE OF EMERGENCY

-------------------------------------------------------------------------------------------------------------------------------------------------------------

Cavity

Cartridge Fuse

Blade Fuse

Description

F25A

–

10 Amp Red

Handsfree LT & RT RR

Door Release Mod

F25B

–

10 Amp Red

Active Grill Shutter/ PWR

Mirror

F26

40 Amp Green

–

Front HVAC Blower Motor

F27

25 Amp Clear

–

RR Slide Door Module-RT

F28A

–

10 Amp Red

Diagnostic Report

F28B

–

10 Amp Red

USB + AUX Port / Video

USB Port

F29

–

–

Not Used

F30A

–

15 Amp Blue

Media HUB 1&2

F30B

–

15 Amp Blue

PWR Lumbar SW

F31

–

–

Not Used

F32

20 Amp Blue

–

ECM

F33

30 Amp Pink

–

Power Liftgate Module

F34

25 Amp Clear

–

RR Door Module-LT

F35

25 Amp Clear

–

Sunroof Control Module

F36

–

–

Not Used

F37

40 Amp Green

–

CBC Feed #4 (Exterior

Lighting #2)

7

IN CASE OF EMERGENCY

459

-------------------------------------------------------------------------------------------------------------------------------------------------------------

Cavity

Cartridge Fuse

Blade Fuse

Description

F38

60 Amp Yellow

–

Vacuum Cleaner

F39

25 Amp Clear

–

Rear HVAC Blower Motor

F40

–

–

Not Used

F41

–

–

Not Used

F42

40 Amp Green

–

Folding Seat Module

F43

–

20 Amp Yellow

Fuel Pump Motor

F44

30 Amp Pink

–

CBC Feed #1 (Interior

Lights)

F45

30 Amp Pink

–

Power Inverter

F46

30 Amp Pink

–

Driver Door Module

F47

30 Amp Pink

–

Passenger Door Module

F48

–

–

Not Used

F49

25 Amp Clear

–

RR Sliding Door

Module-LT

F50

25 Amp Clear

–

RR Door Module-RT

F51

30 Amp Pink

–

Front Wiper

F52

30 Amp Pink

–

Brake Vacuum Pump

F53

–

–

Not Used

F54

40 Amp Green

–

ESP-ECU And Valves

460

IN CASE OF EMERGENCY

-------------------------------------------------------------------------------------------------------------------------------------------------------------

Cavity

Cartridge Fuse

Blade Fuse

Description

F55A

–

15 Amp Blue

Radio Frequency HUB/
Keyless Ignition System

(KIN) / (Electronic Steering

Lock-BUX ONLY)

F55B

–

15 Amp Blue

DVD / Video Routing

Module (VRM

F56A

–

10 Amp Red

Front and Rear HVAC Con-

trol Module / Occupant

Classification Module

(OCM)/Electronic Steering

Lock (ESL)

F56B

–

10 Amp Red

ESP/ESC

F57

–

–

Not Used

F58

–

–

Not Used

F59

30 Amp Pink

–

Trailer Tow Receptacle — If

Equipped

F60

–

20 Amp Yellow

Rear Cargo APO

F61

–

20 Amp Yellow

Trailer Tow Right Stop/

Turn — If Equipped

F62

–

–

Not Used

7

IN CASE OF EMERGENCY

461

-------------------------------------------------------------------------------------------------------------------------------------------------------------

Cavity

Cartridge Fuse

Blade Fuse

Description

F63

–

20 Amp Yellow

Trailer Tow Left Stop/Turn

— If Equipped

F64

–

15 Amp Blue

RT HID Headlamp

F65

–

–

Not Used

F66

–

15 Amp Blue

Instrument Panel Cluster

(IPC)

F67

–

10 Amp Red

Haptic Lane Feedback

Module (HALF) / Park-

tronics System (PTS)/
Drivers Assist System

Module (DASM)

F68

–

–

Not Used

F69

–

–

Not Used

F70

–

–

Not Used

F71

–

20 Amp Yellow

Horn

F72

–

10 Amp Red

Heated Mirrors – If

Equipped

F73

30 Amp Pink

–

Rear Defroster (EBL)

F74

20 Amp Blue

–

Trailer Tow Backup

F75

–

5 Amp Tan

Overhead Console / RR

ISC

462

IN CASE OF EMERGENCY

-------------------------------------------------------------------------------------------------------------------------------------------------------------

Cavity

Cartridge Fuse

Blade Fuse

Description

F76

–

20 Amp Yellow

Uconnect/DCSD/

Telematics

F77A

–

10 Amp Red

RR Entertainment Screen 1

& 2/Media HUB 1 & 2/3rd

Row USB Charge Only/

2nd Row USB Charge

Only/Vaccum Cleaner SW/
3rd Row Recline ST SW/LT

& RT Stow N Go SW/LT &

RT Sliding Door SW Back-

light

F77B

–

10 Amp Red

Rain Sensor/Sunroof

/CRVMM

F78A

–

15 Amp Blue

Transmission Control Mod-

ule (TCM)/ E-Shifter

F78B

–

15 Amp Blue

Instrument Cluster

F79

–

10 Amp Red

ICS/Front And Rear

HVAC/ SCCM/ EPB

F80

–

–

Not Used

F81

–

–

Not Used

F82

–

–

Not Used

7

IN CASE OF EMERGENCY

463

-------------------------------------------------------------------------------------------------------------------------------------------------------------

Cavity

Cartridge Fuse

Blade Fuse

Description

F83

20 Amp Blue

–

TT Park Lights — If

Equipped

30 Amp Pink

–

Headlamp Washer Pump

— If Equipped

F84

–

–

Not Used

F85

–

20 Amp Yellow

Cigar Lighter

F86

–

–

Not Used

F87

–

–

Not Used

F88

–

20 Amp Yellow

Front Heated Seats

F89

–

20 Amp Yellow

Rear Heated Seats

F90

–

–

Not Used

F91

–

15 Amp Blue

Front Ventilated Seats/
Heated Steering Wheel

F92

–

5 Amp Tan

Security Gateway

F93

–

–

Not Used

F94

40 Amp Green

–

ESC Motor Pump

F95A

–

10 Amp Red

USB Charge Port — ACC

RUN

F95B

–

10 Amp Red

Selectable Fuse Location

464

IN CASE OF EMERGENCY

-------------------------------------------------------------------------------------------------------------------------------------------------------------

Cavity

Cartridge Fuse

Blade Fuse

Description

F96

–

10 Amp Red

Occupant Restraint Con-

troller (ORC) (Airbag)

F97

–

10 Amp Red

Occupant Restraint Con-

troller (ORC) (Airbag)

F98

–

15 Amp Blue

Left HID Headlamp

F99

30 Amp Pink

–

Trailer Tow Module - If

Equipped

F100A

–

10 Amp Red

AHLM

F100B

–

10 Amp Red

Rear Camera/LBSS/RBSS/

CVPM/Humidity

Sensor/In Vehicle Tempera-

ture Sensor

Circuit Breakers

CB1

25 Amp

Power Seats (Driver)

CB2

25 Amp *

Power Seats (Pass)

CB3

25 Amp

FRT PWR Window W/O

Door Nodes + RR PWR

Window Lockout

* 30A mini fuse is substituted for 25A Circuit Breaker.

7

IN CASE OF EMERGENCY

465

-------------------------------------------------------------------------------------------------------------------------------------------------------------

JACKING AND TIRE CHANGING — IF EQUIPPED

WARNING!

• Do not attempt to change a tire on the side of the

vehicle close to moving traffic. Pull far enough off
the road to avoid the danger of being hit when
operating the jack or changing the wheel.

• Being under a jacked-up vehicle is dangerous. The

vehicle could slip off the jack and fall on you. You
could be crushed. Never put any part of your body
under a vehicle that is on a jack. If you need to get
under a raised vehicle, take it to a service center
where it can be raised on a lift.

• The jack is designed to be used as a tool for changing

tires only. The jack should not be used to lift the
vehicle for service purposes. The vehicle should be
jacked on a firm level surface only. Avoid ice or
slippery areas.

Jack And Spare Tire Location

The jacking tools, spare tire and portable air compressor (if
equipped) or tire service kit (if equipped) are stowed
behind an access panel on the left hand side of the vehicle.

Jacking Equipment Location

466

IN CASE OF EMERGENCY

-------------------------------------------------------------------------------------------------------------------------------------------------------------

Equipment Removal

1. Remove the access panel to the jacking equipment.

2. Unlatch the Portable Air Compressor or Tire Service Kit

if equipped. Unscrew the wing nut that is holding the
Inflatable Spare Tire and gently remove it from the
storage area. Remove wrench from foam tray.

3. Remove Jack by turning the jack screw counterclockwise

to collapse from storage area that is located behind the
tire.

Preparations For Jacking

1. Park the vehicle on a firm, level surface. Avoid ice or

slippery areas.

Jacking Equipment

1 — Inflatable Spare Tire
2 — Tire Service Kit
3 — Wrench
4 — Fuel Filler Funnel

Jack Location

1 — Jack Screw
2 — Jack

7

IN CASE OF EMERGENCY

467

-------------------------------------------------------------------------------------------------------------------------------------------------------------

WARNING!

Do not attempt to change a tire on the side of the
vehicle close to moving traffic. Pull far enough off the
road to avoid being hit when operating the jack or
changing the wheel.

2. Turn on the Hazard Warning flasher.

3. Apply the parking brake.

4. Place the gear selector into PARK.

5. Place the ignition in OFF mode.

6. Block both the front and rear of the wheel diagonally

opposite the jacking position. For example, if the right
front wheel is being changed, block the left rear wheel.

NOTE:

Passengers should not remain in the

vehicle when the vehicle is being jacked.

Jacking Instructions

WARNING!

Carefully follow these tire changing warnings to help
prevent personal injury or damage to your vehicle:
• Always park on a firm, level surface as far from the

edge of the roadway as possible before raising the
vehicle.

• Turn on the Hazard Warning flasher.

• Block the wheel diagonally opposite the wheel to be

raised.

• Apply the parking brake firmly and set the transmis-

sion in PARK.

• Do not let any passenger sit in the vehicle when it is

on a jack.

• Do not get under the vehicle when it is on a jack. If

you need to get under a raised vehicle, take it to a
service center where it can be raised on a lift.

• Only use the jack in the positions indicated and for

lifting this vehicle during a tire change.

• If working on or near a roadway, be extremely

careful of motor traffic.

468

IN CASE OF EMERGENCY

-------------------------------------------------------------------------------------------------------------------------------------------------------------

CAUTION!

Do not attempt to raise the vehicle by jacking on
locations other than those indicated in the Jacking
Instructions for this vehicle.

NOTE:

Refer to “Tires” in “Servicing And Maintenance

⬙ for

information about the inflatable spare tire, its use, and
operation.

1. Loosen (but do not remove) the wheel lug nuts by

turning them to the left one turn while the wheel is still
on the ground.

Jack Warning Label

Extending The Wrench

7

IN CASE OF EMERGENCY

469

-------------------------------------------------------------------------------------------------------------------------------------------------------------

2. There are two jack engagement locations on each side of

the vehicle body. These locations are on the sill flange of
the vehicle body.

WARNING!

Being under a jacked-up vehicle is dangerous. The
vehicle could slip off the jack and fall on you. You
could be crushed. Never get any part of your body
under a vehicle that is on a jack. If you need to get
under a raised vehicle, take it to a service center where
it can be raised on a lift.

Jack Locations

Front Jack Location

470

IN CASE OF EMERGENCY

-------------------------------------------------------------------------------------------------------------------------------------------------------------

Front Jack Engaged

Rear Jacking Location

7

IN CASE OF EMERGENCY

471

-------------------------------------------------------------------------------------------------------------------------------------------------------------

CAUTION!

Do not attempt to raise the vehicle by jacking on
locations other than those indicated.

3. Place the wrench on the jack screw and turn to the right

until the jack head is properly engaged in the described
location. Do not raise the vehicle until you are sure the
jack is securely engaged.

4. Raise the vehicle by turning the jack screw to the right,

using the swivel wrench. Raise the vehicle only until the

tire just clears the surface and enough clearance is
obtained to install the compact spare tire. Minimum tire
lift provides maximum stability.

WARNING!

Raising the vehicle higher than necessary can make the
vehicle less stable. It could slip off the jack and hurt
someone near it. Raise the vehicle only enough to
remove the tire.

5. Remove the wheel lug nuts, for vehicles with wheel

covers, remove the cover from the wheel by hand. Do
not pry the wheel cover off. Then pull the wheel off the
hub.

6. Install the inflatable spare on the vehicle, located in the

rear cargo area of the vehicle.

WARNING!

To avoid the risk of forcing the vehicle off the jack, do
not tighten the wheel nuts fully until the vehicle has
been lowered. Failure to follow this warning may
result in serious injury.

Rear Jack Engaged

472

IN CASE OF EMERGENCY

-------------------------------------------------------------------------------------------------------------------------------------------------------------


Content      ..     27      28      29      30     ..