Chrysler Pacifica Hybrid (2019 year). Manual - part 35


  Index      Chrysler     Chrysler Pacifica Hybrid (2019 year) - manual in english


Search            copyright infringement  


Content      ..     33      34      35      36     ..


Chrysler Pacifica Hybrid (2019 year). Manual - part 35


Replacing The Remote Control Batteries

Each remote control requires two AAA batteries for opera-
tion.

To replace the batteries:

1. Locate the battery compartment on the back of the

remote, then slide the battery cover downward.

2. Remove the old batteries and follow battery recycling

procedures for your area.

3. Install new batteries, making sure to orient them accord-

ing to the polarity diagram shown inside the battery
compartment.

4. Replace the battery compartment cover.

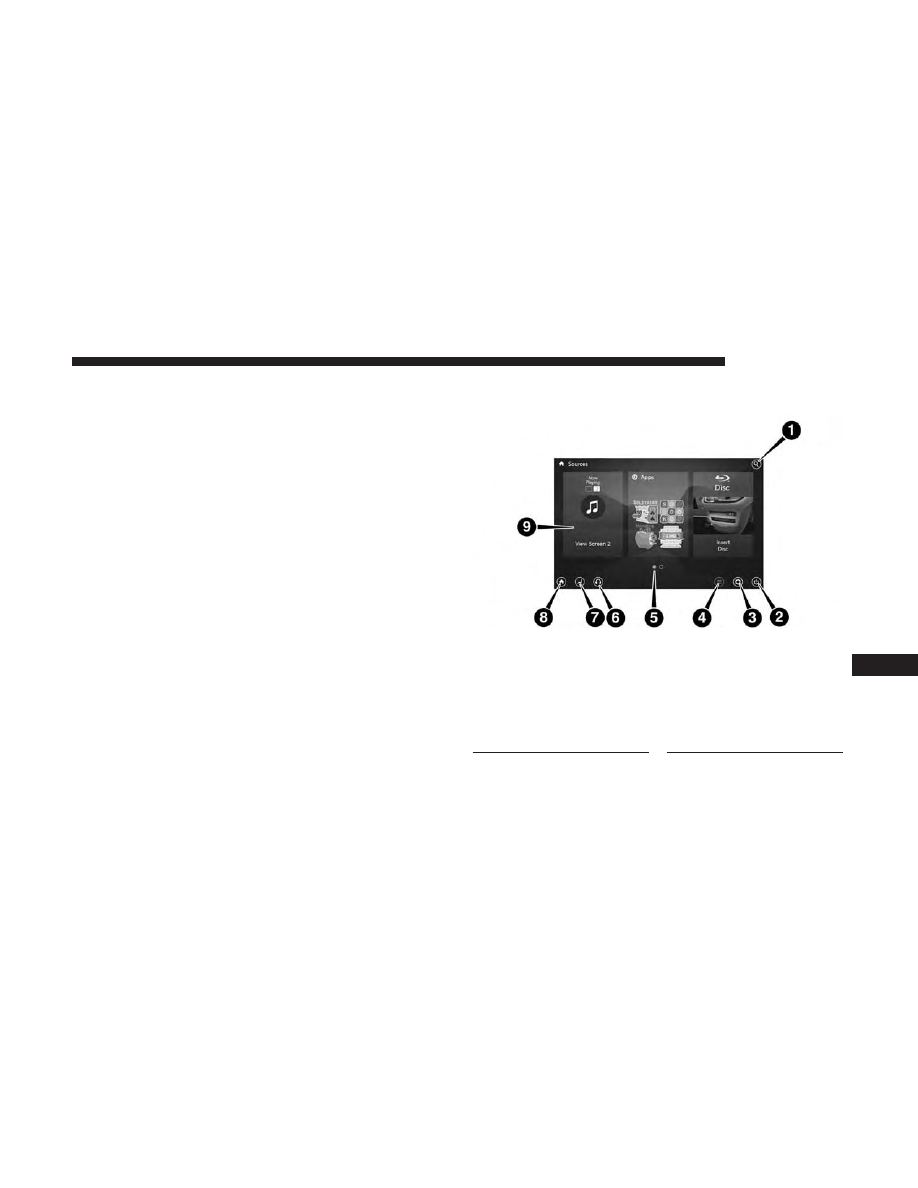
Uconnect Theater Home Screen And Controls

Uconnect Theater Home Screen (Rear Touchscreens)

1 — Search Button (Front USB
Media Search)
2 — Power Button
3 — Settings Button
4 — Toggle Button List And
Icon View

5 — Source Card Page Indicator
6 — Wired Headphone Volume
7 — Rear Climate Control But-
ton
8 — Home Button
9 — Source Cards

10

MULTIMEDIA

553

-------------------------------------------------------------------------------------------------------------------------------------------------------------

You can choose sources such as HDMI, USB, Apps, or
Blu-ray. You may also view content of the opposite screen
in one step by choosing the “View Screen” source card.

NOTE:
• Source card order can be changed by pressing the

Settings button on the touchscreen and scrolling down
to

⬙Source Card Order⬙.

• Use the “View Screen” function to pull content from one

screen to the other in a single press of a button. Doing
this however will disable and gray out certain player
controls on the screen viewing the other screen’s content.

General Settings

To change source card order, select “Source Card Reorder”,
then press and hold source card on the touchscreen, and
drag and drop in desired order.

You can also adjust settings such as:
• Brightness
• Media port lighting on and off
• Clock on and off

NOTE:

System information can also be displayed under

General Settings.

Remote Settings

Under this setting, you can access the following:
• Manage Remotes (this allows you to unpair remotes)
• Pair Remote
• Remote sensitivity (this adjusts the speed and sensitiv-

ity of cursor on screen when using gesture pad)

Source Card Selection

554

MULTIMEDIA

-------------------------------------------------------------------------------------------------------------------------------------------------------------

General Information

The following regulatory statement applies to all Radio
Frequency (RF) devices equipped in this vehicle:

This device complies with Part 15 of the FCC Rules and
with Industry Canada license-exempt RSS standard(s).
Operation is subject to the following two conditions:

1. This device may not cause harmful interference, and

2. This device must accept any interference received, in-

cluding interference that may cause undesired opera-
tion.

NOTE:

Changes or modifications not expressly approved

by the party responsible for compliance could void the
user’s authority to operate the equipment.

Play A DVD/Blu-ray Or USB Media File From
Uconnect System

1. Insert a Blu-ray disc or DVD disc into the disc player

with the label facing up, or insert a USB drive into rear
Video USB port.

NOTE:

The DVD/Blu-ray Disc player and Video USB port

are both located under the radio controls in the instrument
panel.

2. Press the “Uconnect Theater” button on the radio touch-

screen.

Refer to “Accessing The System From The Uconnect Sys-
tem” in this section for further information.

3. Select Disc or USB from the source controls (i.e. select

the desired source from the “Select Input 1” or “Select
Input 2” menu for the respective screen).

4. For DVD/Blu-ray disc – press the “Press to Enter”

feature in the Movie Snapshot on the radio touchscreen,
then press “OK” on the following screen. The steps to
start a DVD are dependent on the steps required by that
specific DVD. For USB Media Files - Press Music, Movie,
or Folders, then select media title from list(s).

5. To play a DVD/Blu-ray disc on both screens simultane-

ously, select “Disc” from both screen drop downs, or
choose “Disc Source” on one screen and push the “View
Screen” button on the other.

10

MULTIMEDIA

555

-------------------------------------------------------------------------------------------------------------------------------------------------------------

DVD Blu-ray Disc Player

1 — Disc Player (Rear)
2 — Rear Video USB Port

Source Controls From The Uconnect System — Uconnect

Theater

556

MULTIMEDIA

-------------------------------------------------------------------------------------------------------------------------------------------------------------

NOTE:

After selecting “Press to Enter” or the Movie

Snapshot, the control functions for that screen appears.
These controls only apply to the individual screen selected
and include:

1. Power

Press to turn “Selected Screen” On/Off.

2. Mute

Mute rear headphones for selected source for the current
ignition cycle. Pressing mute again will unmute rear head-
phones.

3. Lock

Press to enable/disable Remote Control functions and Rear
Touchscreen Controls for the selected source.

4. View

Select this button to view full screen video if vehicle is not
moving. Button is disabled when not viewing a video
source or when the vehicle is in motion.

5. Listen In

Select this button to play one of the rear screens audio over
the vehicle’s audio system.

NOTE:

To view video content on the radio screen, bring the

vehicle to a stop.

Uconnect System Media Control Screen

10

MULTIMEDIA

557

-------------------------------------------------------------------------------------------------------------------------------------------------------------

Disc Menu

When listening to a CD Audio disc, CD Data disc, DVD or
Blu-ray, pushing the remote control’s arrow buttons will
navigate the cursor on the rear touchscreen in the desired
direction, on whichever touchscreen is selected. The UP,
DOWN, LEFT, and RIGHT arrow buttons, and the OK and
MENU buttons on the remote, along with the correspond-
ing buttons overlaid on the radio touchscreen, can be used
to navigate the disc menu when it appears. This can be
used to select specific chapters in a movie, navigate special
features, or to play the movie from the menu.

NOTE:

Inserting a disc into the player will “auto play” the

disc if already in the

⬙Disc⬙ source menu on the rear

screens, and the disc supports “auto play.”

Blu-ray Controls – Disc Specific Functions

The four colored buttons (red, green, blue, yellow) are
designed for use with certain Blu-ray disc movie titles to
access particular features or software on the disc. See the
documentation provided with your Blu-ray disc movie to
see if these buttons can be used. The 5-way control buttons
located to the right of the four colored buttons, are used to
navigate and select items in the disc’s menu, like play
movie, scene selection, etc.

Rear Touchscreen Blu-ray Controls – Disc Specific

Functions

1 — Red Button
2 — Green Button
3 — Blue Button
4 — Yellow Button

5 — 5-Way Control Buttons
6 — Move 5-Way Controls But-
ton

558

MULTIMEDIA

-------------------------------------------------------------------------------------------------------------------------------------------------------------

Uconnect Theater Apps

Select the Apps source card to play pre-loaded games.
Pressing the “Help” button teaches users how to play each
game. Pick from games:
• Back Seat Bingo
• Checkers
• Hanging Fruit
• License Plate Game
• Math Flash Cards
• Solitaire
• Sudoku
• Tic Tac Toe

Apps Home Screen

Sudoku App Home Screen

10

MULTIMEDIA

559

-------------------------------------------------------------------------------------------------------------------------------------------------------------

NOTE:

To exit a game, press “Exit Button” then “Back

Arrow,” or “Home Button” on the touchscreen.

Are We There Yet? — Uconnect 4C NAV

When a navigation route has been set from the Uconnect
system, the second row passengers can use “Are We There

Yet?” for an animated screen showing distance and time
remaining on navigation routes, as well as the estimated
time of arrival with pop-up notifications. Notifications and
their frequency can be set up for route information by
using the arrow buttons, and can be turned on and off
using the “Notifications” button on the “Are We There
Yet?” App. Estimated time of arrival notifications pop-up
at the bottom center of the screen.

Using The Rear Video USB Port

Plug in a USB drive, iPhone, iPod or mass storage device
and play your favorite music or movies.

Are We There Yet? App

1 — Decrease Timing Between Notifications Button
2 — Notifications ON/OFF Button
3 — Increase Timing Between Notifications Button
4 — Arrival Time
5 — Time Remaining Until Destination Is Reached
6 — Distance Remaining

Rear Video USB Port

560

MULTIMEDIA

-------------------------------------------------------------------------------------------------------------------------------------------------------------

NOTE:

To view USB media on the rear theater screens,

insert a USB drive into the port next to the DVD/Blu-ray
disc player. The USB drive port is located under the radio
controls in the instrument panel.

On the rear screen you can browse the content of the USB
device by going to the USB source. Use the search feature
to find your music faster.

Play Video Games

Connect the video game console to the HDMI 1 or 2 ports,
located behind the first row seat.

NOTE:

Certain high-end video games will exceed the

power limit of the vehicle’s Power Inverter. Refer to
“Power Inverter” in “Getting To Know Your Vehicle” in
this guide for further information.

Search Screen

AUX/HDMI/USB

1 — Headphone Jack (Headphone Output Only)
2 — HDMI Port
3 — USB Port (Charge Only)

10

MULTIMEDIA

561

-------------------------------------------------------------------------------------------------------------------------------------------------------------

Headphones Operation

The headphones receive two separate channels of audio
using an infrared transmitter from the video screens.

If no audio is heard after increasing the volume control,
there are a number of things that can be done to trouble-
shoot the issue:
• Verify that the screen is turned on.
• Check to see that the channel is not muted.
• Make sure that the headphones are on.
• Verify that the headphone channel selector button is on

the desired channel. This button switches between the
audio of screen 1 and screen 2.

• Install two new AAA type batteries in the headphones.

The headphone power indicator and controls are located
on the right ear cup.

NOTE:

Uconnect Theater must be turned on before sound

can be heard from the headphones. To conserve battery life,
the headphones will automatically turn off approximately
three minutes after the Uconnect Theater system is turned
off.

Uconnect Theater Headphones

1 — Power ON/OFF Button
2 — Volume Control Wheel
3 — Channel Selector Button

562

MULTIMEDIA

-------------------------------------------------------------------------------------------------------------------------------------------------------------

Changing The Audio Mode For Headphones

1. Ensure the remote control and the headphones are on

the same channel.

2. Push the Home button on the remote control.

3. When the Home menu appears on the touchscreen, use

the arrow buttons on the remote control to navigate to
the available modes and push the OK button to select
the new mode or use the Gesture Pad at the top of the
remote control.

Replacing The Headphone Batteries

Each set of headphones requires two AAA batteries for
operation.

To replace the batteries:

1. Locate the battery compartment on the left ear cup of

the headphones, and then slide the battery cover down-
ward.

2. Remove the old batteries and follow battery recycling

procedures for your area.

3. Install new batteries, making sure to orient them accord-

ing to the polarity diagram shown inside the battery
compartment.

4. Replace the battery compartment cover.

Headphone Channel Selector Button

10

MULTIMEDIA

563

-------------------------------------------------------------------------------------------------------------------------------------------------------------

Stereo Headphone Lifetime Limited Warranty

Who Does This Warranty Cover?

This warranty covers the

initial user or purchaser (

⬙you⬙ or ⬙your⬙) of this particular

Aptiv PLC (“Aptiv”) wireless headphone (

⬙Product⬙). The

warranty is not transferable.

How Long Does the Coverage Last?

This warranty lasts as

long as you own the Product.

What Does This Warranty Cover?

Except as specified

below, this warranty covers any Product that in normal use
is defective in workmanship or materials.

What Does This Warranty Not Cover?

This warranty does

not cover any damage or defect that results from misuse,
abuse or modification of the Product other than by Aptiv.
Foam earpieces, which will wear over time through normal
use, are specifically not covered (replacement foam is
available for a nominal charge). APTIV IS NOT LIABLE
FOR ANY INJURIES OR DAMAGES TO PERSONS OR
PROPERTY RESULTING FROM THE USE OF, OR ANY
FAILURE OR DEFECT IN, THE PRODUCT, NOR IS AP-
TIV LIABLE FOR ANY GENERAL, SPECIAL, DIRECT,
INDIRECT, INCIDENTAL, CONSEQUENTIAL, EXEM-
PLARY, PUNITIVE OR OTHER DAMAGES OF ANY
KIND OR NATURE WHATSOEVER. Some states and
jurisdictions may not allow the exclusion or limitation of

incidental or consequential damages, so the above limita-
tion may not apply to you. This warranty gives you specific
legal rights. You may also have other rights, which vary
from jurisdiction to jurisdiction.

What Will Aptiv Do?

Aptiv, at its option, will repair or

replace any defective Product. Aptiv reserves the right to
replace any discontinued Product with a comparable
model. THIS WARRANTY IS THE SOLE WARRANTY
FOR THIS PRODUCT, SETS FORTH YOUR EXCLUSIVE
REMEDY REGARDING DEFECTIVE PRODUCTS, AND IS
IN LIEU OF ALL OTHER WARRANTIES (EXPRESS OR
IMPLIED), INCLUDING ANY WARRANTY FOR MER-
CHANTABILITY OR FITNESS FOR A PARTICULAR PUR-
POSE.

If you have any questions or comments regarding your
Aptiv wireless headphones, or to register your wireless
headphones, please phone:

1-248-724-5900

564

MULTIMEDIA

-------------------------------------------------------------------------------------------------------------------------------------------------------------

Display Settings

When watching a video source, pressing “Settings”

icon on the touchscreen activates the Settings menu.

These settings control the appearance of the video on
the screen. The factory default settings are already set
for optimum viewing, so there is no need to change
these settings under normal circumstances.

To change the settings, use one of the touchscreens or
remote. To reset all values back to the original settings,
select “Reset to Defaults”, then select “YES.”

Listening To Audio With The Screen Closed

To listen to only audio portion of the channel with the
screen closed:
• Set the audio to the desired source and channel.
• Close the video screen.
• When the screen is reopened, the video screen will

automatically turn back on and show the appropriate
display menu or media.

If the screen is closed and there is no audio heard, verify
that the headphones are turned on (the ON indicator is
illuminated) and the headphone selector switch is on the
desired channel. If the headphones are turned on, push the

remote control’s power button to turn audio on. If audio is
still not heard, check that fully charged batteries are
installed in the headphones.

Rear Climate Controls

The rear climate controls can also be controlled using the
Uconnect Theater system. Refer to “Climate Controls” in
“Getting To Know Your Vehicle” for further information.

Rear Climate Controls

10

MULTIMEDIA

565

-------------------------------------------------------------------------------------------------------------------------------------------------------------

Icon

Description

ON

Climate Control ON Button
Press and release this button to turn the Rear Climate.

OFF

Climate Control OFF Button
Press and release this button to turn the Climate Controls off.
AUTO Button
Automatically controls the rear interior cabin temperature by adjusting airflow distribution and amount.
Toggling this function will cause the system to switch between manual mode and automatic modes. Re-
fer to “Automatic Operation” in

⬙Getting To Know Your Vehicle” for more information.

Rear Passenger Temperature Up and Down Buttons
Provides the rear passengers with independent temperature control. Press the button on the touchscreen
to increase or decrease the temperature. The temperature will get warmer as you move up toward the
red arrow and colder as you move down toward the blue arrow.

Headliner

Mode

Headliner Mode
Air comes from the outlets in the headliner. Each of these outlets can be individually adjusted to direct
the flow of air. Moving the air vanes of the outlets to one side will shut off the airflow.

566

MULTIMEDIA

-------------------------------------------------------------------------------------------------------------------------------------------------------------

Icon

Description

Bi-Level

Mode

Bi-Level Mode
Air comes from both the headliner outlets and the floor outlets.

NOTE:

In many temperature positions, the Bi-Level mode is designed to provide cooler air out of the

headliner outlets and warmer air from the floor outlets.

Floor

Mode

Floor Mode
Air comes from the floor outlets.

Blower Control
Blower Control is used to regulate the amount of air forced through the climate system. There are seven
blower speeds available. Adjusting the blower will cause automatic mode to switch to manual operation.

10

MULTIMEDIA

567

-------------------------------------------------------------------------------------------------------------------------------------------------------------

Accessibility — If Equipped

Accessibility is a feature of the DVD/Blu-ray/USB Video
system that announces a function prior to performing the
action. For further information refer to “Uconnect Settings”
in “Multimedia.”

Wireless Streaming — If Equipped

Your Uconnect Theater System may be equipped with Wire-
less Streaming functionality that allows you to project your
smartphone or tablet onto your rear Uconnect Theater touch-
screens. This Source Card will allow you to wirelessly link
your compatible Android devices to your Uconnect Theater
system and stream your device onto the touchscreens.

Choose the Wireless Streaming Source Card on your rear
Uconnect Theater touchscreen.

Wireless Streaming Source Card

568

MULTIMEDIA

-------------------------------------------------------------------------------------------------------------------------------------------------------------


Content      ..     33      34      35      36     ..