Chrysler Aspen (2009 year). Manual - part 8


  Index      Chrysler     Chrysler Aspen (2009 year) - manual in english


Search            copyright infringement  


Content      ..     6      7      8      9     ..


Chrysler Aspen (2009 year). Manual - part 8


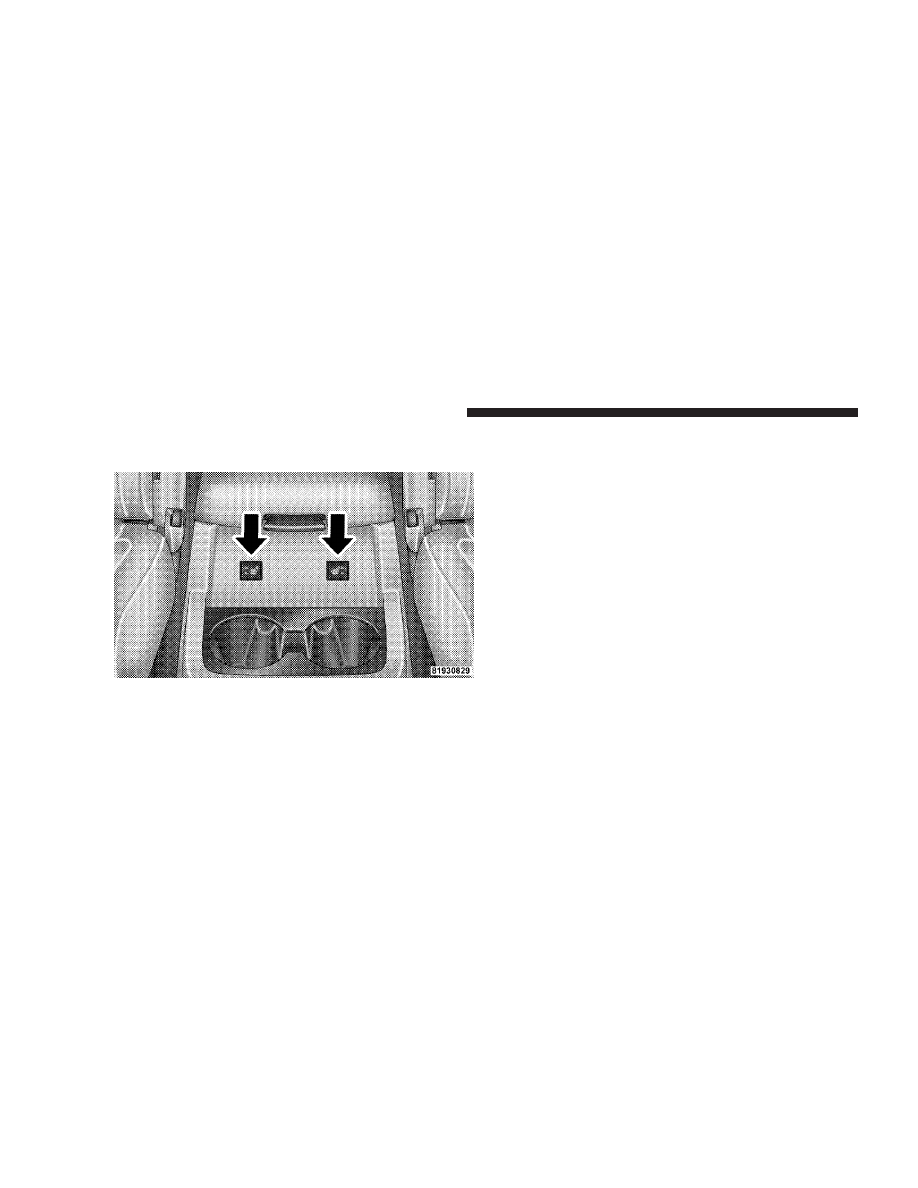
The controls for the second row heated seats are located
on the center console between the second row seats.

NOTE:

The High level setting will operate for approxi-

mately 30 minutes. After 30 minutes, the system will
automatically transition to the Low level setting. The
Low level setting will operate for 30 minutes, then the
system will turn Off.

If the Low level setting is initially selected, the system
will operate for 30 minutes and then turn off.

If the indicator light on the heated seat switch does not
light, an indicator blinks when the switch is depressed or
if the heated seats do not operate, the system should be
serviced by a qualified technician.

Second Row Heated Seats Switches

124

UNDERSTANDING THE FEATURES OF YOUR VEHICLE

-------------------------------------------------------------------------------------------------------------------------------------------------------------

WARNING!

• Persons who are unable to feel pain to the skin

because of advanced age, chronic illness, diabetes,
spinal cord injury, medication, alcohol use, ex-
haustion or other physical condition must exercise
care when using the seat heater. It may cause burns
even at low temperatures, especially if used for
long periods of time.

• Do not place anything on the seat that insulates

against heat, such as a blanket or cushion. This
may cause the seat heater to overheat.

Second Row Bucket Seats — Fold and Tumble

Second row bucket seats have seatback recliners on both
seating positions. Raising the lever allows the seatback to
be reclined an additional 11 degrees.

The second row bucket seats can be folded and tumbled
forward for easy access to the third seat or rear cargo
area.

To fold and tumble the seat, follow these steps:

1. Remove any obstructions from the floor in front of the
seat.

2. Lower the head restraint to its full downward posi-
tion.

UNDERSTANDING THE FEATURES OF YOUR VEHICLE

125

3

-------------------------------------------------------------------------------------------------------------------------------------------------------------

3. Pull up on the seatback release lever located on the
outboard side of the seat and push the seatback forward.

4. Pull up on the release handle and lift to tumble the
seat fully forward. If the seat contacts the rear of the front
seat, move the front seat forward.

To re-latch the seat, tilt the seat rearward and push down
firmly to engage the rear attachments. Then, lift the
seatback release lever and pull the seatback up to return
it to its full upright position.

Folding The Seatback

Tumbling the Seat Forward

126

UNDERSTANDING THE FEATURES OF YOUR VEHICLE

-------------------------------------------------------------------------------------------------------------------------------------------------------------

To fold and tumble the second row seats from the third
row fully raise the lever at the rear of the seat to fold the
seatback. Continue lifting the lever to release the floor
latches to tumble the seat.

WARNING!

In a collision, you or others in your vehicle could be
injured if seats are not properly latched to their floor
attachments. Always be sure the seats are fully
latched.

Second Row 40/20/40 Seat — Fold and Tumble

The 40/20/40 seat configuration is standard on all mod-
els. This seat is equipped with a unique fold-and-tumble
feature. The 40% seatbacks have spring loaded hinges
which assist with the folding of the seatbacks.

Tumble Lever

UNDERSTANDING THE FEATURES OF YOUR VEHICLE

127

3

-------------------------------------------------------------------------------------------------------------------------------------------------------------

Second row leather seats have seatback recliners at the
40% seating positions. Raising the lever allows the seat-
back to be reclined an additional 11 degrees.

To fold the 40% seatbacks, fully raise the lever on the side
of the seat to release the seatback. The seatback can now
be folded into the down position for use as a cargo floor,
or the seat can now be tumbled forward to allow access
to the rear of the vehicle.

Fold, Tumble And Recline Lever

Rear 20% Seat Pull Strap

128

UNDERSTANDING THE FEATURES OF YOUR VEHICLE

-------------------------------------------------------------------------------------------------------------------------------------------------------------

To fold the 20% seatback, pull the strap forward to release
the seatback. Fold the seatback down for use as an
armrest or to carry cargo. When returning the seatback to
the upright position, push the seatback rearward to latch
the seatback. Pull the seatback forward to ensure that it is
locked in the upright position.

WARNING!

The 20% seatback contains the center shoulder belt.
A 20% seatback that is not fully latched in the
upright position will not protect you properly.

To tumble the 40% seat, fully raise the lever on the side of
the seat to release the floor latches and tumble the seat.

Fold, Tumble And Recline Lever

UNDERSTANDING THE FEATURES OF YOUR VEHICLE

129

3

-------------------------------------------------------------------------------------------------------------------------------------------------------------

WARNING!

Do not drive the vehicle with the outer 40% second
row seats in the tumbled position. The outer 40%
second row seats are only intended to be tumbled for
entry and exit to the third row seat. Failure to follow
these instructions could result in personal injury.

NOTE:

The seatback must be fully folded into the down

position to allow the lever to be raised enough to release
the floor latches.

To fold and tumble the second row 40% seats from the
third row, fully raise the lever at the rear of the seat to
fold the seatback. Continue raising the lever to release the
floor latches to tumble the seat.

NOTE:

The head restraints must be lowered but do not

have to be removed to fold and tumble the seats.

Tumble Lever

130

UNDERSTANDING THE FEATURES OF YOUR VEHICLE

-------------------------------------------------------------------------------------------------------------------------------------------------------------

Third Row Seat Bench — If Equipped

To Fold the Seats
Folding the third seat occurs in two stages: First, the
cushion is lifted and moved forward from the pockets at
the front of the cushion. The cushion will rest on the floor
directly behind the second row seat. Second, the top of
the back is folded forward and rests on the cushion. The
back will not fold unless the cushion has been folded
forward first.

Seat Cushion Pockets

UNDERSTANDING THE FEATURES OF YOUR VEHICLE

131

3

-------------------------------------------------------------------------------------------------------------------------------------------------------------

CAUTION!

When loading cargo into the rear of your vehicle with
the third row seat folded flat, be careful not to
damage the material on the head restraints.

Seat Cushion Movement Up And Forward

Third Row Seat Folded Forward

132

UNDERSTANDING THE FEATURES OF YOUR VEHICLE

-------------------------------------------------------------------------------------------------------------------------------------------------------------

NOTE:

The seat belt buckles are hinged to fold with the

seatback.

WARNING!

• Do not sit in the third row seat unless the cushion

and back are properly engaged. Proper engage-
ment can be verified by pushing/pulling on the
upright seatback. The seatback will not move
unless properly engaged.

• Do not sit in the third row seat with the second

row seatback(s) folded or tumbled. In a collision,
you could slide under the seat belt and be seri-
ously or even fatally injured.

Third Row 60/40 Folding — If Equipped

Third Row Seat

UNDERSTANDING THE FEATURES OF YOUR VEHICLE

133

3

-------------------------------------------------------------------------------------------------------------------------------------------------------------

Third Row Seat 40% Seatback Fold

Third Row Seat Features

1 — Seatback Return Strap
2 — Seatback Release Lever

134

UNDERSTANDING THE FEATURES OF YOUR VEHICLE

-------------------------------------------------------------------------------------------------------------------------------------------------------------

Third Row Seat Folded Forward

Third Row Seat Return Pull Strap

UNDERSTANDING THE FEATURES OF YOUR VEHICLE

135

3

-------------------------------------------------------------------------------------------------------------------------------------------------------------

DRIVER MEMORY SYSTEM — IF EQUIPPED

Once programmed, the memory buttons 1 and 2 on the
driver’s door panel can be used to recall the driver’s seat
position, driver’s outside mirror position, adjustable
brake, accelerator pedals position, Automatic Tempera-
ture Control (ATC) temperature setting and radio station
preset settings. Your Remote Keyless Entry (RKE) trans-
mitters can also be programmed to recall the same
positions when the UNLOCK button is pressed.

Your vehicle was delivered with two RKE transmitters.
One or both RKE transmitters can be linked to either
memory position. The memory system can accommodate
up to two RKE transmitters, each RKE transmitter linked
to either of the two memory positions.

Memory Buttons

136

UNDERSTANDING THE FEATURES OF YOUR VEHICLE

-------------------------------------------------------------------------------------------------------------------------------------------------------------

Setting Memory Positions and Linking RKE
Transmitter to Memory

NOTE:

Each time the S (SET) button and a numbered

button (1 or 2) are pressed, you erase the memory settings
for that button and store new settings.

1. Turn the vehicle key to the ON/RUN position.

2. Adjust the driver’s seat, recliner, and both sideview
mirrors to the desired positions.

NOTE:

Not all motors may be moved at one time. Refer

to the eight-way power seat description in this section.

3. Adjust the brake and accelerator pedals to the desired
positions.

4. Turn on the radio and set the radio station presets (up
to 10 AM and 10 FM stations can be set).

5. Adjust the Automatic Temperature Control (ATC)
while the ATC is in Auto mode.

6. Press and release the SET button located on the
driver’s door.

7. Within five seconds, press and release memory button
1 or 2 on the driver’s door. The next steps must be
performed within 10 seconds if you desire to also use a
RKE transmitter to recall memory positions.

8. Turn the vehicle off and remove the key.

9. Press and release the LOCK button on one of the RKE
transmitters.

10. Insert the ignition key and turn the ignition switch to
the ON position.

11. Repeat the above steps to set the next memory
position using the other numbered memory button or to
link another RKE transmitter to memory.

NOTE:

A chime sound may be heard if Setting Memory

was inhibited for any reason.

UNDERSTANDING THE FEATURES OF YOUR VEHICLE

137

3

-------------------------------------------------------------------------------------------------------------------------------------------------------------

Memory Position Recall

NOTE:

• The driver’s seat belt must be unbuckled to recall

memory positions.

• The vehicle must be in PARK to recall memory posi-

tions.

• Not all motors may be moved at one time. Please refer

to the eight-way power seat description in this section.

To recall the memory settings for driver one, press
memory button number 1 on the driver’s door or the
UNLOCK button on the RKE transmitter linked to
memory position 1.

To recall the memory setting for driver two, press
memory button number 2 on the driver’s door or the
UNLOCK button on the RKE transmitter linked to
memory position 2.

A recall can be cancelled by pressing any of the memory
buttons on the driver’s door during a recall (S, 1, or 2), or
pressing any one of the power seat buttons, pressing the
adjustable pedals button, or pressing either the LOCK or
UNLOCK button on the RKE transmitter when not in the
ignition switch. When a recall is cancelled, the driver’s
seat, and the pedals stop moving. A delay of one second
will occur before another recall can be selected.

NOTE:

A chime sound may be heard if Setting Memory

was inhibited for any reason.

To Disable A RKE Transmitter Linked to Memory

1. Turn the ignition switch to the OFF position and
remove the key.

2. Press and release the memory SET button located on
the driver’s door.

3. Within 10 seconds, press and release the UNLOCK
button on the RKE transmitter.

138

UNDERSTANDING THE FEATURES OF YOUR VEHICLE

-------------------------------------------------------------------------------------------------------------------------------------------------------------

To disable another RKE transmitter linked to either
memory position, repeat steps 1-3 for each RKE transmit-
ter.

NOTE:

The capability to link RKE transmitters to

memory is enabled when delivered from the factory. The
capability to link RKE transmitters to memory can be
disabled (or later re-enabled) by a qualified Chrysler LLC
representative. For vehicles equipped with the Electronic
vehicle Information Center (EVIC), refer to “Personal
Settings (Customer Programmable Features)” under
“Overhead Console with Electronic Vehicle Information
Center (EVIC) – If Equipped” in Section 3.

Self-Limiting Control

To improve vehicle reliability, the memory system in-
cludes a self-limiting control for full travel positioning of
power seat and adjustable pedal movement (all direc-
tions). This self-limiting control may, however, develop
an unintended movement limitation if an obstruction is

encountered sometime during usage. One example of
such an occurrence may include a box or package ob-
structing the full rearward movement of the driver’s seat.
Once the obstruction is removed, the self-limiting control
may be restored to maximum position. The self-limiting
control may be restored by first reaching the recently
limited or obstructed position, then release and reactivate
the same button or buttons. Continued seat travel beyond
the obstructed position will indicate the recently encoun-
tered self-limitation has been cleared.

Driver Easy Exit and Easy Entry Control

This additional feature provides automatic driver’s seat
positioning which will enhance driver mobility out of
and into the vehicle. The seat cushion will move rear-
ward approximately 2.5 in (60 mm) when the key is
removed from the ignition switch. The seat will move
forward approximately 2.5 in (60 mm) when the key is
placed into the ignition and turned out of the LOCK

UNDERSTANDING THE FEATURES OF YOUR VEHICLE

139

3

-------------------------------------------------------------------------------------------------------------------------------------------------------------


Content      ..     6      7      8      9     ..