Chrysler Aspen (2009 year). Manual - part 2


  Index      Chrysler     Chrysler Aspen (2009 year) - manual in english


Search            copyright infringement  


Content      ..      1      2      3      ..


Chrysler Aspen (2009 year). Manual - part 2


3. To reassemble the transmitter case, snap the two
halves of the case together. Make sure there is an even
“gap” between the two halves. If equipped, install and
tighten the screw until snug. Test transmitter operation.

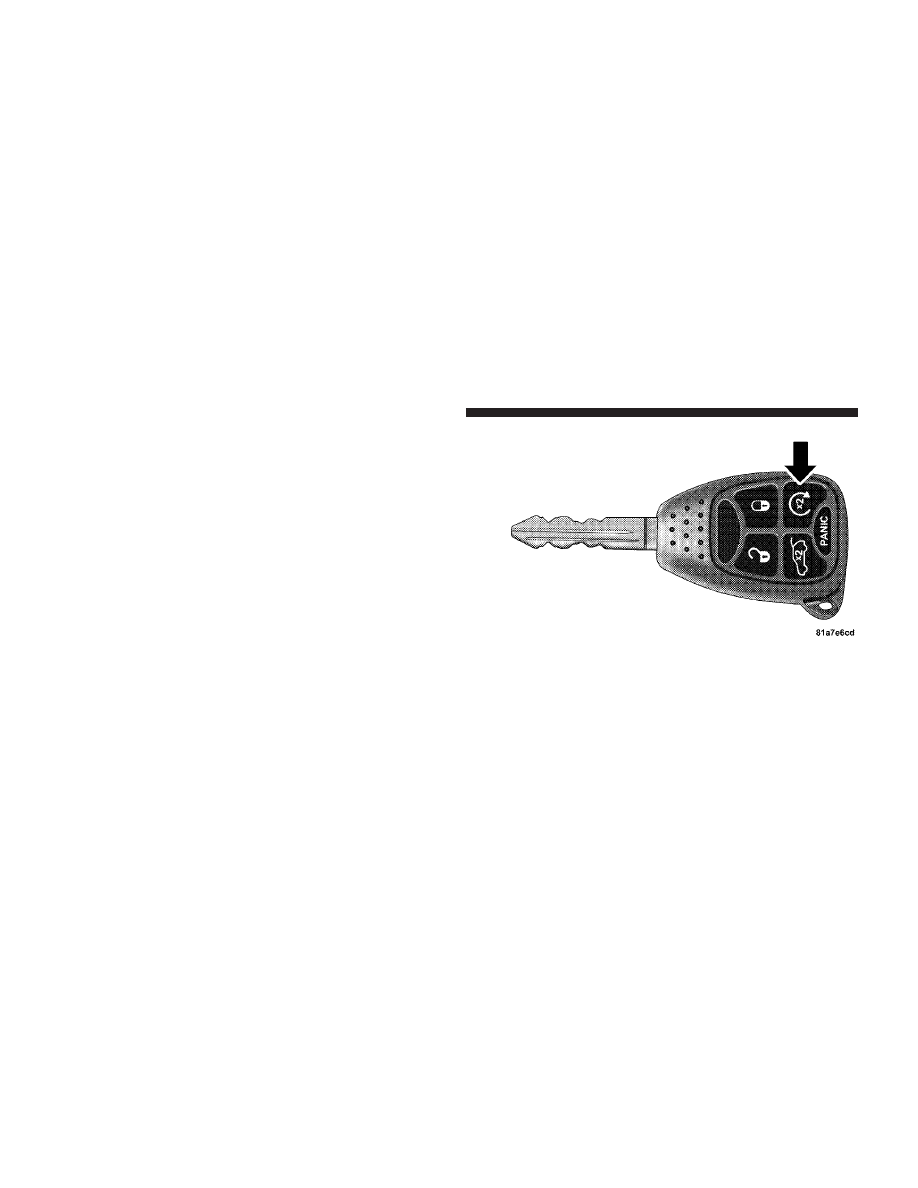
REMOTE STARTING SYSTEM — IF EQUIPPED

Your vehicle may be equipped with a remote starting
system, which will allow the vehicle to be started from
distances up to approximately 300 ft (91 m) away from
the vehicle using the Remote Keyless Entry key fob
which is part of your ignition key.

In order to remote start your vehicle, the hood, liftgate,
and all the doors must be closed.

To remote start your vehicle, press the REMOTE START
button on the key fob twice within five seconds. To
indicate that the vehicle is about to start, the parking
lights will flash and the horn will sound briefly (if
programmed).

Once the vehicle has started, the engine will run for 15
minutes. To cancel remote start, press the REMOTE
START button once.

Remote Start Transmitter

28

THINGS TO KNOW BEFORE STARTING YOUR VEHICLE

-------------------------------------------------------------------------------------------------------------------------------------------------------------

To enter the vehicle while the engine is running during a
remote start, you must first unlock the vehicle using the
UNLOCK button on the (RKE) transmitter. Then, prior to
the end of the 15-minute cycle, insert the key into the
ignition switch and turn the switch to the ON position,
otherwise the engine will cancel remote start and auto-
matically turn off.

Remote start will also cancel if any of the following occur:

• If the engine stalls or RPM exceeds 2500
• Any engine warning lamps come on
• The hood is opened
• The hazard switch is pressed
• The transmission is moved out of PARK

The vehicle can be started remotely up to a maximum of
two times. The vehicle is also allowed a maximum of one
failed start, where the remote start sequence was initiated
but the engine stopped cranking without starting. After
either of these conditions, or if the Security Alarm System
is alarming or if the PANIC button was pressed, the
vehicle must be reset by inserting a valid key into the
ignition and moving it to the RUN position, then back to
LOCK.

THINGS TO KNOW BEFORE STARTING YOUR VEHICLE

29

2

-------------------------------------------------------------------------------------------------------------------------------------------------------------

DOOR LOCKS

Manual Door Locks

All the doors can be “manually” locked from the inside
by pushing down the door lock plunger, located at the
rear of the door. Both front doors may be opened from the
inside with the door lock plunger in the down or locked
position.

WARNING!

• For personal security and safety in the event of an

accident, lock the vehicle doors when you drive as
well as when you park and leave the vehicle.

• Never leave unattended children alone in a ve-

hicle. Leaving children in a vehicle is dangerous
for a number of reasons. A child or others could be
seriously or fatally injured. Don’t leave the keys in
the ignition. A child could operate power win-
dows, other controls, or move the vehicle.

Power Door Locks

A power door lock switch is on each front door trim
panel. Use this switch to lock or unlock the doors.

If you press the power door lock switch while the key is
in the ignition and any front door is open, the power

Power Door Lock Switch

30

THINGS TO KNOW BEFORE STARTING YOUR VEHICLE

-------------------------------------------------------------------------------------------------------------------------------------------------------------

locks will not operate. This prevents you from acciden-
tally locking your keys in the vehicle. Removing the key
or closing the door will allow the locks to operate. A
chime will sound if the key is in the ignition switch and
a door is open, as a reminder to remove the key.

Automatic Door Locks
If this feature is enabled, your door locks will lock
automatically when the vehicle’s speed exceeds 15 mph
(24 km/h).

Automatic Door Lock Programming
This feature is enabled when your vehicle is shipped
from the assembly plant and can be disabled by follow-
ing these procedures:

• For vehicles equipped with the Electronic Vehicle

Information Center (EVIC), refer to “Personal Settings
(Customer Programmable Features)” under “Over-
head Console with Electronic Vehicle Information
Center (EVIC) – If Equipped” in Section 3.

• For vehicles not equipped with the EVIC:

1. Enter your vehicle and close all doors.

2. Fasten your seat belt. Fastening the seat belt will
cancel any chiming that may confuse you during this
programming procedure.

3. Place the key into the ignition.

4. Within 10 seconds, cycle the key from the LOCK
position to the ON position a minimum of four times,
ending in the LOCK position (do not start the engine).

5. Within 30 seconds, press the driver’s door lock switch
in the LOCK direction.

6. A single chime will be heard to indicate the feature has
been disabled.

7. To reactivate this feature, repeat the above steps.

THINGS TO KNOW BEFORE STARTING YOUR VEHICLE

31

2

-------------------------------------------------------------------------------------------------------------------------------------------------------------

8. If a chime is not heard, the program mode was
canceled before the feature could be disabled. If neces-
sary, repeat the above procedure.

Auto Unlock On Exit — If Equipped
This feature unlocks all of the doors of the vehicle when
any door is opened (excluding the liftgate). This will
occur only after the vehicle has been shifted into the
PARK position after the vehicle has been driven (shifted
out of PARK and all doors closed).

This feature will not operate if there is any manual
operation of the power door locks (LOCK or UNLOCK).

Auto Unlock On Exit Programming — If Equipped
Customer programming sequence to enable or disable
the Auto Unlock feature:

• For vehicles equipped with the Electronic Vehicle

Information Center (EVIC), refer to “Personal Settings

(Customer Programmable Features)” under “Over-
head Console with Electronic Vehicle Information
Center (EVIC) – If Equipped” in Section 3.

• For vehicles not equipped with the EVIC, performing

the following procedure:

1. Enter your vehicle and close all doors.

2. Fasten your seat belt. Fastening the seat belt will
cancel any chimes that may be confusing during this
programming procedure.

3. Insert the key into the ignition.

4. Within 15 seconds, cycle the key from the LOCK
position to the ON position a minimum of four times,
ending in the LOCK position (do not start the engine).

5. Within 30 seconds, press the driver’s door lock switch
in the UNLOCK direction.

32

THINGS TO KNOW BEFORE STARTING YOUR VEHICLE

-------------------------------------------------------------------------------------------------------------------------------------------------------------

6. A single chime will sound to indicate the feature has
been changed.

7. Repeat the above steps to alternate the availability of
this feature.

8. If a chime is not heard, the program mode was
canceled before the feature could be changed. If neces-
sary, repeat the above procedure.

Child Protection Door Lock

To provide a safer environment for children riding in the
rear seat, the rear doors of your vehicle have the child
protection door lock system.

To use the system, open each rear door and slide the
control UP to engage the locks and DOWN to disengage
the child protection locks. When the system on a door is
engaged, that door can only be opened by using the
outside door handle even if the inside door lock is in the
unlocked position.

Child Lock

THINGS TO KNOW BEFORE STARTING YOUR VEHICLE

33

2

-------------------------------------------------------------------------------------------------------------------------------------------------------------

WARNING!

Avoid trapping anyone in a vehicle in a collision.
Remember that the rear doors can only be opened
from the outside when the child protection locks are
engaged.

NOTE:

After setting the child protection door lock

system, always test the door from the inside to make
certain it is in the desired position.

NOTE:

For emergency exit with the system engaged,

move the door lock switch to the UNLOCK position, roll
down the window and open the door with the outside
door handle.

WINDOWS

Power Windows

The control on the left front door has up-down switches
that give you finger tip control of all four power win-
dows. There is a single opening and closing switch on the
passenger doors for passenger window control. The

Power Window Switch

34

THINGS TO KNOW BEFORE STARTING YOUR VEHICLE

-------------------------------------------------------------------------------------------------------------------------------------------------------------

windows will operate only when the ignition switch is
turned to the ON position and for ten minutes after the
ignition is turned OFF or the driver’s door is opened.

NOTE:

The Power Accessory Delay feature (ten-minute

delay) can be programmed On or Off by your authorized
dealer. If the vehicle is equipped with an Electronic
Vehicle Information Center (EVIC, the customer can
program this feature On or Off. For details, refer to
“Personal Settings (Customer Programmable Features)”
under “Overhead Console with Electronic Vehicle Infor-
mation Center (EVIC) – If Equipped” in Section 3.

WARNING!

Never leave children alone in a vehicle. Leaving
unattended children in a vehicle is dangerous for a
number of reasons. A child or others could be seri-
ously or fatally injured. Don’t leave the keys in the
ignition. A child could operate power windows,
other controls, or move the vehicle.

Auto Down

The driver’s and front passenger window switch has an
Auto Down feature. Push the window switch past the
first detent, release, and the window will go down
automatically. To cancel the Auto Down movement,
operate the switch in either the up or down direction and
release the switch.

THINGS TO KNOW BEFORE STARTING YOUR VEHICLE

35

2

-------------------------------------------------------------------------------------------------------------------------------------------------------------

Auto Up Feature with Anti-Pinch Protection
(Driver’s and Front Passenger Door Only)

Lift the window switch to the second detent, release, and
the window will go up automatically.

To stop the window from going all the way up during the
Auto Up operation, push down on the switch briefly.

To close the window part way, lift the window switch to
the first detent and release when you want the window to
stop.

NOTE:

If the window runs into any obstacle during the

auto-closure, it will reverse direction and then stop.
Remove the obstacle and use the window switch again to
close the window. Any impact due to rough road condi-
tions may trigger the auto reverse function unexpectedly
during auto-closure. If this happens, pull the switch
lightly to the first detent and hold to close the window
manually.

WARNING!

There is no anti-pinch protection when the window
is almost closed. Be sure to clear all objects from the
window before closing.

Resetting the Auto Up Feature
Should the Auto Up feature stop working, the window
probably needs to be reset. To reset Auto Up:

Pull the window switch up and close the window com-
pletely, then pull and hold the switch for one second.

Window Lockout Switch

The window lockout switch on the driver’s door allows
you to disable the window control on the other doors. To
disable the window controls on the other doors, press the
window lockout switch. To enable the window controls,
press the window lockout switch again.

36

THINGS TO KNOW BEFORE STARTING YOUR VEHICLE

-------------------------------------------------------------------------------------------------------------------------------------------------------------

LIFTGATE

The liftgate can be unlocked using the Remote Keyless
Entry (RKE) Transmitter or by activating the power door
lock switches located on the front doors.

NOTE:

When the engine is running from a remote start

(if equipped), the vehicle must first be unlocked by

pressing the remote transmitter UNLOCK button prior to
activating the power liftgate; otherwise, the engine will
stop automatically.

Once unlocked, the liftgate can be opened or closed. To
open the liftgate, pull the exterior handle and open the
liftgate with one fluid motion.

Window Lockout Switch

Power Liftgate Button

THINGS TO KNOW BEFORE STARTING YOUR VEHICLE

37

2

-------------------------------------------------------------------------------------------------------------------------------------------------------------

The liftgate will not manually open if the vehicle is in
gear or the vehicle speed is above 0 mph (0 km/h).

NOTE:

If the liftgate is locked and is not equipped with

a powered liftgate, pressing the button on the RKE
Transmitter will result in the liftgate becoming unlocked
for 30 seconds allowing you to manually access the
liftgate area. The liftgate will re-lock automatically within
10 seconds once the liftgate is closed.

Power Liftgate — If Equipped

The power liftgate may be opened manually or by using
the button on the RKE Transmitter. Press the power
liftgate button on the RKE Transmitter twice within five
seconds, to open the power liftgate. Once the liftgate is
fully open, pressing the power liftgate button twice
within five seconds a second time will close the liftgate.

When the RKE Transmitter power liftgate button is
pressed two times and the “Lamp Flash” feature is
enabled, the turn signals will flash twice to signal that the
liftgate is opening or closing.

The power liftgate may also be opened by pressing the
switch located on the overhead console.

Power Liftgate Switch

38

THINGS TO KNOW BEFORE STARTING YOUR VEHICLE

-------------------------------------------------------------------------------------------------------------------------------------------------------------

WARNING!

During power operation, personal injury or cargo
damage may occur. Ensure the liftgate travel path is
clear. Make sure the liftgate is closed and latched
before driving away.

NOTE:

• If anything obstructs the power liftgate while it is

closing or opening, the liftgate will automatically
reverse to the closed or open position, provided it
meets sufficient resistance.

• There are also pinch sensors attached to the side of the

liftgate. Light pressure anywhere along these strips
will cause the liftgate to return to the open position.

• The power liftgate must be in the full open position in

order to power close. If the liftgate is not fully open,

press the RKE Transmitter or overhead console button
to fully open the liftgate and then press again to close.

• If the liftgate handle is pulled while the power liftgate

is closing, the liftgate will reverse to the full open
position.

• If the liftgate handle is pulled while the power liftgate

is opening, the liftgate motor will disengage to allow
manual operation.

• The power liftgate buttons will not operate if the

vehicle is in gear or the vehicle speed is above 0 mph
(0 km/h).

• The power liftgate will not operate in temperatures

below

222°F (230°C) or temperatures above 150°F

(65°C). Be sure to remove any buildup of snow or ice
from the liftgate before pressing any of the power
liftgate buttons.

THINGS TO KNOW BEFORE STARTING YOUR VEHICLE

39

2

-------------------------------------------------------------------------------------------------------------------------------------------------------------

• If the power liftgate encounters multiple obstructions

within the same cycle, the system will automatically
stop and must be opened or closed manually.

• If your liftgate is power closing and you put the

vehicle in gear, the liftgate will continue to power
close. However, vehicle movement may result in a
detection of an obstruction.

WARNING!

• Driving with the liftgate open can allow poison-

ous exhaust gases into your vehicle. You and your
passengers could be injured by these fumes. Keep
the liftgate closed when you are operating the
vehicle.

• If you are required to drive with the liftgate open,

make sure that all windows are closed and the
climate control blower switch is set at high speed.
DO NOT use the recirculation mode.

Gas props support the liftgate in the open position.
However, because the gas pressure drops with tempera-
ture, it may be necessary to assist the props when
opening the liftgate in cold weather.

OCCUPANT RESTRAINTS

Some of the most important safety features in your
vehicle are the restraint systems. These include the front
and rear seat belts for the driver and all passengers, knee
bolsters, front airbags for both the driver and front
passenger, and left and right side curtain airbags for the
driver and passengers seated next to a window. If you
will be carrying children too small for adult-size seat
belts, your seat belts or the LATCH feature (refer to the
“Child Restraint” in this section), can be used to hold
infant and child restraint systems.

40

THINGS TO KNOW BEFORE STARTING YOUR VEHICLE

-------------------------------------------------------------------------------------------------------------------------------------------------------------

Please pay close attention to the information in this
section. It tells you how to use your restraint system
properly to keep you and your passengers as safe as
possible.

WARNING!

In a collision, you and your passengers can suffer
much greater injuries if you are not properly buckled
up. You can strike the interior of your vehicle or other
passengers, or you can be thrown out of the vehicle.
Always be sure you and others in your vehicle are
buckled up properly.

Buckle up even though you are an excellent driver, even
on short trips. Someone on the road may be a poor driver
and cause a collision that includes you. This can happen
far away from home or on your own street.

Research has shown that seat belts save lives, and that
they can reduce the seriousness of injuries in a collision.
Some of the worst injuries happen when people are
thrown from the vehicle. Seat belts reduce the possibility
of ejection and the risk of injury caused by striking the
inside of the vehicle. Everyone in a motor vehicle should
be belted at all times.

Lap/Shoulder Belts

All seating positions in your vehicle have combination
lap/shoulder belts. The belt webbing retractor is de-
signed to lock during very sudden stops or collisions.
This feature allows the shoulder part of the belt to move
freely with you under normal conditions. But in a colli-
sion, the belt will lock and reduce the risk of your striking
the inside of the vehicle or being thrown out.

THINGS TO KNOW BEFORE STARTING YOUR VEHICLE

41

2

-------------------------------------------------------------------------------------------------------------------------------------------------------------

WARNING!

It is extremely dangerous to ride in a cargo area,
inside or outside of a vehicle. In a collision, people
riding in these areas are more likely to be seriously
injured or killed.
Do not allow people to ride in any area of your
vehicle that is not equipped with seats and seat belts.
Be sure everyone in your vehicle is in a seat and
using a seat belt properly.

WARNING!

• Wearing a seat belt incorrectly is dangerous. Seat

belts are designed to go around the large bones of
your body. These are the strongest parts of your
body and can take the forces of a collision the best.
Wearing your belt in the wrong place could make
your injuries in a collision much worse. You might
suffer internal injuries, or you could even slide out
of part of the belt. Follow these instructions to
wear your seat belt safely and to keep your pas-
sengers safe, too.

• Two people should never be belted into a single

seat belt. People belted together can crash into one
another in an accident, hurting one another badly.
Never use a lap/shoulder belt or a lap belt for more
than one person, no matter what their size.

42

THINGS TO KNOW BEFORE STARTING YOUR VEHICLE

-------------------------------------------------------------------------------------------------------------------------------------------------------------

Lap/Shoulder Belt Operating Instructions

1. Enter the vehicle and close the door. Sit back and
adjust the seat.

2. The seat belt latch plate is above the back of the front
seat, next to your arm in the rear seat. Grasp the latch

plate and pull out the belt. Slide the latch plate up the
webbing as far as necessary to allow the belt to go around
your lap.

3. When the belt is long enough to fit, insert the latch
plate into the buckle until you hear a “click.”

Pulling Out Belt And Latch Plate

Latch Plate To Buckle

THINGS TO KNOW BEFORE STARTING YOUR VEHICLE

43

2

-------------------------------------------------------------------------------------------------------------------------------------------------------------


Content      ..      1      2      3      ..