Chrysler Sebring, Stratus sedan, Sebring Convertible. Manual - part 659


  Index      Chrysler     Chrysler Sebring, Stratus sedan, Sebring Convertible - service repair manual 2001-2007 year


Search            


Content   ..  657  658  659  660   ..


Chrysler Sebring, Stratus sedan, Sebring Convertible. Manual - part 659


ADJUSTMENTS

ADJUSTMENT

(1) Align door to achieve equal spacing to sur-

rounding body panels.

(2) Panels should be flush across all gaps. (Refer to

23 - BODY/BODY STRUCTURE/JR - 27 or JR - 41
GAP AND FLUSH - SPECIFICATIONS).

(3) If door needs to be adjusted Fore/Aft loosen

A-pillar to hinge bolts (Fig. 3).

(4) If door needs to be adjusted In/Out loosen door

to hinge nuts.

(5) If in/out alignment can not be achieved, it

maybe necessary to enlarge (drill) the hinge/door
flange holes to 12.5 mm (1/2 inch) maximum.

(6) This may allow extra movement to achieve the

proper alignment.

(7) Remove door and hinge as necessary.

DOOR GLASS

REMOVAL

REMOVAL

(1) Remove door trim panel and inner belt weath-

erstrip.

(2) Connect power window switch and lower win-

dow to approximately mid position. The lift plate
nuts will align with holes in the inner door panel.

(3) Loosen screws attaching regulator roller chan-

nel to glass.

(4) Slide roller channel rearward to allow screw

heads to pass through key hole slots in channel.

(5) Remove glass from roller channel.
(6) Raise glass upward and out of the opening at

top of door (Fig. 4).
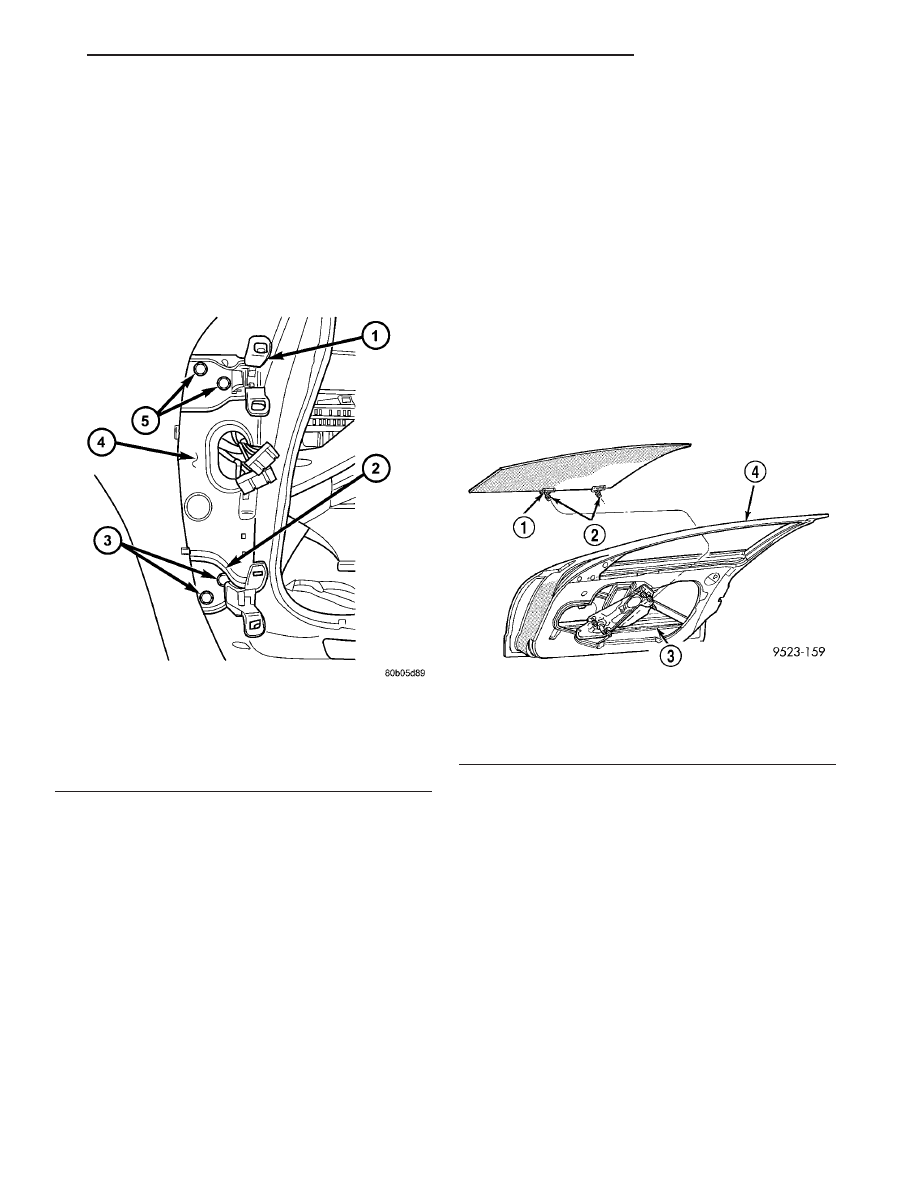
Fig. 3 FRONT HINGES

1 - UPPER HINGE
2 - LOWER HINGE
3 - LOWER HINGE BOLTS
4 - A-PILLAR
5 - UPPER HINGE BOLTS

Fig. 4 Front Door Glass

1 - DOOR GLASS
2 - SCREWS
3 - ROLLER CHANNEL
4 - FRONT DOOR

JR

DOOR - FRONT

23 - 33

DOOR (Continued)

REMOVAL - JR-27 ONLY

(1) Remove door trim panel and watershield.
(2) Remove inner door belt weatherstrip.
(3) Loosen inner belt stabilizer (Fig. 5).
(4) Remove door speaker, if so equipped.
(5) Lower door glass to access glass attachment

bolts approximately six inches from bottom of travel.

(6) Remove bolts attaching regulator lift channel

to door glass (Fig. 6).

(7) Remove bolts attaching rear guide plate to door

glass (Fig. 7).

(8) Remove rear guide plate from door glass.
(9) Lift door glass upward and out of opening at

top of door (Fig. 6).

INSTALLATION

INSTALLATION

(1) Lower glass down and in the opening at top of

door.

(2) Position glass on roller channel.
(3) Slide roller channel forward to allow screw

heads to engage key hole slots in channel.

(4) Tighten screws attaching regulator roller chan-

nel to glass.

Fig. 5 INNER BELT STABILIZER

Fig. 6 REGULATOR LIFT CHANNEL

1 - DOOR GLASS
2 - DOOR
3 - WINDOW REGULATOR

4 - LIFT CHANNEL
5 - ROLLER CHANNEL NUT

Fig. 7 REAR GUIDE BOLTS

1 - REAR GUIDE BOLTS
2 - INNER DOOR PANEL

23 - 34

DOOR - FRONT

JR

DOOR GLASS (Continued)

(5) Install door trim panel and inner belt weather-

strip.

INSTALLATION - JR-27 ONLY

(1) Carefully lower door glass through opening in

top of door. Verify that the front edge of the glass is
in the mirror flag glass channel.

(2) Position rear guide plate onto door glass and

install bolts.

(3) Install nuts attaching regulator lift channel to

door glass.

(4) Tighten all door glass fasteners to 7.3 N·m (65

in. lbs.).

(5) Install door speaker, if so equipped. (Refer to 8

-

ELECTRICAL/AUDIO/SPEAKER

-

INSTALLA-

TION)

(6) Tighten window inner belt stabilizer.
(7) Install inner door belt weatherstrip. (Refer to

23 - BODY/WEATHERSTRIP/SEALS/FRONT DOOR
INNER BELT WEATHERSTRIP - INSTALLATION)

(8) Install the watershield. (Refer to 23 - BODY/

DOOR - FRONT/WATERSHIELD - INSTALLATION)

ADJUSTMENTS

ADJUSTMENT - JR-27 ONLY

NOTE: Verify that the door is properly adjusted to
the body prior to adjusting the door glass.

NOTE: Lower quarter glass to the full down position
while making door glass adjustments, unless other-
wise instructed.

TOP OF GLASS – INBOARD/OUTBOARD
ADJUSTMENTS

(1) Remove the access covers. Disengage front

cover by prying at its rear edge. Disengage rear cover
by prying at notch at bottom of reflector (Fig. 8) and
(Fig. 9)

(2) Remove the convertible top side rail weather-

strip from the location to be adjusted.

NOTE: Remove only one weatherstrip section at a
time or the glass to weatherstrip retainer measure-
ments will not be accurate.

(3) Using a 10 mm socket, loosen the jack screw

nuts. (Fig. 8) and (Fig. 9)

(4) Using a 3 mm allen wrench, rotate the jack

screw to achieve the proper gap between the door
glass and the weatherstrip retainer (Fig. 14). Tighten
all fasteners prior to measuring the gaps.

Fig. 8 REAR UP-STOP ACCESS HOLE

1 - REFLECTOR
2 - TRIM PANEL
3 - JACK SCREW ACCESS HOLE

Fig. 9 FRONT JACK SCREW ACCESS HOLE

1 - TRIM PANEL
2 - ACCESS COVER
3 - JACK SCREW ACCESS HOLE

JR

DOOR - FRONT

23 - 35

DOOR GLASS (Continued)

(5) Install the weatherstrip. Cycle the glass fully

down and up, open and close the door. Verify that the
top edge of the door glass is beneath the lip of the
weatherstrip.

UP-STOP ADJUSTMENTS

NOTE: For minor adjustments (up to 3mm), rear up
stop can be accessed without removing the door
trim panel. Remove the reflector plate (Fig. 8). The
jackscrew nut also acts as a minor adjustment up
stop. Loosen the nut and move up or down to
achieve the correct height. Do not adjust the jack-
screw, as this will affect the inboard/outboard
adjustments.

(1) Remove door trim panel. (Refer to 23 - BODY/

DOOR - FRONT/TRIM PANEL - REMOVAL)

(2) Remove window switch from door trim panel,

to operate glass.

(3) Remove watershield as necessary to gain access

to the rear adjuster. Lifting up the flap in the water-
shield can access the front adjuster. (Fig. 10)

(4) With glass in the slightly lowered position to

relieve pressure on up stops prior to adjustment.
Loosen up stop fasteners. (Fig. 11) and (Fig. 12).

Fig. 10 FRONT ADJUSTER

1 - WATERSHIELD FLAP
2 - JACK SCREW

Fig. 11 FORWARD UP STOP ADJUSTMENT

1 - FORWARD UP STOP
2 - ADJUSTMENT BOLT
3 - CONTACT BOLT

Fig. 12 REAR UP STOP ADJUSTMENT

1 - REAR UP STOP
2 - UP STOP ADJUSTMENT NUT

23 - 36

DOOR - FRONT

JR

DOOR GLASS (Continued)


Content   ..  657  658  659  660   ..