Chrysler New Yorker. Manual - part 94


  Index      Chrysler     Chrysler New Yorker - service repair manual 1997-1999 year


Search            


Content   ..  92  93  94  95   ..


Chrysler New Yorker. Manual - part 94


LAMP BULB SERVICE

INDEX

page

page

REMOVAL AND INSTALLATION

CHMSL LAMP BULB . . . . . . . . . . . . . . . . . . . . . . 13
CITY LAMP BULB . . . . . . . . . . . . . . . . . . . . . . . . 9
FRONT FOG LAMP BULB . . . . . . . . . . . . . . . . . 10
FRONT PARKING, SIDE MARKER, AND TURN

SIGNAL LAMP BULB . . . . . . . . . . . . . . . . . . . . . 9

HEADLAMP BULB . . . . . . . . . . . . . . . . . . . . . . . . 8
REAR LICENSE PLATE LAMP BULB . . . . . . . . . 12
SIDE REPEATER LAMP BULB . . . . . . . . . . . . . . 11
TAIL, STOP, BACKUP, FOG LAMP AND TURN

SIGNAL BULBS . . . . . . . . . . . . . . . . . . . . . . . . 11

REMOVAL AND INSTALLATION

HEADLAMP BULB

Removal

(1) Hoist Vehicle.
(2) Partially remove the front fascia to gain access

to the headlamp assembly. Refer to Group 13, Frame
and Bumpers for Removal and Installation proce-
dures.

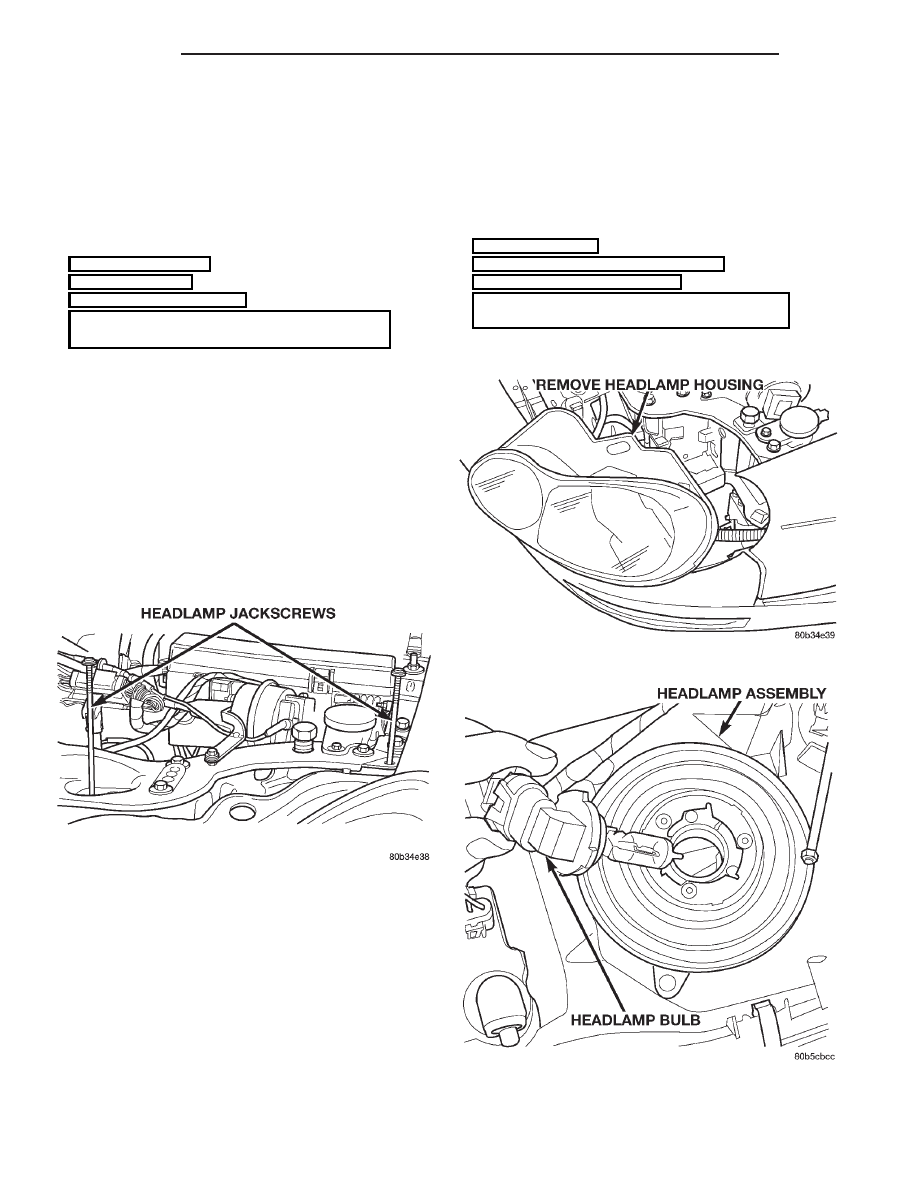
(3) Remove the jackscrews attaching the headlamp

assembly to the crossmember (Fig. 1).

(4) Pull the headlamp assembly out and disconnect

the electrical connectors (Fig. 2).

(5) Twist and remove the appropriate bulb from

the headlamp assembly (Fig. 3).

(6) Remove the electrical connector from the bulb.

Installation

CAUTION: Do not touch the bulb glass with fingers
or other oily surfaces. Reduced bulb life will result.

(1) Twist the new bulb into the headlamp assembly.

Fig. 1 Headlamp Jackscrews

Fig. 2 Headlamp Assembly Removal

Fig. 3 Headlamp Bulb

8L - 8

LAMPS

300M

(2) Reconnect the headlamp assembly electrical

connectors and slide the headlamp assembly back
into the crossmember.

(3) Install the headlamp jackscrews (Fig. 1).
(4) Reinstall the front fascia. Refer to Group 13,

Frame and Bumpers for Removal and Installation
procedures.

(5) Lower vehicle from hoist.

FRONT PARKING, SIDE MARKER, AND TURN
SIGNAL LAMP BULB

Removal

(1) Remove the front fog lamp assembly. Refer to

the Front Fog Lamp Assembly Removal and Installa-
tion procedures.

(2) Reach up through the front fascia and rotate

the bulb socket.

(3) Pull the bulb socket from the lamp housing

(Fig. 4).

(4) Pull the bulb from the socket.

Installation

(1) Push the bulb into the socket.
(2) Install the socket into the lamp housing.
(3) Install the fog lamp assembly.

CITY LAMP BULB

Removal

(1) Remove the headlamp assembly. Refer to the

Headlamp Assembly removal and Installation proce-
dures.

(2) Twist and remove the city lamp socket housing

from the headlamp assembly (Fig. 5).

(3) Pull the city lamp bulb from the socket housing

(Fig. 6).

Installation

(1) Push the new city lamp bulb into the city lamp

housing.

(2) Install the city lamp socket housing into the

headlamp assembly.

(3) Install the headlamp assembly.

Fig. 4 Front Parking, Side Marker, and Turn Signal

Lamp Bulb

Fig. 5 City Lamp Housing

Fig. 6 City Lamp Bulb

300M

LAMPS

8L - 9

REMOVAL AND INSTALLATION (Continued)

FRONT FOG LAMP BULB

Removal

(1) Remove the front fog lamp attaching screws

(Fig. 7).

(2) Pull the fog lamp assembly from the bumper

fascia and disconnect the electrical connector (Fig. 8).

(3) Remove the fog lamp assembly rear cover from

the fog lamp assembly (Fig. 9).

(4) Disengage the fog lamp bulb retaining wire and

remove the bulb from the fog lamp assembly (Fig.
10).

Installation

(1) Install bulb into the fog lamp assembly and

reattach the retaining wire.

(2) Cover exposed terminals with protective sleeve.
(3) Install the rear cover on the fog lamp assembly.

Fig. 7 Front Fog Lamp

Fig. 8 Front Fog Lamp Electrical Connector

Fig. 9 Front Fog Lamp Assembly Rear Cover

Fig. 10 Front Fog Lamp Bulb

8L - 10

LAMPS

300M

REMOVAL AND INSTALLATION (Continued)

(4) Connect the electrical connector and place the

fog lamp assembly into the front bumper fascia.

(5) Install the fog lamp assembly attaching screws.

SIDE REPEATER LAMP BULB

Removal

(1) Insert a small flat screwdriver between the

lamp and the body panel. Disengage the lamp retain-
ing tabs (Fig. 11) (Fig. 12).

(2) Pull lamp from fender.
(3) Twist the bulb socket 1/4 turn and separate the

bulb socket from the lamp (Fig. 13).

(4) Pull the bulb from the socket.

Installation

(1) Insert the bulb into the socket.
(2) Position the socket in the lamp and twist the

socket 1/4 turn.

(3) Position the lamp into the body opening and

push into place.

TAIL, STOP, BACKUP, FOG LAMP AND TURN
SIGNAL BULBS

Removal

(1) Release the deck lid latch and open the deck

lid.

(2) Remove the tail lamp assembly attaching nuts

(Fig. 14).

Fig. 11 Side Repeater Lamp

Fig. 12 Side Repeater Lamp Retaining Tabs

Fig. 13 Side Repeater Lamp Socket

Fig. 14 Tail Lamp Assembly Fasteners

300M

LAMPS

8L - 11

REMOVAL AND INSTALLATION (Continued)


Content   ..  92  93  94  95   ..