Chrysler Crossfire. Manual - part 915


  Index      Chrysler     Chrysler Crossfire - service repair manual 2005 year


Search            


Content   ..  913  914  915  916   ..


Chrysler Crossfire. Manual - part 915


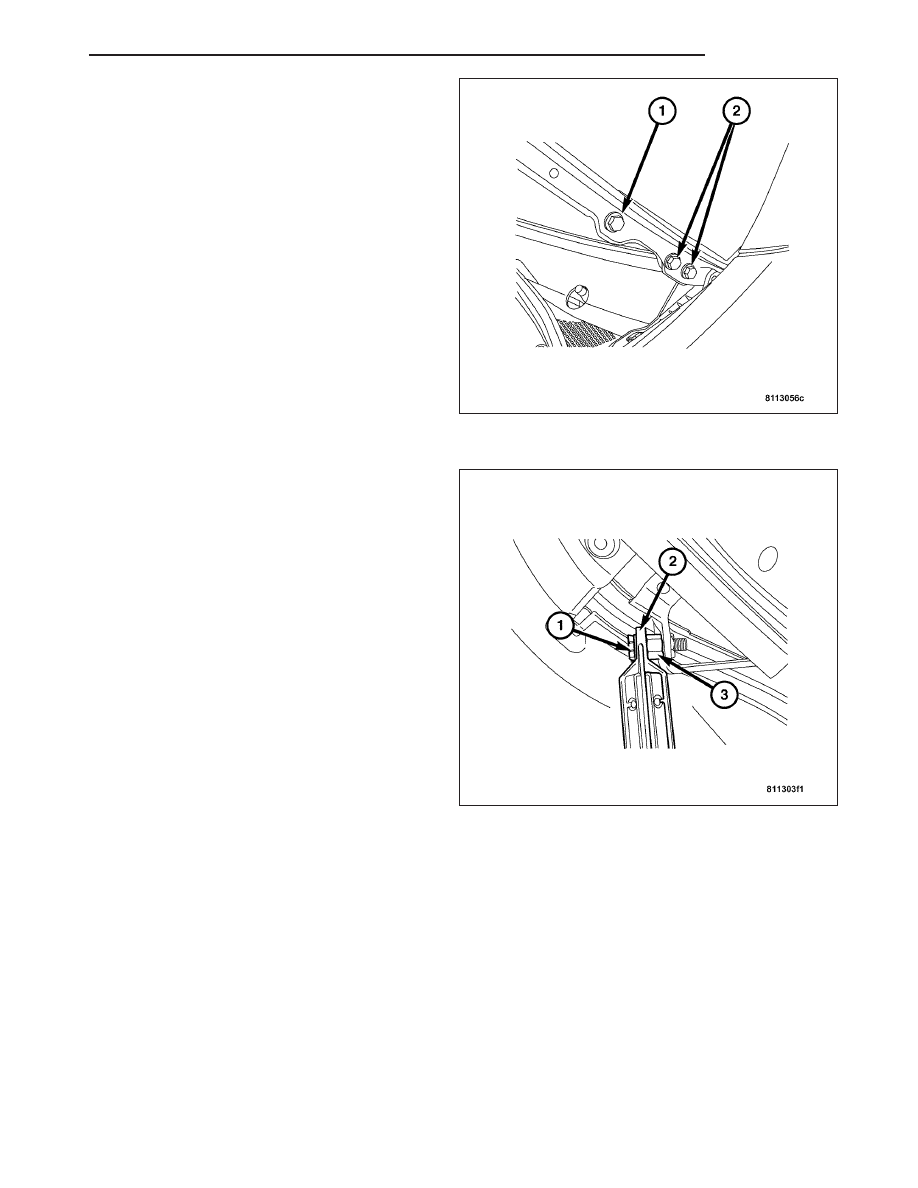
Note: The hood is held in place by the safety
hooks on the hood hinges.

2. Remove the two lower bolts (2) from the left and

right hood hinges.

3. Remove the gas prop rod retainer (1) and remove

the gas prop rod (2) from the hood at the top
retaining hook (3).

ZH

HOOD

23 - 331

CAUTION: To avoid paint damage, have an assis-
tant help while removing the hood bolts.

4. Remove the upper bolt (1) from the left and right

hood hinges.

5. With the aid of an assistant, remove the hood from

the vehicle. Set the hood down on a suitable flat
surface.

INSTALLATION

CAUTION: To avoid paint damage, have an assis-
tant help while installing the hood.

1. With the aid of an assistant, position the hood on

the safety hooks on the hood hinges.

2. Loosely install the lower bolts (2) on the hood.

3. Loosely install the upper bolts (1) on the hood.

4. Align the hood with the bolts (1,2) to coincide with

the witness marks.

5. With the aid of an assistant tighten the hood hinge

bolts (1,2) to the hood. Tighten to 10 N·m (88 in.
lbs.).

23 - 332

HOOD

ZH

6. Install the gas prop rod (2) to the hood at the top

then install the gas prop rod retainer (1).

7. Shut the hood and insure that the hood shuts prop-

erly and securely and that there is a uniform gap
around the hood to the front fenders and grille.

8. Verify fit of hood to vehicle body. Adjust as neces-

sary.

(Refer

to

23

-

BODY/HOOD/HOOD

-

ADJUSTMENTS).

ADJUSTMENTS

ADJUSTMENT - HOOD

ADJUSTING IN LONGITUDINAL AND VERTICAL DIRECTIONS

Note: For minor adjustment in longitudinal and
vertical directions; for larger adjustment path see
steps 4 - 10.

1. Open the hood.

2. Loosen the bolts (1,2) on the hood hinges and

adjust the hood.

3. Tighten the bolts. Tighten to 10 N·m (88 in. lbs.).

4. Move the hood to its fully upright position. (Refer to

23 - BODY/HOOD/HOOD - STANDARD PROCE-
DURE.)

5. Remove the gas prop rod from the hood at the top

and lay it down in the engine compartment.

6. Close the hood.

7. Remove the inner fender from the front fender.

8. Loosen the bolts on the hood hinges in the front

fender.

Note: For larger adjustment path loosen the top section of the hood latch, adjust and retighten.

9. Adjust the hood so that the front edge of the front fender coincides with the hood and the top edges are flush.

ZH

HOOD

23 - 333

10. Tighten the bolts on the engine hood hinges.

Tighten to 10 N·m (88 in. lbs.).

Note: If necessary install a spacer below the top
section of engine hood latch. Raise/lower the
upper frame cross member.

11. Adjust the height of the stop bumper so that the

top edges of the front fenders are flush with the
hood.

12. Install the gas prop rod.

ADJUSTING IN LATERAL DIRECTION

1. Loosen the bolts (1) on the top section of hood

latch (2).

2. Adjust the gaps on the left and right of the hood.

3. Center the top section of hood latch (2) in the lat-

eral and longitudinal directions in relation to the
bottom section of the hood latch and then tighten
the bolts (2). Tighten to 8 N·m (70 in. lbs.).

4. Install the inner fender in the front fender.

Note: For this purpose close the hood, release and
ensure that hook is caught in upper frame cross
member.

5. Check the function of the safety hook.

6. Close the hood.

7. Check the locking function of the hood latch and

the safety hook.

GAP DIMENSIONS

Hood and front fender

4.0 mm (±0.5 mm)

Hood and front headlamps

6.0 mm (+1/-0.5 mm)

Hood and radiator grille

7.0 mm (+1/-0.5 mm)

Radiator grille and front headlamp

5.0 mm (+1/-0.5 mm)

23 - 334

HOOD

ZH


Content   ..  913  914  915  916   ..