Chrysler 300/300 Touring/300C, Dodge Magnum. Manual - part 2066


  Index      Chrysler     Chrysler 300/300 Touring/300C, Dodge Magnum - service repair manual


Search            


Content   ..  2064  2065  2066  2067   ..


Chrysler 300/300 Touring/300C, Dodge Magnum. Manual - part 2066


BEARING-OUTPUT SHAFT

REMOVAL

1. Raise and support vehicle.

2. Remove the propeller shaft (Refer to 3 - DIFFER-

ENTIAL & DRIVELINE/PROPELLER SHAFT/PRO-
PELLER SHAFT - REMOVAL).

3. Verify that the transmission is in PARK in order to

prepare for the removal of the output shaft nut.

4. Remove the nut holding the propeller shaft flange

to the output shaft and remove the flange.

5. Remove the transmission rear oil seal with a suit-

able slide hammer and screw.

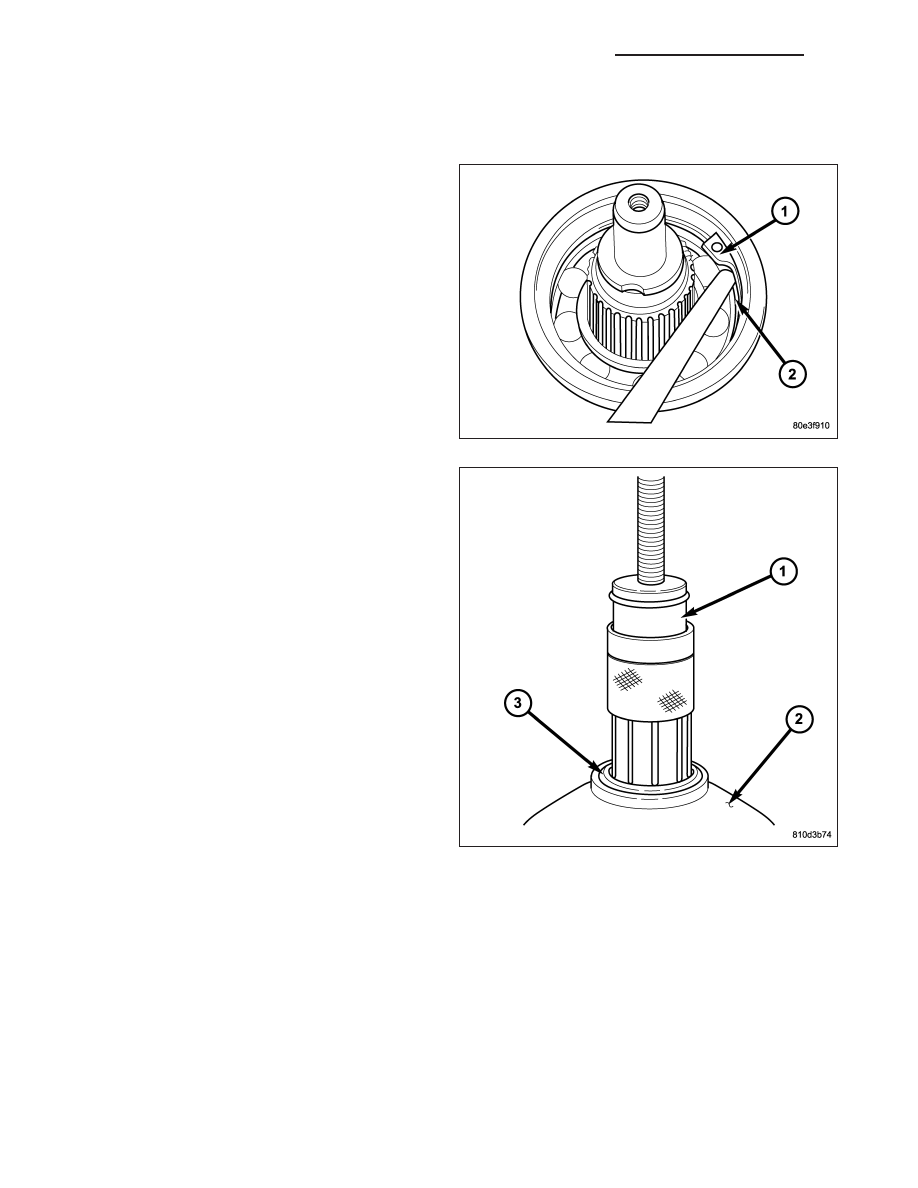
6. Remove the transmission rear output shaft bearing

retaining ring (1).

7. Position Bearing Remover 9082 (1) over the inner

race of the output shaft bearing.

21 - 798

AUTOMATIC TRANSMISSION 42RLE - SERVICE INFORMATION

LX

NOTE: Due to production variations in the bearing,
it may not be possible to slide the collar fully
downward. It is only necessary to slide the collar
down far enough that the fingers securely grasp
the inner bearing race.

8. Slide the collar (3) on the Bearing Remover 9082

(1) downward over the fingers (3) of the tool.

9. Remove the output shaft bearing (3).

LX

AUTOMATIC TRANSMISSION 42RLE - SERVICE INFORMATION

21 - 799

INSTALLATION

1. Install output shaft bearing in the rear transmission

housing. Using Bearing Installer 9287 (1), install
the output shaft bearing (2) into the transmission
housing. The closed side of the plastic cage
must point towards the transmission.

2. Install the retaining ring (1). Ensure that the retain-

ing ring is seated correctly in the groove.

3. Install the output shaft washer onto the output

shaft.

4. Install a new transmission rear seal into the trans-

mission case with Seal Installer 8902A (1).

5. Verify that the transmission is in PARK in order to

prepare for the installation of the output shaft nut.

6. Install the propeller shaft flange onto the output

shaft and install an new flange nut. Tighten the
flange nut to 120 N·m (88.5 ft.lbs.).

21 - 800

AUTOMATIC TRANSMISSION 42RLE - SERVICE INFORMATION

LX

7. Stake the output shaft nut to the output shaft as

follows.Place the Staking Tool 9078 (2) and Driver
Handle C-4171 onto the output shaft.

8. Rotate the Staking Tool 9078 (2) until the alignment

pin (3) engages the output shaft notch (4).

9. Press downward on the staking tool (1) until the

staking pin (3) contacts the output shaft nut flange
(2).

10. Strike the Driver handle C-4171 with a suitable

hammer until the output shaft nut is securely
staked to the output shaft.

11. Install the propeller shaft (Refer to 3 - DIFFEREN-

TIAL & DRIVELINE/PROPELLER SHAFT/PRO-
PELLER SHAFT - INSTALLATION).

LX

AUTOMATIC TRANSMISSION 42RLE - SERVICE INFORMATION

21 - 801


Content   ..  2064  2065  2066  2067   ..