Chery QQ6 (S21) / S12LHD. Manual - part 141
 

  Index      Chery     Chery QQ6 (S21) / S12LHD - service repair manual


Search            


Content   ..  139  140  141  142   ..


Chery QQ6 (S21) / S12LHD. Manual - part 141


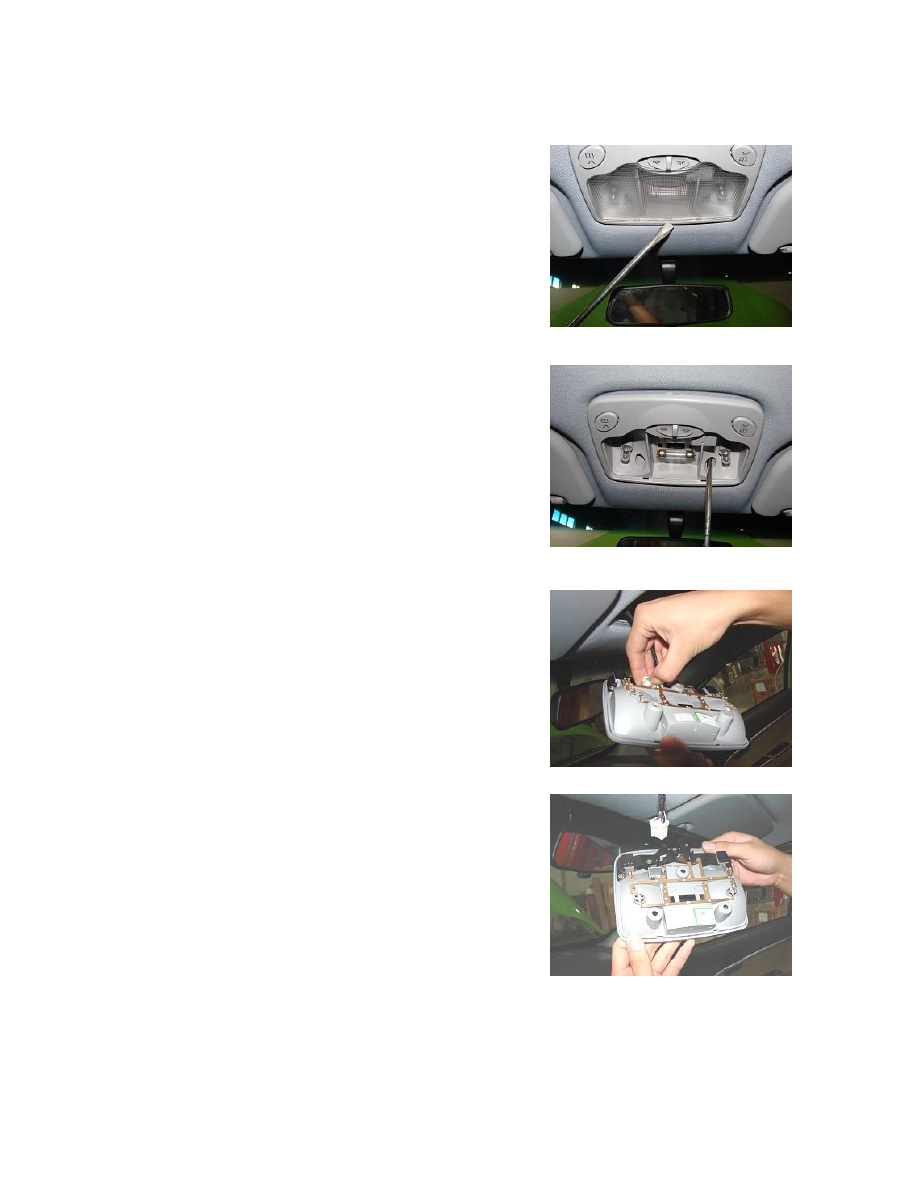
5.  Removal  and  Installation  of  Front  Ceiling 
light 

5.1. Removal Steps 

5.1.1. Align a flat head screwdriver with the groove along the ceiling 
light edge to pry it open, as shown in the figure:   
Note: Do not scratch part surface. 


5.1.2. Remove the three fixing screws of the the front ceiling light.   
Torque: 1.5±0.5Nm 


5.1.3.  Unplug  the  harness  and  disassemble  the  front  ceiling  light 
assembly.   


5.2. Installation Steps 

The installation steps are reverse to those for removal. 


6.  Removal and Installation of Reverse Radar 
Display 

6.1. Removal Steps 

6.1.1.  Use  a  cross  head  screwdriver  to  loosen  off  the  screws  of  the 
reverse radar display.   


6.1.2. Unplug the harness and remove the reverse radar display. 


6.2. Installation Steps 

The installation steps are reverse to those for removal. 
 

7. Removal and Installation of A-pillar Shield 

7.1. Removal Steps 

7.1.1.  Use  a  flat  head  screwdriver  to  pry  open  the  weather  strip  of 
the  left  A-pillar  shield,  and  then  take  out  the  left  A-pillar  shield  by 
hand.   


7.1.2. Take out the left A-pillar shield. 


7.1.3.  Follow  the  the  removal  steps  of  the  right  A-pillar  shield  for 
that of the left one.   

7.2. Installation Steps 

The installation steps are reverse to those for removal. 
 

8. Removal and Installation of B-pillar Shield 

8.1. Removal Steps 

8.1.1.  Disassemble  the  shield  below  the  left  B-pillar  (See  Removal 
and Installation of Seat belt). 


8.1.2. Use a flat head screwdriver to pry open the B-pillar shield. 
Note: protect the trim part surface from scratching. 


8.1.3.  Follow  the  removal  steps  of  the  left  B-pillar  shield  for 
removal of the right B-pillar shield. 
 

8.2. Installation Steps 

The installation steps are reverse to those for removal. 


9. Removal and Installation of C-pillar Shield 

9.1. Removal Steps 

9.1.1.  Use  a  sleeve  wrench  to  loosen  off  the  seat  belt  bolts  (See 
Removal and Installation of Rear Seats & Seat belts).   


9.1.2.  Use  a  flat  head  screwdriver  to  pry  open  the  C-pillar  upper 
shield.   


9.1.3. Remove the C-pillar upper shield.   


9.1.4.  Please  follow  the  removal  steps  of  left  C-pillar  upper  shield 
for that of the right C-pillar upper shield.   

9.2. Installation Steps 

The installation steps are reverse to those for removal. 


Content   ..  139  140  141  142   ..