Acura RDX (2019 year). Manual - part 37


  Index      Acura     Acura RDX (2019 year) - manual in english


Search            copyright infringement  


Content      ..     35      36      37      38     ..


Acura RDX (2019 year). Manual - part 37


Continued

583

uu

If a Tire Goes Flat

u

Changing a Flat Tire

Han

d

lin
g the U

n

expected

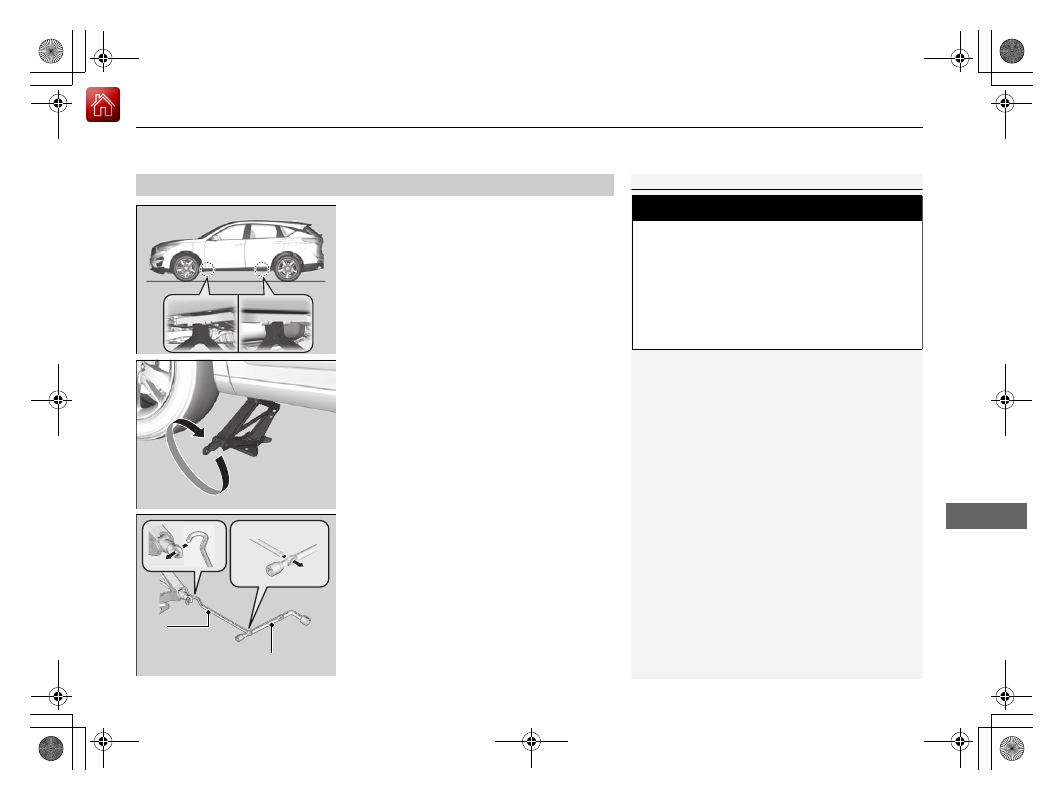
1. Place the jack under the jacking point 

closest to the tire to be changed.

2. Turn the end bracket clockwise as shown in 

the image until the top of the jack contacts 
the jacking point.

u

Make sure that the jacking point tab is 
resting in the jack notch.

3. Raise the vehicle, using the jack handle bar 

and the jack handle, until the tire is off the 
ground.

How to Set Up the Jack

1

How to Set Up the Jack

Do not use the jack with people or luggage in the 
vehicle.

Use the jack provided in your vehicle.
Other jacks may not support the weight (“load”) or 
may not fit the jacking point.

The following instructions must be followed to use 
the jack safely:

Do not use while the engine is running.

Use only where the ground is firm and level.

Use only at the jacking points.

Do not get in the vehicle while using the jack.

Do not put anything on top of or underneath the 
jack.

3

WARNING

The vehicle can easily roll off the jack, 
seriously injuring anyone underneath.

Follow the directions for changing a tire 
exactly, and no person should place any 
portion of their body under a vehicle that is 
supported by a jack.

Jack 
Handle Bar

Wheel Nut Wrench as Jack Handle

19 ACURA RDX-31TJB6000.book  583 ページ  2018年4月26日 木曜日 午後4時51分

-------------------------------------------------------------------------------------------------------------------------------------------------------------

uu

If a Tire Goes Flat

u

Changing a Flat Tire

584

Han

d

lin
g the U

n

expected

1. Remove the wheel nuts and flat tire.

2. Wipe the mounting surfaces of the wheel 

with a clean cloth.

3. Mount the compact spare tire.
4. Screw the wheel nuts until they touch the 

lips around the mounting holes, and stop 
rotating.

5. Lower the vehicle and remove the jack. 

Tighten the wheel nuts in the order 
indicated in the image. Go around, 
tightening the nuts, two to three times in 
this order.
Wheel nut torque:
80 lbf∙ft (108 N∙m, 11 kgf∙m)

Replacing the Flat Tire

1

Replacing the Flat Tire

Do not over tighten the wheel nuts by applying extra 
torque using your foot or a pipe.

19 ACURA RDX-31TJB6000.book  584 ページ  2018年4月26日 木曜日 午後4時51分

-------------------------------------------------------------------------------------------------------------------------------------------------------------

Continued

585

uu

If a Tire Goes Flat

u

Changing a Flat Tire

Han

d

lin
g the U

n

expected

1. Put the Flat tire in the storage bag provided 

with your vehicle.

u

The storage bag is in the tool case.

2. Knot the top of the storage bag.
3. Securely put the jack and wheel nut wrench 

back in the tool case.

4. Bore through the bag, and pass the holding 

belt through the hole of the bag and the 
wheel of the flat tire as shown.

5. Place the flat tire in the cargo area, and 

thread the belt through the cargo hook as 
shown.

6. Pass the belt through the ring, and tighten 

the belt to secure the flat tire in place.

Storing the Flat Tire

1

Storing the Flat Tire

3

WARNING

Loose items can fly around the interior in a 
crash and can seriously injure the 
occupants.

Store the wheel, jack, and tools securely 
before driving.

Belt

Cargo Hook

19 ACURA RDX-31TJB6000.book  585 ページ  2018年4月26日 木曜日 午後4時51分

-------------------------------------------------------------------------------------------------------------------------------------------------------------

uu

If a Tire Goes Flat

u

Changing a Flat Tire

586

Han

d

lin
g the U

n

expected

If you replace a flat tire with the spare tire, the low tire pressure/TPMS indicator 
comes on while you are driving. After driving for a few miles (kilometers), the 
indicator will start blinking for a short time and then stay on. Tire Pressure 
Monitor System Problem. Check Tire Pressure. See Your Dealer
 appears on the 
multi-information display, but this is normal.

If you replace the tire with a specified regular tire, the warning message on the 
multi-information display and the low tire pressure/TPMS indicator will go off after 
a few miles (kilometers).

TPMS and the Compact Spare Tire

1

TPMS and the Compact Spare Tire

The system cannot monitor the pressure of the spare 
tire. Manually check the spare tire pressure to be sure 
that it is correct.

Use the TPMS specific wheels. Each is equipped with 
a tire pressure sensor mounted inside the tire behind 
the valve stem.

19 ACURA RDX-31TJB6000.book  586 ページ  2018年4月26日 木曜日 午後4時51分

-------------------------------------------------------------------------------------------------------------------------------------------------------------

587

uu

If a Tire Goes Flat

u

Temporarily Repairing a Flat Tire

Continued

Han

d

lin
g the U

n

expected

Temporarily Repairing a Flat Tire

If the tire has a large cut or is otherwise severely damaged, you will need to have the 
vehicle towed. If the tire only has a small puncture, from a nail for instance, you can 
use the temporary tire repair kit so that you can drive to the nearest service station 
for a more permanent repair.

If a tire goes flat while driving, grasp the steering wheel firmly, and brake gradually 
to reduce speed. Then stop in a safe place.

1. Park the vehicle on a firm, level, and non-slippery surface and apply the parking 

brake.

2. Change the gear position to 

(

P.

3. Turn on the hazard warning lights and set the power mode to VEHICLE OFF 

(LOCK).

Vehicles with temporary tire repair kit

1

Temporarily Repairing a Flat Tire

The kit should not be used in the following situations. 
Instead, contact a dealer or roadside assistant to have 
the vehicle towed.

The tire sealant has expired.

More than one tire is punctured.

The puncture or cut is larger than 3/16 inch (4mm).

The tire side wall is damaged or the puncture is 
outside the contact area.

Damage has been caused by driving with the tires 
extremely under inflated.

The tire bead is no longer seated.

The rim is damaged.

Do not remove a nail or screw that punctured the 
tire. If you remove it from the tire, you may not be 
able to repair the puncture using the kit.

NOTICE

Do not use a puncture-repairing agent other than the 
one provided in the kit that came with your vehicle. If 
a different agent is used, you may permanently 
damage the tire pressure sensor.

When the puncture is:

Kit Use

Smaller than 3/16 inch 

(4 mm)

Yes

Larger than 3/16 inch 

(4 mm)

No

Contact 
Area

19 ACURA RDX-31TJB6000.book  587 ページ  2018年4月26日 木曜日 午後4時51分

-------------------------------------------------------------------------------------------------------------------------------------------------------------

uu

If a Tire Goes Flat

u

Temporarily Repairing a Flat Tire

588

Han

d

lin
g the U

n

expected

1. Push the rear edge of the handle on the 

floor lid and open the lid.

Getting Ready to Temporarily Repair the Flat Tire

1

Getting Ready to Temporarily Repair the Flat Tire

Repair notification label and speed restriction label 
are applied to the side of temporary tire repair kit.

When making a temporary repair, carefully read the 
instruction manual provided with the kit.

Pressure Relief Button

Pressure Gauge

Instruction Manual

REPAIR

AIR

Power Plug

Sealant/Air Hose

Inflator Switch

Selector Knob

Repair Notification Label

Speed Restriction Label

Handle

19 ACURA RDX-31TJB6000.book  588 ページ  2018年4月26日 木曜日 午後4時51分

-------------------------------------------------------------------------------------------------------------------------------------------------------------

589

uu

If a Tire Goes Flat

u

Temporarily Repairing a Flat Tire

Continued

Han

d

lin
g the U

n

expected

2. Push the tabs to open the tool box lid.
3. Take the kit out of the tool box.
4. Place the kit face up, on flat ground near 

the flat tire, and away from traffic. Do not 
place the kit on its side.

Tool Box Lid

Tab

19 ACURA RDX-31TJB6000.book  589 ページ  2018年4月26日 木曜日 午後4時51分

-------------------------------------------------------------------------------------------------------------------------------------------------------------

uu

If a Tire Goes Flat

u

Temporarily Repairing a Flat Tire

590

Han

d

lin
g the U

n

expected

1. Remove the valve cap from the tire valve 

stem.

2. Remove the sealant/air hose from the 

packaging.

3. Attach the sealant/air hose onto the tire 

valve stem. Screw it until it is tight.

Injecting Sealant and Air

1

Injecting Sealant and Air

In cold temperatures, the sealant may not flow easily. 
In this situation, warm it up for five minutes before 
using. 

The sealant can permanently stain clothing and other 
materials. Be careful during handling and wipe away 
any spills immediately.

3

WARNING

Tire sealant contains substances that are 
harmful and can be fatal if swallowed.

If accidentally swallowed, do not induce 
vomiting. Drink plenty of water and get 
medical attention immediately.

For skin or eye contact, flush with cool 
water and get medical attention if 
necessary.

Valve Stem

Valve Cap

Sealant/Air Hose

Valve Stem

Sealant/Air Hose

19 ACURA RDX-31TJB6000.book  590 ページ  2018年4月26日 木曜日 午後4時51分

-------------------------------------------------------------------------------------------------------------------------------------------------------------

Continued

591

uu

If a Tire Goes Flat

u

Temporarily Repairing a Flat Tire

Han

d

lin
g the U

n

expected

4. Plug in the compressor to the accessory 

power socket.

u

Be careful not to pinch the cord in a 
door or window.

u

Do not plug any other electric devices 
into other accessory power sockets.

Accessory Power Socket P. 225

5. Start the engine.

u

Keep the engine running while injecting 
sealant and air.

Carbon Monoxide Gas P. 71

6. Turn the selector switch to REPAIR.

1

Injecting Sealant and Air

NOTICE

Do not operate the temporary tire repair kit 
compressor for more than 15 minutes. The 
compressor can overheat and become permanently 
damaged.

Until the sealant injection is complete, the pressure 
shown on the pressure gauge will appear higher than 
actual. After the sealant injection is complete the 
pressure will drop and then begin to rise again as the 
tire is inflated with air. This is normal. To accurately 
measure the air pressure using the gauge, turn the air 
compressor off only after the sealant injection is 
complete.

3

WARNING

Running the engine with the vehicle in an 
enclosed or even partly enclosed area can 
cause a rapid build-up of toxic carbon 
monoxide.

Breathing this colorless, odorless gas can 
cause unconsciousness and even death.

Only run the engine to power the air 
compressor with the vehicle outdoors.

REPAIR

19 ACURA RDX-31TJB6000.book  591 ページ  2018年4月26日 木曜日 午後4時51分

-------------------------------------------------------------------------------------------------------------------------------------------------------------

uu

If a Tire Goes Flat

u

Temporarily Repairing a Flat Tire

592

Han

d

lin
g the U

n

expected

7. Press the inflator switch to turn on the 

compressor.

u

The compressor starts injecting sealant 
and air into the tire.

u

When the sealant injection is complete 
continue to add air.

8.

After the air pressure reaches 33 psi (230 
kPa), turn off the kit.

After the air pressure reaches 36 psi (250 
kPa), turn off the kit.

u

To check the pressure, occasionally turn 
off the compressor and read the gauge.

9. Unplug the power plug from the accessory 

power socket.

10. Unscrew the sealant/air hose from the tire 

valve stem. Reinstall the valve cap.

Pressure 
Gauge

ON

OFF

Models with 235/55R19 101H tires

Models with 255/45R20 101V tires

1

Injecting Sealant and Air

If the required air pressure is not reached within 10 
minutes, the tire may be too severely damaged for 
the kit to provide the necessary seal and your vehicle 
will need to be towed.

See an Acura dealer for a replacement sealant bottle 
and proper disposal of an empty bottle.

Sealant/Air Hose

19 ACURA RDX-31TJB6000.book  592 ページ  2018年4月26日 木曜日 午後4時51分

-------------------------------------------------------------------------------------------------------------------------------------------------------------

593

uu

If a Tire Goes Flat

u

Temporarily Repairing a Flat Tire

Continued

Han

d

lin
g the U

n

expected

11. Press the pressure relief button until the 

gauge returns to 0 psi (0 kPa).

12. Apply the repair notification label to the 

flat surface of the wheel.

u

The wheel surface must be clean to 
ensure the label adheres properly.

Pressure Relief Button

Repair Notification Label

19 ACURA RDX-31TJB6000.book  593 ページ  2018年4月26日 木曜日 午後4時51分

-------------------------------------------------------------------------------------------------------------------------------------------------------------

594

uu

If a Tire Goes Flat

u

Temporarily Repairing a Flat Tire

Han

d

lin
g the U

n

expected

1. Apply the speed restriction label to the 

location as shown.

2. Drive the vehicle for about 10 minutes.

u

Do not exceed 50 mph (80 km/h).

3. Stop the vehicle in a safe place.

4. Recheck the air pressure using the sealant/

air hose on the compressor. 

Distributing the Sealant in the Tire

Speed Restriction Label

Sealant/Air Hose

19 ACURA RDX-31TJB6000.book  594 ページ  2018年4月26日 木曜日 午後4時51分

-------------------------------------------------------------------------------------------------------------------------------------------------------------

595

uu

If a Tire Goes Flat

u

Temporarily Repairing a Flat Tire

Continued

Han

d

lin
g the U

n

expected

5. Turn the selector switch to AIR.

u

Do not turn the air compressor on to 
check the pressure.

Inflating an Under-inflated Tire P. 598

6. If the air pressure is

• Less than 25 psi (175 kPa):

Do not add air or continue driving. The 
leak is too severe. Call for help and have 
your vehicle towed.

Emergency Towing P. 622

• 33 psi (230 kPa) or more:

• 36 psi (250 kPa) or more:

Continue driving for another 10 minutes 
or until you reach the nearest service 
station, whichever is sooner.
Do not exceed 50 mph (80 km/h). If you 
have not reached a service station, stop 
and check the tire pressure.

u

If the air pressure does not go down 
after the 10 minute driving, you do not 
need to check the pressure any more.

AIR

ON

Models with 235/55R19 101H tires

Models with 255/45R20 101V tires

19 ACURA RDX-31TJB6000.book  595 ページ  2018年4月26日 木曜日 午後4時51分

-------------------------------------------------------------------------------------------------------------------------------------------------------------

uu

If a Tire Goes Flat

u

Temporarily Repairing a Flat Tire

596

Han

d

lin
g the U

n

expected

• Greater than 25 psi (175 kPa), but less 

than 33 psi (230 kPa):
Turn the air compressor on to inflate 
the tire until the tire pressure reaches 
33 psi (230 kPa).

• Greater than 25 psi (175 kPa), but less 

than 36 psi (250 kPa):
Turn the air compressor on to inflate 
the tire until the tire pressure reaches 
36 psi (250 kPa).

Inflating an Under-inflated Tire 

P. 598

Then drive carefully for 10 more minutes 
or until you reach the nearest service 
station, whichever is sooner. Do not 
exceed 50 mph (80 km/h). If you have not 
reached a service station, stop and check 
the tire pressure.

u

You should repeat this procedure as 
long as the air pressure is within this 
range.

7. Unplug the kit from the accessory power 

socket.

8. Unscrew the sealant/air hose from the tire 

valve stem. Reinstall the valve cap.

Models with 235/55R19 101H tires

Models with 255/45R20 101V tires

1

Distributing the Sealant in the Tire

3

WARNING

Running the engine with the vehicle in an 
enclosed or even partly enclosed area can 
cause a rapid build-up of toxic carbon 
monoxide.

Breathing this colorless, odorless gas can 
cause unconsciousness and even death.

Only run the engine to power the air 
compressor with the vehicle outdoors.

19 ACURA RDX-31TJB6000.book  596 ページ  2018年4月26日 木曜日 午後4時51分

-------------------------------------------------------------------------------------------------------------------------------------------------------------

597

uu

If a Tire Goes Flat

u

Temporarily Repairing a Flat Tire

Continued

Han

d

lin
g the U

n

expected

9. Press the pressure relief button until the 

gauge returns to 0 psi (0 kPa).

10. Repackage and properly stow the kit.

Pressure Relief Button

19 ACURA RDX-31TJB6000.book  597 ページ  2018年4月26日 木曜日 午後4時51分

-------------------------------------------------------------------------------------------------------------------------------------------------------------

uu

If a Tire Goes Flat

u

Temporarily Repairing a Flat Tire

598

Han

d

lin
g the U

n

expected

You can use the kit to inflate a non-punctured under-inflated tire.

1. Open the cargo area floor lid.

Getting Ready to Temporarily Repair 

the Flat Tire P. 588

2. Push the tabs to open the tool box lid.
3. Remove the kit from the box.
4. Place the kit, face up, on flat ground near 

the flat tire, away from traffic. Do not 
place the kit on its side.

5. Remove the sealant/air hose from the kit.
6. Remove the valve cap.

7. Attach the sealant/air hose onto the tire 

valve stem. Screw it until it is tight.

Inflating an Under-inflated Tire

1

Inflating an Under-inflated Tire

NOTICE

Do not operate the temporary tire repair kit 
compressor for more than 15 minutes. The 
compressor can overheat and become permanently 
damaged.

3

WARNING

Running the engine with the vehicle in an 
enclosed or even partly enclosed area can 
cause a rapid build-up of toxic carbon 
monoxide.

Breathing this colorless, odorless gas can 
cause unconsciousness and even death.

Only run the engine to power the air 
compressor with the vehicle outdoors.

Sealant/Air Hose

Valve Cap

Valve Stem

Sealant/Air Hose

19 ACURA RDX-31TJB6000.book  598 ページ  2018年4月26日 木曜日 午後4時51分

-------------------------------------------------------------------------------------------------------------------------------------------------------------


Content      ..     35      36      37      38     ..