Acura MDX (2018 year). Manual - part 39


  Index      Acura     Acura MDX (2018 year) - manual in english


Search            copyright infringement  


Content      ..     37      38      39      40     ..


Acura MDX (2018 year). Manual - part 39


uu

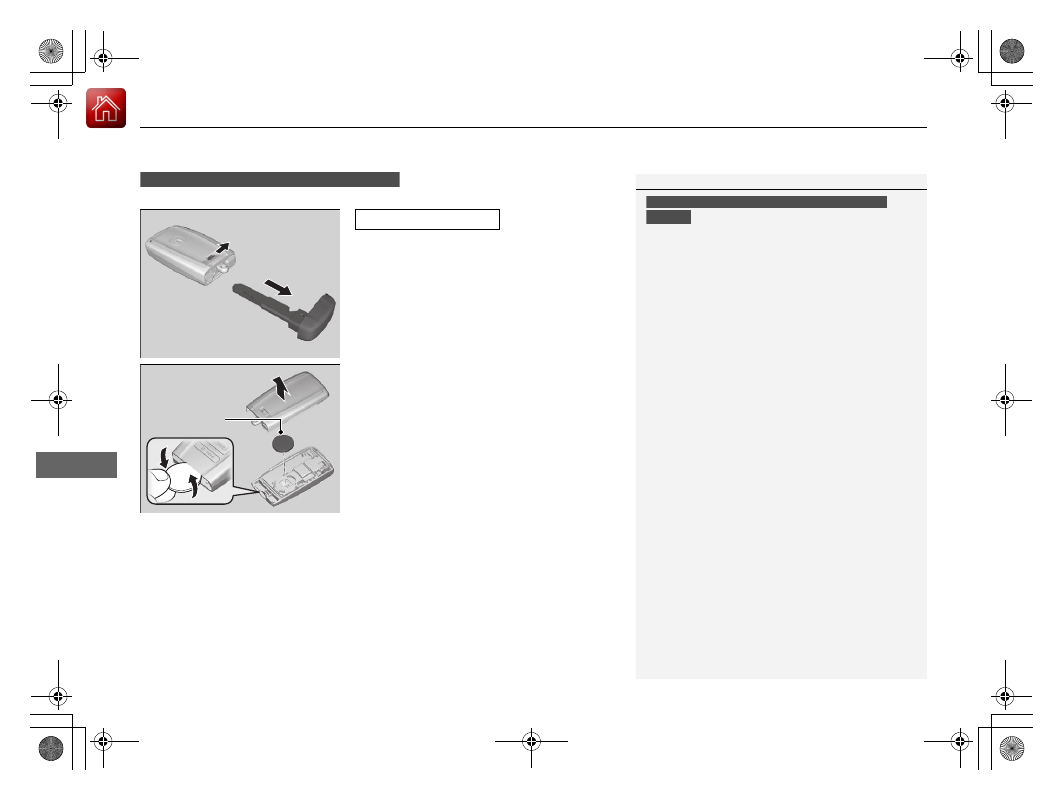
Remote Transmitter Care

u

Replacing the Button Battery

614

Main

tenan

ce

If the indicator does not come on when the button is pressed, replace the battery.

1. Remove the built-in key.

u

As a convenience, lightly place masking 
tape over the remote buttons to hold 
them in place.

2. Remove the upper half of the cover by 

carefully prying on the edge with a coin.

u

Wrap a coin with a cloth to prevent 
scratching the transmitter.

3. Press down on the center of the assembly 

and remove the battery.

u

When removing the button battery, be 
careful not to touch parts around it.

4. Make sure to replace the battery with the 

correct polarity.

Models with remote control engine start system

1

Replacing the Button Battery

NOTICE

The Remote transmitter is equipped with two 
batteries: A standard replaceable CR2032 coin 
button battery and an integral non-replaceable 
rechargeable battery. To prevent permanent damage 
to the rechargeable battery, replace the CR2032 
battery every three to four years.

Models with remote control engine start system

Battery type: CR2032

Battery

18 ACURA MDX-31TZ56400.book  614 ページ  2017年8月23日 水曜日 午後4時1分

-------------------------------------------------------------------------------------------------------------------------------------------------------------

615

Continued

Main

tenan

ce

Remote Control and Wireless Headphone Care

*

Replacing the Battery

If it takes several pushes on the remote control buttons to operate the rear 
entertainment system, replace the battery.

1. Remove the cover.
2. Make sure to replace the battery with the 

correct polarity.

Remote Control

Models with Rear Entertainment System

1

Replacing the Battery

NOTICE

An improperly disposed of battery can damage the 
environment. Always confirm local regulations for 
battery disposal.

Replacement batteries are commercially available or 
at a dealer.

3

WARNING

CHEMICAL BURN HAZARD
The battery that powers the remote control 
can cause severe internal burns and can 
even lead to death if swallowed.
Keep new and used batteries away from 
children.
If you suspect that a child has swallowed 
the battery, seek medical attention 
immediately.

Battery type: BR3032

* Not available on all models

18 ACURA MDX-31TZ56400.book  615 ページ  2017年8月23日 水曜日 午後4時1分

-------------------------------------------------------------------------------------------------------------------------------------------------------------

616

uu

Remote Control and Wireless Headphone Care

*

u

Replacing the Battery

Main

tenan

ce

If there is no sound coming from the wireless headphone, replace the battery.

1. Remove the screw.

2. Open the cover.
3. Make sure to replace the battery with the 

correct polarity.

Wireless Headphone

Battery type: AAA

Cover

Battery

18 ACURA MDX-31TZ56400.book  616 ページ  2017年8月23日 水曜日 午後4時1分

-------------------------------------------------------------------------------------------------------------------------------------------------------------

617

Main

tenan

ce

Climate Control System Maintenance

Dust and Pollen Filter

The climate control system is equipped with a dust and pollen filter that collects 
pollen, dust, and other debris in the air. The Maintenance Minder

TM

 messages will let 

you know when to replace the filter.

We recommend that you replace the dust and pollen filter sooner when using your 
vehicle in areas with high concentrations of dust.

1

Dust and Pollen Filter

If the airflow from the climate control system 
deteriorates noticeably, and the windows fog up 
easily, the filter may need to be replaced. Please 
contact a dealer for replacement.

18 ACURA MDX-31TZ56400.book  617 ページ  2017年8月23日 水曜日 午後4時1分

-------------------------------------------------------------------------------------------------------------------------------------------------------------

618

Main

tenan

ce

Cleaning

Interior Care

Use a damp cloth with a mixture of mild detergent and warm water to remove dirt. 
Use a clean cloth to remove detergent residue.

Use a soft brush with a mixture of mild soap and warm water to clean the seat belts. 
Let the belts air dry. Wipe the openings of the seat belt anchors using a clean cloth.

Cleaning Seat Belts

1

Interior Care

Do not spill liquids inside the vehicle. Electrical 
devices and systems may malfunction if liquids are 
splashed on them.

Do not use silicone based sprays on electrical devices 
such as audio devices and switches. Doing so may 
cause the items to malfunction or cause a fire inside 
the vehicle.
If a silicone based spray is inadvertently used on 
electrical devices, consult a dealer.

Depending on their composition, chemicals and 
liquid aromatics may cause discoloration, wrinkles, 
and cracking to resin-based parts and textiles.
Do not use alkali solvents or organic solvents such as 
benzene or gasoline.

After using chemicals, make sure to gently wipe them 
away using a dry cloth.
Do not place used cloths on top of resin based parts 
or textiles for long periods of time without washing.

Opening

18 ACURA MDX-31TZ56400.book  618 ページ  2017年8月23日 水曜日 午後4時1分

-------------------------------------------------------------------------------------------------------------------------------------------------------------

619

uu

Cleaning

u

Interior Care

Main

tenan

ce

Wipe using a glass cleaner.

The front and second row passenger’s floor 
mats hook over floor anchors, which keep 
them from sliding forward. To remove a mat 
for cleaning, turn the anchor knobs to the 
unlock position. When reinstalling the mat 
after cleaning, turn the knobs to the lock 
position.

Do not put additional floor mats on top of 
the anchored mats.

To properly clean leather:
1. Use a vacuum or soft dry cloth first to remove any dirt or dust.
2. Clean the leather with a soft cloth dampened with a solution comprised of 90% 

water and 10% neutral soap.

3. Wipe away any soap residue with a clean damp cloth.
4. Wipe away residual water and allow leather to air dry in the shade.

Cleaning the Window

Floor Mats

1

Cleaning the Window

Wires are mounted to the inside of the rear window. 
Wipe along the same direction as the wires with a 
soft cloth so as not to damage them.

Be careful not to spill fluids, such as water or glass 
cleaner, on or around the cover of both the front 
sensor camera and the rainfall/light sensor

*

.

Automatic Operation (automatic lighting 

control) P. 174

Automatic Intermittent Wipers

*

 P. 181

Front Sensor Camera P. 487

1

Floor Mats

If you use any floor mats that were not originally 
provided with your vehicle, make sure they are 
designed for your specific vehicle, fit correctly, and 
are securely anchored by the floor anchors.
Position the rear seat floor mat properly. If they are 
not properly positioned, the floor mat can interfere 
with the front seat functions.

Lock

Unlock

Maintaining Genuine Leather

1

Maintaining Genuine Leather

It is important to clean or wipe away dirt or dust as 
soon as possible. Spills can soak into leather resulting 
in stains. Dirt or dust can cause abrasions in the 
leather. In addition, please note that some dark 
colored clothing can rub onto the leather seats 
resulting in discoloration or stains.

* Not available on all models

18 ACURA MDX-31TZ56400.book  619 ページ  2017年8月23日 水曜日 午後4時1分

-------------------------------------------------------------------------------------------------------------------------------------------------------------

620

uu

Cleaning

u

Exterior Care

Main

tenan

ce

Exterior Care

Dust off the vehicle body after you drive.
Regularly inspect your vehicle for scratches on painted surfaces. A scratch on a 
painted surface can result in body rust. If you find a scratch, promptly repair it.

Wash the vehicle regularly. Wash more frequently when driving in the following 
conditions:
• If driving on roads with road salt.
• If driving in coastal areas.
• If tar, soot, bird droppings, insects, or tree sap are stuck to painted surfaces.

• Make sure to follow the instructions indicated on the automated car wash.
• Fold in the door mirrors.
• For models equipped with automatic intermittent wipers, turn the wipers off.

Washing the Vehicle

Using an Automated Car Wash

1

Washing the Vehicle

Do not spray water into the air intake vents. It can 
cause a malfunction.

Do not spray water onto the capless unit when the 
fuel fill door is open. It can cause damage to the fuel 
system or engine.

Air Intake Vents

1

Using an Automated Car Wash

When using an automated car wash that pulls the 
vehicle through with a conveyor, make sure vehicle is 
in car wash mode.

If you want to keep the transmission in 

(

N 

position [car wash mode] P. 476

18 ACURA MDX-31TZ56400.book  620 ページ  2017年8月23日 水曜日 午後4時1分

-------------------------------------------------------------------------------------------------------------------------------------------------------------

Continued

621

uu

Cleaning

u

Exterior Care

Main

tenan

ce

• Keep sufficient distance between the cleaning nozzle and the vehicle body.
• Take particular care around the windows. Standing too close may cause water to 

enter the vehicle interior.

• Do not spray high pressure water directly into the engine compartment. Instead, 

use low pressure water and a mild detergent. 

A good coat of automotive body wax helps protect your vehicle’s paint from the 
elements. Wax will wear off over time and expose your vehicle’s paint to the 
elements, so reapply as necessary.

If you get gasoline, oil, engine coolant, or battery fluid on resin coated parts, they 
may be stained or the coating may peel. Promptly wipe it away using a soft cloth and 
clean water.

Wipe using a glass cleaner.

Using High Pressure Cleaners

Applying Wax

Maintaining the Bumpers and Other Resin Coated Parts

Cleaning the Window

1

Applying Wax

NOTICE

Chemical solvents and strong cleaners can damage 
the paint, metal, and plastic on your vehicle. Wipe 
away spills immediately.

1

Maintaining the Bumpers and Other Resin Coated Parts

Ask a dealer about the correct coating material when 
you want to repair the painted surface of the parts 
made of resin.

18 ACURA MDX-31TZ56400.book  621 ページ  2017年8月23日 水曜日 午後4時1分

-------------------------------------------------------------------------------------------------------------------------------------------------------------

622

uu

Cleaning

u

Exterior Care

Main

tenan

ce

Aluminum is susceptible to deterioration caused by salt and other road 
contaminants. When necessary, as early as possible use a sponge and mild detergent 
to wipe away these contaminants. Do not use a stiff brush or harsh chemicals 
(including some commercial wheel cleaners). These can damage the protective finish 
on aluminum alloy wheels, resulting in corrosion. Depending on the type of finish, 
the wheels also may lose their luster or appear burnished. To avoid water stains, 
wipe the wheels dry with a cloth while they are still wet.

The inside lenses of exterior lights (headlights, brake lights, etc.) may fog temporarily 
if you have driven in the rain, or after the vehicle has been run through a car wash. 
Dew condensation also may build up inside the lenses when there is a significant 
enough difference between the ambient and inside lens temperatures (similar to 
vehicle windows fogging up in rainy conditions). These conditions are natural 
processes, not structural design problems in the exterior lights.
Lens design characteristics may result in moisture developing on the light lens frame 
surfaces. This also is not a malfunction.
However, if you see large amounts of water accumulation, or large water drops 
building up inside the lenses, have your vehicle inspected by a dealer.

Maintaining Aluminum Wheels

Fogged Exterior Light Lenses

18 ACURA MDX-31TZ56400.book  622 ページ  2017年8月23日 水曜日 午後4時1分

-------------------------------------------------------------------------------------------------------------------------------------------------------------

623

Main

tenan

ce

Accessories and Modifications

Accessories

When installing accessories, check the following:
• Do not install accessories on the windshield. They can obstruct your view and 

delay your reaction to driving conditions.

• Do not install any accessories over areas marked SRS Airbag, on the sides or backs 

of the front seats, on front or side pillars, or near the side windows.
Accessories installed in these areas may interfere with proper operation of the 
vehicle’s airbags or may be propelled into you or another occupant if the airbags 
deploy.

• Be sure electronic accessories do not overload electrical circuits or interfere with 

proper operation of your vehicle.

Fuses P. 658

• Before installing any electronic accessory, have the installer contact a dealer for 

assistance. If possible, have a dealer inspect the final installation.

1

Accessories and Modifications

Acura Genuine accessories are recommended to 
ensure proper operation on your vehicle.

3

WARNING

Improper accessories or modifications can 
affect your vehicle’s handling, stability, and 
performance, and cause a crash in which 
you can be seriously hurt or killed.

Follow all instructions in this owner’s 
manual regarding accessories and 
modifications.

18 ACURA MDX-31TZ56400.book  623 ページ  2017年8月23日 水曜日 午後4時1分

-------------------------------------------------------------------------------------------------------------------------------------------------------------

624

uu

Accessories and Modifications

u

Modifications

Main

tenan

ce

Modifications

Do not modify your vehicle in a manner that may affect its handling, stability, or 
reliability, or install non-genuine Acura parts or accessories that may have a similar 
effect.

Even minor modifications to vehicle systems can affect overall vehicle performance.
Always make sure all equipment is properly installed and maintained, and do not 
make any modification to your vehicle or its systems that might cause your vehicle 
to no longer meet federal, state, province, territory, and local regulations.

The on-board diagnostic port (OBD-II/SAE J1962 connector) installed on this vehicle 
is intended to be used with automobile system diagnostic devices or with other 
devices that Acura has approved. Use of any other type of device may adversely 
affect the vehicle’s electronic systems or allow them to be compromised, possibly 
resulting in a system malfunction, drained battery, or other unexpected problems.

Do not modify or attempt to repair any of the electrical components.

18 ACURA MDX-31TZ56400.book  624 ページ  2017年8月23日 水曜日 午後4時1分

-------------------------------------------------------------------------------------------------------------------------------------------------------------

625

Handling the Unexpected

This chapter explains how to handle unexpected troubles.

Tools

Types of Tools .................................. 626

If a Tire Goes Flat

Changing a Flat Tire

*

....................... 627

Temporarily Repairing a Flat Tire

*

..... 634

Engine Does Not Start

Checking the Engine ........................ 646
If the Keyless Access Remote Battery is 

Weak ............................................. 647

Emergency Engine Stop ................... 648

Jump Starting.................................... 649

Overheating

How to Handle Overheating............. 651

Indicator, Coming On/Blinking

If the Low Oil Pressure Indicator Comes On... 653
If the Charging System Indicator Comes 

On ................................................. 653

If the Malfunction Indicator Lamp Comes 

On or Blinks ................................... 654

If the Brake System Indicator (Red) Comes 

On ................................................... 655

If the Speed-Sensitive Electric Power Steering 

(EPS) System Indicator Comes On........... 655

If the Low Tire Pressure/TPMS Indicator 

Comes On or Blinks ....................... 657

If the Transmission System Indicator Blinks 

along with the Warning Message...... 657

Fuses

Fuse Locations ................................. 658
Inspecting and Changing Fuses........ 665

Emergency Towing........................... 666
When You Cannot Unlock the Fuel Fill Door.. 667
When You Cannot Open the Tailgate ..668
Refueling........................................... 669

Refueling From a Portable Fuel Container.. 669

* Not available on all models

18 ACURA MDX-31TZ56400.book  625 ページ  2017年8月23日 水曜日 午後4時1分

-------------------------------------------------------------------------------------------------------------------------------------------------------------

626

Han

d

lin
g the U

n

expected

Tools

Types of Tools

1

Types of Tools

The tools are stored in the cargo area.

Wheel Nut Wrench/Jack Handle

Jack

Jack Handle Bar

Models with a compact spare tire

Towing Hook

Funnel

Funnel

Tool Case

18 ACURA MDX-31TZ56400.book  626 ページ  2017年8月23日 水曜日 午後4時1分

-------------------------------------------------------------------------------------------------------------------------------------------------------------

627

Continued

Han

d

lin
g the U

n

expected

If a Tire Goes Flat

Changing a Flat Tire

*

If a tire goes flat while driving, grasp the steering wheel firmly, and brake gradually 
to reduce speed. Then, stop in a safe place. Replace the flat tire with a compact 
spare tire. Go to a dealer as soon as possible to have the full-size tire repaired or 
replaced.

1. Park the vehicle on firm, level, non-slippery surface and apply the parking brake.
2. Change the gear position to 

(

P.

3. Turn on the hazard warning lights and set the power mode to VEHICLE OFF 

(LOCK).

1

Changing a Flat Tire

*

Periodically check the tire pressure of the compact 
spare. It should be set to the specified pressure. 
Specified Pressure: 60 psi (420 kPa, 4.2 kgf/cm

2

)

When driving with the compact spare tire, keep the 
vehicle speed under 50 mph (80 km/h). Replace with 
a full-size tire as soon as possible.

The compact spare tire and wheel in your vehicle are 
specifically for this model. Do not use them with 
another vehicle. Do not use another type of compact 
spare tire or wheel with your vehicle.

Do not mount tire chains on a compact spare tire. 
If a chain-mounted front tire goes flat, remove one of 
the full-size rear tires and replace it with the compact 
spare tire. Remove the flat front tire and replace it 
with the full-size tire that was removed from the rear. 
Mount the tire chains on the front tire.

Do not use a puncture-repairing agent other than the 
one provided in the kit that came with your vehicle (if 
equipped). If a different agent is used, you may 
permanently damage the tire pressure sensor.

* Not available on all models

18 ACURA MDX-31TZ56400.book  627 ページ  2017年8月23日 水曜日 午後4時1分

-------------------------------------------------------------------------------------------------------------------------------------------------------------

uu

If a Tire Goes Flat

u

Changing a Flat Tire

*

628

Han

d

lin
g the U

n

expected

1. Push the rear edge of the handle on the 

floor lid and open the lid.

2. Take out the cargo floor box.

3. Take the jack, wheel nut wrench, and jack 

handle bar out of the tool case.

Getting Ready to Replace the Flat Tire

1

Changing a Flat Tire

*

NOTICE

Do not use the jack if it doesn’t work properly. Call 
your dealer or a professional towing service.

The wheel nut wrench supplied with your vehicle is 
specially adapted to fit the holder shaft. Do not use 
any other tool.

The subwoofer is located on the rear right side. Do 
not store anything in this area. Doing so may 
compromise vehicle audio performance.

Handle

Cargo Floor Box

Tool Case

* Not available on all models

18 ACURA MDX-31TZ56400.book  628 ページ  2017年8月23日 水曜日 午後4時1分

-------------------------------------------------------------------------------------------------------------------------------------------------------------

629

uu

If a Tire Goes Flat

u

Changing a Flat Tire

*

Continued

Han

d

lin
g the U

n

expected

4. Remove the cover on the cargo area lining 

to access the shaft for the spare tire hoist.

5. Put the wheel nut wrench with the jack 

handle bar on the hoist shaft.
Turn the wrench to the left to lower the 
spare tire to the ground.

6. Keep turning the wheel nut wrench to 

create slack in the cable.

7. Remove the bracket from the spare tire.

Cover

Jack Handle Bar

Wheel Nut Wrench

Bracket

18 ACURA MDX-31TZ56400.book  629 ページ  2017年8月23日 水曜日 午後4時1分

-------------------------------------------------------------------------------------------------------------------------------------------------------------


Content      ..     37      38      39      40     ..