Acura RSX Honda Integra. Manual - part 313


  Index      Acura     Acura RSX Honda Integra - service repair manual 2002-2006 year


Search            


Content   ..  311  312  313  314   ..


Acura RSX Honda Integra. Manual - part 313


01

S6M6A02E10411212231MAAT00

Standard: 0.05 mm (0.002 in.) minimum

14-378

Shafts and Clutches

Clutch Waved-plate Phase Difference Inspection

H

I

G

F

E

D

A

C

B

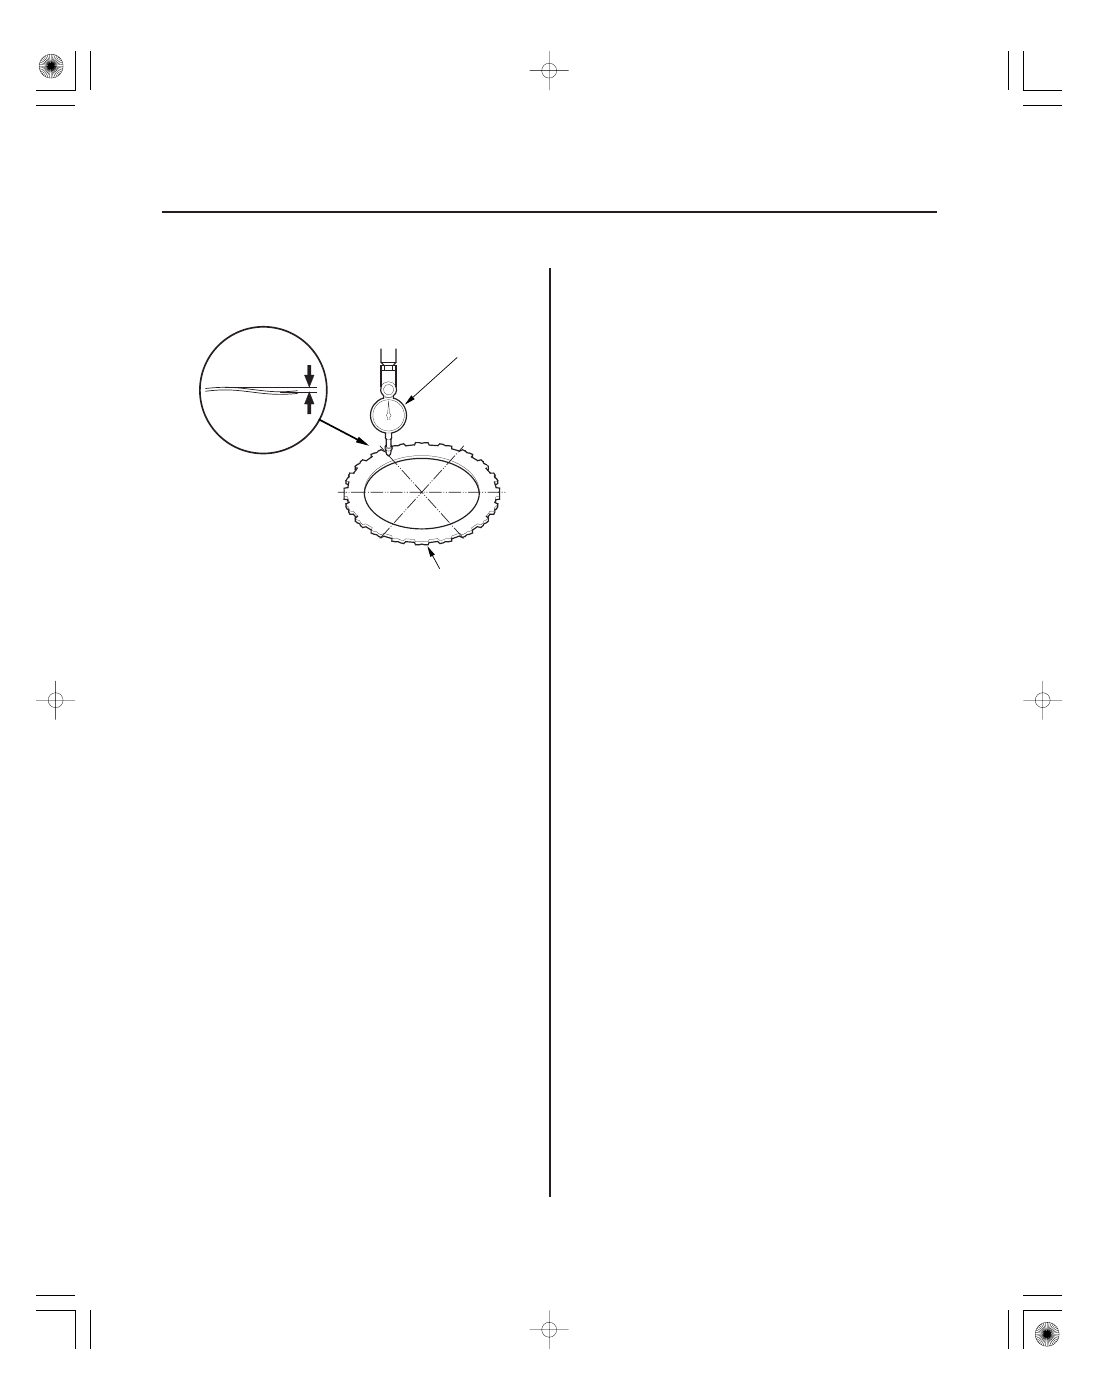
1. Place the clutch waved-plate (A) on a surface plate,

and set a dial indicator (B) on the waved-plate.

2. Find the bottom (D) of a phase difference of the

waved-plate, zero the dial indicator and make a
reference mark on the bottom of the waved-plate.

3. Rotate the waved-plate about 60-degrees apart

from the bottom while holding the waved-plate by
its circumference. The dial indicator should be at
the top (E) of a phase difference. Do not rotate the
waved-plate while holding its surface, always
rotate it with holding its circumference.

4. Read the dial indicator. The dial indicator reads the

phase difference (C) of the waved-plate between
bottom and top.

5. Rotate the waved-plate about 60-degrees. The dial

indicator should be at the bottom of a phase
difference (F and H), and zero the dial indicator.

6. Measure the phase difference at the other two tops

(G and I) of the waved-plate by following steps 3
through 5.

7. If the two values of the three measurements are

within the standard, the waved-plate is OK. If the
two values of the three measurements are out of
the standard, replace the waved-plate.

05/06/27 17:59:34 61S6M040_140_0379

01

02

03

04

S6M6A02E10411212211MAAT00

Special Tools Required

14-379

Clutch Clearance Inspection

E

D

C

A

B

A

B

C

D

E

F

F

E

D

C

A

B

Clutch compressor attachment 07ZAE-PRP0100

1. Inspect the clutch piston, discs, plates, and end

plate for wear and damage (see page 14-377), and
inspect clutch waved-plate phase difference
(see page 14-378), if necessary.

2. Install the clutch piston in the clutch drum. Do not

install the O-rings during inspection.

3. Install the waved spring (A) in the 1st clutch drum

(B). Starting with the clutch waved-plate,
alternately install the clutch plate (C) (4) and discs
(D) (4), then install the clutch end plate (E) with the
flat side toward the disc.

4. Install the waved spring (A) in the 2nd clutch drum

(B). Install the clutch flat-plate (C), then starting
with the clutch disc, alternately install the clutch
disc (D) (4) and waved-plates (E) (3), then install the
clutch end plate (F) with the flat side toward the
disc.

5. Install the waved spring (A) in the 3rd clutch drum

(B). Install the clutch flat-plate (C), then starting
with the clutch disc, alternately install the clutch
disc (D) (4) and waved-plates (E) (3), then install the
clutch end plate (F) with the flat side toward the
disc.

(cont’d)

05/06/27 17:59:35 61S6M040_140_0380

05

06

02

07

08

14-380

Shafts and Clutches

Clutch Clearance Inspection (cont’d)

A

B

C

D

E

A

B

C

D

E

A

B

C

B

A

D

C

150

160 N

(15

16 kgf,

33

35 lbf)

07ZAE-PRP0100

6. Install the waved spring (A) in the 4th clutch drum

(B). Starting with the clutch waved-plate,
alternately install the clutch plate (C) (3) and discs
(D) (3), then install the clutch end plate (E) with the
flat side toward the disc.

7. Install the waved spring (A) in the 5th clutch drum

(B). Starting with the clutch waved-plate,
alternately install the clutch plate (C) (3) and discs
(D) (3), then install the clutch end plate (E) with the
flat side toward the disc.

8. Install the snap ring with a screwdriver.

9. Set a dial indicator (A) on the clutch end plate (B).

10. Zero the dial indicator with the clutch end plate

lifted up to the snap ring (C).

11. Release the clutch end plate to lower the clutch end

plate, then put the special tool on the end plate (A).

05/06/27 17:59:35 61S6M040_140_0381

*01

Clutch End Plate-to-Top Disc Clearance:

Service Limit:
1st Clutch:

1.23

1.43 mm (0.048

0.056 in.)

2nd Clutch:

0.75

0.95 mm (0.030

0.037 in.)

3rd Clutch:

0.83

1.03 mm (0.033

0.041 in.)

4th Clutch:

0.73

0.93 mm (0.029

0.037 in.)

5th Clutch:

0.73

0.93 mm (0.029

0.037 in.)

1ST and 3RD CLUTCH END PLATES

Mark

Part Number

Thickness

2ND CLUTCH END PLATES

Mark

Part Number

Thickness

4TH and 5TH CLUTCH END PLATES

Mark

Part Number

Thickness

4TH and 5TH CLUTCH END PLATES

Mark

Part Number

Thickness

4TH and 5TH CLUTCH END PLATES

Mark

Part Number

Thickness

14-381

12. Press the special tool down with 150

160 N (15

16 kgf, 33

35 lbf) using a force gauge, and read

the dial indicator (B). The dial indicator reads the
clearance (C) between the clutch end plate and top
disc (D). Take measurements in at least three
places, and use the average as the actual clearance.

13. If the clearance is out of the service limit, select a

new clutch end plate from the following table.

1

22551-PRP-003

2.3 mm (0.091 in.)

2

22552-PRP-003

2.4 mm (0.094 in.)

3

22553-PRP-003

2.5 mm (0.098 in.)

4

22554-PRP-003

2.6 mm (0.102 in.)

5

22555-PRP-003

2.7 mm (0.106 in.)

6

22556-PRP-003

2.8 mm (0.110 in.)

7

22557-PRP-003

2.9 mm (0.114 in.)

8

22558-PRP-003

3.0 mm (0.118 in.)

9

22559-PRP-003

3.1 mm (0.122 in.)

10

22560-PRP-003

3.2 mm (0.126 in.)

11

22561-PRP-003

3.3 mm (0.130 in.)

12

22562-PRP-003

3.4 mm (0.134 in.)

1

22571-PRP-003

2.6 mm (0.102 in.)

2

22572-PRP-003

2.7 mm (0.106 in.)

3

22573-PRP-003

2.8 mm (0.110 in.)

4

22574-PRP-003

2.9 mm (0.114 in.)

5

22575-PRP-003

3.0 mm (0.118 in.)

6

22576-PRP-003

3.1 mm (0.122 in.)

7

22577-PRP-003

3.2 mm (0.126 in.)

8

22578-PRP-003

3.3 mm (0.130 in.)

9

22579-PRP-003

3.4 mm (0.134 in.)

2002 model: MRMA transmission number
1000001-1021247

11

22581-PRP-003

3.1 mm (0.122 in.)

12

22582-PRP-003

3.2 mm (0.126 in.)

13

22583-PRP-003

3.3 mm (0.130 in.)

14

22584-PRP-003

3.4 mm (0.134 in.)

15

22585-PRP-003

3.5 mm (0.138 in.)

16

22586-PRP-003

3.6 mm (0.142 in.)

17

22587-PRP-003

3.7 mm (0.146 in.)

18

22588-PRP-003

3.8 mm (0.150 in.)

19

22589-PRP-003

3.9 mm (0.154 in.)

2002 model: MRMA transmission number
1021248 or later 2003-2004 models

1

22581-PRP-901

3.0 mm (0.118 in.)

2

22582-PRP-901

3.1 mm (0.122 in.)

3

22583-PRP-901

3.2 mm (0.126 in.)

4

22584-PRP-901

3.3 mm (0.130 in.)

5

22585-PRP-901

3.4 mm (0.134 in.)

6

22586-PRP-901

3.5 mm (0.138 in.)

7

22587-PRP-901

3.6 mm (0.142 in.)

8

22588-PRP-901

3.7 mm (0.146 in.)

9

22589-PRP-901

3.8 mm (0.150 in.)

2005-2006 models

1

22581-RCL-003

2.1 mm (0.083 in.)

2

22582-RCL-003

2.2 mm (0.087 in.)

3

22583-RCL-003

2.3 mm (0.091 in.)

4

22584-RCL-003

2.4 mm (0.094 in.)

5

22585-RCL-003

2.5 mm (0.098 in.)

6

22586-RCL-003

2.6 mm (0.102 in.)

7

22587-RCL-003

2.7 mm (0.106 in.)

8

22588-RCL-003

2.8 mm (0.110 in.)

9

22589-RCL-003

2.9 mm (0.114 in.)

14. Install the new clutch end plate, then recheck the

clearance.

NOTE: If the thickest clutch end plate is installed,
but the clearance is still over the service limit,
replace the clutch discs and plates.

05/06/27 17:59:36 61S6M040_140_0382


Content   ..  311  312  313  314   ..