Acura RL (1996-2004 year). Manual - part 707


  Index      Acura     Acura RL 1996-2004 year - service repair manual


Search            


Content   ..  705  706  707  708   ..


Acura RL (1996-2004 year). Manual - part 707


From page 

24-124

 (K)

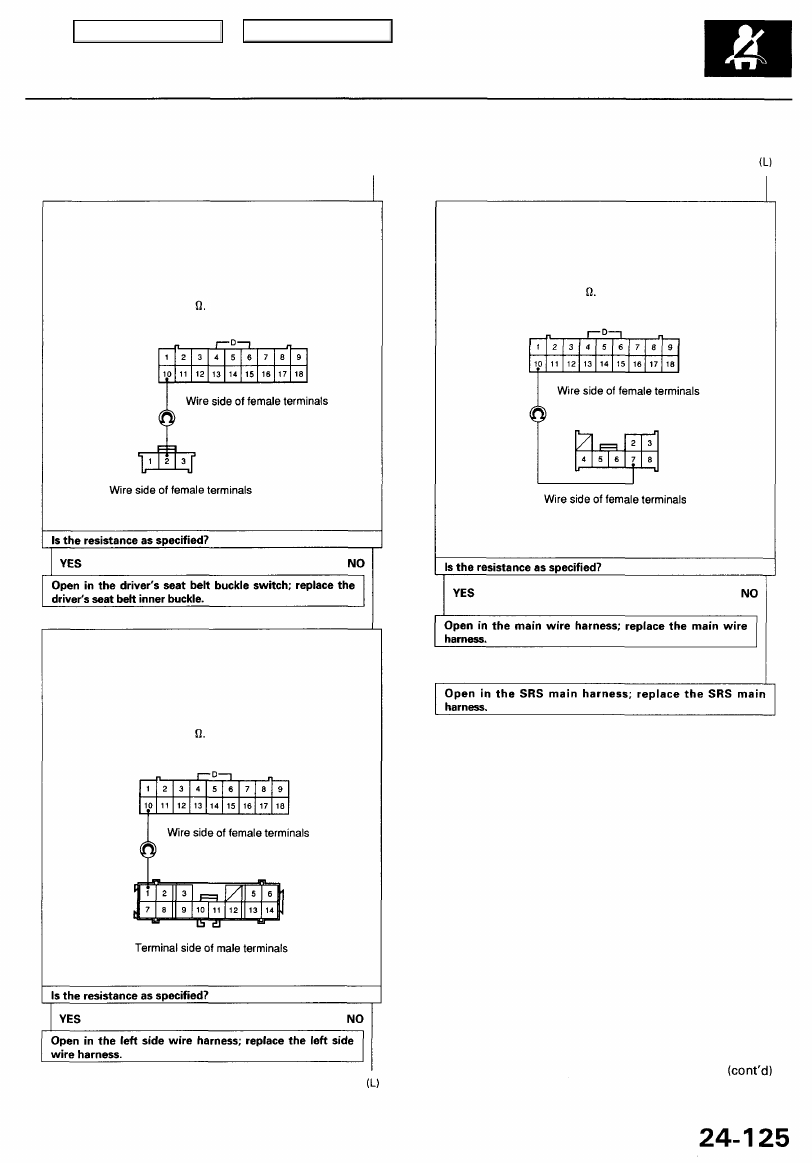
Check for an open between the left side wire harness and
SRS main harness:

1. Disconnect the left side wire harness 3P connector (see

page 

24-92

).

2. Check resistance between the No. 10 terminal of the SRS

main harness 18P connector and No. 2 terminal of the
left side wire harness 3P connector.

There should be 0 - 1.0

Check for an open in the SRS main harness:

1. Disconnect the main wire harness 8P connector from the

SRS main harness (see page 

24-93

).

2. Check resistance between the No. 10 terminal of the SRS

main harness 18P connector and the No. 7 terminal of the
SRS main harness 8P connector.

There should be 0 - 1.0

Check for an open between the main wire harness and SRS
main harness:

1. Disconnect the main wire harness 14P connectors (see

pag

24-93

).

2. Check resistance between the No. 10 terminal of the SRS

main harness 18P connector and No. 1 terminal of the
main wire harness 14P connector.

There should be 0- 1.0

Main Menu

Table of Contents

DTC 9-3 (cont'd)

(A) From page 

24-120

Troubleshooting - '99 - 01 Models

Check for a short to ground between the hot line and low
line:

1. Disconnect the driver's tension reducer solenoid connec-

tor.

2. Disconnect the dashboard wire harness 16P connector

from the left side wire harness (see page 

24-93

).

3. Disconnect the airbag connectors (see page 

24-33

).

4. Disconnect the SRS main harness 18P connector from

the SRS unit (see page 

24-92

).

5. Check resistance between the No. 10 and No. 11 terminals

of the SRS main harness 18P connector.

There should be 1 or more.

Check for a short to another wire between the left side wire
harness and the SRS main harness:

1. Disconnect the left side wire harness 3P connector from

the driver's seat belt buckle switch (see page 

24-92

).

2. Check resistance between the No. 10 and No. 11 terminals

of the SRS main harness 18P connector.

There should be 1 or more.

Check for a short to ground in the left side wire harness:

1. Disconnect the left side wire harness 3P connector from

the driver's seat belt buckle switch (see page 

24-92

).

2. Check resistance between the No. 1 terminal of the left

side wire harness 3P connector and body ground.
There should be 0 - 1.0

Check for a short to another wire between the main wire
harness and SRS main harness.

1. Disconnect the main wire harness 14P connector (see

page 

24-93

).

2. Check resistance between the No. 10 and No. 11 terminals

of the SRS main harness 18P connector.
There should be 1 or more.

To page 

24-127

 (O)

Main Menu

Table of Contents

Check for a short to ground in the SRS main harness.

1. Disconnect the main wire harness 8P connector from the

SRS main harness (see page 

24-93

).

2. Check resistance between the No. 11 terminal of the SRS

main harness 18P connector and body ground.

There should be 1 or more.

Check for a short to ground between the main wire harness
and the SRS main harness:

1. Disconnect the left side wire harness 14P connector (see

pag

24-93

).

2. Check resistance between the No. 11 terminal of the SRS

main harness 18P connector and body ground.

There should be 1 or more.

From page 

24-124

 (M)

From page 

24-126

 (O)

Check for a short to another wire in the SRS main harness.

1. Disconnect the main wire harness 8P connector from the

SRS main harness (see page 

24-93

).

2. Check resistance between the No. 10 and No. 11 terminals

of the SRS main harness 18P connector.
There should be 1 or more.

Main Menu

Table of Contents

Troubleshooting - '99 - 01 Models

DTC 9-4

CAUTION: Whenever the ignition switch is ON (II), or has

been turned OFF for less than 3 minutes, be careful not

to bump the SRS unit or the side impact sensor; the

airbags could accidentally deploy and cause damage or

injuries.

(H) To page 

24-131

 To page 

24-132

 (I)

Check for a DTC:

1. Connect the front passenger's seat belt buckle switch.

2. Erase the DTC memory (see page 

24-87

).

3. Read the DTC (see page 

24-84

).

Check for a DTC:

1. Disconnect the front passenger's seat belt buckle switch.

2. Erase the DTC memory (see page 

24-87

).

3. Read the DTC (see page 

24-84

).

To page 

24-132

 (B)

Check for reading the DTC:

1. Disconnect the front passenger's seat belt buckle switch.

2. Erase the DTC memory (see page 

24-87

).

3. Read the DTC (see page

 24-84

).

Intermittent failure, system is OK at this time. See
Troubleshooting Intermittent Failures on page

 24-87

.

(C) To page 

24-129

Main Menu

Table of Contents


Content   ..  705  706  707  708   ..