Acura RL. Manual - part 281


  Index      Acura     Acura RL - service repair manual 2005-2008 year


Search            


Content   ..  279  280  281  282   ..


Acura RL. Manual - part 281


1. Disconnect the input shaft (mainshaft) speed sensor connector, and remove the input shaft (mainshaft) 
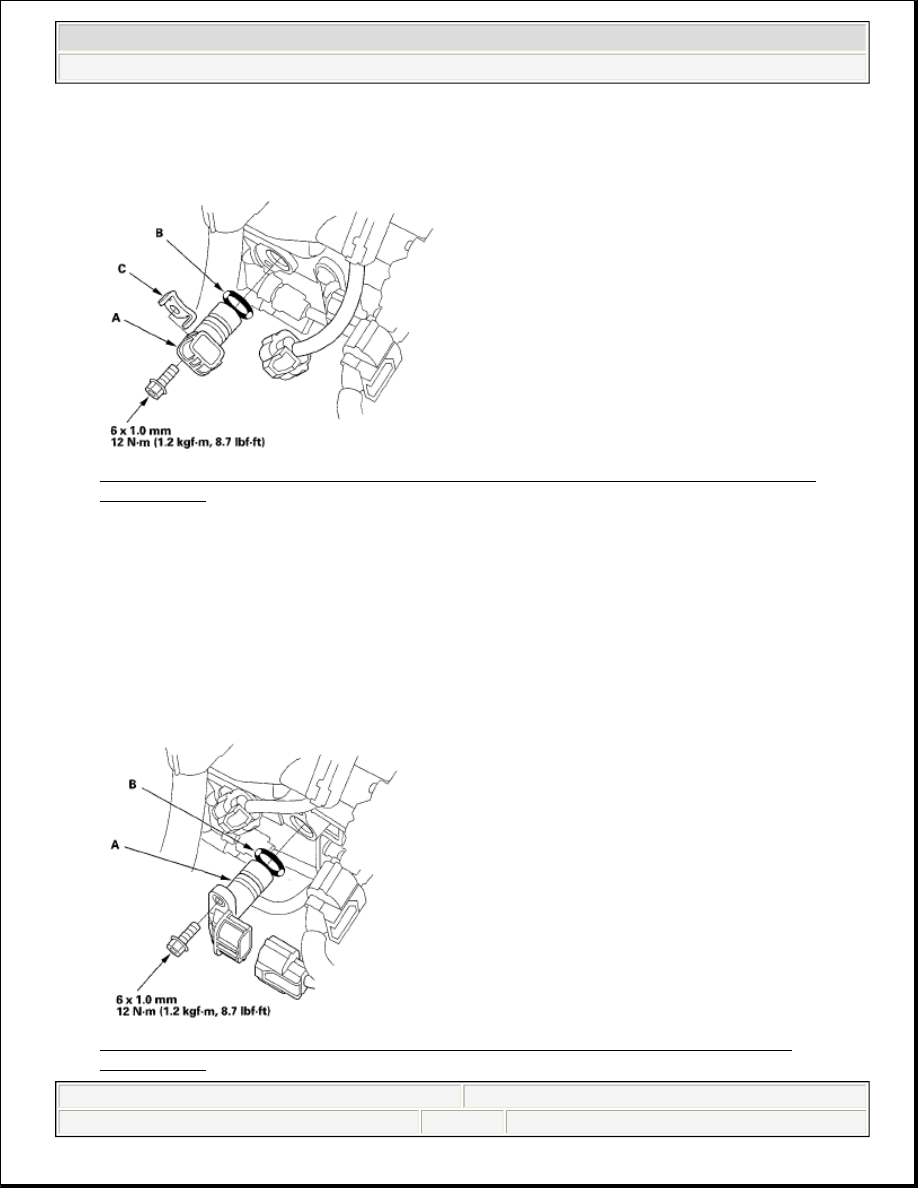
speed sensor (A). 

Fig. 232: Identifying Input Shaft (Mainshaft) Speed Sensor And Sensor Washer With Torque 
Specifications
 
Courtesy of AMERICAN HONDA MOTOR CO., INC. 

2. Install a new O-ring (B) on the new input shaft (mainshaft) speed sensor, then install the input shaft 

(mainshaft) speed sensor and sensor washer (C) in the transmission housing.  

3. Check the connector for rust, dirt, or oil, then connect the connector securely.  

OUTPUT SHAFT (COUNTERSHAFT) SPEED SENSOR REPLACEMENT 

1. Disconnect the output shaft (countershaft) speed sensor connector, and remove the output shaft 

(countershaft) speed sensor (A). 

Fig. 233: Identifying Output Shaft (Countershaft) Speed Sensor And O-Ring With Torque 
Specifications


2007 Acura RL 

2005-08 TRANSMISSION Automatic Transmission - RL


me 


Friday, June 05, 2009 1:18:14 PM

Page 295 

© 2005 Mitchell Repair Information Company, LLC. 

Courtesy of AMERICAN HONDA MOTOR CO., INC.

2. Install a new O-ring (B) on the new output shaft (countershaft) speed sensor, then install the output shaft 

(countershaft) speed sensor in the transmission housing.  

3. Check the connector for rust, dirt, or oil, then connect the connector securely.  

2ND CLUTCH TRANSMISSION FLUID PRESSURE SWITCH REPLACEMENT 

1. Make sure you have the anti-theft codes for the audio system and the navigation system. Make sure the 

ignition switch is in LOCK (0).  

2. Remove the battery trim and left upper fender cover.  

3. Disconnect the negative terminal from the battery, then disconnect the positive terminal.  

4. Remove the battery hold-down bracket, and remove the battery and battery tray.  

5. Remove the air cleaner (see AIR CLEANER REMOVAL/INSTALLATION ).  

6. Remove the bolts securing the under-hood fuse/relay box, and move the fuse/relay box.  

7. Disconnect the 2nd clutch transmission fluid pressure switch connector, and remove the 2nd clutch 

transmission fluid pressure switch (A). 

Fig. 234: Identifying 2nd Clutch Transmission Fluid Pressure Switch With Torque Specifications 
Courtesy of AMERICAN HONDA MOTOR CO., INC. 

8. Make sure there is no water, oil, dust, or foreign particles inside the connector.  

9. Install the new 2nd clutch transmission fluid pressure switch and a new sealing washer (B), and tighten 

the switch.  

10. Connect the connector securely.  

11. Install the air cleaner (see AIR CLEANER REMOVAL/INSTALLATION ).  

12. Install the battery tray, battery, and battery hold-down bracket, then connect the battery terminals.  

13. Install the left upper fender cover and battery trim.  

14. Enter the anti-theft codes for the audio system and the navigation system. 


2007 Acura RL 

2005-08 TRANSMISSION Automatic Transmission - RL


me 


Friday, June 05, 2009 1:18:14 PM

Page 296 

© 2005 Mitchell Repair Information Company, LLC. 

15. Do the steering column memorization (see STEERING COLUMN POSITION MEMORIZATION ).  

16. Do the power window control unit reset procedure (see RESETTING THE POWER WINDOW 

CONTROL UNIT ).  

3RD CLUTCH TRANSMISSION FLUID PRESSURE SWITCH REPLACEMENT 

1. Remove the splash shield.  

2. Disconnect the 3rd clutch transmission fluid pressure switch connector, and remove the 3rd clutch 

transmission fluid pressure switch (A). 

Fig. 235: Identifying 3rd Clutch Transmission Fluid Pressure Switch And Sealing Washer With 
Torque Specifications
 
Courtesy of AMERICAN HONDA MOTOR CO., INC. 

3. Make sure there is no water, oil, dust, or foreign particles inside the connector.  

4. Install the new 3rd clutch transmission fluid pressure switch and a new sealing washer (B), and tighten 

the switch.  

5. Connect the connector securely.  

6. Install the splash shield.  

4TH CLUTCH TRANSMISSION FLUID PRESSURE SWITCH REPLACEMENT 

1. Remove the battery trim and left upper fender cover.  

2. Remove the air cleaner (see AIR CLEANER REMOVAL/INSTALLATION ).  

3. Disconnect the 4th clutch transmission fluid pressure switch harness connectors (A). 


2007 Acura RL 

2005-08 TRANSMISSION Automatic Transmission - RL


me 


Friday, June 05, 2009 1:18:14 PM

Page 297 

© 2005 Mitchell Repair Information Company, LLC. 

Fig. 236: Identifying 4th Clutch Transmission Fluid Pressure Switch Connectors And Harness 
Clamp Bracket With Torque Specifications
 
Courtesy of AMERICAN HONDA MOTOR CO., INC. 

4. Remove the bolt securing the connector bracket, and remove the connector bracket (B) and harness clamp 

bracket (C).  

5. Remove the 4th clutch transmission fluid pressure switch (A). 

Fig. 237: Identifying 4th Clutch Transmission Fluid Pressure Switch And Sealing Washer With 
Torque Specifications
 
Courtesy of AMERICAN HONDA MOTOR CO., INC. 

6. Make sure there is no water, oil, dust, or foreign particles inside the connector.  


2007 Acura RL 

2005-08 TRANSMISSION Automatic Transmission - RL


me 


Friday, June 05, 2009 1:18:14 PM

Page 298 

© 2005 Mitchell Repair Information Company, LLC. 


Content   ..  279  280  281  282   ..