Acura CSX. Manual - part 471


  Index      Acura     Acura CSX - P/NO. 61SNR03 - service repair manual 2006-2009 year


Search            


Content   ..  469  470  471  472   ..


Acura CSX. Manual - part 471


*01

SNR9A00G10500000000DAAT00

21-3

Climate Control

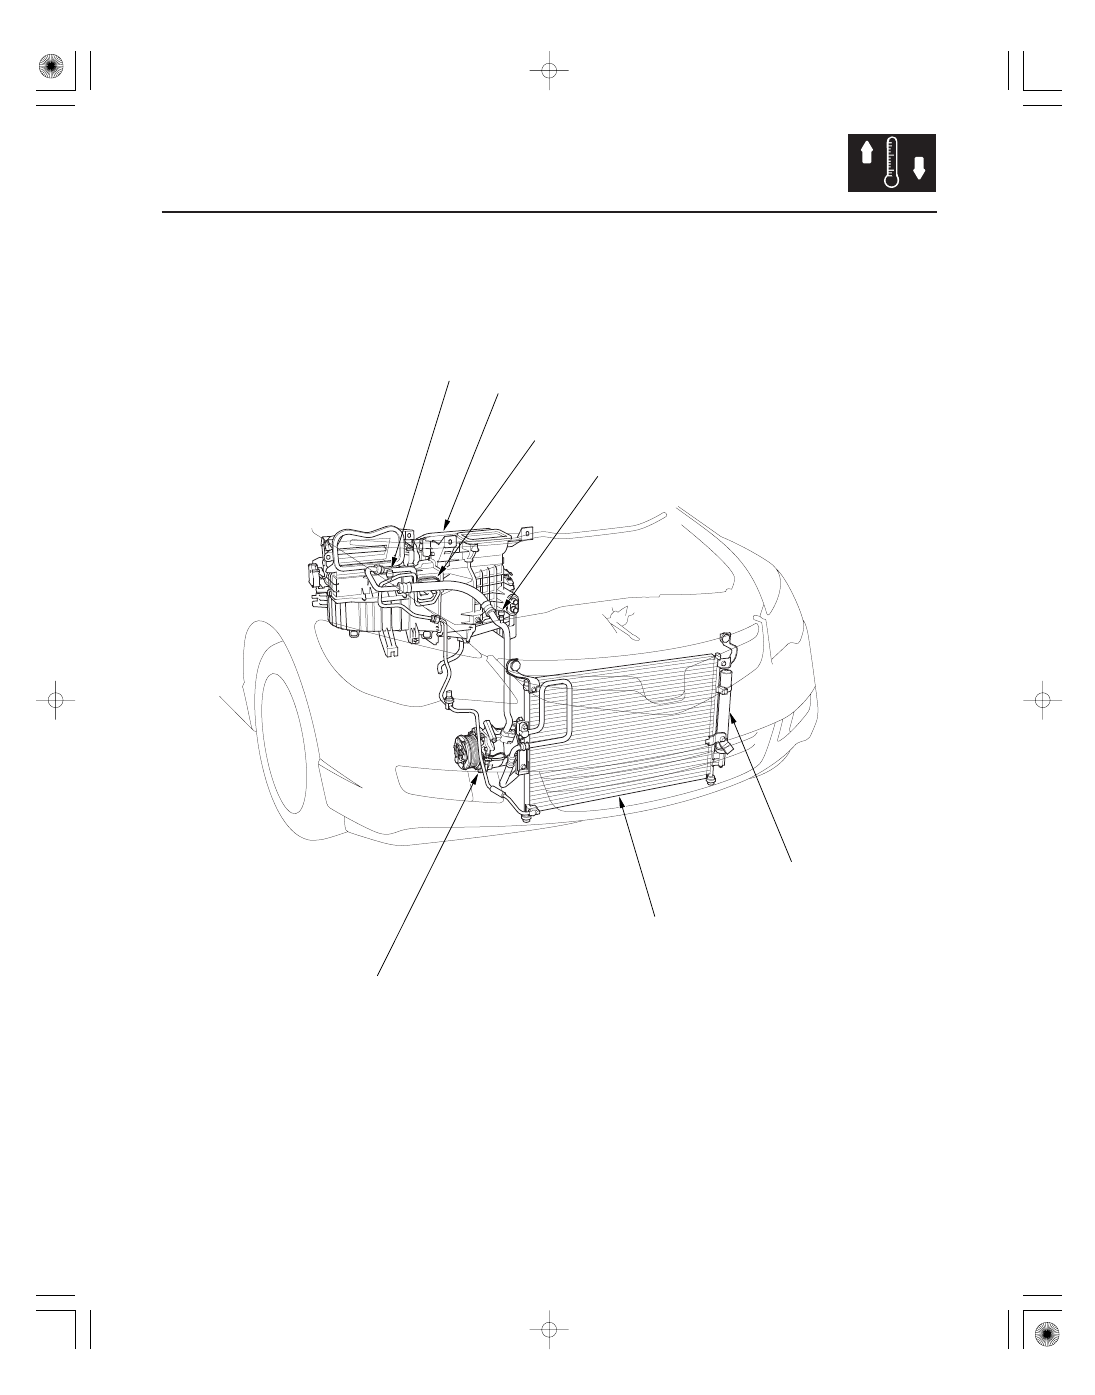
Component Location Index

SERVICE VALVE
(HIGH-PRESSURE SIDE)

A/C COMPRESSOR

RECEIVER/DRYER DESICCANT

A/C CONDENSER

SERVICE VALVE
(LOW-PRESSURE SIDE)

EXPANSION VALVE

EVAPORATOR CORE
(Located in the heater unit)

Replacement, page 21-83
Clutch Check, page 21-85
Clutch Overhaul, page 21-86
Thermal Protector Check, page 21-85
Thermal Protector Replacement, page 21-87
Relief Valve Replacement, page 21-87

Replacement, page 21-89

Replacement, page 21-88

Replacement, page 21-80

Replacement, page 21-78

08/08/21 14:40:48 61SNR030_210_0004

*02

21-4

Climate Control

A/C PRESSURE SENSOR

RADIATOR FAN

A/C CONDENSER FAN

A/C CONDENSER FAN RELAY

BLOWER MOTOR RELAY

RADIATOR FAN RELAY

A/C COMPRESSOR CLUTCH RELAY

FAN CONTROL RELAY

UNDER-HOOD FUSE/RELAY BOX

A/C DIODE B

A/C DIODE A

ECM/PCM

OUTSIDE AIR TEMPERATURE SENSOR

Test, page 22-70

Test, page 22-70

Test, page 22-70

Test, page 22-70

Test, page 22-70

Test, page 21-68
Replacement, page 21-68

08/08/21 14:40:50 61SNR030_210_0005

*03

21-5

EVAPORATOR CORE
(Located in the heater unit)

EVAPORATOR TEMPERATURE
SENSOR

HEATER UNIT/CORE

RECIRCULATION
CONTROL MOTOR

POWER TRANSISTOR

AIR MIX CONTROL MOTOR

DUST AND POLLEN FILTER

CLIMATE CONTROL UNIT

SUNLIGHT SENSOR

IN-CAR TEMPERATURE SENSOR

MODE CONTROL MOTOR

BLOWER UNIT

EXPANSION VALVE

Replacement, page 21-78

Test, page 21-70

Replacement, page 21-81

Test, page 21-74
Replacement,

page 21-74

Test, page 21-71

Test, page 21-72
Replacement, page 21-72

Replacement,

page 21-75

Removal/Installation, page 21-75

Test, page 21-69
Replacement, page 21-69

Test, page 21-67
Replacement, page 21-67

Test, page 21-73
Replacement, page 21-73

Removal/Installation,

page 21-76

Component Replacement,

page 21-77

Replacement, page 21-80

08/08/21 14:40:55 61SNR030_210_0006

SNR9A00G10100000000BAAT00

*01

*02

SNR9A00G10100000000MAAT00

21-6

21-6

Climate Control

A/C Service Tips and Precautions

A/C System Inspection

A

• Compressed air mixed with the R-134a forms a

combustible vapor.

• The vapor can burn or explode causing serious

injury.

• Never use compressed air to pressure test

R-134a service equipment or vehicle air
conditioning systems.

• Air conditioning refrigerant or lubricant vapor

can irritate your eyes, nose, or throat.

• Be careful when connecting service equipment.
• Do not breathe refrigerant or vapor.

The air conditioning system uses HFC-134a (R-134a)
refrigerant and polyalkyleneglycol (PAG) refrigerant oil,
which are not compatible with CFC-12 (R-12) refrigerant
or mineral oil. Do not use R-12 refrigerant or mineral oil
in this system, and do not attempt to use R-12 servicing
equipment; damage to the air conditioning system or
your servicing equipment will result.
Use only service equipment that is U.L.-listed and is
certified to meet the requirements of SAE J2210 to
remove R-134a from the air conditioning system.

If accidental system discharge occurs, ventilate the
work area before resuming service.

R-134a service equipment or vehicle air conditioning
systems should not be pressure tested or leak tested
with compressed air.

Additional health and safety information may be
obtained from the refrigerant and lubricant
manufacturers.

• Always disconnect the negative cable from the

battery whenever replacing air conditioning parts.

• Keep moisture and dirt out of the system. When

disconnecting any lines, plug or cap the fittings
immediately; don’t remove the caps or plugs until
just before you reconnect each line.

• Before connecting any hose or line, apply a few drops

of refrigerant oil to the O-ring.

• When tightening or loosening a fitting, use a second

wrench to support the matching fitting.

• When discharging the system, use an R-134a

refrigerant recovery/recycling/charging station; don’t
release refrigerant into the atmosphere.

Before troubleshooting any problem with the air
conditioning system, do the following:

1. With the ignition switch in LOCK (0), inspect the A/C

components, the pressure lines, and the hoses for
stains that may indicate a refrigerant or a
compressor oil leak.

2. Check the A/C condenser (A) for material clogging

the fins or for damage to the fins:

• Carefully clean any material from the A/C

condenser fins with water and detergent. If
deeper cleaning is required, clean the fins with
Honda brite cleaner (P/N 08732-0020B).

• Be sure to dry the A/C condenser completely.
• Refer to the Refrigerant Leak Check (see page

21-93) to confirm leaks if there is visible damage
to the A/C condenser.

Check for stains.

08/08/21 14:40:55 61SNR030_210_0007


Content   ..  469  470  471  472   ..