Oracle VM VirtualBox. User Manual (Version 7.0.18) - page 1
Contents
1
Preface
1
2
First Steps
1
2.1
Why is Virtualization Useful?
2
2.2
Some Terminology
2
2.3
Features Overview
3
2.4
Supported Host Operating Systems
5
2.4.1
Host CPU Requirements
6
2.5
Installing Oracle VM VirtualBox and Extension Packs
6
2.6
Starting Oracle VM VirtualBox
7
2.7
VirtualBox Manager
7
2.7.1
The Machine List
8
2.7.2
The Details Pane
9
2.7.3
VirtualBox Manager Tools
10
2.7.4
Help Viewer
12
2.7.5
About VirtualBox Manager Wizards
13
2.8
Creating Your First Virtual Machine
13
2.8.1
Create Virtual Machine Wizard: Name and Operating System
14
2.8.2
(Optional) Create Virtual Machine Wizard: Unattended Guest OS Install
15
2.8.3
Create Virtual Machine Wizard: Hardware
16
2.8.4
Create Virtual Machine Wizard: Virtual Hard Disk
17
2.8.5
Create Virtual Machine Wizard: Summary
18
2.8.6
Some Examples of Unattended Installation
18
2.9
Running Your Virtual Machine
19
2.9.1
Starting a New VM for the First Time
19
2.9.2
Capturing and Releasing Keyboard and Mouse
19
2.9.3
Typing Special Characters
20
2.9.4
Changing Removable Media
21
2.9.5
Resizing the Machine’s Window
21
2.9.6
Saving the State of the Machine
22
2.10
Using VM Groups
23
2.11
Snapshots
24
2.11.1
Taking, Restoring, and Deleting Snapshots
25
2.11.2
Snapshot Contents
26
2.12
Virtual Machine Configuration
27
2.13
Removing and Moving Virtual Machines
27
2.14
Cloning Virtual Machines
28
2.15
Importing and Exporting Virtual Machines
30
2.15.1
About the OVF Format
30
2.15.2
Importing an Appliance in OVF Format
31
2.15.3
Exporting an Appliance in OVF Format
32
2.16
Integrating with Oracle Cloud Infrastructure
32
2.16.1
Preparing for Oracle Cloud Infrastructure Integration
33
2.16.2
Creating an API Signing Key Pair
33
2.16.3
Uploading the Public Key to Oracle Cloud Infrastructure
34
2.16.4
Creating a Cloud Profile
34
2.16.5
Using the Cloud Profile Manager
35
ii
Contents
2.16.6
Using Oracle VM VirtualBox With Oracle Cloud Infrastructure .
37
2.16.7
Using Cloud Virtual Machines
38
2.16.8
Exporting an Appliance to Oracle Cloud Infrastructure
42
2.16.9
Importing an Instance from Oracle Cloud Infrastructure
45
2.16.10 Using a Cloud Network
46
2.16.11 Using VBoxManage Commands With Oracle Cloud Infrastructure
46
2.17
Preferences
47
2.18
Alternative Front-Ends
48
2.19
Soft Keyboard
49
2.19.1
Using the Soft Keyboard
49
2.19.2
Creating a Custom Keyboard Layout
50
2.20
Monitoring of Virtual Machines
50
2.20.1
VM Activity Overview
51
2.20.2
Session Information Dialog
51
2.21
The Log Viewer
52
3
Installation Details
55
3.1
Installing on Windows Hosts
55
3.1.1
Prerequisites
55
3.1.2
Windows Installation Directory Security Requirements
55
3.1.3
Performing the Installation
55
3.1.4
Uninstallation
57
3.1.5
Unattended Installation
57
3.1.6
Public Properties
57
3.2
Installing on macOS Hosts
58
3.2.1
Performing the Installation
58
3.2.2
Uninstallation
58
3.2.3
Unattended Installation
58
3.3
Installing on Linux Hosts
59
3.3.1
Prerequisites
59
3.3.2
The Oracle VM VirtualBox Kernel Modules
59
3.3.3
Performing the Installation
60
3.3.4
The vboxusers Group
64
3.3.5
Starting Oracle VM VirtualBox on Linux
64
3.4
Installing on Oracle Solaris Hosts
64
3.4.1
Performing the Installation
64
3.4.2
The vboxuser Group
65
3.4.3
Starting Oracle VM VirtualBox on Oracle Solaris
65
3.4.4
Uninstallation
65
3.4.5
Unattended Installation
65
3.4.6
Configuring a Non-Global Zone for Running Oracle VM VirtualBox
66
3.5
Installing an Extension Pack
66
3.5.1
The Extension Pack Manager
67
4
Configuring Virtual Machines
68
4.1
Supported Guest Operating Systems
68
4.1.1
Mac OS X Guests
69
4.1.2
64-bit Guests
70
4.2
Unattended Guest Installation
70
4.2.1
Using VBoxManage Commands for Unattended Guest Installation
71
4.3
Emulated Hardware
72
4.4
General Settings
73
4.4.1
Basic Tab
73
4.4.2
Advanced Tab
73
iii
Contents
4.4.3
Description Tab
74
4.4.4
Disk Encryption Tab
74
4.5
System Settings
74
4.5.1
Motherboard Tab
74
4.5.2
Processor Tab
76
4.5.3
Acceleration Tab
77
4.6
Display Settings
77
4.6.1
Screen Tab
77
4.6.2
Remote Display Tab
78
4.6.3
Recording Tab
78
4.7
Storage Settings
79
4.8
Audio Settings
81
4.9
Network Settings
81
4.10
Serial Ports
81
4.11
USB Support
83
4.11.1
USB Settings
83
4.11.2
Implementation Notes for Windows and Linux Hosts . .
84
4.12
Shared Folders
85
4.13
User Interface
85
4.14
Alternative Firmware (EFI)
85
4.14.1
Video Modes in EFI
86
4.14.2
Specifying Boot Arguments
88
5
Guest Additions
89
5.1
Introduction to Guest Additions
89
5.2
Installing and Maintaining Guest Additions
90
5.2.1
Guest Additions for Windows
90
5.2.2
Guest Additions for Linux
93
5.2.3
Guest Additions for Oracle Solaris
96
5.2.4
Guest Additions for OS/2
97
5.3
Shared Folders
97
5.3.1
Manual Mounting
98
5.3.2
Automatic Mounting
100
5.4
Drag and Drop
100
5.4.1
Supported Formats
101
5.4.2
Known Limitations
102
5.5
Hardware-Accelerated Graphics
102
5.5.1
Hardware 3D Acceleration (OpenGL and Direct3D 8/9)
102
5.5.2
Hardware 2D Video Acceleration for Windows Guests . .
103
5.6
Seamless Windows
103
5.7
Guest Properties
104
5.7.1
Using Guest Properties to Wait on VM Events
106
5.8
Guest Control File Manager
106
5.8.1
Using the Guest Control File Manager
107
5.9
Guest Control of Applications
108
5.10
Memory Overcommitment
108
5.10.1
Memory Ballooning
108
5.10.2
Page Fusion
109
5.11
Controlling Virtual Monitor Topology
110
5.11.1
X11/Wayland Desktop Environments
110
6
Virtual Storage
111
6.1
Hard Disk Controllers
111
6.2
Disk Image Files (VDI, VMDK, VHD, HDD)
114
iv
Contents
6.3
The Virtual Media Manager
115
6.3.1
Creating a Virtual Hard Disk Image
117
6.3.2
Creating a Virtual Optical Disk Image
118
6.3.3
Creating a Virtual Floppy Disk Image
118
6.4
Special Image Write Modes
119
6.5
Differencing Images
120
6.6
Cloning Disk Images
122
6.7
Host Input/Output Caching
123
6.8
Limiting Bandwidth for Disk Images
123
6.9
CD/DVD Support
124
6.10
iSCSI Servers
125
6.11
vboximg-mount: A Utility for FUSE Mounting a Virtual Disk Image .
125
6.11.1
Viewing Detailed Information About a Virtual Disk Image
126
6.11.2
Mounting a Virtual Disk Image
127
7
Virtual Networking
128
7.1
Virtual Networking Hardware
128
7.2
Introduction to Networking Modes
129
7.3
Network Address Translation (NAT)
130
7.3.1
Configuring Port Forwarding with NAT
131
7.3.2
PXE Booting with NAT
131
7.3.3
NAT Limitations
132
7.4
Network Address Translation Service
132
7.5
Bridged Networking
134
7.6
Internal Networking
135
7.7
Host-Only Networking
136
7.8
UDP Tunnel Networking
137
7.9
VDE Networking
138
7.10
Cloud Networks
139
7.11
Network Manager
139
7.11.1
Host-Only Networks Tab
139
7.11.2
NAT Networks Tab
139
7.11.3
Cloud Networks Tab
140
7.12
Limiting Bandwidth for Network Input/Output
140
7.13
Improving Network Performance
141
8
Remote Virtual Machines
143
8.1
Remote Display (VRDP Support)
143
8.1.1
Common Third-Party RDP Viewers
143
8.1.2
VBoxHeadless, the Remote Desktop Server
144
8.1.3
Step by Step: Creating a Virtual Machine on a Headless Server
145
8.1.4
Remote USB
147
8.1.5
RDP Authentication
147
8.1.6
RDP Encryption
148
8.1.7
Multiple Connections to the VRDP Server
149
8.1.8
Multiple Remote Monitors
150
8.1.9
VRDP Video Redirection
150
8.1.10
VRDP Customization
150
8.2
Teleporting
151
8.3
VBoxHeadless
152
9
VBoxManage
154
9.1
Introduction
154
9.2
Commands Overview
155
v
Contents
9.3
General Options
167
9.4
VBoxManage
168
9.5
VBoxManage list
170
9.6
VBoxManage showvminfo
175
9.7
VBoxManage registervm
177
9.8
VBoxManage unregistervm
178
9.9
VBoxManage createvm
179
9.10
VBoxManage modifyvm
180
9.11
VBoxManage clonevm
203
9.12
VBoxManage movevm
205
9.13
VBoxManage encryptvm
205
9.14
VBoxManage cloud
207
9.15
VBoxManage cloudprofile
214
9.16
VBoxManage import
216
9.17
VBoxManage export
220
9.18
VBoxManage signova
224
9.19
VBoxManage startvm
225
9.20
VBoxManage controlvm
226
9.21
VBoxManage unattended
244
9.22
VBoxManage discardstate
246
9.23
VBoxManage adoptstate
247
9.24
VBoxManage snapshot
247
9.25
VBoxManage closemedium
251
9.26
VBoxManage storageattach
252
9.27
VBoxManage storagectl
256
9.28
VBoxManage bandwidthctl
257
9.29
VBoxManage showmediuminfo
260
9.30
VBoxManage createmedium
260
9.31
VBoxManage modifymedium
262
9.32
VBoxManage clonemedium
264
9.33
VBoxManage mediumproperty
265
9.34
VBoxManage encryptmedium
267
9.35
VBoxManage checkmediumpwd
268
9.36
VBoxManage convertfromraw
269
9.37
VBoxManage mediumio
271
9.38
VBoxManage setextradata
273
9.39
VBoxManage getextradata
274
9.40
VBoxManage setproperty
275
9.41
VBoxManage usbfilter
276
9.42
VBoxManage sharedfolder
279
9.43
VBoxManage guestproperty . .
281
9.44
VBoxManage guestcontrol
284
9.45
VBoxManage debugvm
295
9.46
VBoxManage metrics
302
9.47
VBoxManage natnetwork
305
9.48
VBoxManage hostonlyif
309
9.49
VBoxManage hostonlynet
310
9.50
VBoxManage dhcpserver
311
9.51
VBoxManage usbdevsource
322
9.52
VBoxManage extpack
322
9.53
VBoxManage updatecheck
324
9.54
VBoxManage modifynvram
325
9.55
vboximg-mount
328
vi
Contents
10 Advanced Topics
332
10.1
Automated Guest Logins
332
10.1.1
Automated Windows Guest Logins
332
10.1.2
Automated Linux and UNIX Guest Logins
333
10.2
Advanced Configuration for Windows Guests
336
10.2.1
Automated Windows System Preparation
336
10.3
Advanced Configuration for Linux and Oracle Solaris Guests
337
10.3.1
Manual Setup of Selected Guest Services on Linux
337
10.3.2
Guest Graphics and Mouse Driver Setup in Depth
337
10.4
CPU Hot-Plugging
338
10.5
Webcam Passthrough
339
10.5.1
Using a Host Webcam in the Guest
339
10.5.2
Windows Hosts
340
10.5.3
macOS Hosts
340
10.5.4
Linux and Oracle Solaris Hosts
340
10.6
Advanced Display Configuration
340
10.6.1
Custom VESA Resolutions
340
10.6.2
Configuring the Maximum Resolution of Guests When Using the
Graphical Frontend
341
10.7
Advanced Storage Configuration
341
10.7.1
Using a Raw Host Hard Disk From a Guest
341
10.7.2
Configuring the Hard Disk Vendor Product Data (VPD)
343
10.7.3
Access iSCSI Targets Using Internal Networking
344
10.8
Fine Tuning the Oracle VM VirtualBox NAT Engine
345
10.8.1
Configuring the Address of a NAT Network Interface
345
10.8.2
Configuring the Boot Server (Next Server) of a NAT Network Interface .
345
10.8.3
Tuning TCP/IP Buffers for NAT
345
10.8.4
Binding NAT Sockets to a Specific Interface
345
10.8.5
Enabling DNS Proxy in NAT Mode
346
10.8.6
Using the Host’s Resolver as a DNS Proxy in NAT Mode
346
10.8.7
Configuring Aliasing of the NAT Engine
347
10.9
Configuring the BIOS DMI Information
347
10.10
Configuring Custom ACPI Tables
349
10.11
Fine Tuning Timers and Time Synchronization
349
10.11.1 Configuring the Guest Time Stamp Counter (TSC) to Reflect Guest
Execution
349
10.11.2 Accelerate or Slow Down the Guest Clock
349
10.11.3 Tuning the Guest Additions Time Synchronization Parameters
350
10.11.4 Disabling the Guest Additions Time Synchronization
350
10.12
Installing the Alternate Bridged Networking Driver on Oracle Solaris 11 Hosts
350
10.13
Oracle VM VirtualBox VNIC Templates for VLANs on Oracle Solaris 11 Hosts .
351
10.14
Configuring Multiple Host-Only Network Interfaces on Oracle Solaris Hosts . .
352
10.15
Configuring the Oracle VM VirtualBox CoreDumper on Oracle Solaris Hosts . .
352
10.16
Oracle VM VirtualBox and Oracle Solaris Kernel Zones
353
10.17
Locking Down VirtualBox Manager
354
10.17.1 Customizing VirtualBox Manager
354
10.17.2 VM Selector Customization
354
10.17.3 Configure VM Selector Menu Entries
355
10.17.4 Configure VM Window Menu Entries
355
10.17.5 Configure VM Window Status Bar Entries
360
10.17.6 Configure VM Window Visual Modes
361
10.17.7 Host Key Customization
362
10.17.8 Action when Terminating the VM
362
vii
Contents
10.17.9 Default Action when Terminating the VM
363
10.17.10Action for Handling a Guru Meditation
363
10.17.11Configuring Automatic Mouse Capturing
364
10.17.12Requesting Legacy Full-Screen Mode
364
10.17.13Removing Certain Modes of Networking From the GUI
364
10.18
Starting the Oracle VM VirtualBox Web Service Automatically .
365
10.18.1 Linux: Starting the Web Service With init
365
10.18.2 Oracle Solaris: Starting the Web Service With SMF
366
10.18.3 macOS: Starting the Web Service With launchd
366
10.19
Oracle VM VirtualBox Watchdog
366
10.19.1 Memory Ballooning Control
367
10.19.2 Host Isolation Detection
368
10.19.3 More Information
368
10.19.4 Linux: Starting the Watchdog Service With init
369
10.19.5 Oracle Solaris: Starting the Watchdog Service With SMF
369
10.20
Other Extension Packs
370
10.21
Starting Virtual Machines During System Boot
370
10.21.1 Linux: Starting the Autostart Service With init
370
10.21.2 Oracle Solaris: Starting the Autostart Service With SMF
371
10.21.3 macOS: Starting the Autostart Service With launchd . .
371
10.21.4 Windows: Starting the Autostart Service
372
10.22
Encryption of VMs
373
10.22.1 Limitations of VM Encryption
373
10.22.2 Encrypting a VM
373
10.22.3 Opening the Encrypted VM
374
10.22.4 Decrypting Encrypted VMs
374
10.23
Oracle VM VirtualBox Expert Storage Management
374
10.24
Handling of Host Power Management Events
374
10.25
Passing Through SSE4.1/SSE4.2 Instructions
375
10.26
Support for Keyboard Indicator Synchronization
375
10.27
Capturing USB Traffic for Selected Devices
376
10.28
Configuring the Heartbeat Service
376
10.29
Encryption of Disk Images
376
10.29.1 Limitations of Disk Encryption
377
10.29.2 Encrypting Disk Images
377
10.29.3 Starting a VM with Encrypted Images
377
10.29.4 Decrypting Encrypted Images
378
10.30
Paravirtualized Debugging
378
10.30.1 Hyper-V Debug Options
378
10.31
PC Speaker Passthrough
381
10.32
Accessing USB devices Exposed Over the Network with USB/IP .
382
10.32.1 Setting up USB/IP Support on a Linux System
382
10.32.2 Security Considerations
383
10.33
Using Hyper-V with Oracle VM VirtualBox
383
10.34
Nested Virtualization
383
10.35
VBoxSVC running in Windows Session 0
384
10.35.1 Known Issues
384
10.36
VISO file format / RTIsoMaker
384
11 Technical Background
391
11.1
Where Oracle VM VirtualBox Stores its Files
391
11.1.1
The Machine Folder
391
11.1.2
Global Settings
392
11.1.3
Summary of Configuration Data Locations
392
viii
Contents
11.1.4
Oracle VM VirtualBox XML Files
392
11.2
Oracle VM VirtualBox Executables and Components
393
11.3
Hardware Virtualization
395
11.4
Details About Hardware Virtualization
396
11.5
Paravirtualization Providers
396
11.6
Nested Paging and VPIDs
397
12
Oracle VM VirtualBox Programming Interfaces
398
13
Troubleshooting
399
13.1
Procedures and Tools
399
13.1.1
Categorizing and Isolating Problems
399
13.1.2
Collecting Debugging Information
400
13.1.3
Using the VBoxBugReport Command to Collect Debug Information
Automatically
400
13.1.4
The Built-In VM Debugger
401
13.1.5
VM Core Format
403
13.2
General Troubleshooting
404
13.2.1
Guest Shows IDE/SATA Errors for File-Based Images on Slow Host
File System
404
13.2.2
Responding to Guest IDE/SATA Flush Requests
404
13.2.3
Performance Variation with Frequency Boosting
405
13.2.4
Frequency Scaling Effect on CPU Usage
405
13.2.5
Inaccurate Windows CPU Usage Reporting
405
13.2.6
Poor Performance Caused by Host Power Management
405
13.2.7
GUI: 2D Video Acceleration Option is Grayed Out
406
13.3
Windows Guests
406
13.3.1
No USB 3.0 Support in Windows 7 Guests
406
13.3.2
Windows Bluescreens After Changing VM Configuration
406
13.3.3
Windows 0x101 Bluescreens with SMP Enabled (IPI Timeout)
407
13.3.4
Windows 2000 Installation Failures
407
13.3.5
How to Record Bluescreen Information from Windows Guests
407
13.3.6
No Networking in Windows Vista Guests
407
13.3.7
Windows Guests may Cause a High CPU Load
408
13.3.8
Long Delays When Accessing Shared Folders
408
13.3.9
USB Tablet Coordinates Wrong in Windows 98 Guests
408
13.3.10 Windows Guests are Removed From an Active Directory Domain
After Restoring a Snapshot
408
13.3.11 Windows 3.x Limited to 64 MB RAM
408
13.4
Linux and X11 Guests
409
13.4.1
Linux Guests May Cause a High CPU load
409
13.4.2
Buggy Linux 2.6 Kernel Versions
409
13.4.3
Shared Clipboard, Auto-Resizing, and Seamless Desktop in X11 Guests
409
13.5
Oracle Solaris Guests
410
13.5.1
Certain Oracle Solaris 10 Releases May Take a Long Time to Boot
with SMP
410
13.5.2
Older Solaris Releases Do Not Work with E1000 Ethernet
410
13.6
Windows Hosts
410
13.6.1
Drag’n Drop not Working
410
13.6.2
VBoxSVC Out-of-Process COM Server Issues
410
13.6.3
CD and DVD Changes Not Recognized
411
13.6.4
Sluggish Response When Using Microsoft RDP Client
411
13.6.5
Running an iSCSI Initiator and Target on a Single System
411
13.6.6
Bridged Networking Adapters Missing
412
ix
Contents
13.6.7
Host-Only Networking Adapters Cannot be Created
412
13.7
Linux Hosts
412
13.7.1
Linux Kernel Module Refuses to Load
412
13.7.2
Linux Host CD/DVD or Floppy Disk Drive Not Found
412
13.7.3
Strange Guest IDE Error Messages When Writing to CD or DVD
413
13.7.4
VBoxSVC IPC Issues
413
13.7.5
USB Not Working
413
13.7.6
PAX/grsec Kernels
413
13.7.7
Linux Kernel vmalloc Pool Exhausted
414
13.8
Oracle Solaris Hosts
414
13.8.1
Cannot Start VM, Not Enough Contiguous Memory
414
14
Security Guide
415
14.1
General Security Principles
415
14.2
Secure Installation and Configuration
415
14.2.1
Installation Overview
415
14.2.2
Post Installation Configuration
416
14.3
Security Features
416
14.3.1
The Security Model
416
14.3.2
Secure Configuration of Virtual Machines
416
14.3.3
Configuring and Using Authentication
417
14.3.4
Potentially Insecure Operations
418
14.3.5
Encryption
419
14.4
Security Recommendations
419
14.4.1
CVE-2018-3646
419
14.4.2
CVE-2018-12126, CVE-2018-12127, CVE-2018-12130, CVE-2019-11091
420
15
Known Limitations
421
15.1
Experimental Features
421
15.2
Known Issues
421
16
Change Log
424
16.1
Version 7.0.18 (2024-05-07)
424
16.2
Version 7.0.16 (2024-04-16)
424
16.3
Version 7.0.14 (2024-01-16)
425
16.4
Version 7.0.12 (2023-10-17)
425
16.5
Version 7.0.10 (2023-07-18)
427
16.6
Version 7.0.8 (2023-04-18)
428
16.7
Version 7.0.6 (2023-01-17)
429
16.8
Version 7.0.4 (2022-11-18)
429
16.9
Version 7.0.2 (2022-10-20)
430
16.10 Version 7.0.0 (2022-10-10)
431
16.11 Change Logs for Legacy Versions
433
17
Third-Party Materials and Licenses
434
17.1
Third-Party Materials
434
17.2
Third-Party Licenses
444
17.2.1
GNU General Public License (GPL)
444
17.2.2
GNU Lesser General Public License (LGPL)
447
17.2.3
Mozilla Public License (MPL)
453
17.2.4
MIT License
459
17.2.5
X Consortium License (X11) (variant 1)
459
17.2.6
X Consortium License (X11) (variant 2)
459
17.2.7
zlib License
460
x
Contents
17.2.8
Apache License v2
460
17.2.9
OpenSSL License
462
17.2.10
Slirp License
463
17.2.11
liblzf License
463
17.2.12
libpng License
464
17.2.13
lwIP License
464
17.2.14
libxml License
464
17.2.15
gSOAP Public License Version 1.3a
465
17.2.16
curl License
470
17.2.17
libgd License
470
17.2.18
BSD License from Intel
471
17.2.19
IJG (Independent JPEG Group) License
472
17.2.20
libjpeg-turbo Modified (3-clause) BSD License
472
17.2.21
FreeBSD License
473
17.2.22
NetBSD License
473
17.2.23
VPX License
474
17.2.24
Vorbis License
474
17.2.25
curl License
475
17.2.26
DocBook XML DTD License
475
17.2.27
DocBook XSL Stylesheets License
475
17.2.28
Intel ACPI Component Architecture (ACPICA) License
476
17.2.29
Khronos License
477
17.2.30
SGI Free Software License B
478
17.2.31
Boost Software License
478
17.2.32
Default Mesa 3D Graphics Library License
479
17.2.33
Microsoft Software License
481
17.2.34
Python License
485
17.2.35
License for Berkeley SoftFloat Release 3e
488
17.2.36
BSD 3-Clause License for Glslang
489
17.2.37
BSD 2-Clause License for Glslang
489
17.2.38
GNU General Public License (GPL) License with Bison Exception
for Glslang
490
17.2.39
WiX Toolset License
497
17.2.40
XFree86 License (variant 1)
499
17.2.41
XFree86 License (variant 2)
499
17.2.42
Cereal License
499
17.2.43
Keith Packard License
500
17.2.44
X Direct Rendering Infrastructure (DRI) 2 Extension License
500
17.2.45
Network Computing Devices and DEC License
501
17.2.46
MIT Open Group Variant License
501
17.2.47
Digital Equipment Corporation License (variant 1)
501
17.2.48
Digital Equipment Corporation License (variant 2)
502
17.2.49
Digital Equipment Corporation License (variant 3)
502
17.2.50
Digital Equipment Corporation and QuarterDeck Office Systems License
502
17.2.51
Hewlett-Packard License (variant 1)
503
17.2.52
Hewlett-Packard License (variant 2)
503
17.2.53
Hewlett-Packard License (variant 3)
503
17.2.54
Hewlett-Packard License (variant 4)
504
17.2.55
Silicon Graphics License
504
17.2.56
X Resize and Rotate Extension (RandR) License
504
17.2.57
SuSE License
505
17.2.58
Network Computing Devices (NCD) License (variant 1)
505
17.2.59
Network Computing Devices (NCD) License (variant 2)
505
xi
Contents
17.2.60
Network Computing Devices (NCD) License (variant 3)
506
17.2.61
Digital Equipment Corporation and Olivetti Research Limited License
506
17.2.62
X Consortium, DEC, Intergraph, Silicon Graphics, and Hewlett-
Packard License
506
17.2.63
Sun Microsystems License
506
17.2.64
X libpciaccess Library License
507
17.2.65
X libxshmfence License
507
17.2.66
X xf86-input-mouse driver License
507
17.2.67
Kazutaka YOKOTA License
508
17.2.68
Conectiva License
508
17.2.69
Red Hat and SuSE License
509
17.2.70
Red Hat License
509
17.2.71
X Consortium and Red Hat License
509
17.2.72
Precision Insight License
510
17.2.73
VA Linux and IBM License
510
17.2.74
IBM License
511
17.2.75
Metro Link License (variant 1)
511
17.2.76
Metro Link License (variant 2)
511
17.2.77
Metro Link License (variant 3)
512
17.2.78
NVIDIA License
512
17.2.79
Vrije Universiteit License
512
17.2.80
Concurrent Computer Corporation License
513
17.2.81
Nokia License
513
17.2.82
Adobe License
513
17.2.83
University of California License (variant 1)
514
17.2.84
University of California License (variant 2)
514
17.2.85
OMRON Corporation and Data General Corporation License
515
17.2.86
X11 Legacy License (variant 1)
515
17.2.87
X11 Legacy License (variant 2)
515
17.2.88
X11 Legacy License (variant 3)
516
17.2.89
X11 Legacy License (variant 4)
516
17.2.90
X11 Legacy License (variant 5)
517
17.2.91
X11 Legacy License (variant 6)
517
17.2.92
X11 Legacy License (variant 7)
518
17.2.93
X11 Legacy License (variant 8)
518
17.2.94
X11 Legacy License (variant 9)
518
17.2.95
X11 Legacy License (variant 10)
519
17.2.96
X11 Legacy License (variant 11)
519
17.2.97
X11 Legacy License (variant 12)
519
17.2.98
X11 Legacy License (variant 13)
520
17.2.99
X11 Legacy License (variant 14)
520
17.2.100Davor Matic License
521
17.2.101Harold L Hunt II License
521
17.2.102Thomas Roell License
521
17.2.103Thomas Roell and David Wexelblat License
522
17.2.104Thomas Roell and SGCS (Snitily Graphics Consulting Services) License
522
17.2.105Alan Hourihane License
522
17.2.106Kaleb S. Keithley License
523
17.2.107Matthieu Herrb License
523
17.2.108Egbert Eich License
523
17.2.109David Wexelblat License
524
17.2.110Orest Zborowski and David Wexelblat License
524
17.2.111Orest Zborowski and David Dawes License
525
xii
Contents
17.2.112Frederic Lepied License
525
17.2.113Rich Murphey and David Wexelblat License
525
17.2.114Rich Murphey and David Dawes License
526
17.2.115Anders Carlsson License
526
17.2.116Eric Anholt License
526
17.2.117Todd C. Miller License
527
17.2.118Philip Blundell License
527
17.2.119Marc Aurele La France License
527
17.2.120J. Kean Johnston License
528
17.2.121Jakub Jelinek License
528
17.2.122UCHIYAMA Yasushi License
528
17.2.123OpenedHand Ltd License
529
17.2.124Oracle License
529
17.2.125NVIDIA License for Glslang
529
17.2.126The Khronos Group Inc. License for Glslang
530
17.2.127The Khronos Group Inc. License for the EGL Registry Repository
530
17.2.128The IBM Corporation License for the libtpms library
531
18 Oracle VM VirtualBox Privacy Information
533
Glossary
534
xiii
1 Preface
The Oracle VM VirtualBox User Manual provides an introduction to using Oracle VM VirtualBox.
The manual provides information on how to install Oracle VM VirtualBox and use it to create
and configure virtual machines.
Audience
This document is intended for both new and existing users of Oracle VM VirtualBox. It is assumed
that readers are familiar with Web technologies and have a general understanding of Windows
and UNIX platforms.
Related Documents
The documentation for this product is available at:
Conventions
The following text conventions are used in this document:
• boldface: Boldface type indicates graphical user interface elements associated with an
action, or terms defined in text or the glossary.
• italic: Italic type indicates book titles, emphasis, or placeholder variables for which you
supply particular values.
• monospace: Monospace type indicates commands within a paragraph, URLs, code in ex-
amples, text that appears on the screen, or text that you enter.
Documentation Accessibility
For information about Oracle’s commitment to accessibility, visit the Oracle Accessibility Program
website at https://www.oracle.com/corporate/accessibility/.
For information about the accessibility of the Oracle Help Center, see the Oracle Accessibility
Conformance Report at https://www.oracle.com/corporate/accessibility/templates/
t2-11535.html.
Access to Oracle Support
Oracle customers that have purchased support have access to electronic support through My
Oracle Support. For information, visit
or
visit
1
1 Preface
Diversity and Inclusion
Oracle is fully committed to diversity and inclusion. Oracle respects and values having a diverse
workforce that increases thought leadership and innovation. As part of our initiative to build a
more inclusive culture that positively impacts our employees, customers, and partners, we are
working to remove insensitive terms from our products and documentation. We are also mindful
of the necessity to maintain compatibility with our customers’ existing technologies and the need
to ensure continuity of service as Oracle’s offerings and industry standards evolve. Because of
these technical constraints, our effort to remove insensitive terms is ongoing and will take time
and external cooperation.
2
2 First Steps
Welcome to Oracle VM VirtualBox.
Oracle VM VirtualBox is a cross-platform virtualization application. What does that mean? For
one thing, it installs on your existing Intel or AMD-based computers, whether they are running
Windows, macOS, Linux, or Oracle Solaris operating systems (OSes). Secondly, it extends the
capabilities of your existing computer so that it can run multiple OSes, inside multiple virtual
machines, at the same time. As an example, you can run Windows and Linux on your Mac, run
Windows Server on your Linux server, run Linux on your Windows PC, and so on, all alongside
your existing applications. You can install and run as many virtual machines as you like. The
only practical limits are disk space and memory.
Oracle VM VirtualBox is deceptively simple yet also very powerful. It can run everywhere from
small embedded systems or desktop class machines all the way up to datacenter deployments
and even Cloud environments.
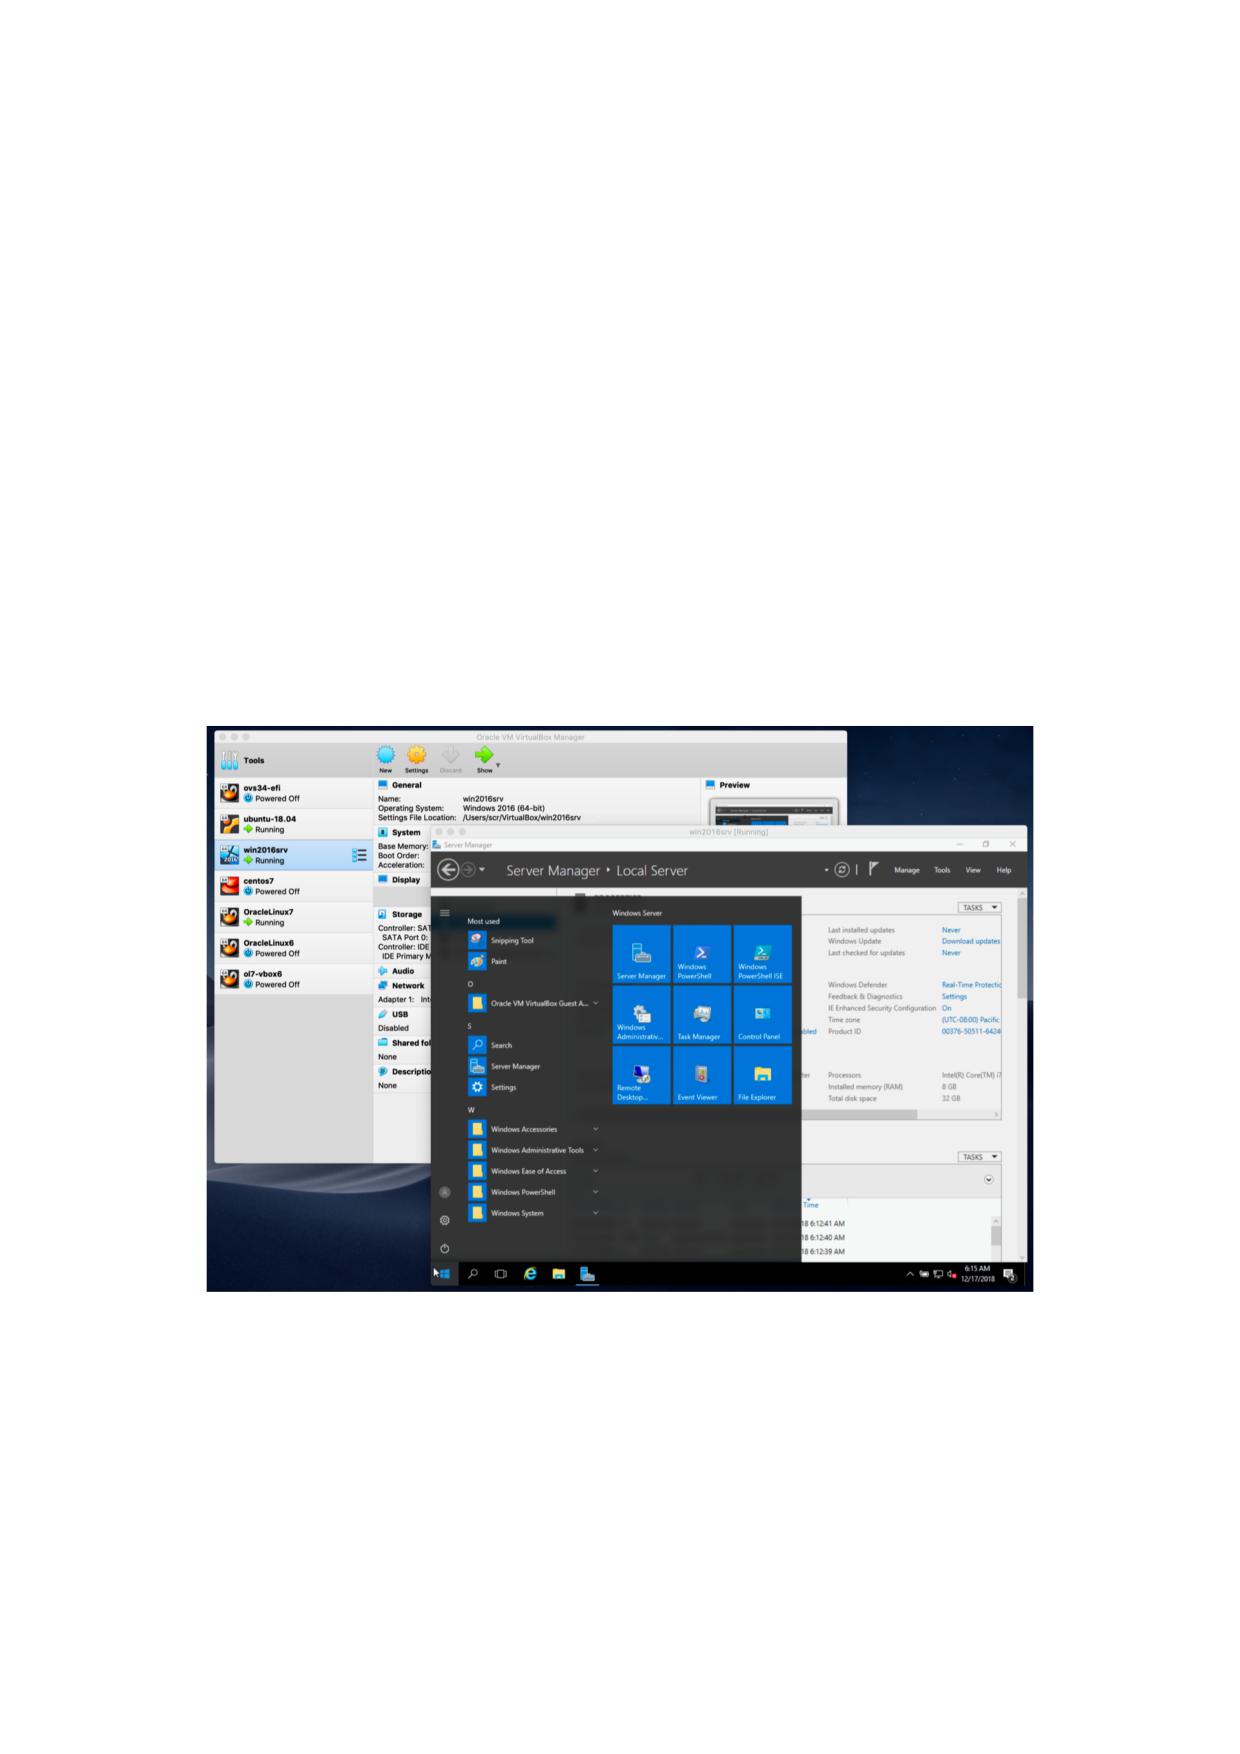
The following screenshot shows how Oracle VM VirtualBox, installed on an Apple Mac com-
puter, is running Windows Server 2016 in a virtual machine window.
In this User Manual, we will begin simply with a quick introduction to virtualization and how
to get your first virtual machine running with the easy-to-use Oracle VM VirtualBox graphical
user interface. Subsequent chapters will go into much more detail covering more powerful tools
and features, but fortunately, it is not necessary to read the entire User Manual before you can
use Oracle VM VirtualBox.
You can find a summary of Oracle VM VirtualBox’s capabilities in chapter 2.3, Features
Overview, page 3. For existing Oracle VM VirtualBox users who just want to find out what is
new in this release, see the chapter 16, Change Log, page 424.
1
2 First Steps
2.1 Why is Virtualization Useful?
The techniques and features that Oracle VM VirtualBox provides are useful in the following
scenarios:
•
Running multiple operating systems simultaneously. Oracle VM VirtualBox enables you
to run more than one OS at a time. This way, you can run software written for one OS on
another, such as Windows software on Linux or a Mac, without having to reboot to use it.
Since you can configure what kinds of virtual hardware should be presented to each such
OS, you can install an old OS such as DOS or OS/2 even if your real computer’s hardware
is no longer supported by that OS.
•
Easier software installations. Software vendors can use virtual machines to ship entire
software configurations. For example, installing a complete mail server solution on a real
machine can be a tedious task. With Oracle VM VirtualBox, such a complex setup, often
called an appliance, can be packed into a virtual machine. Installing and running a mail
server becomes as easy as importing such an appliance into Oracle VM VirtualBox.
•
Testing and disaster recovery. Once installed, a virtual machine and its virtual hard disks
can be considered a container that can be arbitrarily frozen, woken up, copied, backed up,
and transported between hosts.
Using virtual machines enables you to build and test a multi-node networked service, for
example. Issues with networking, operating system, and software configuration can be
investigated easily.
In addition to that, with the use of another Oracle VM VirtualBox feature called snapshots,
one can save a particular state of a virtual machine and revert back to that state, if nec-
essary. This way, one can freely experiment with a computing environment. If something
goes wrong, such as problems after installing software or infecting the guest with a virus,
you can easily switch back to a previous snapshot and avoid the need of frequent backups
and restores.
Any number of snapshots can be created, allowing you to travel back and forward in virtual
machine time. You can delete snapshots while a VM is running to reclaim disk space.
•
Infrastructure consolidation. Virtualization can significantly reduce hardware and elec-
tricity costs. Most of the time, computers today only use a fraction of their potential power
and run with low average system loads. A lot of hardware resources as well as electricity
is thereby wasted. So, instead of running many such physical computers that are only par-
tially used, one can pack many virtual machines onto a few powerful hosts and balance the
loads between them.
2.2
Some Terminology
When dealing with virtualization, and also for understanding the following chapters of this doc-
umentation, it helps to acquaint oneself with a bit of crucial terminology, especially the following
terms:
• Host operating system (host OS). This is the OS of the physical computer on which Oracle
VM VirtualBox was installed. There are versions of Oracle VM VirtualBox for Windows,
macOS, Linux, and Oracle Solaris hosts. See chapter 2.4, Supported Host Operating Systems,
page 5.
Most of the time, this manual discusses all Oracle VM VirtualBox versions together. There
may be platform-specific differences which we will point out where appropriate.
2
2 First Steps
• Guest operating system (guest OS). This is the OS that is running inside the virtual
machine. Theoretically, Oracle VM VirtualBox can run any x86 OS such as DOS, Windows,
OS/2, FreeBSD, and OpenBSD. But to achieve near-native performance of the guest code
on your machine, we had to go through a lot of optimizations that are specific to certain
OSes. So while your favorite OS may run as a guest, we officially support and optimize for
a select few, which include the most common OSes.
See chapter 4.1, Supported Guest Operating Systems, page 68.
• Virtual machine (VM). This is the special environment that Oracle VM VirtualBox creates
for your guest OS while it is running. In other words, you run your guest OS in a VM.
Normally, a VM is shown as a window on your computer’s desktop. Depending on which
of the various frontends of Oracle VM VirtualBox you use, the VM might be shown in full
screen mode or remotely on another computer.
Internally, Oracle VM VirtualBox treats a VM as a set of parameters that specify its behavior.
Some parameters describe hardware settings, such as the amount of memory and number
of CPUs assigned. Other parameters describe the state information, such as whether the
VM is running or saved.
You can view these VM settings in VirtualBox Manager, in the Settings window, and by
running the VBoxManage command. See chapter 9, VBoxManage, page 154.
• Guest Additions. This refers to special software packages which are shipped with Oracle
VM VirtualBox but designed to be installed inside a VM to improve performance of the
guest OS and to add extra features. See chapter 5, Guest Additions, page 89.
2.3 Features Overview
The following is a brief outline of Oracle VM VirtualBox’s main features:
• Portability. Oracle VM VirtualBox runs on a large number of 64-bit host operating systems.
See chapter 2.4, Supported Host Operating Systems, page 5.
Oracle VM VirtualBox is a so-called hosted hypervisor, sometimes referred to as a type
2 hypervisor. Whereas a bare-metal or type 1 hypervisor runs directly on the hardware,
Oracle VM VirtualBox requires an existing OS to be installed. It can thus run alongside
existing applications on that host.
To a very large degree, Oracle VM VirtualBox is functionally identical on all of the host
platforms, and the same file and image formats are used. This enables you to run virtual
machines created on one host on another host with a different host OS. For example, you
can create a virtual machine on Windows and then run it on Linux.
In addition, virtual machines can easily be imported and exported using the Open Vir-
tualization Format (OVF), an industry standard created for this purpose. You can even
import OVFs that were created with a different virtualization software. See chapter 2.15,
Importing and Exporting Virtual Machines, page 30.
For users of Oracle Cloud Infrastructure the functionality extends to exporting and import-
ing virtual machines to and from the cloud. This simplifies development of applications and
deployment to the production environment. See chapter 2.16.8, Exporting an Appliance to
Oracle Cloud Infrastructure, page 42.
• Guest Additions: shared folders, seamless windows, 3D virtualization. The Oracle
VM VirtualBox Guest Additions are software packages which can be installed inside of sup-
ported guest systems to improve their performance and to provide additional integration
and communication with the host system. After installing the Guest Additions, a virtual
3
2 First Steps
machine will support automatic adjustment of video resolutions, seamless windows, accel-
erated 3D graphics and more. See chapter 5, Guest Additions, page 89.
In particular, Guest Additions provide for shared folders, which let you access files on the
host system from within a guest machine. See chapter 5.3, Shared Folders, page 97.
•
Comprehensive hardware support. Among other features, Oracle VM VirtualBox sup-
ports the following:
- Guest multiprocessing (SMP). Oracle VM VirtualBox can present up to 32 virtual
CPUs to each virtual machine, irrespective of how many CPU cores are physically
present on your host.
- USB device support. Oracle VM VirtualBox implements a virtual USB controller and
enables you to connect arbitrary USB devices to your virtual machines without having
to install device-specific drivers on the host. USB support is not limited to certain
device categories. See chapter 4.11.1, USB Settings, page 83.
- Hardware compatibility. Oracle VM VirtualBox virtualizes a vast array of virtual
devices, among them many devices that are typically provided by other virtualization
platforms. That includes IDE, SCSI, and SATA hard disk controllers, several virtual
network cards and sound cards, virtual serial ports and an Input/Output Advanced
Programmable Interrupt Controller (I/O APIC), which is found in many computer
systems. This enables easy cloning of disk images from real machines and importing
of third-party virtual machines into Oracle VM VirtualBox.
- Full ACPI support. The Advanced Configuration and Power Interface (ACPI) is fully
supported by Oracle VM VirtualBox. This enables easy cloning of disk images from real
machines or third-party virtual machines into Oracle VM VirtualBox. With its unique
ACPI power status support, Oracle VM VirtualBox can even report to ACPI-aware guest
OSes the power status of the host. For mobile systems running on battery, the guest
can thus enable energy saving and notify the user of the remaining power, for example
in full screen modes.
- Multiscreen resolutions. Oracle VM VirtualBox virtual machines support screen res-
olutions many times that of a physical screen, allowing them to be spread over a large
number of screens attached to the host system.
- Built-in iSCSI support. This unique feature enables you to connect a virtual ma-
chine directly to an iSCSI storage server without going through the host system. The
VM accesses the iSCSI target directly without the extra overhead that is required for
virtualizing hard disks in container files. See chapter 6.10, iSCSI Servers, page 125.
- PXE Network boot. The integrated virtual network cards of Oracle VM VirtualBox
fully support remote booting using the Preboot Execution Environment (PXE).
•
Multigeneration branched snapshots. Oracle VM VirtualBox can save arbitrary snapshots
of the state of the virtual machine. You can go back in time and revert the virtual machine
to any such snapshot and start an alternative VM configuration from there, effectively
creating a whole snapshot tree. See chapter 2.11, Snapshots, page 24. You can create and
delete snapshots while the virtual machine is running.
•
VM groups. Oracle VM VirtualBox provides a groups feature that enables the user to
organize and control virtual machines collectively, as well as individually. In addition to
basic groups, it is also possible for any VM to be in more than one group, and for groups
to be nested in a hierarchy. This means you can have groups of groups. In general, the
operations that can be performed on groups are the same as those that can be applied to
individual VMs: Start, Pause, Reset, Close (Save state, Send Shutdown, Poweroff), Discard
Saved State, Show in File System, Sort.
4
2 First Steps
•
Clean architecture and unprecedented modularity. Oracle VM VirtualBox has an ex-
tremely modular design with well-defined internal programming interfaces and a clean
separation of client and server code. This makes it easy to control it from several interfaces
at once. For example, you can start a VM simply by clicking on a button in the Oracle VM
VirtualBox graphical user interface and then control that machine from the command line,
or even remotely. See chapter 2.18, Alternative Front-Ends, page 48.
Due to its modular architecture, Oracle VM VirtualBox can also expose its full functionality
and configurability through a comprehensive software development kit (SDK), which
enables integration of Oracle VM VirtualBox with other software systems. See chapter 12,
Oracle VM VirtualBox Programming Interfaces, page 398.
•
Remote machine display. The VirtualBox Remote Desktop Extension (VRDE) enables
high-performance remote access to any running virtual machine. This extension supports
the Remote Desktop Protocol (RDP) originally built into Microsoft Windows, with special
additions for full client USB support.
The VRDE does not rely on the RDP server that is built into Microsoft Windows. Instead,
the VRDE is plugged directly into the virtualization layer. As a result, it works with guest
OSes other than Windows, even in text mode, and does not require application support in
the virtual machine either. The VRDE is described in detail in chapter 8.1, Remote Display
(VRDP Support), page 143.
On top of this special capacity, Oracle VM VirtualBox offers you more unique features:
- Extensible RDP authentication. Oracle VM VirtualBox already supports Winlogon
on Windows and PAM on Linux for RDP authentication. In addition, it includes an
easy-to-use SDK which enables you to create arbitrary interfaces for other methods of
authentication. See chapter 8.1.5, RDP Authentication, page 147.
- USB over RDP. Using RDP virtual channel support, Oracle VM VirtualBox also enables
you to connect arbitrary USB devices locally to a virtual machine which is running
remotely on an Oracle VM VirtualBox RDP server. See chapter 8.1.4, Remote USB,
page 147.
2.4
Supported Host Operating Systems
Currently, Oracle VM VirtualBox runs on the following host OSes:
• Windows hosts (64-bit):
- Windows 8.1
- Windows 10
- Windows 11 21H2
- Windows Server 2012
- Windows Server 2012 R2
- Windows Server 2016
- Windows Server 2019
- Windows Server 2022
• macOS hosts (64-bit):
- 10.15 (Catalina)
- 11 (Big Sur)
- 12 (Monterey)
5
2 First Steps
Intel hardware is required. See also chapter 15, Known Limitations, page 421.
An installer package is available for macOS/Arm64, for systems using an Apple silicon CPU.
With this package, you can run some guest operating systems for Intel x86/x64 CPUs in an
emulation.
The macOS/Arm64 installer package for Apple silicon platform is available as a Developer
Preview release. This package represents a work in progress project and the performance
is very modest.
Note: Developer Preview is a public release for developers, which provides early access
to unsupported software release and features.
•
Linux hosts (64-bit). Includes the following:
- Ubuntu 18.04 LTS, 20.04 LTS and 22.04
- Debian GNU/Linux 10 (“Buster”) and 11 (“Bullseye”)
- Oracle Linux 7, 8 and 9
- CentOS/Red Hat Enterprise Linux 7, 8 and 9
- Fedora 35 and 36
- Gentoo Linux
- SUSE Linux Enterprise server 12 and 15
- openSUSE Leap 15.3
It should be possible to use Oracle VM VirtualBox on most systems based on Linux kernel
2.6, 3.x, 4.x or 5.x using either the Oracle VM VirtualBox installer or by doing a manual
installation. See chapter 3.3, Installing on Linux Hosts, page 59. However, the formally
tested and supported Linux distributions are those for which we offer a dedicated package.
Note that Linux 2.4-based host OSes are no longer supported.
•
Oracle Solaris hosts (64-bit only). The following versions are supported with the restric-
tions listed in chapter 15, Known Limitations, page 421:
- Oracle Solaris 11.4
Note that any feature which is marked as experimental is not supported. Feedback and sugges-
tions about such features are welcome.
2.4.1 Host CPU Requirements
SSE2 (Streaming SIMD Extensions 2) support is required for host CPUs.
2.5 Installing Oracle VM VirtualBox and Extension Packs
Oracle VM VirtualBox comes in many different packages, and installation depends on your host
OS. If you have installed software before, installation should be straightforward. On each host
platform, Oracle VM VirtualBox uses the installation method that is most common and easy to
use. If you run into trouble or have special requirements, see chapter 3, Installation Details, page
55 for details about the various installation methods.
Oracle VM VirtualBox is split into the following components:
• Base package. The base package consists of all open source components and is licensed
under the GNU General Public License V2.
6
2 First Steps
• Extension packs. Additional extension packs can be downloaded which extend the func-
tionality of the Oracle VM VirtualBox base package. Currently, Oracle provides a single
extension pack, available from: http://www.virtualbox.org. The extension pack pro-
vides the following added functionality:
- VirtualBox Remote Desktop Protocol (VRDP) support. See chapter 8.1, Remote Display
(VRDP Support), page 143.
- Host webcam passthrough. See chapter 10.5, Webcam Passthrough, page 339.
- Intel PXE boot ROM.
- Disk image encryption with AES algorithm. See chapter 10.29, Encryption of Disk
Images, page 376.
- Cloud integration features. See chapter 2.16, Integrating with Oracle Cloud Infrastruc-
ture, page 32.
For details of how to install an extension pack, see chapter 3.5, Installing an Extension Pack,
page 66.
2.6 Starting Oracle VM VirtualBox
After installation, you can start Oracle VM VirtualBox as follows:
• Windows hosts. In the Programs menu, click on the item in the VirtualBox group. On
some Windows platforms, you can also enter VirtualBox in the search box of the Start
menu.
• macOS hosts. In the Finder, double-click on the VirtualBox item in the Applications folder.
You may want to drag this item onto your Dock.
• Linux or Oracle Solaris hosts. Depending on your desktop environment, an Oracle VM
VirtualBox item may have been placed in either the System or System Tools group of your
Applications menu. Alternatively, you can enter VirtualBox in a terminal window.
When you start Oracle VM VirtualBox, the VirtualBox Manager interface is shown. See chapter
2.7, VirtualBox Manager, page 7.
2.7 VirtualBox Manager
VirtualBox Manager is the user interface for Oracle VM VirtualBox. You can use VirtualBox
Manager to create, configure, and manage your virtual machines.
This section describes the main features of the VirtualBox Manager user interface. Subsequent
sections and chapters describe how to use VirtualBox Manager to perform tasks in Oracle VM
VirtualBox.
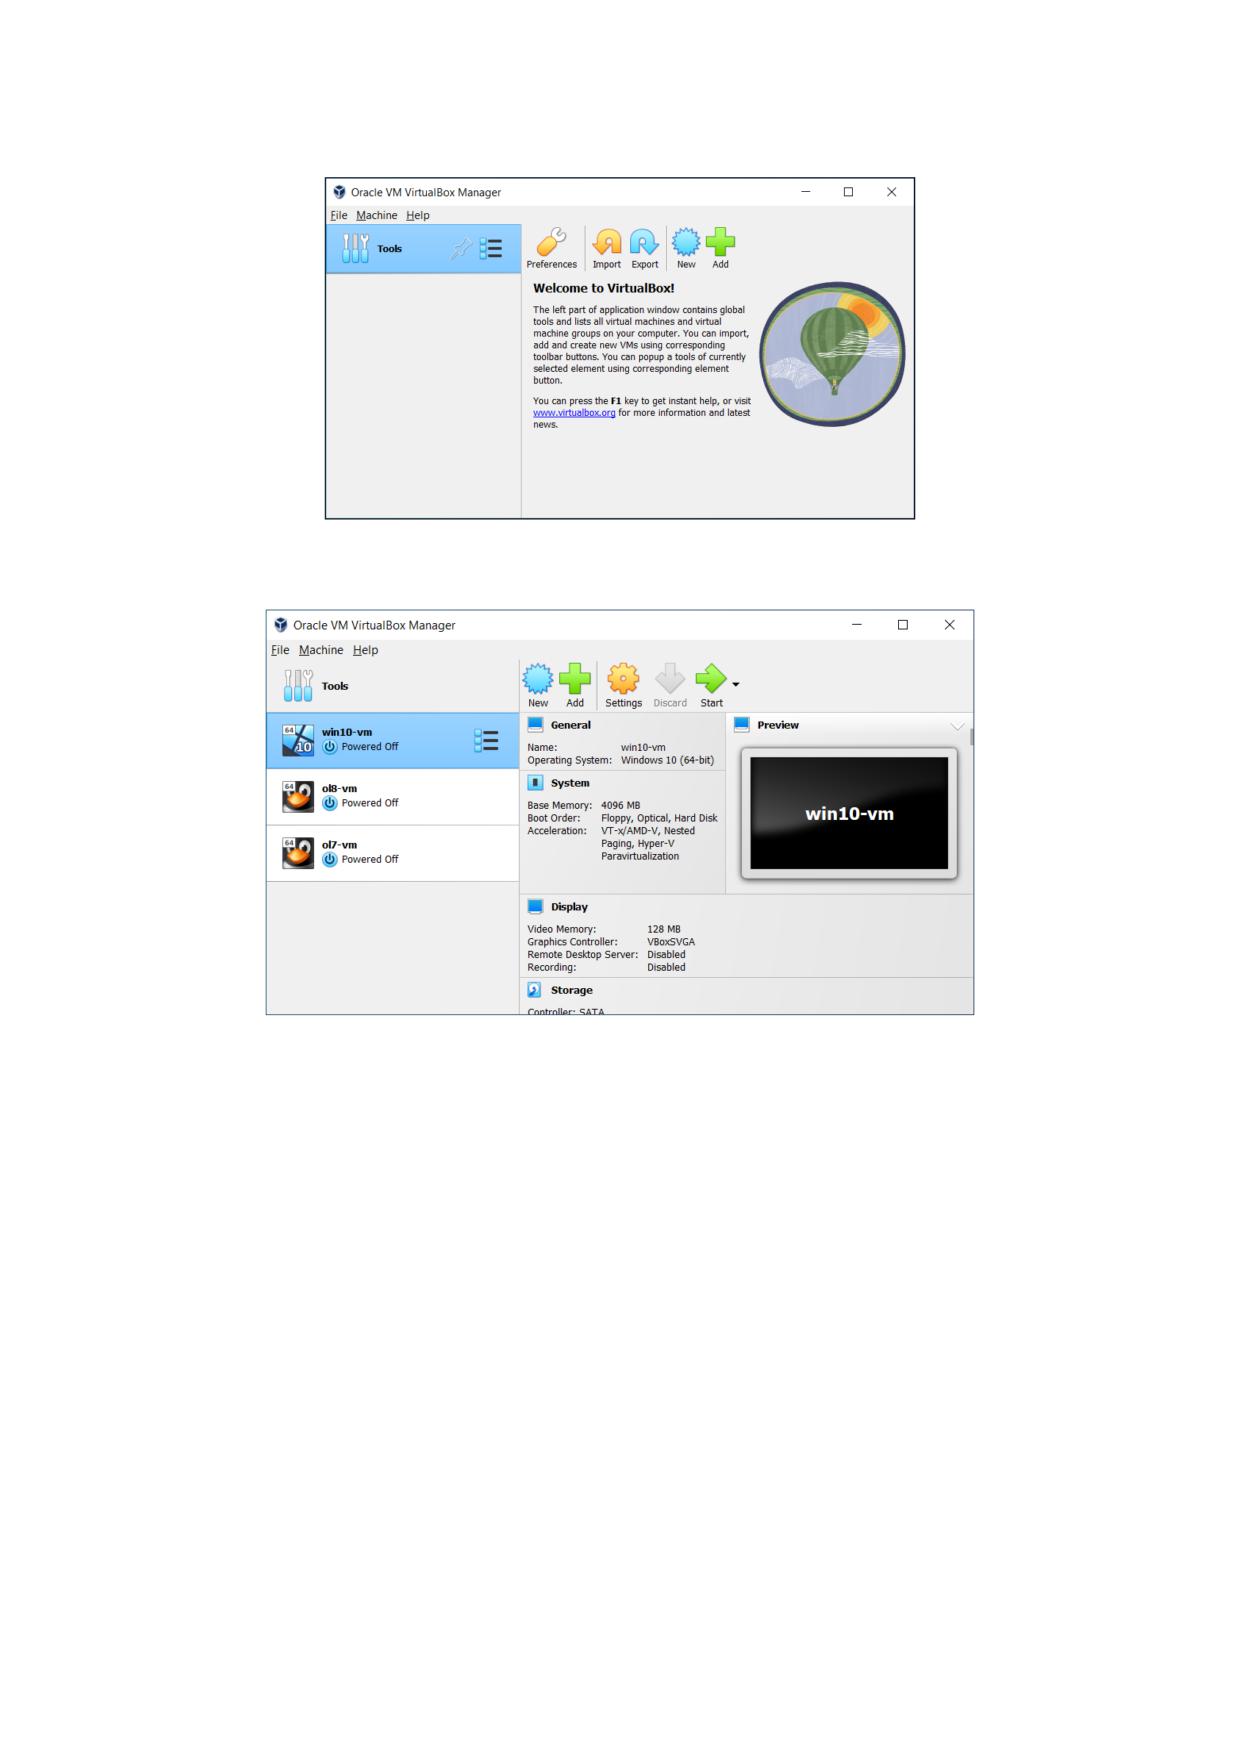
When you start Oracle VM VirtualBox, the VirtualBox Manager window is displayed.
chapter 2.7, VirtualBox Manager, page 7 shows VirtualBox Manager the first time you start
Oracle VM VirtualBox, before you have created any virtual machines.
7
2 First Steps
chapter 2.7, VirtualBox Manager, page 8 shows how VirtualBox Manager might look after you
have created some virtual machines.
The main components of the VirtualBox Manager window are as follows:
• The machine list. The left pane of the VirtualBox Manager window lists all your virtual
machines. If you have not yet created any virtual machines, this list is empty. See chapter
2.7.1, The Machine List, page 8.
• The Details pane. The pane on the right displays the properties of the currently selected
virtual machine. If you do not have any machines yet, the pane displays a welcome mes-
sage.
The toolbar buttons on the Details pane can be used to create and work with virtual ma-
chines. See chapter 2.7.2, The Details Pane, page 9.
• Help Viewer. A window that displays context-sensitive help topics for VirtualBox Manager
tasks. See chapter 2.7.4, Help Viewer, page 12.
2.7.1 The Machine List
The list of virtual machines in the left pane is called the machine list.
The following methods can be used to control and configure virtual machines in the machine
list:
8
2 First Steps
• Right-click on the virtual machine name, to display menu options.
• Click on the Machine Tools menu, to the right of the virtual machine name. See chapter
2.7.3, Machine Tools, page 12.
• Click a button in the toolbar in the Details pane. See chapter 2.7.2, The Details Pane, page
9.
2.7.2 The Details Pane
The Details pane shows configuration information for a virtual machine that is selected in the
machine list. The pane also includes a toolbar for performing tasks.
The Details pane includes the following:
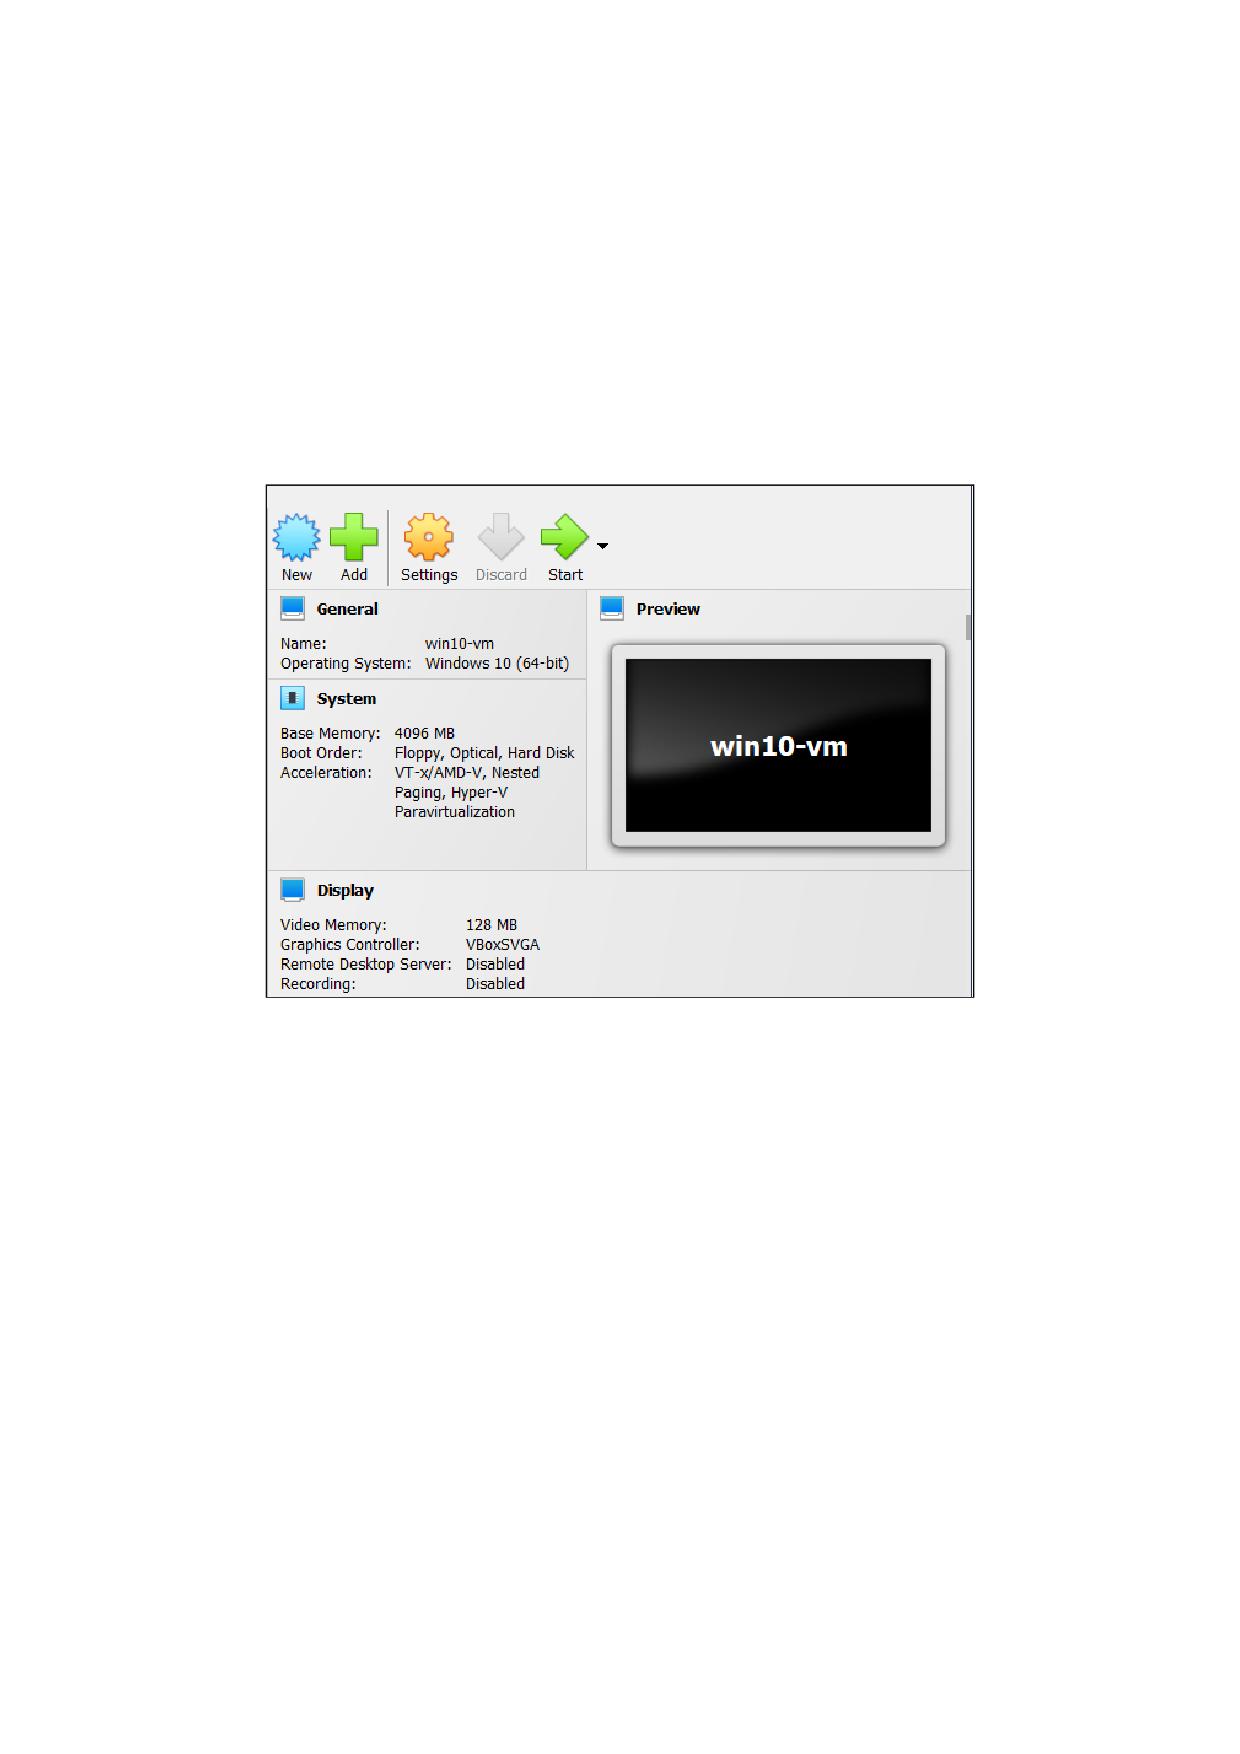
VirtualBox Manager Toolbar
A toolbar at the top of the Details pane contains buttons that enable you to configure the selected
virtual machine, or to create a new virtual machine.
The toolbar includes the following buttons:
• New. Creates a new virtual machine, and adds it to the machine list.
• Add. Adds an existing virtual machine to the machine list.
• Settings. Displays the Settings window for the virtual machine, enabling you to make
configuration changes.
• Discard. For a running virtual machine, discards the saved state for the virtual machine
and closes it down.
• Show/Start. For a running virtual machine, Show displays the virtual machine window.
For a stopped virtual machine, Start displays options for powering up the virtual machine.
9
2 First Steps
Settings
A summary of settings is shown for the virtual machine.
You can change some virtual machine settings, by clicking on the setting in the Details pane.
Note: If a virtual machine is running, some settings cannot be altered. You must stop
the virtual machine first in order to change the setting.
Virtual machine settings can also be changed using the Settings button on the VirtualBox
Manager toolbar.
The virtual machine settings on the Details pane are organized in sections that correspond to
those used in the Settings window. See chapter 4, Configuring Virtual Machines, page 68.
Click the arrow icon to hide or show each section.
Preview Window
The virtual machine display is shown in a small window.
You can use the Preview window to check if your virtual machine has finished booting up.
Click the arrow icon to hide or show the Preview window.
Notification Center
Notification messages may be shown in a sliding panel on the right of the Details pane, called
the Notification Center. Click the warning triangle to show the notification messages.
Most system messages that do not require user interaction are displayed in the Notification
Center, including task failure alerts.
The progress of some tasks can be observed and stopped using the Notification Center.
2.7.3 VirtualBox Manager Tools
VirtualBox Manager provides two types of user tools, to enable you to perform common tasks
easily.
• Global Tools. These tools apply to all virtual machines. See chapter 2.7.3, Global Tools,
page 10.
• Machine Tools. These tools apply to a specific virtual machine. See chapter 2.7.3, Machine
Tools, page 12.
Global Tools
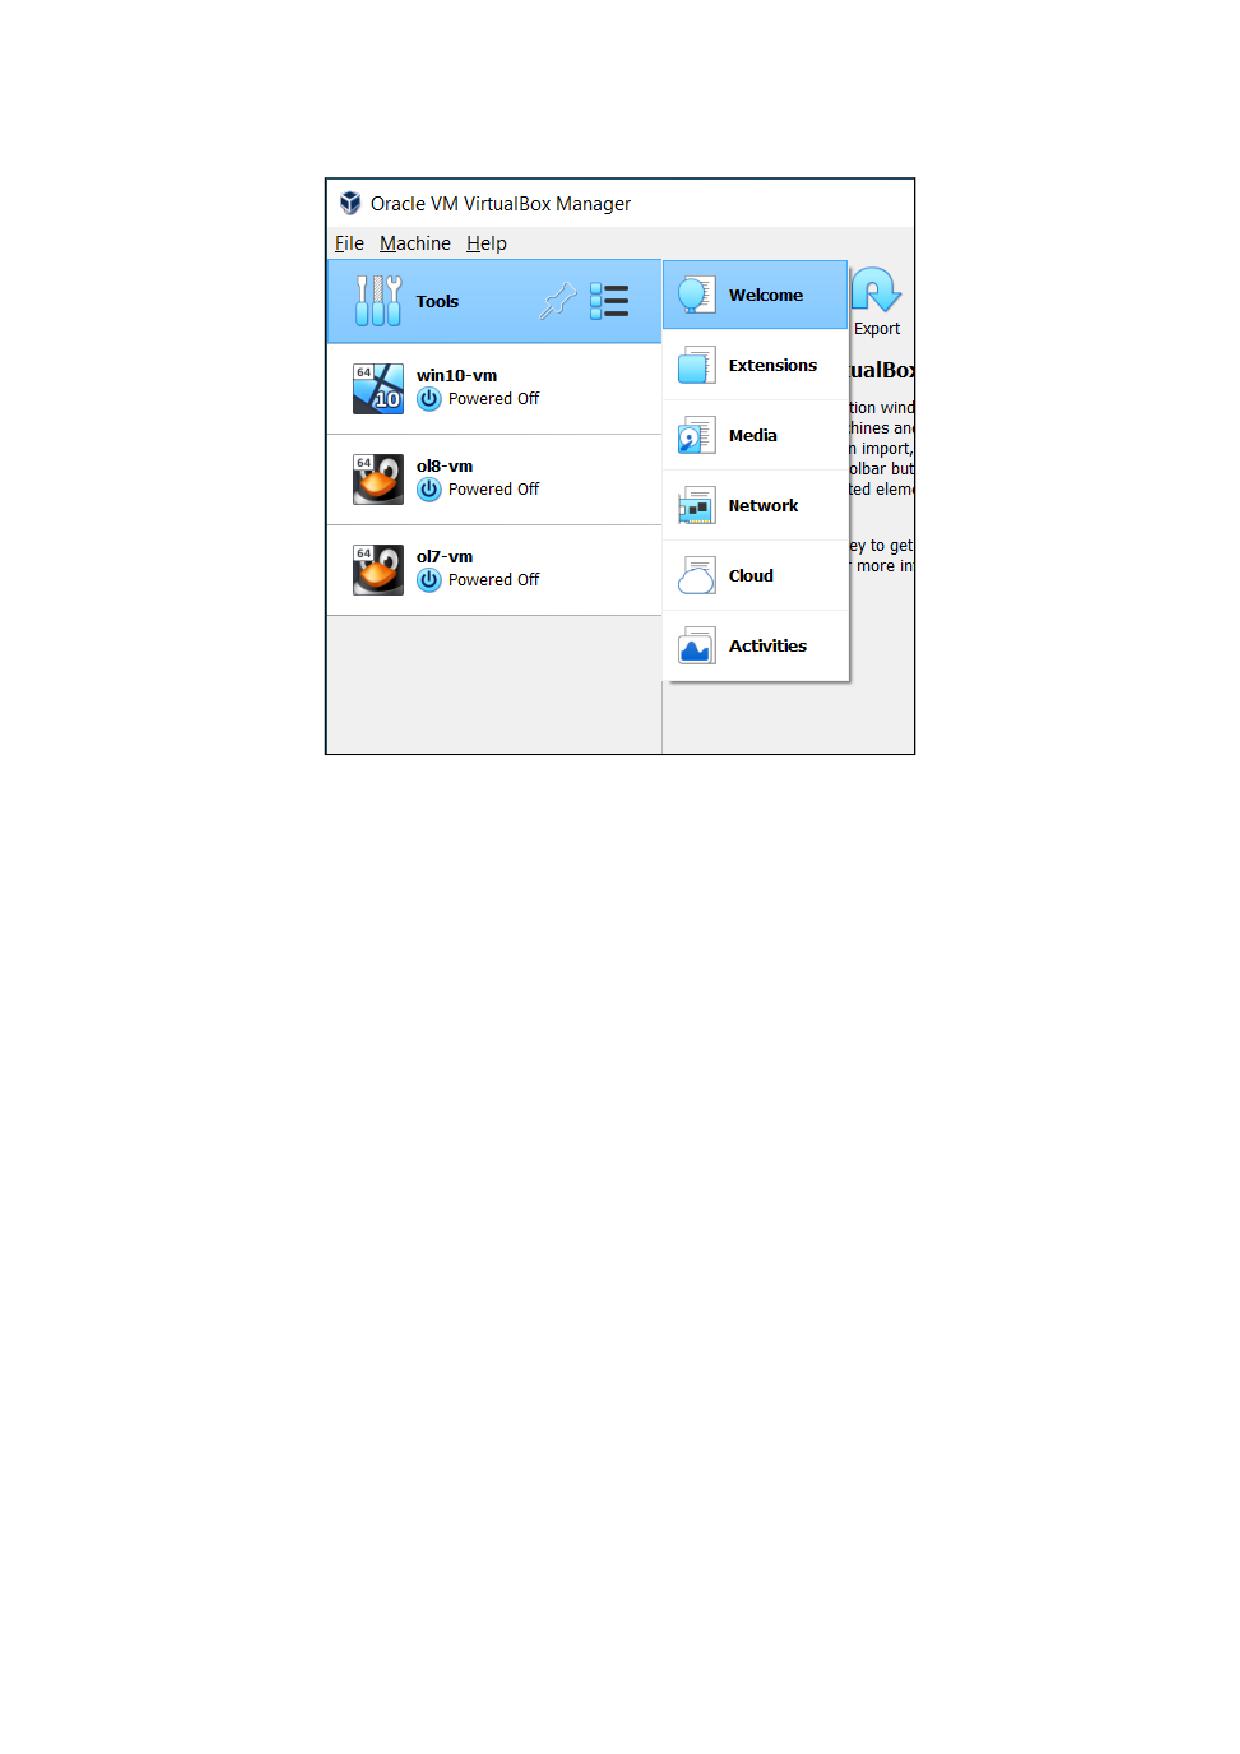
In the left pane of the VirtualBox Manager window, click the Menu icon in the Tools banner
located above the machine list. The Global Tools menu is displayed.
10
2 First Steps
A drop-down list enables you to select from the following global tools:
• Welcome. Displays the VirtualBox Manager welcome message. The VirtualBox Manager
toolbar is also included, to enable you to get started with using Oracle VM VirtualBox. See
chapter 2.7, VirtualBox Manager, page 7.
• Extensions. Displays the Extension Pack Manager tool. This tool is used to install and
uninstall Oracle VM VirtualBox Extension Packs. See chapter 3.5.1, The Extension Pack
Manager, page 67.
• Media. Displays the Virtual Media Manager tool. This tool is used to manage the disk
images used by Oracle VM VirtualBox. See chapter 6.3, The Virtual Media Manager, page
115.
• Network. Displays the Network Manager tool. This tool is used to create and configure
some types of networks used by Oracle VM VirtualBox. See chapter 7.11, Network Manager,
page 139.
• Cloud. Displays the Cloud Profile Editor tool. This tool is used to configure connections
to a cloud service, such as Oracle Cloud Infrastructure. See chapter 2.16.5, Using the Cloud
Profile Manager, page 35.
• Activities. Displays the VM Activity Overview tool. This tool is used to monitor perfor-
mance and resource usage of virtual machines. See chapter 2.20, Monitoring of Virtual
Machines, page 50.
The Pin icon is used to keep the Tools banner visible as you scroll down the entries in the
machine list.
11
2 First Steps
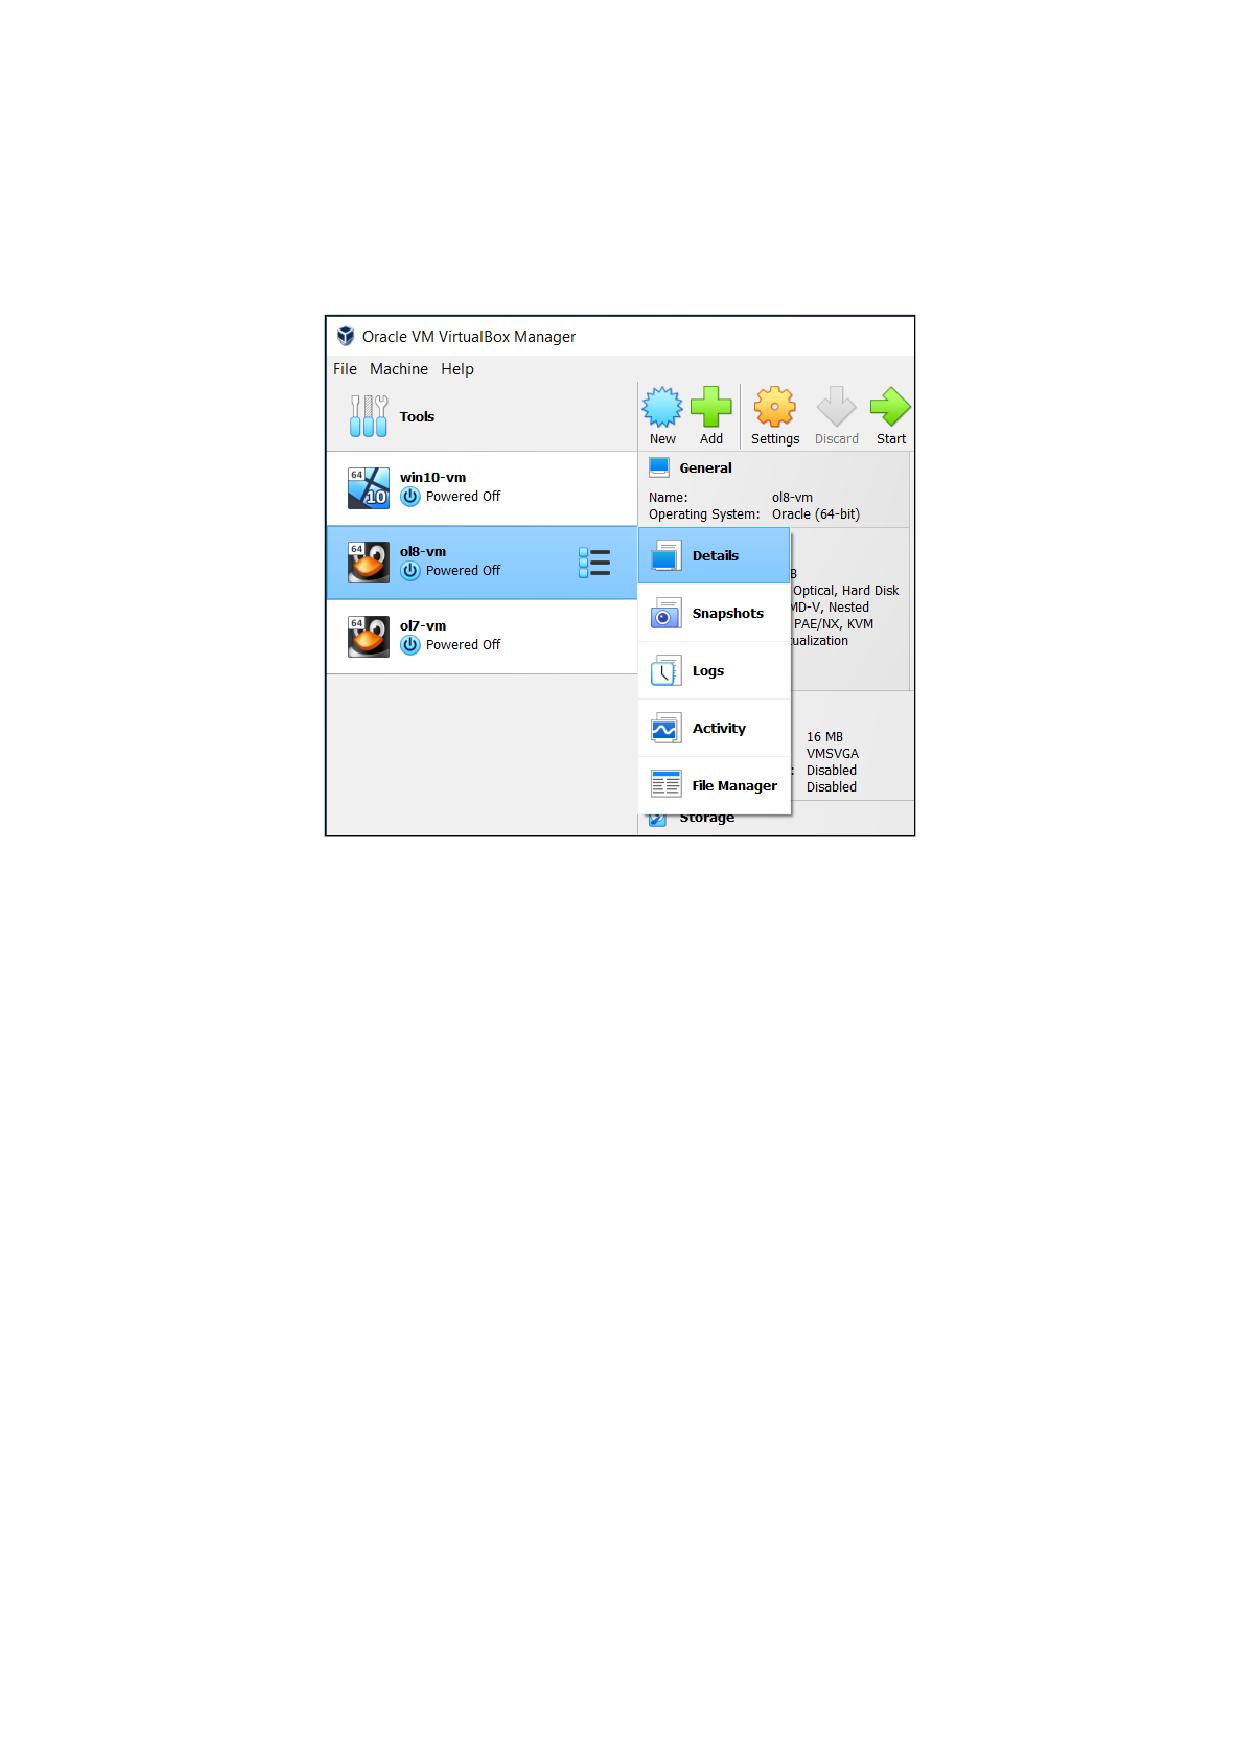
Machine Tools
In the machine list in the left pane of the VirtualBox Manager window, select a virtual machine.
Click the Menu icon to the right of the virtual machine name. The Machine Tools menu is
displayed.
A drop-down list enables you to select from the following machine tools:
• Details. Displays the Details pane for the selected virtual machine. See chapter 2.7.2, The
Details Pane, page 9.
• Snapshots. Displays the Snapshots tool. This tool enables you to view and manage snap-
shots for the virtual machine. See chapter 2.11, Snapshots, page 24.
• Logs. Displays the Log Viewer tool. This tool enables you to view and search system logs
for the virtual machine. See chapter 2.21, The Log Viewer, page 52.
• Activity. Displays the VM Activity page of the Session Information dialog. This dialog
enables you to view and analyze performance metrics for the virtual machine. See chapter
2.20, Monitoring of Virtual Machines, page 50.
• File Manager. Displays the Guest Control File Manager tool. This tool enables you to
manage files on the guest system. See chapter 5.8, Guest Control File Manager, page 106.
2.7.4 Help Viewer
The Help Viewer is a window that displays context-sensitive help to assist you in completing
common VirtualBox Manager tasks. You can display the Help Viewer in the following ways:
• In a VirtualBox Manager wizard or dialog, click Help to display the relevant help topic.
• In VirtualBox Manager or from a guest VM, do either of the following:
- Select the Help, Contents menu option.
12
2 First Steps
- Press the F1 button.
The keyboard shortcut used to access the Help Viewer can be configured in the Pref-
erences window.
The Help Viewer has the following features:
• Navigation tools. The left hand pane contains the following navigation tools:
- Contents. Displays the help topic location in the Oracle VM VirtualBox documenta-
tion.
- Search. Enables you to search the documentation for help topics.
- Bookmarks. Enables you to bookmark useful help topics.
• Tabbed browsing. Help topics that you have visited are displayed in tabs in the main
window pane.
• Zoomable topics. Zoom controls enable you to enlarge help topic details.
• Printing. Help topics can be printed to PDF file or to a local printer.
2.7.5 About VirtualBox Manager Wizards
VirtualBox Manager includes wizards that enable you to complete tasks easily. Examples of such
tasks are when you create a new virtual machine or use the cloud integration features of Oracle
VM VirtualBox.
To display a help topic for the wizard, click the Help button.
Some wizards can be displayed in either of the following modes:
• Guided mode. This is the default display mode. Wizards are shown in the conventional
manner, using a series of pages with descriptions to guide the user through the steps for a
task.
• Expert mode. This display mode is designed for more advanced users of Oracle VM
VirtualBox. All settings are displayed on a single page, enabling quicker completion of
tasks.
Click the button at the bottom of the wizard window to switch between Guided mode and
Expert mode.
2.8 Creating Your First Virtual Machine
Click New in the VirtualBox Manager window. The Create Virtual Machine wizard is shown, to
guide you through the required steps for setting up a new virtual machine (VM).
The Create Virtual Machine wizard pages are described in the following sections.
13
2 First Steps
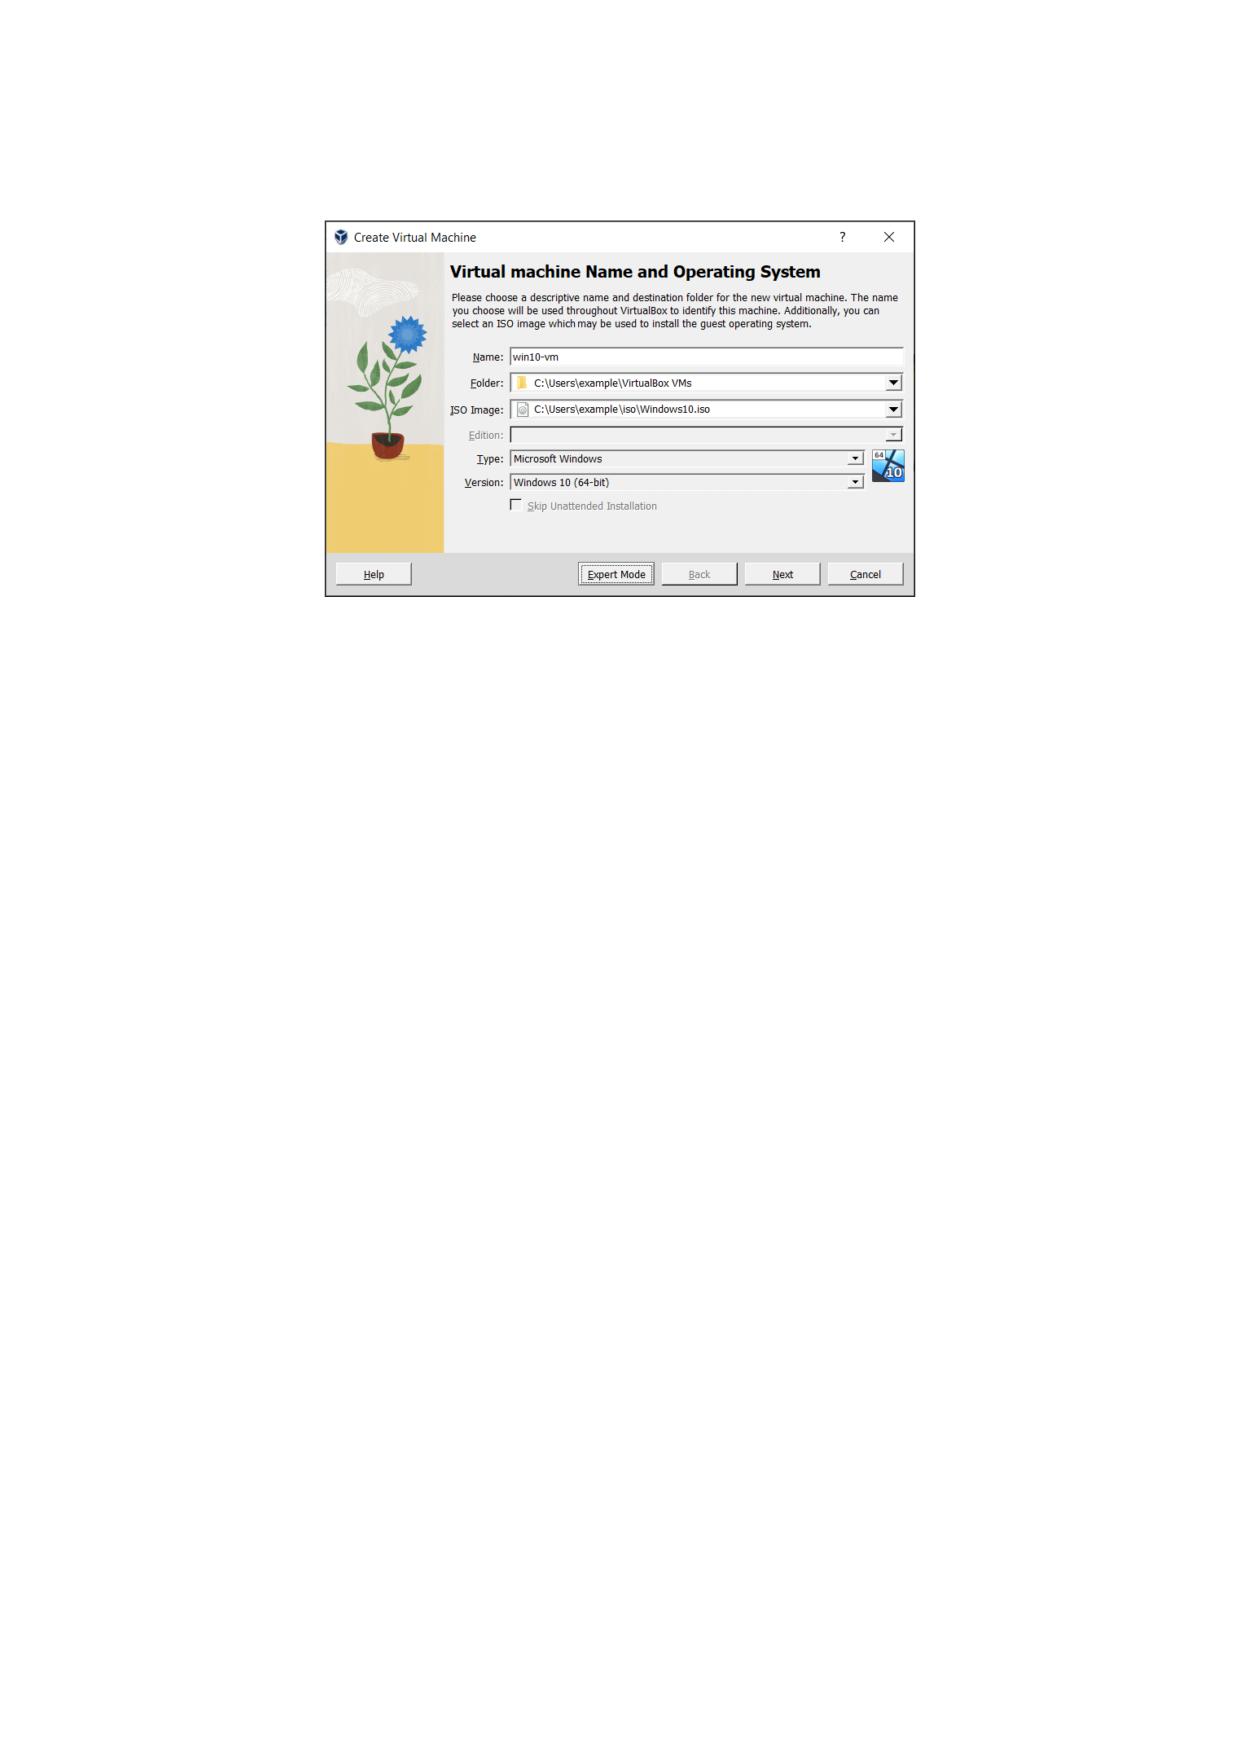
2.8.1 Create Virtual Machine Wizard: Name and Operating System
Use this page to specify a name and operating system (OS) for the virtual machine and to
change the storage location used for VMs.
You can also choose to disable the unattended guest operating system install feature. See also
chapter 2.8.2, (Optional) Create Virtual Machine Wizard: Unattended Guest OS Install, page 15.
The following fields are available on this wizard page:
• Name. A name for the new VM. The name you enter is shown in the machine list of
VirtualBox Manager and is also used for the virtual machine’s files on disk.
Be sure to assign each VM an informative name that describes the OS and software running
on the VM. For example, a name such as Windows 10 with Visio.
• Folder. The location where VMs are stored on your computer, called the machine folder.
The default folder location is shown.
Ensure that the folder location has enough free space, especially if you intend to use the
snapshots feature. See also chapter 11.1.1, The Machine Folder, page 391.
• ISO Image. Select an ISO image file. The image file can be used to install an OS on the
new virtual machine or it can be attached to a DVD drive on the new virtual machine.
• Type and Version. These fields are used to select the OS that you want to install on the
new virtual machine.
The supported OSes are grouped into types. If you want to install something very unusual
that is not listed, select the Other type. Depending on your selection, Oracle VM VirtualBox
will enable or disable certain VM settings that your guest OS may require. This is particu-
larly important for 64-bit guests. See chapter 4.1.2, 64-bit Guests, page 70. It is therefore
recommended to always set this field to the correct value.
If an ISO image is selected and Oracle VM VirtualBox detects the operating system for the
ISO, the Type and Version fields are populated automatically and are disabled.
• Skip Unattended Installation. Disables unattended guest OS installation, even if an ISO
image is selected that supports unattended installation. In that case, the selected ISO image
is mounted automatically on the DVD drive of the new virtual machine and user interaction
is required to complete the OS installation.
The unattended installation step in the wizard is skipped.
14
2 First Steps
Note: This option is disabled if you do not select an installation medium in the ISO
Image field.
Click Next to go to the next wizard page.
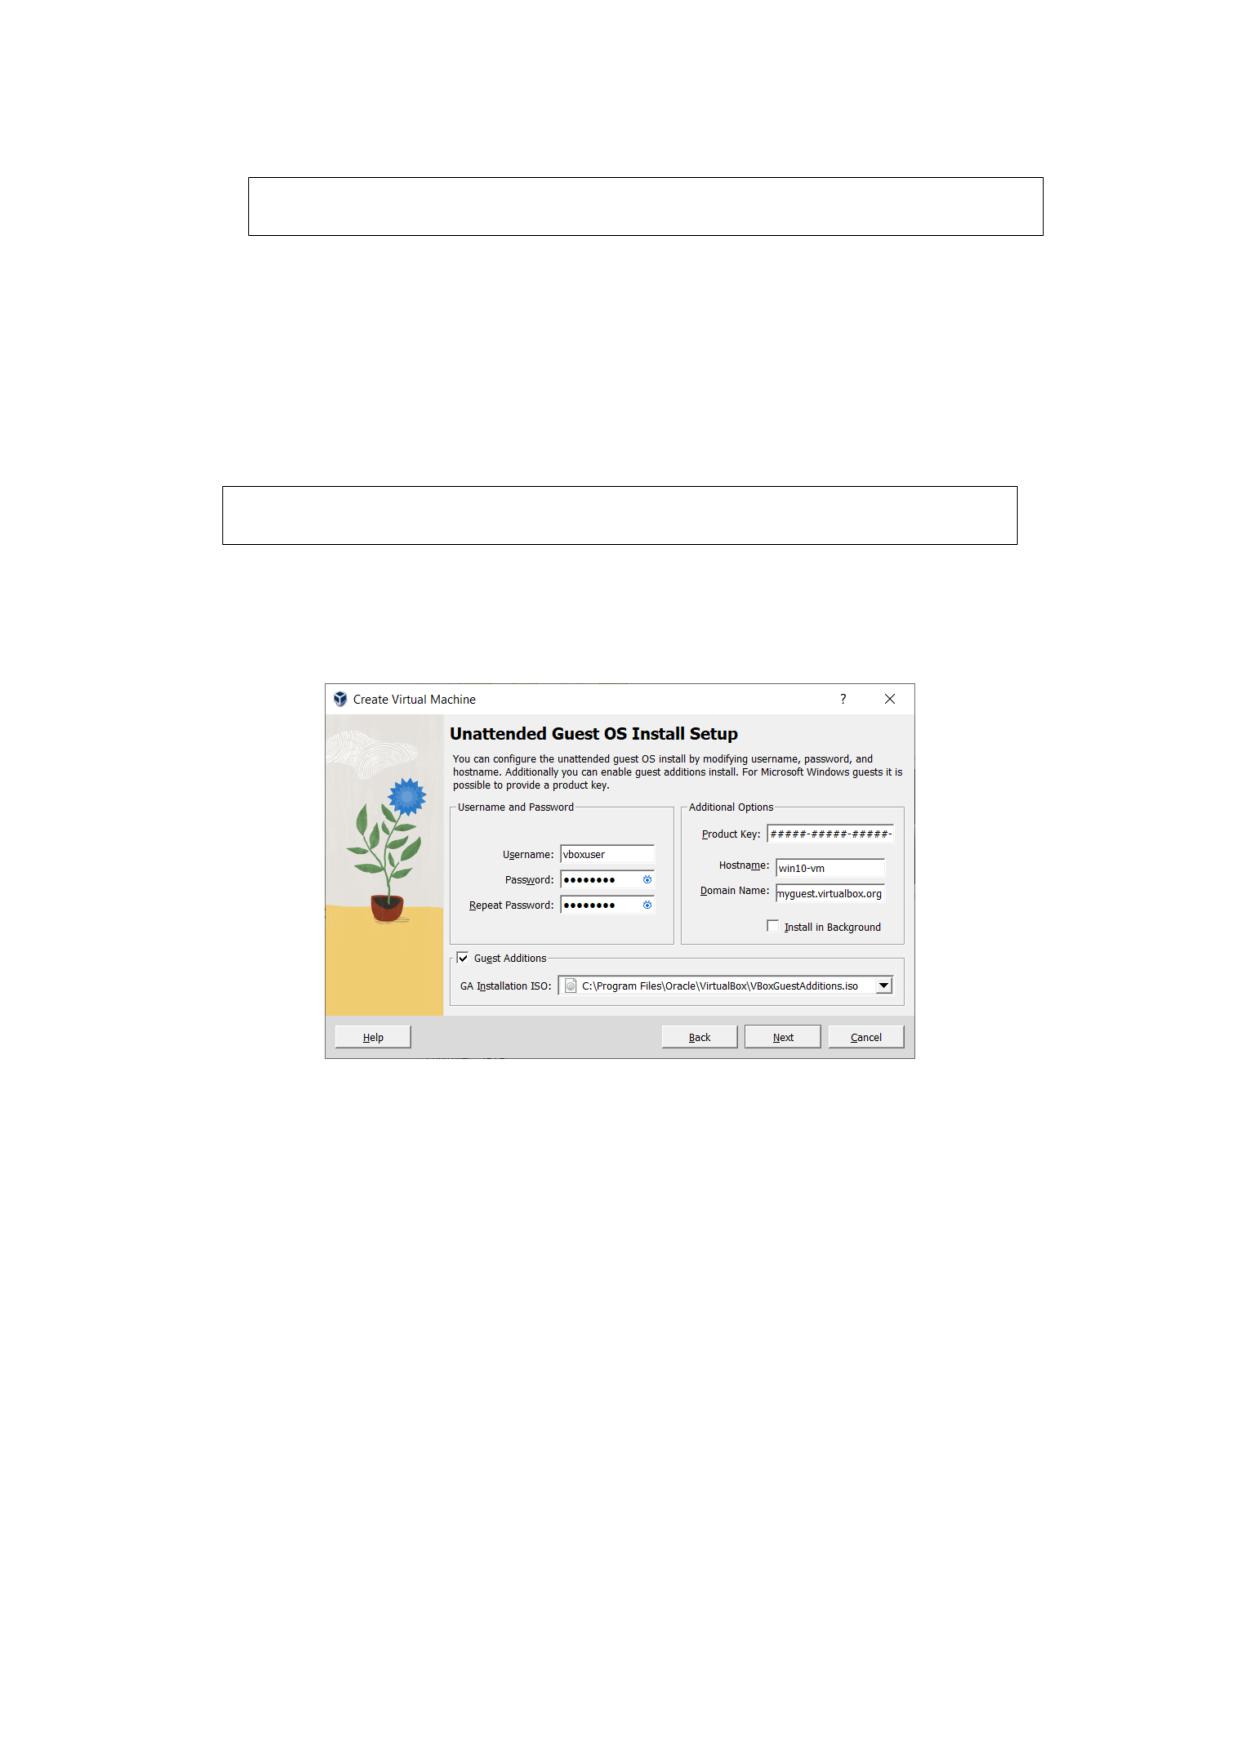
2.8.2 (Optional) Create Virtual Machine Wizard: Unattended Guest OS
Install
Unattended guest OS installation enables you to install the OS on a virtual machine automati-
cally.
Note: This page is optional. It is not displayed if you have selected the Skip Unat-
tended Installation option on the initial wizard page.
Use this page to set up the required parameters for unattended guest OS installation and to
configure automatic installation of the Oracle VM VirtualBox Guest Additions. See also chapter
2.8.6, Some Examples of Unattended Installation, page 18 for some typical scenarios when using
automated installation.
The following fields are available on this wizard page:
• Username and Password. Enter the credentials for a default user on the guest OS.
• Guest Additions. Enables automatic installation of the Guest Additions, following instal-
lation of the guest OS. Use the drop-down list to select the location of the ISO image file
for the Guest Additions.
• Additional Options. The following options enable you to perform extra configuration of
the guest OS:
- Product Key. For Windows guests only. Enter the product key required for Windows
installation.
- Hostname. Host name for the guest. By default, this is the same as the VM name.
- Domain Name. Domain name for the guest.
- Install in Background. Enable headless mode for the VM, where a graphical user
interface is not shown.
Click Next to go to the next wizard page.
15
2 First Steps
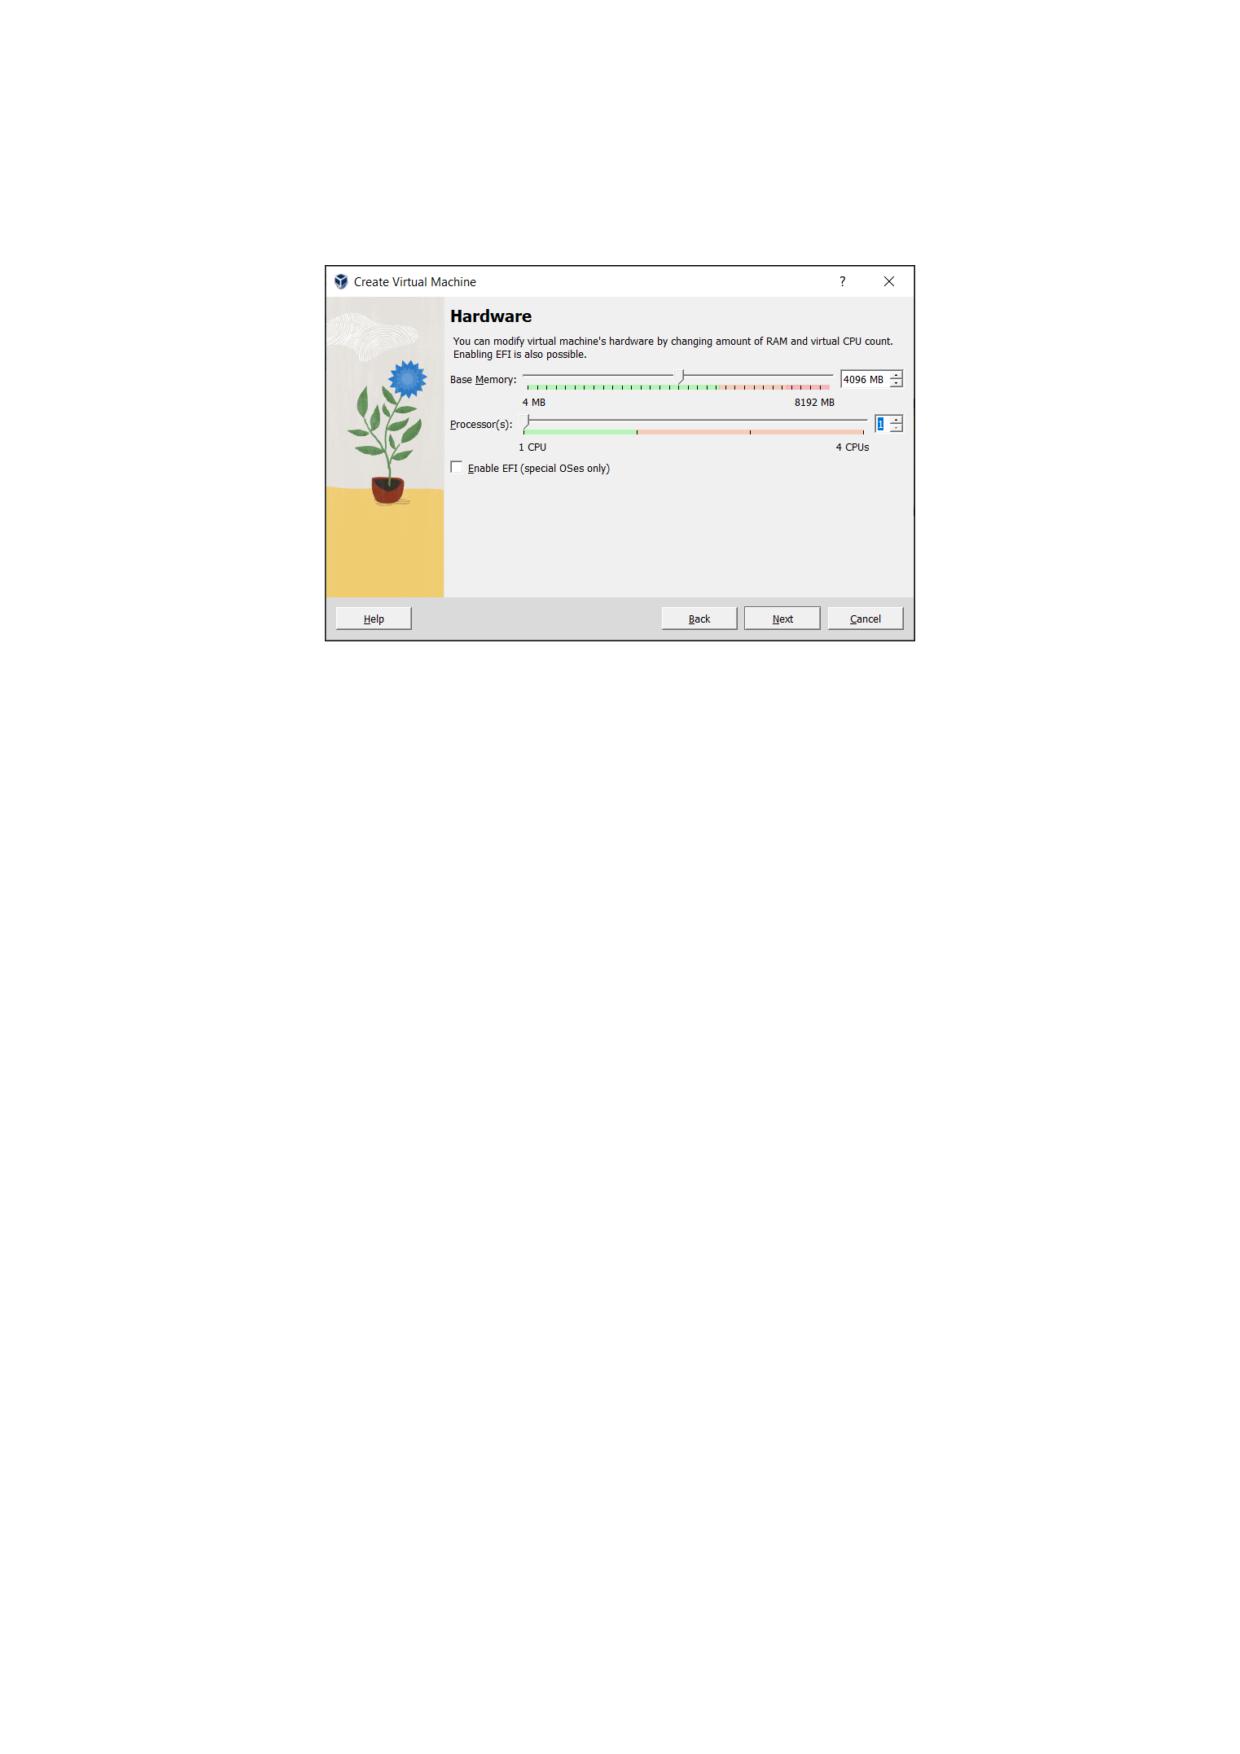
2.8.3 Create Virtual Machine Wizard: Hardware
Use this page to configure hardware settings for the virtual machine.
The following fields are available on this wizard page:
• Base Memory. Select the amount of RAM that Oracle VM VirtualBox should allocate every
time the virtual machine is started. The amount of memory selected here will be taken
away from your host machine and presented to the guest OS, which will report this size as
the virtual machines installed RAM.
Choose this setting carefully. The memory you give to the VM will not be available to your
host OS while the VM is running, so do not specify more than you can spare.
For example, if your host machine has 4 GB of RAM and you enter 2048 MB as the amount
of RAM for a particular virtual machine, you will only have 2 GB left for all the other
software on your host while the VM is running. If you run two VMs at the same time, even
more memory will be allocated for the second VM, which may not even be able to start if
that memory is not available.
On the other hand, you should specify as much as your guest OS and your applications will
require to run properly. A guest OS may require at least 1 or 2 GB of memory to install and
boot up. For best performance, more memory than that may be required.
Always ensure that the host OS has enough RAM remaining. If insufficient RAM remains,
the system might excessively swap memory to the hard disk, which effectively brings the
host system to a standstill.
As with other Create Virtual Machine wizard settings, you can change this setting later,
after you have created the VM.
• Processor(s). Select the number of virtual processors to assign to the VM.
It is not advised to assign more than half of the total processor threads from the host
machine.
• Enable EFI. Enables Extensible Firware Interface (EFI) booting for the guest OS.
Click Next to go to the next wizard page.
16
2 First Steps
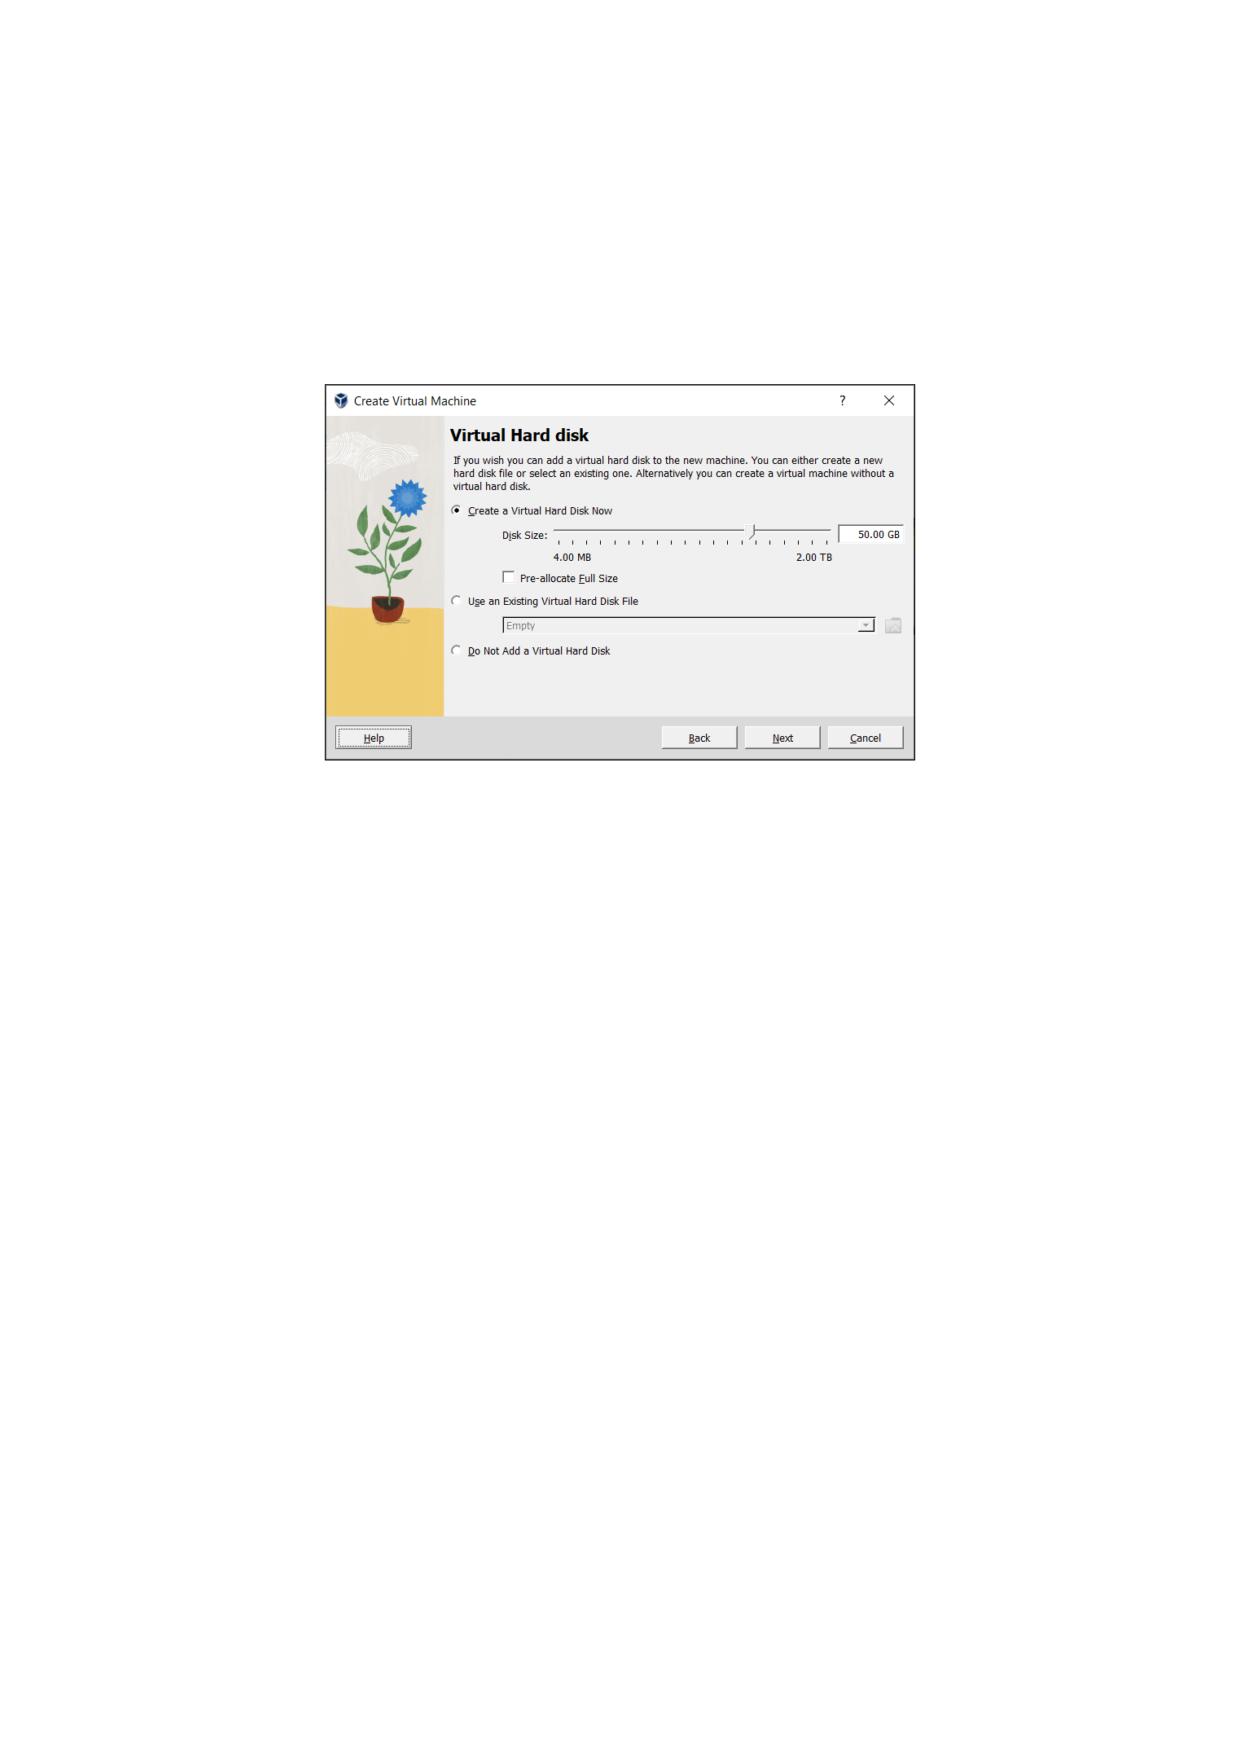
2.8.4 Create Virtual Machine Wizard: Virtual Hard Disk
Use this page to specify a virtual hard disk for the virtual machine.
There are many ways in which Oracle VM VirtualBox can provide hard disk space to a VM,
see chapter 6, Virtual Storage, page 111. The most common way is to use a large image file on
your physical hard disk, whose contents Oracle VM VirtualBox presents to your VM as if it were
a complete hard disk. This file then represents an entire hard disk, so you can even copy it to
another host and use it with another Oracle VM VirtualBox installation.
The following fields are available on this wizard page:
• Create a Virtual Hard Disk Now. Creates a new empty virtual hard disk image, located in
the VM’s machine folder.
Enter the following settings:
- Disk Size. Use the slider to select a maximum size for the hard disk in the new VM.
- Pre-Allocate Full Size. This setting determines the type of image file used for the
disk image. Select this setting to use a fixed-size file for the disk image. Deselect this
setting to use a dynamically allocated file for the disk image.
The different types of image file behave as follows:
∗ Dynamically allocated file. This type of image file only grows in size when the
guest actually stores data on its virtual hard disk. Therefore, this file is small
initially. As the drive is filled with data, the file grows to the specified size.
∗ Fixed-size file. This type of image file immediately occupies the file specified,
even if only a fraction of that virtual hard disk space is actually in use. While
occupying much more space, a fixed-size file incurs less overhead and is therefore
slightly faster than a dynamically allocated file.
For more details about the differences, see chapter 6.2, Disk Image Files (VDI, VMDK,
VHD, HDD), page 114.
• Use an Existing Hard Disk File. Enables you to select an existing disk image file to use
with the new VM.
The drop-down list presented in the window lists all disk images which are known by
Oracle VM VirtualBox. These disk images are currently attached to a virtual machine, or
have been attached to a virtual machine.
Alternatively, click on the small folder icon next to the drop-down list. In the Hard Disk
Selector window that is displayed, click Add to select a disk image file on your host disk.
17
2 First Steps
• Do Not Add a Virtual Hard Disk. The new VM is created without a hard disk.
To prevent your physical hard disk on the host OS from filling up, Oracle VM VirtualBox limits
the size of the image file. But the image file must be large enough to hold the contents of
the guest OS and the applications you want to install. For a Windows or Linux guest, you will
probably need several gigabytes for any serious use. The limit of the image file size can be
changed later, see chapter 9.31, VBoxManage modifymedium, page 262.
Note: You can skip attaching a virtual hard disk file to the new virtual machine you
are creating. But you will then need to attach an hard disk later on, in order to install
a guest operating system.
After having selected or created your image file, click Next to go to the next wizard page.
2.8.5 Create Virtual Machine Wizard: Summary
This page displays a summary of the configuration for the virtual machine.
If you are not happy with any of the settings, use the Back button to return to the correspond-
ing page and modify the setting.
Click Finish to create your new virtual machine. The virtual machine is displayed in the
machine list on the left side of the VirtualBox Manager window, with the name that you entered
on the first page of the wizard.
2.8.6 Some Examples of Unattended Installation
To configure unattended installation, you typically just need to specify an ISO image in the Cre-
ate Virtual Machine wizard. Oracle VM VirtualBox then detects the OS type and the unattended
installation process is done automatically when the wizard is completed. However, in some
situations the installation may need be completed manually.
The following list describes some common scenarios for unattended installation:
• OS type is detected automatically. The following outcomes are possible:
- If unattended installation is supported for the selected ISO, the guest OS is installed
automatically. No user input is required.
- If unattended installation is not supported for the selected ISO, the ISO image is in-
serted automatically into the DVD drive of the new VM. The guest OS installation
must then be completed manually.
• OS type is not detected automatically. You must configure Type and Version settings in
the wizard.
The ISO image is inserted automatically into the DVD drive of the new VM. The guest OS
installation must then be completed manually.
• Unattended Installation is disabled. Users can disable unattended installation, by select-
ing the Skip Unattended Installation check box on the initial wizard page.
The ISO image is inserted automatically into the DVD drive of the new VM. The guest OS
installation must then be completed manually.
See also chapter 4.2, Unattended Guest Installation, page 70 for details of how to perform
unattended installation from the command line.
18
2 First Steps
2.9 Running Your Virtual Machine
To start a virtual machine, you have the following options:
• Double-click on the VM’s entry in the machine list in VirtualBox Manager.
• Select the VM’s entry in the machine list in VirtualBox Manager, and click Start in the
toolbar the top of the window.
• Go to the VirtualBox VMs folder in your system user’s home directory. Find the subdirec-
tory of the machine you want to start and double-click on the machine settings file. This
file has a .vbox file extension.
Starting a virtual machine displays a new window, and the virtual machine which you selected
will boot up. Everything which would normally be seen on the virtual system’s monitor is shown
in the window. See chapter 2, First Steps, page 1.
In general, you can use the virtual machine as you would use a real computer. The following
topics describe a few points to note when running a VM.
2.9.1 Starting a New VM for the First Time
When you start a VM for the first time the OS installation process is started automatically, using
the ISO image file specified in the Create Virtual Machine wizard.
Follow the onscreen instructions to install your OS.
2.9.2 Capturing and Releasing Keyboard and Mouse
Oracle VM VirtualBox provides a virtual USB tablet device to new virtual machines through
which mouse events are communicated to the guest OS. If you are running a modern guest OS
that can handle such devices, mouse support may work out of the box without the mouse being
captured as described below. See chapter 4.5.1, Motherboard Tab, page 74.
Otherwise, if the virtual machine detects only standard PS/2 mouse and keyboard devices,
since the OS in the virtual machine does not know that it is not running on a real computer, it
expects to have exclusive control over your keyboard and mouse. But unless you are running the
VM in full screen mode, your VM needs to share keyboard and mouse with other applications
and possibly other VMs on your host.
After installing a guest OS and before you install the Guest Additions, described in chapter 5,
Guest Additions, page 89, either your VM or the rest of your computer can own the keyboard and
the mouse. Both cannot own the keyboard and mouse at the same time. You will see a second
mouse pointer which is always confined to the limits of the VM window. You activate the VM by
clicking inside it.
To return ownership of keyboard and mouse to your host OS, Oracle VM VirtualBox reserves a
special key on your keyboard: the Host key. By default, this is the right Ctrl key on your keyboard.
On a Mac host, the default Host key is the left Command key. You can change this default using
the Preferences window. See chapter 2.17, Preferences, page 47. The current setting for the Host
key is always displayed at the bottom right of your VM window.
This means the following:
19
2 First Steps
• Your keyboard is owned by the VM if the VM window on your host desktop has the key-
board focus. If you have many windows open in your guest OS, the window that has the
focus in your VM is used. This means that if you want to enter text within your VM, click
on the title bar of your VM window first.
To release keyboard ownership, press the Host key. As explained above, this is typically the
right Ctrl key.
Note that while the VM owns the keyboard, some key sequences, such as Alt+Tab, will
no longer be seen by the host, but will go to the guest instead. After you press the Host
key to reenable the host keyboard, all key presses will go through the host again, so that
sequences such as Alt+Tab will no longer reach the guest. For technical reasons it may
not be possible for the VM to get all keyboard input even when it does own the keyboard.
Examples of this are the Ctrl+Alt+Del sequence on Windows hosts or single keys grabbed
by other applications on X11 hosts such as the GNOME desktop Locate Pointer feature.
• Your mouse is owned by the VM only after you have clicked in the VM window. The host
mouse pointer will disappear, and your mouse will drive the guest’s pointer instead of your
normal mouse pointer.
Note that mouse ownership is independent of that of the keyboard. Even after you have
clicked on a titlebar to be able to enter text into the VM window, your mouse is not neces-
sarily owned by the VM yet.
To release ownership of your mouse by the VM, press the Host key.
As this behavior is inconvenient, Oracle VM VirtualBox provides a set of tools and device
drivers for guest systems called the Oracle VM VirtualBox Guest Additions. These tools make VM
keyboard and mouse operations much more seamless. Most importantly, the Guest Additions
suppress the second “guest” mouse pointer and make your host mouse pointer work directly in
the guest. See chapter 5, Guest Additions, page 89.
2.9.3 Typing Special Characters
Some OSes expect certain key combinations to initiate certain procedures. The key combinations
that you type into a VM might target the host OS, the Oracle VM VirtualBox software, or the
guest OS. The recipient of these keypresses depends on a number of factors, including the key
combination itself.
• Host OSes reserve certain key combinations for themselves. For example, you cannot use
the Ctrl+Alt+Delete combination to reboot the guest OS in your VM, because this key
combination is reserved by the host OS. Even though both Windows and Linux OSes can
intercept this key combination, the host OS is rebooted automatically.
On Linux and Oracle Solaris hosts, which use the X Window System, the key combination
Ctrl+Alt+Backspace normally resets the X server and restarts the entire graphical user
interface. As the X server intercepts this combination, pressing it will usually restart your
host graphical user interface and kill all running programs, including Oracle VM VirtualBox,
in the process.
On Linux hosts supporting virtual terminals, the key combination Ctrl+Alt+Fx, where Fx
is one of the function keys from F1 to F12, normally enables you to switch between virtual
terminals. As with Ctrl+Alt+Delete, these combinations are intercepted by the host OS
and therefore always switch terminals on the host.
If, instead, you want to send these key combinations to the guest OS in the virtual machine,
you will need to use one of the following methods:
20
2 First Steps
- Use the items in the Input, Keyboard menu of the virtual machine window. This
menu includes the settings Insert Ctrl+Alt+Delete and Insert Ctrl+Alt+Backspace.
However, the latter setting affects only Linux guests or Oracle Solaris guests.
This menu also includes an option for inserting the Host key combination.
- Use special key combinations with the Host key, which is normally the right Control
key. Oracle VM VirtualBox then translates the following key combinations for the VM:
∗ Host key + Del sends Ctrl+Alt+Del to reboot the guest OS.
∗ Host key + Backspace sends Ctrl+Alt+Backspace to restart the graphical user
interface of a Linux or Oracle Solaris guest.
∗ Host key + Function key. For example, use this key combination to simulate
Ctrl+Alt+Fx to switch between virtual terminals in a Linux guest.
• For some other keyboard combinations such as Alt+Tab to switch between open windows,
Oracle VM VirtualBox enables you to configure whether these combinations will affect the
host or the guest, if a virtual machine currently has the focus. This is a global setting for
all virtual machines and can be found under File, Preferences, Input.
• A soft keyboard can be used to input key combinations in the guest. See chapter 2.19, Soft
Keyboard, page 49.
2.9.4 Changing Removable Media
While a virtual machine is running, you can change removable media in the Devices menu of
the VM’s window. Here you can select in detail what Oracle VM VirtualBox presents to your VM
as a CD, DVD, or floppy drive.
The settings are the same as those available for the VM in the Settings window of VirtualBox
Manager. But as the Settings window is disabled while the VM is in the Running or Saved state,
the Devices menu saves you from having to shut down and restart the VM every time you want
to change media.
Using the Devices menu, you can attach the host drive to the guest or select a floppy or DVD
image, as described in chapter 4.7, Storage Settings, page 79.
The Devices menu also includes an option for creating a virtual ISO (VISO) from selected files
on the host.
2.9.5 Resizing the Machine’s Window
You can resize the VM’s window while that VM is running. When you do, the window is scaled
as follows:
• If you have scaled mode enabled, then the virtual machine’s screen will be scaled to the
size of the window. This can be useful if you have many machines running and want to
have a look at one of them while it is running in the background. Alternatively, it might
be useful to enlarge a window if the VM’s output screen is very small, for example because
you are running an old OS in it.
To enable scaled mode, press Host key + C, or select Scaled Mode from the View menu
in the VM window. To leave scaled mode, press Host key + C again.
The aspect ratio of the guest screen is preserved when resizing the window. To ignore the
aspect ratio, press Shift during the resize operation.
See chapter 15, Known Limitations, page 421 for additional remarks.
21
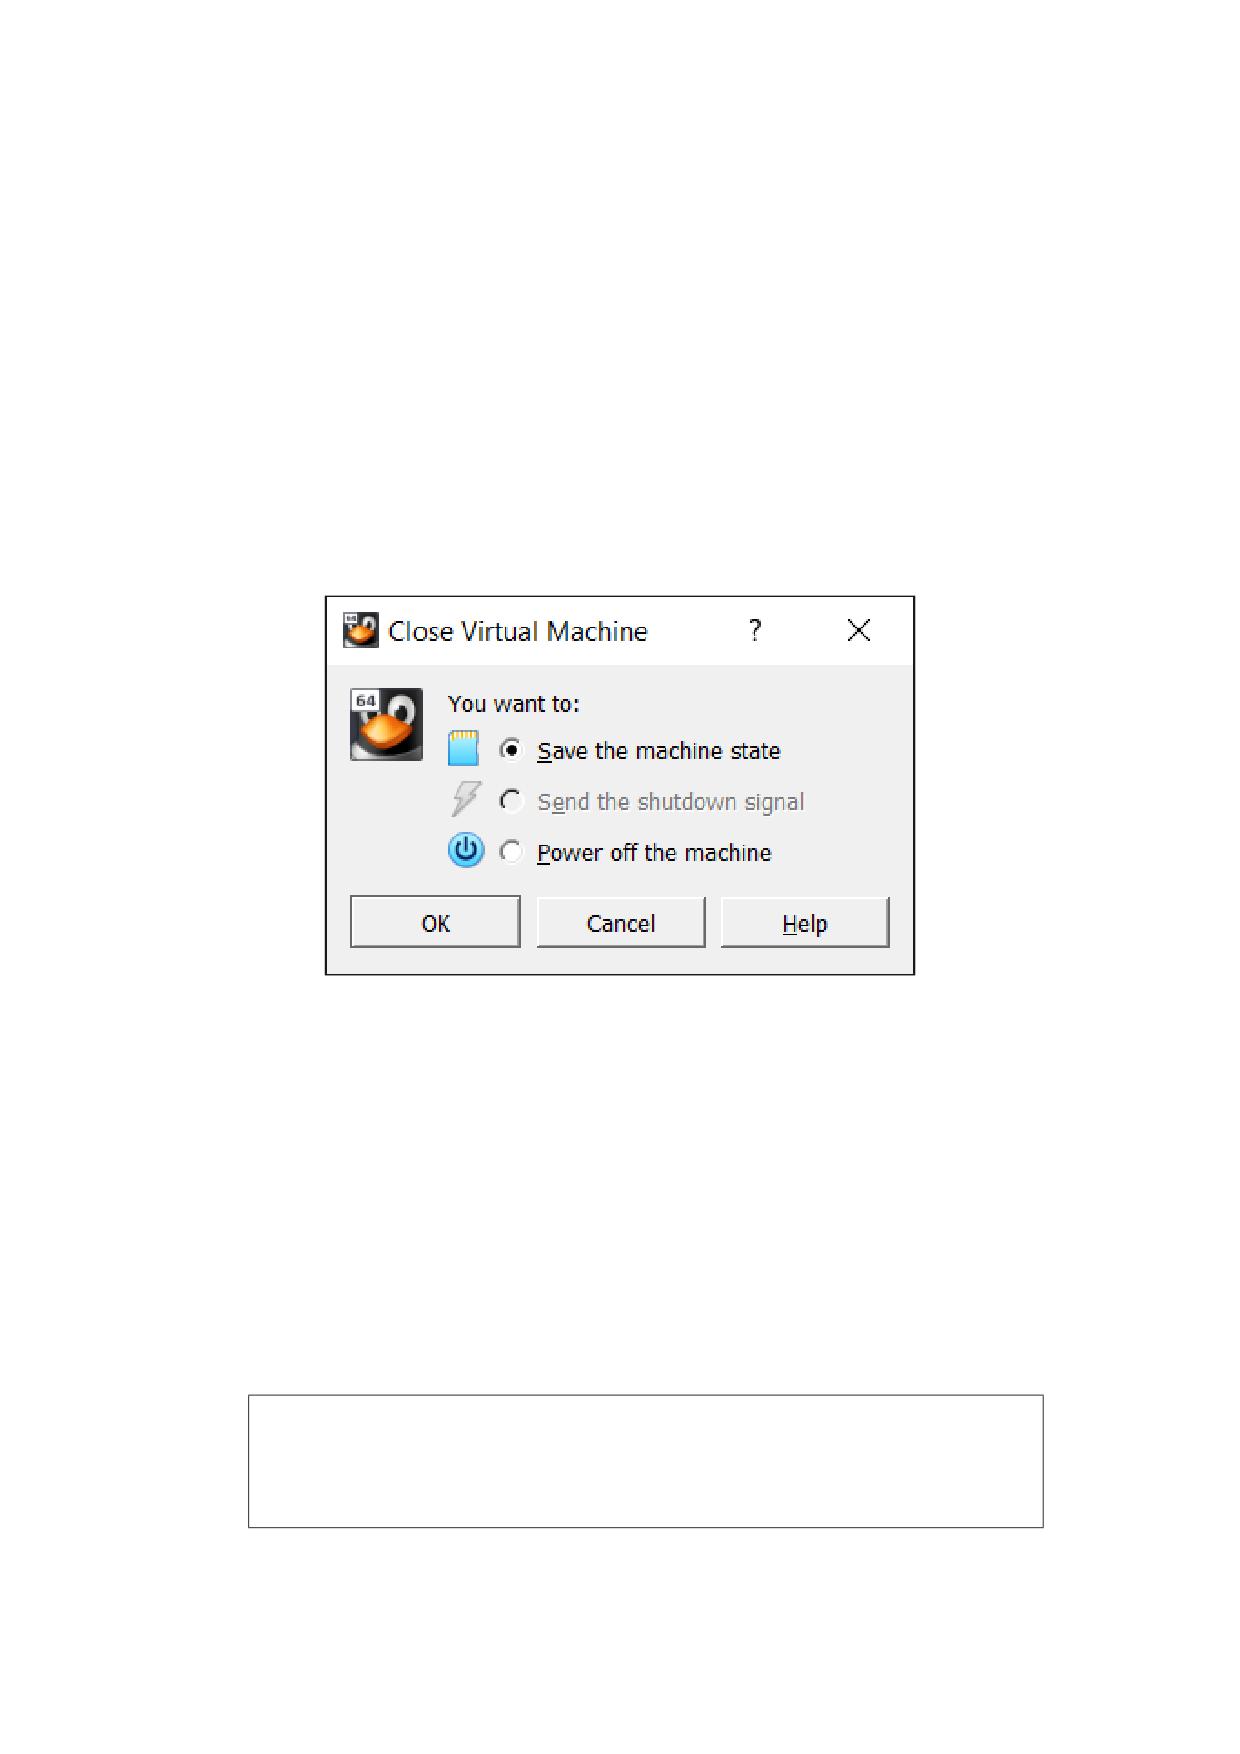
2 First Steps
• If you have the Guest Additions installed and they support automatic resizing, the Guest
Additions will automatically adjust the screen resolution of the guest OS. For example, if
you are running a Windows guest with a resolution of 1024x768 pixels and you then resize
the VM window to make it 100 pixels wider, the Guest Additions will change the Windows
display resolution to 1124x768.
See chapter 5, Guest Additions, page 89.
• Otherwise, if the window is bigger than the VM’s screen, the screen will be centered. If it
is smaller, then scroll bars will be added to the machine window.
2.9.6 Saving the State of the Machine
When you click on the Close button of your virtual machine window, at the top right of the
window, just like you would close any other window on your system, Oracle VM VirtualBox asks
you whether you want to save or power off the VM. As a shortcut, you can also press Host key
+ Q.
The difference between the three options is crucial. They mean the following:
• Save the machine state: With this option, Oracle VM VirtualBox freezes the virtual ma-
chine by completely saving its state to your local disk.
When you start the VM again later, you will find that the VM continues exactly where it
was left off. All your programs will still be open, and your computer resumes operation.
Saving the state of a virtual machine is thus in some ways similar to suspending a laptop
computer by closing its lid.
• Send the shutdown signal. This will send an ACPI shutdown signal to the virtual machine,
which has the same effect as if you had pressed the power button on a real computer. This
should trigger a proper shutdown mechanism from within the VM.
• Power off the machine: With this option, Oracle VM VirtualBox also stops running the
virtual machine, but without saving its state.
Warning: This is equivalent to pulling the power plug on a real computer without
shutting it down properly. If you start the machine again after powering it off, your
OS will have to reboot completely and may begin a lengthy check of its virtual system
disks. As a result, this should not normally be done, since it can potentially cause data
loss or an inconsistent state of the guest system on disk.
22
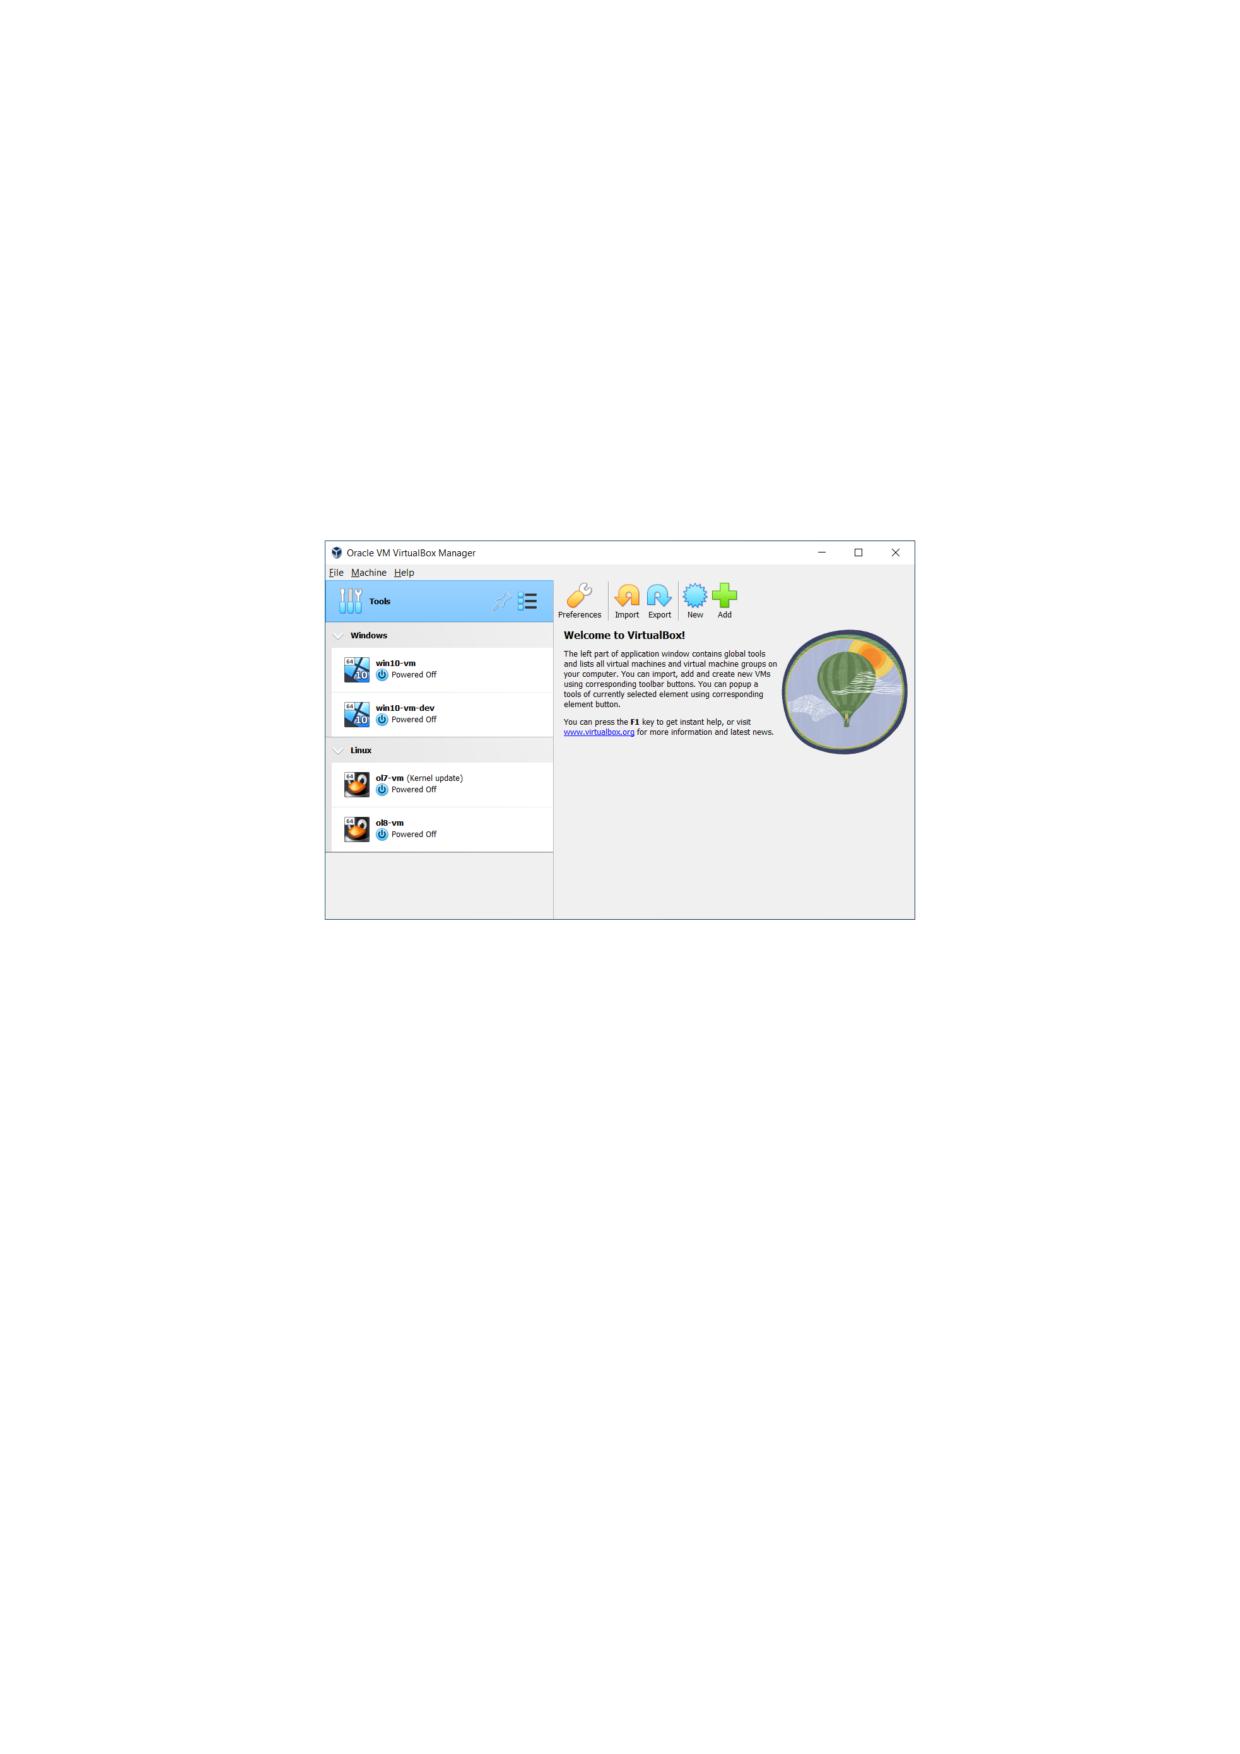
2 First Steps
As an exception, if your virtual machine has any snapshots, see chapter 2.11, Snapshots,
page 24, you can use this option to quickly restore the current snapshot of the virtual
machine. In that case, powering off the machine will discard the current state and any
changes made since the previous snapshot was taken will be lost.
The Discard button in the VirtualBox Manager window discards a virtual machine’s saved
state. This has the same effect as powering it off, and the same warnings apply.
2.10 Using VM Groups
VM groups are groups of VMs that you can create as and when required. You can manage and
perform functions on them collectively, as well as individually.
The following figure shows VM groups displayed in VirtualBox Manager.
The following features are available for groups:
• Create a group using VirtualBox Manager. Do one of the following:
- Drag a VM on top of another VM.
- Select multiple VMs and select Group from the right-click menu.
• Create and manage a group using the command line. Do one of the following:
- Create a group and assign a VM. For example:
VBoxManage modifyvm "vm01" --groups "/TestGroup"
This command creates a group TestGroup and attaches the VM vm01 to that group.
- Detach a VM from the group, and delete the group if empty. For example:
VBoxManage modifyvm "vm01" --groups ""
This command detaches all groups from the VM vm01 and deletes the empty group.
• Create multiple groups. For example:
VBoxManage modifyvm "vm01" --groups "/TestGroup,/TestGroup2"
This command creates the groups TestGroup and TestGroup2, if they do not exist, and
attaches the VM vm01 to both of them.
23
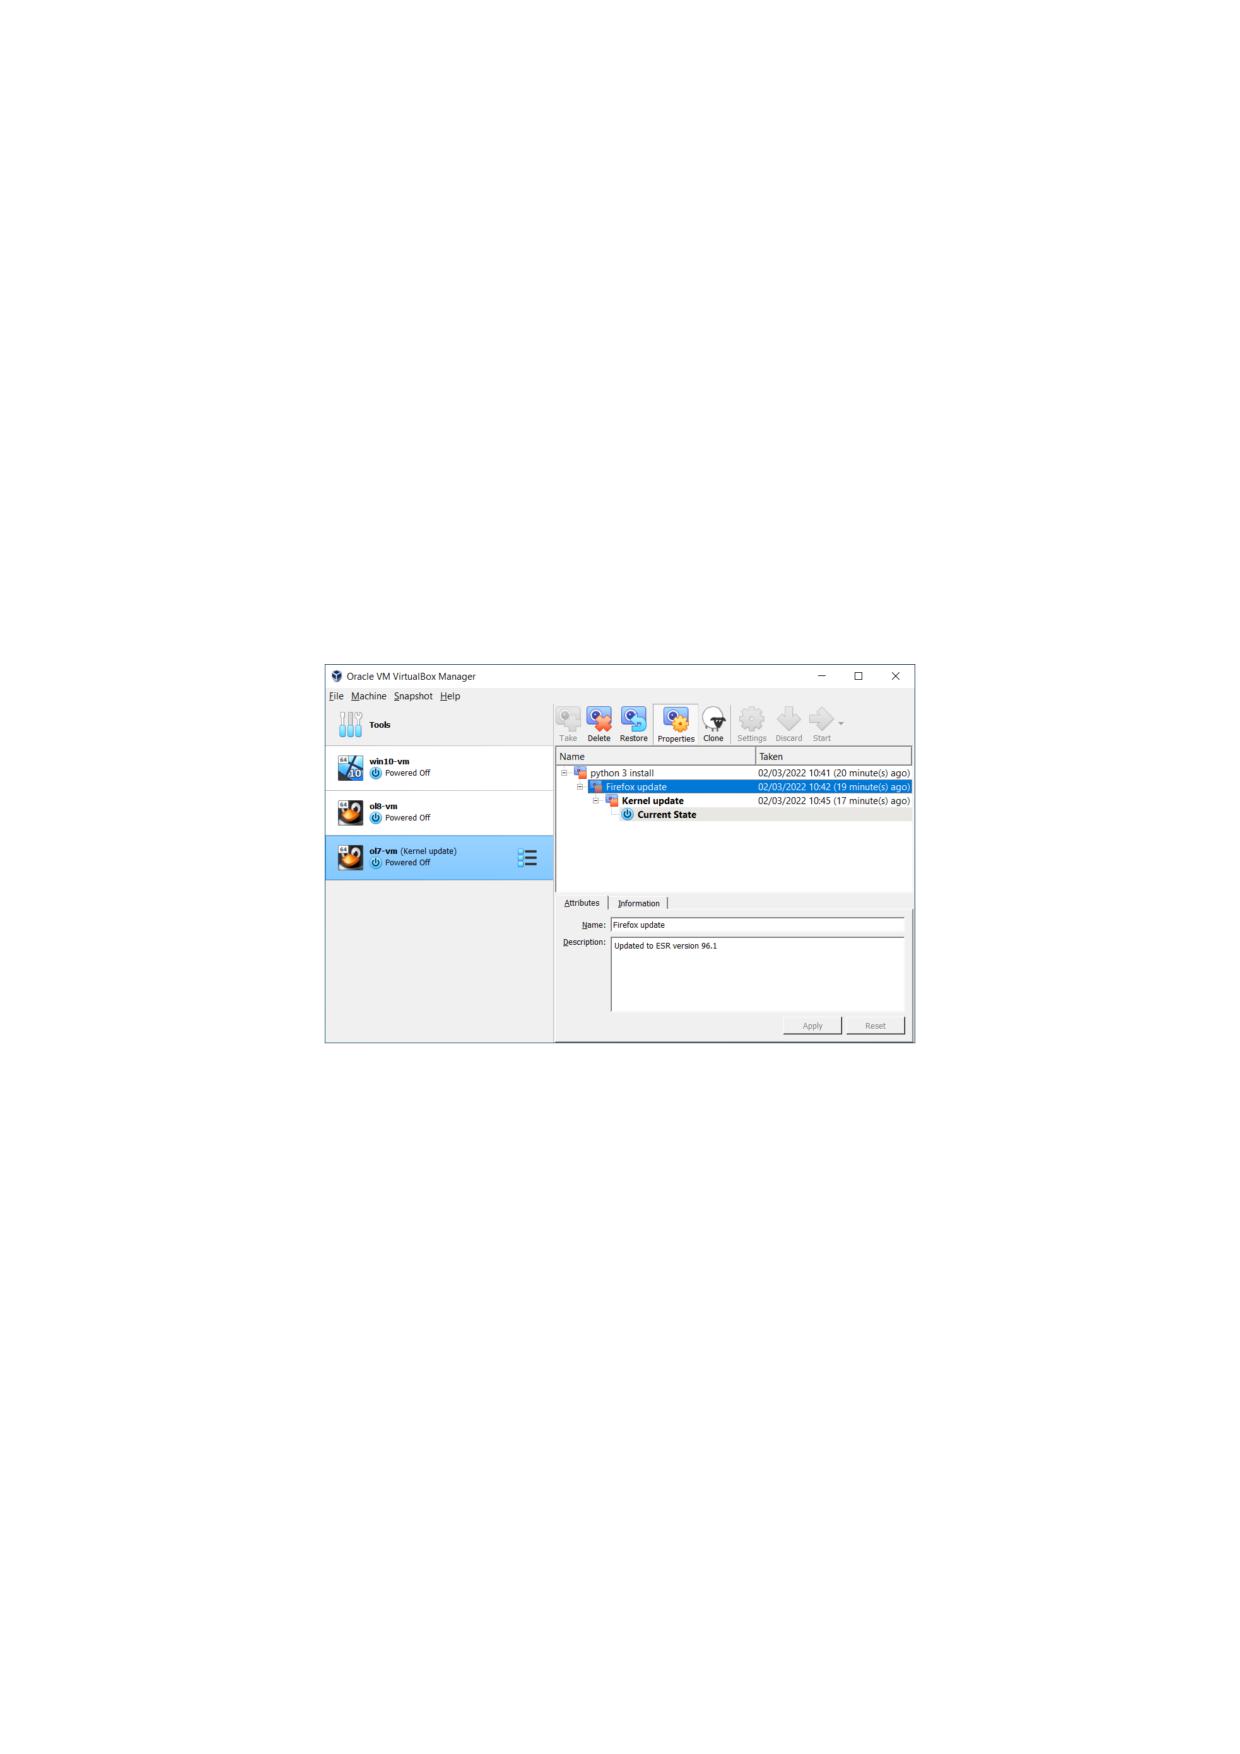
2 First Steps
• Create nested groups, having a group hierarchy. For example:
VBoxManage modifyvm "vm01" --groups "/TestGroup/TestGroup2"
This command attaches the VM vm01 to the subgroup TestGroup2 of the TestGroup group.
• Use VirtualBox Manager menu options to control and manage all the VMs in a group. For
example: Start, Pause, Reset, Close (save state, send shutdown signal, poweroff), Discard
Saved State, Show in Explorer, Sort.
2.11 Snapshots
With snapshots, you can save a particular state of a virtual machine for later use. At any later
time, you can revert to that state, even though you may have changed the VM considerably since
then. A snapshot of a virtual machine is thus similar to a machine in Saved state, but there can
be many of them, and these saved states are preserved.
To see the snapshots of a virtual machine, click on the machine name in VirtualBox Manager.
In the machine tools menu for the VM, click Snapshots. The Snapshots tool is displayed.
If you select multiple VMs in the machine list, all snapshots are listed for each VM.
Until you take a snapshot of the virtual machine, the list of snapshots will be empty, except
for the Current State item. This item represents the current point in the lifetime of the virtual
machine.
The Snapshots window includes a toolbar, enabling you to perform the following snapshot
operations:
• Take. Takes a snapshot of the selected VM. See chapter 2.11.1, Taking, Restoring, and
Deleting Snapshots, page 25.
• Delete. Removes a snapshot from the list of snapshots. See chapter 2.11.1, Taking, Restor-
ing, and Deleting Snapshots, page 25.
• Restore. Restores the VM state to be the same as the selected snapshot. See chapter 2.11.1,
Taking, Restoring, and Deleting Snapshots, page 25.
• Properties. Displays the properties for the selected snapshot. The Attributes tab is used to
specify a Name and Description for the snapshot. The Information tab shows VM settings
for the snapshot.
24
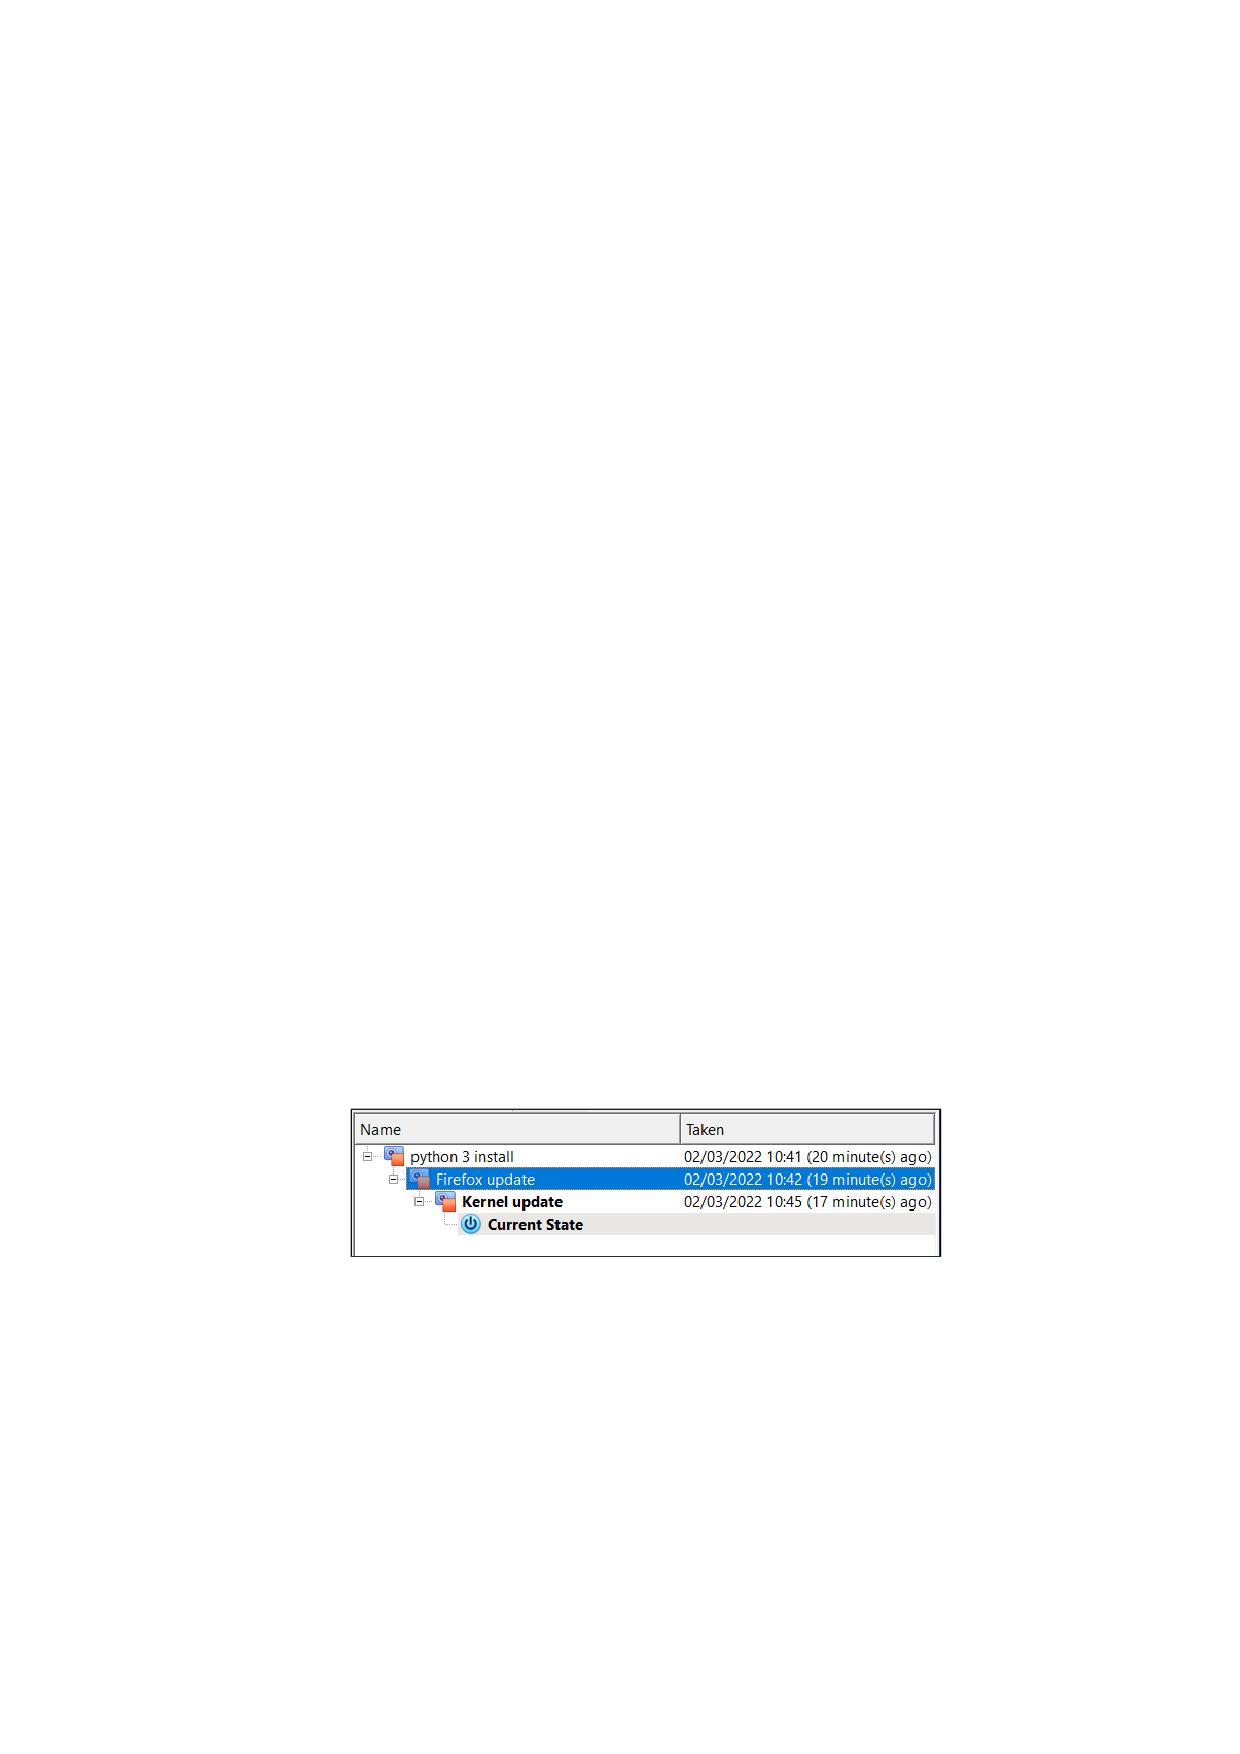
2 First Steps
• Clone. Displays the Clone Virtual Machine wizard. This enables you to create a clone of
the VM, based on the selected snapshot.
• Settings. Available for the Current State snapshot only. Displays the Settings window for
the VM, enabling you to make configuration changes.
• Discard. For a running VM, discards the saved state for the VM and closes it down.
• Start. Start the VM. This operation is available for the Current State item.
2.11.1 Taking, Restoring, and Deleting Snapshots
There are three operations related to snapshots, as follows:
1. Take a snapshot. This makes a copy of the machine’s current state, to which you can go
back at any given time later.
• If your VM is running:
Select Take Snapshot from the Machine menu in the VM window.
The VM is paused while the snapshot is being created. After snapshot creation, the
VM continues to run as normal.
• If your VM is in either the Saved or the Powered Off state, as displayed next to the VM
name in the machine list:
Display the Snapshots window and do one of the following:
- Click Take in the Snapshots window toolbar.
- Right-click on the Current State item in the list and select Take.
A dialog is displayed, prompting you for a snapshot name. This name is purely for reference
purposes, to help you remember the state of the snapshot. For example, a useful name
would be “Fresh installation from scratch, no Guest Additions”, or “Service Pack 3 just
installed”. You can also add a longer text description in the Snapshot Description field.
Your new snapshot will then appear in the snapshots list. Underneath your new snapshot,
you will see an item called Current State, signifying that the current state of your VM is a
variation based on the snapshot you took earlier. If you later take another snapshot, you
will see that they are displayed in sequence, and that each subsequent snapshot is derived
from an earlier one.
Oracle VM VirtualBox imposes no limits on the number of snapshots you can take. The
only practical limitation is disk space on your host. Each snapshot stores the state of the
virtual machine and thus occupies some disk space. See chapter 2.11.2, Snapshot Contents,
page 26 for details on what is stored in a snapshot.
2. Restore a snapshot. In the Snapshots window, select the snapshot you have taken and
click Restore in the toolbar. By restoring a snapshot, you go back or forward in time. The
current state of the machine is lost, and the machine is restored to the exact state it was in
when the snapshot was taken.
25
2 First Steps
Note: Restoring a snapshot will affect the virtual hard drives that are connected to
your VM, as the entire state of the virtual hard drive will be reverted as well. This
means also that all files that have been created since the snapshot and all other file
changes will be lost. In order to prevent such data loss while still making use of the
snapshot feature, it is possible to add a second hard drive in write-through mode using
the VBoxManage interface and use it to store your data. As write-through hard drives
are not included in snapshots, they remain unaltered when a machine is reverted. See
chapter 6.4, Special Image Write Modes, page 119.
To avoid losing the current state when restoring a snapshot, you can create a new snapshot
before the restore operation.
By restoring an earlier snapshot and taking more snapshots from there, it is even possible
to create a kind of alternate reality and to switch between these different histories of the
virtual machine. This can result in a whole tree of virtual machine snapshots.
3. Delete a snapshot. This does not affect the state of the virtual machine, but only releases
the files on disk that Oracle VM VirtualBox used to store the snapshot data, thus freeing
disk space. To delete a snapshot, select the snapshot name in the Snapshots window and
click Delete in the toolbar. Snapshots can be deleted even while a machine is running.
Note: Whereas taking and restoring snapshots are fairly quick operations, deleting a
snapshot can take a considerable amount of time since large amounts of data may need
to be copied between several disk image files. Temporary disk files may also need large
amounts of disk space while the operation is in progress.
There are some situations which cannot be handled while a VM is running, and you will
get an appropriate message that you need to perform this snapshot deletion when the VM
is shut down.
2.11.2 Snapshot Contents
Think of a snapshot as a point in time that you have preserved. More formally, a snapshot consists
of the following:
• The snapshot contains a complete copy of the VM settings, including the hardware con-
figuration, so that when you restore a snapshot, the VM settings are restored as well.
For example, if you changed the hard disk configuration or the VM’s system settings, that
change is undone when you restore the snapshot.
The copy of the settings is stored in the machine configuration, an XML text file, and thus
occupies very little space.
• The complete state of all the virtual disks attached to the machine is preserved. Going back
to a snapshot means that all changes that had been made to the machine’s disks, file by file
and bit by bit, will be undone as well. Files that were since created will disappear, files that
were deleted will be restored, changes to files will be reverted.
Strictly speaking, this is only true for virtual hard disks in “normal” mode. You can config-
ure disks to behave differently with snapshots, see chapter 6.4, Special Image Write Modes,
page 119. In technical terms, it is not the virtual disk itself that is restored when a snapshot
is restored. Instead, when a snapshot is taken, Oracle VM VirtualBox creates differencing
images which contain only the changes since the snapshot were taken. When the snapshot
is restored, Oracle VM VirtualBox throws away that differencing image, thus going back to
26
2 First Steps
the previous state. This is both faster and uses less disk space. For the details, which can
be complex, see chapter 6.5, Differencing Images, page 120.
Creating the differencing image as such does not occupy much space on the host disk
initially, since the differencing image will initially be empty and grow dynamically later
with each write operation to the disk. The longer you use the machine after having created
the snapshot, however, the more the differencing image will grow in size.
• If you took a snapshot while the machine was running, the memory state of the machine
is also saved in the snapshot. This is in the same way that memory can be saved when you
close a VM window. When you restore such a snapshot, execution resumes at exactly the
point when the snapshot was taken.
The memory state file can be as large as the memory size of the VM and will therefore
occupy considerable disk space.
2.12 Virtual Machine Configuration
When you select a virtual machine from the list in the VirtualBox Manager window, you will see
a summary of that machine’s settings on the right.
Clicking on Settings displays a window, where you can configure many of the properties of
the selected VM. But be careful when changing VM settings. It is possible to change all VM set-
tings after installing a guest OS, but certain changes might prevent a guest OS from functioning
correctly if done after installation.
Note: The Settings button is disabled while a VM is either in the Running or Saved
state. This is because the Settings window enables you to change fundamental char-
acteristics of the virtual machine that is created for your guest OS. For example, the
guest OS may not perform well if half of its memory is taken away. As a result, if the
Settings button is disabled, shut down the current VM first.
Oracle VM VirtualBox provides a wide range of parameters that can be changed for a virtual
machine. The various settings that can be changed in the Settings window are described in
detail in chapter 4, Configuring Virtual Machines, page 68. Even more parameters are available
when using the VBoxManage command line interface. See chapter 9, VBoxManage, page 154.
2.13 Removing and Moving Virtual Machines
You can remove a VM from Oracle VM VirtualBox or move the VM and its associated files, such
as disk images, to another location on the host.
• Removing a VM. To remove a VM, right-click on the VM in the VirtualBox Manager ma-
chine list and select Remove.
The confirmation dialog enables you to specify whether to only remove the VM from the
list of machines or to remove the files associated with the VM.
Note that the Remove menu item is disabled while a VM is running.
• Moving a VM. To move a VM to a new location on the host, right-click on the VM in the
VirtualBox Manager’s machine list and select Move.
The file dialog prompts you to specify a new location for the VM.
When you move a VM, Oracle VM VirtualBox configuration files are updated automatically
to use the new location on the host.
27
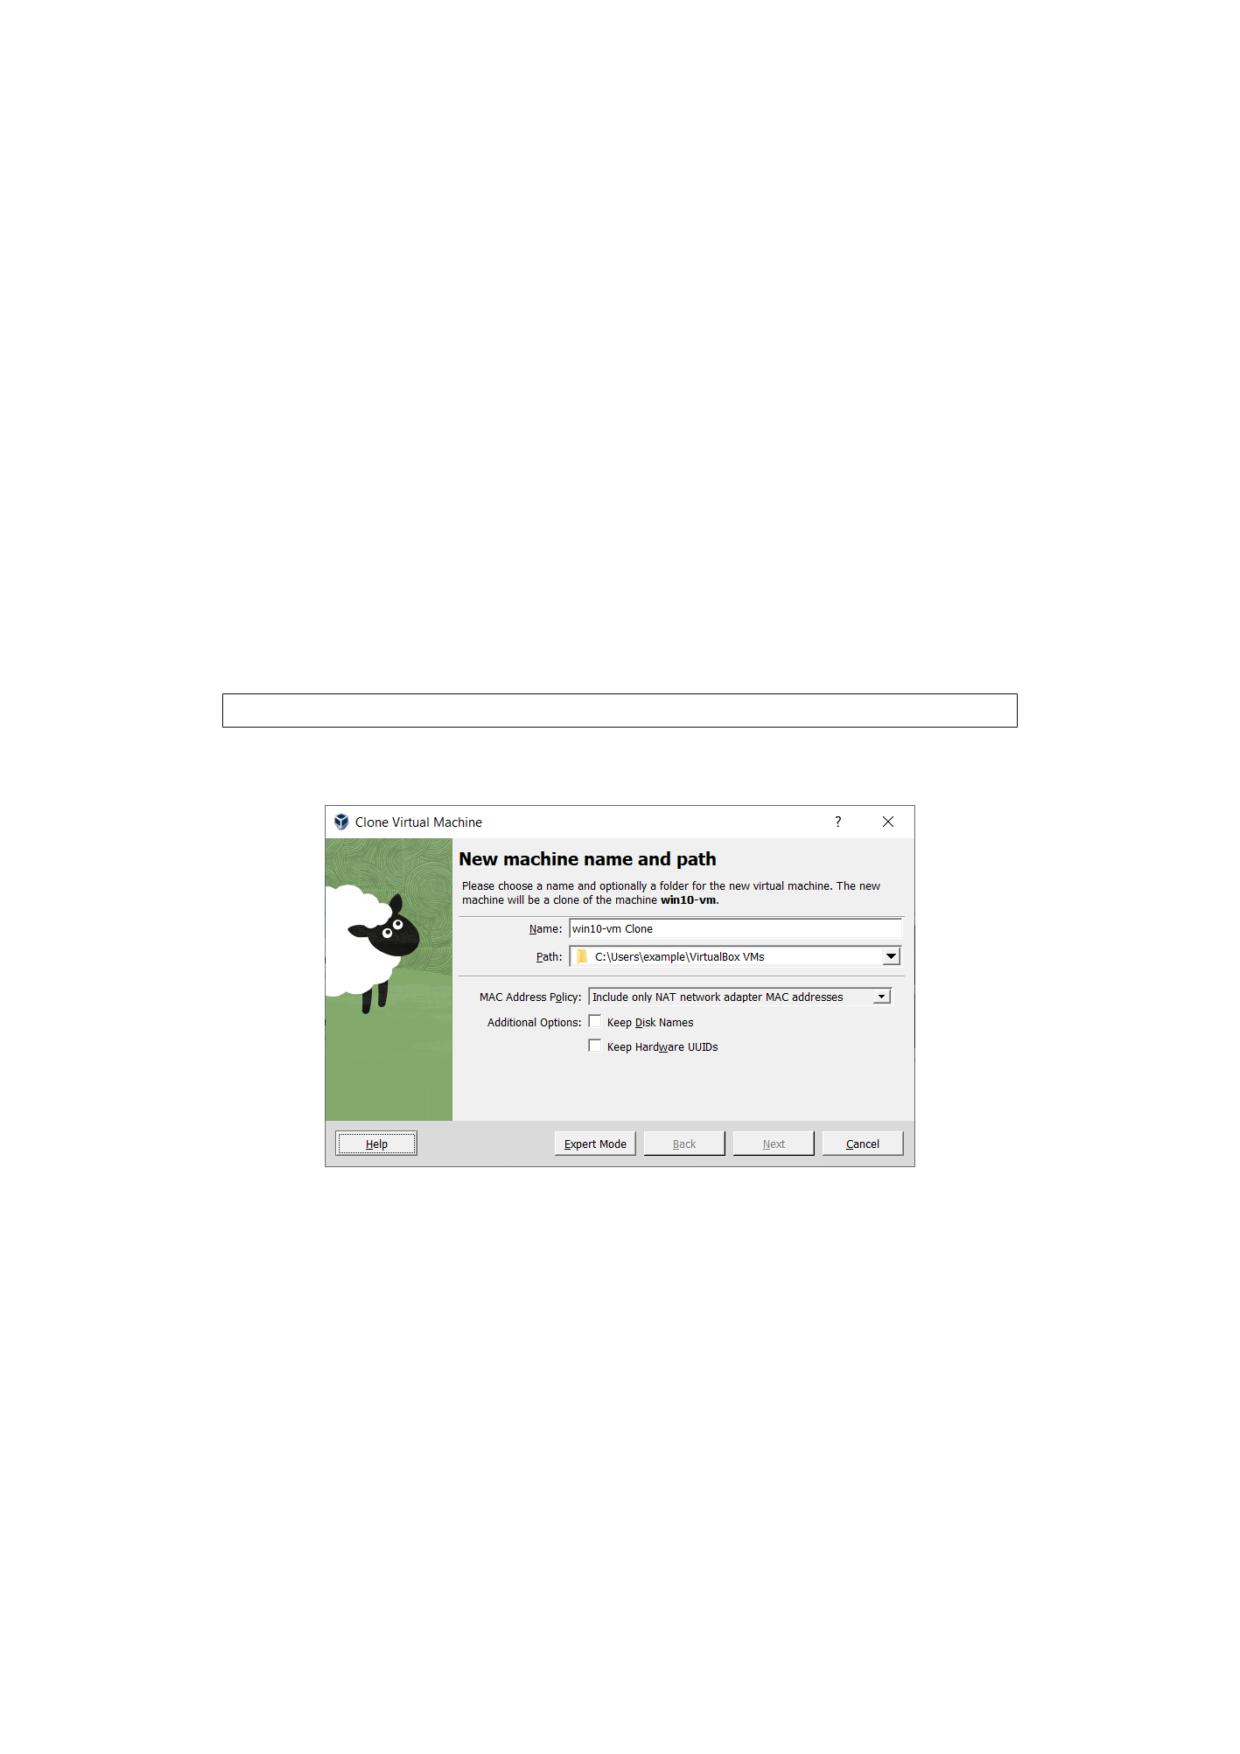
2 First Steps
Note that the Move menu item is disabled while a VM is running.
You can also use the VBoxManage movevm command to move a VM. See chapter 9.12,
VBoxManage movevm, page 205.
For information about removing or moving a disk image file from Oracle VM VirtualBox, see
chapter 6.3, The Virtual Media Manager, page 115.
2.14 Cloning Virtual Machines
You can create a full copy or a linked copy of an existing VM. This copy is called a clone. You
might use a cloned VM to experiment with a VM configuration, to test different guest OS levels,
or to back up a VM.
The Clone Virtual Machine wizard guides you through the cloning process.
You can start the Clone Virtual Machine wizard in one of the following ways:
• Click the VM name in the machine list and then select Clone from the Machine menu.
• Click Clone in the Snapshots window for the selected VM.
Note: The Clone menu item is disabled while a virtual machine is running.
The New Machine Name and Path page is displayed.
The following clone options are available:
• Name: A name for the cloned machine.
• Path: Choose a location for the cloned virtual machine, otherwise Oracle VM VirtualBox
uses the default machines folder.
• MAC Address Policy: Specifies whether to retain network card MAC addresses when
cloning the VM.
For example, the Generate New MAC Addresses For All Network Adapters value assigns
a new MAC address to each network card during cloning. This is the default setting. This
is the best option when both the source VM and the cloned VM must operate on the same
network. Other values enable you to retain the existing MAC addresses in the cloned VM.
28
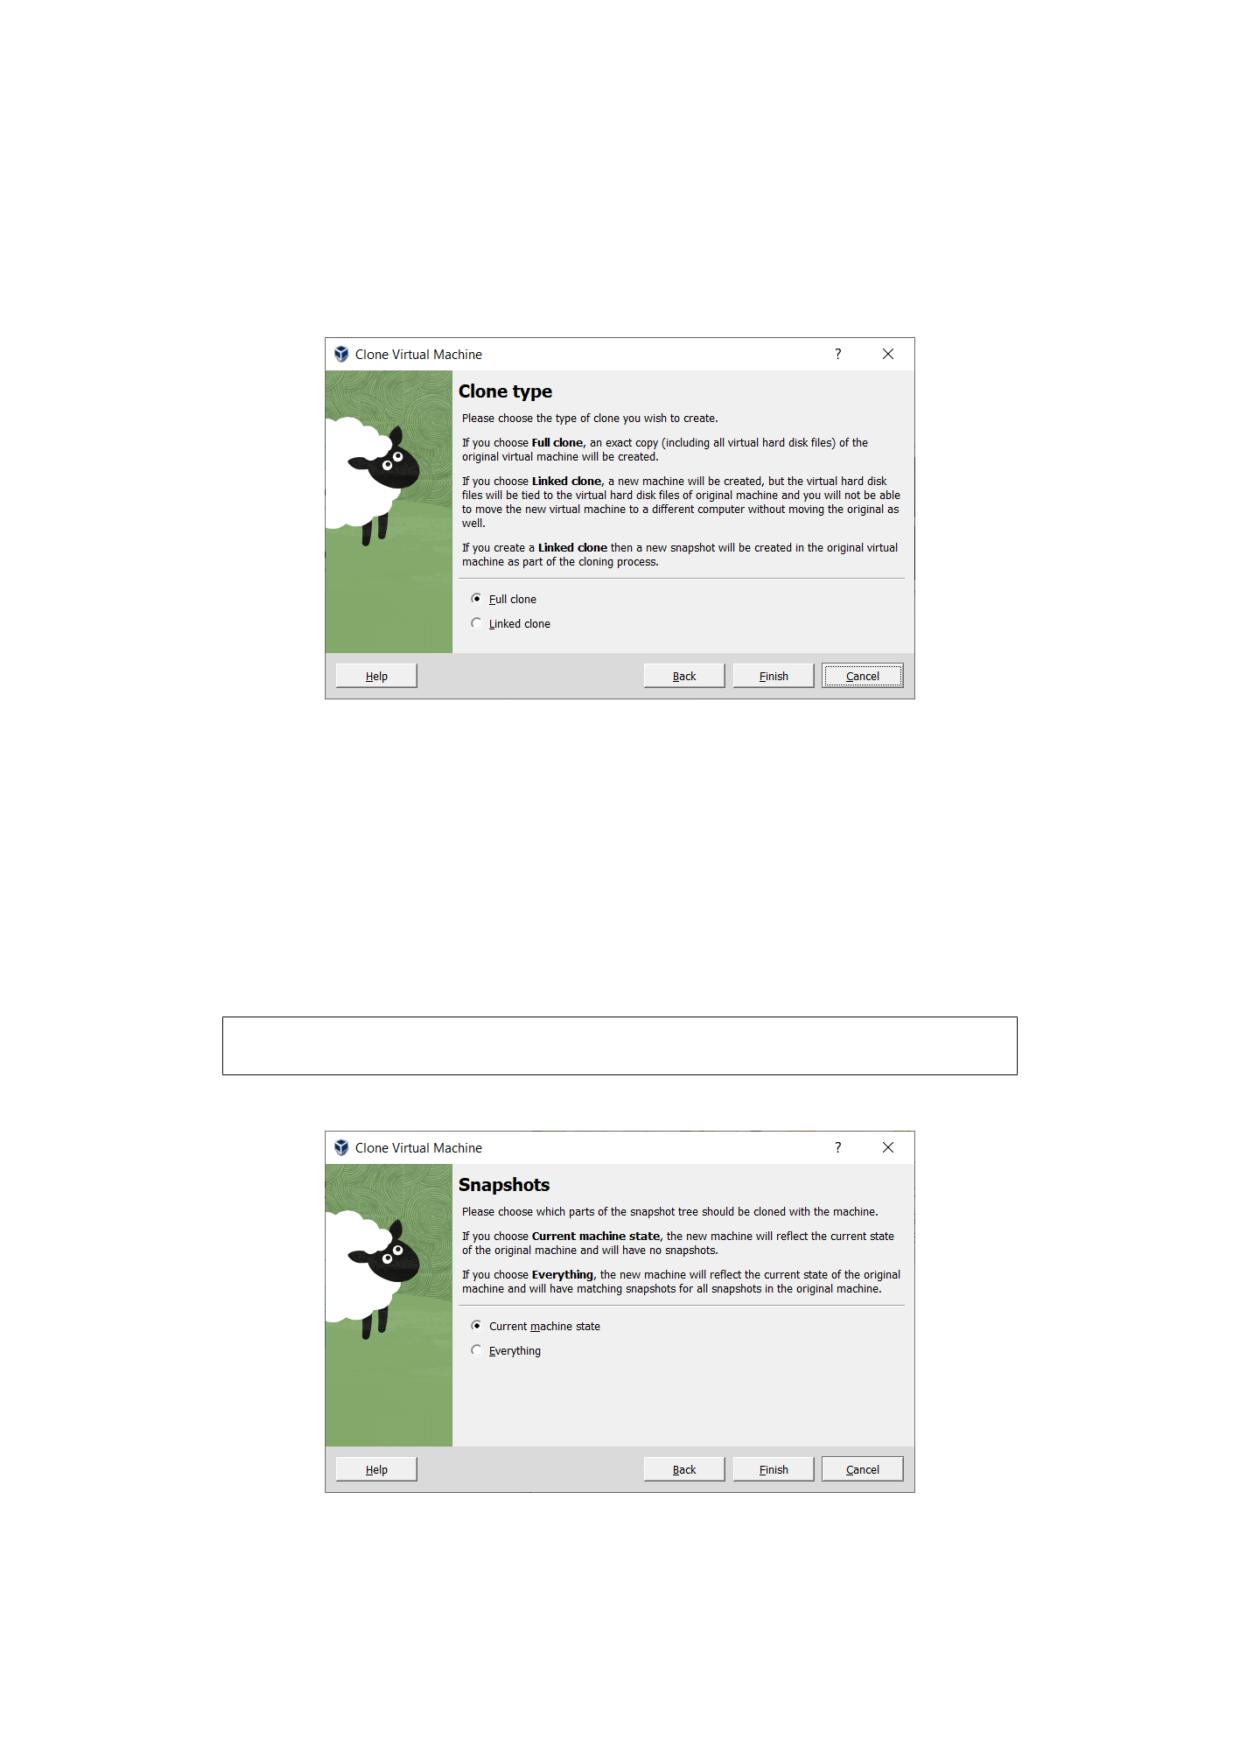
2 First Steps
• Keep Disk Names: Retains the disk image names when cloning the VM.
• Keep Hardware UUIDs: Retains the hardware universally unique identifiers (UUIDs) when
cloning the VM.
Click Next. The Clone Type page is displayed.
The Clone Type option specifies whether to create a clone that is linked to the source VM or
to create a fully independent clone:
• Full Clone: Copies all dependent disk images to the new VM folder. A full clone can
operate fully without the source VM.
• Linked Clone: Creates new differencing disk images based on the source VM disk images.
If you select the current state of the source VM as the clone point, Oracle VM VirtualBox
creates a new snapshot.
(Optional) Click Next. The Snapshots page is displayed.
Note: The Snapshots page is only displayed for machines that have snapshots and the
selected clone type is Full Clone.
29
2 First Steps
You use this page to select which parts of the snapshot tree to include in the clone. The
available options are as follows:
• Current Machine State: Clones the current state of the VM. Snapshots are not included.
• Everything: Clones the current machine state and all its snapshots.
Click Finish to start the clone operation.
The duration of the clone operation depends on the size and number of attached disk images.
In addition, the clone operation saves all the differencing disk images of a snapshot.
You can also use the VBoxManage clonevm command to clone a VM. See chapter 9.11, VBox-
Manage clonevm, page 203.
2.15 Importing and Exporting Virtual Machines
Oracle VM VirtualBox can import and export virtual machines in the following formats:
• Open Virtualization Format (OVF). This is the industry-standard format. See chapter
2.15.1, About the OVF Format, page 30.
• Cloud service formats. Export to and import from cloud services such as Oracle Cloud
Infrastructure is supported. See chapter 2.16, Integrating with Oracle Cloud Infrastructure,
page 32.
2.15.1 About the OVF Format
OVF is a cross-platform standard supported by many virtualization products which enables the
creation of ready-made virtual machines that can then be imported into a hypervisor such as
Oracle VM VirtualBox. Oracle VM VirtualBox makes OVF import and export easy to do, using
VirtualBox Manager or the command-line interface.
Using OVF enables packaging of virtual appliances. These are disk images, together with con-
figuration settings that can be distributed easily. This way one can offer complete ready-to-use
software packages, including OSes with applications, that need no configuration or installation
except for importing into Oracle VM VirtualBox.
Note: The OVF standard is complex, and support in Oracle VM VirtualBox is an ongoing
process. In particular, no guarantee is made that Oracle VM VirtualBox supports all
appliances created by other virtualization software. For a list of known limitations, see
chapter 15, Known Limitations, page 421.
Appliances in OVF format can appear in the following variants:
• They can come in several files, as one or several disk images, typically in the widely-used
VMDK format. See chapter 6.2, Disk Image Files (VDI, VMDK, VHD, HDD), page 114. They
also include a textual description file in an XML dialect with an .ovf extension. These files
must then reside in the same directory for Oracle VM VirtualBox to be able to import them.
• Alternatively, the above files can be packed together into a single archive file, typically
with an .ova extension. Such archive files use a variant of the TAR archive format and can
therefore be unpacked outside of Oracle VM VirtualBox with any utility that can unpack
standard TAR files.
30
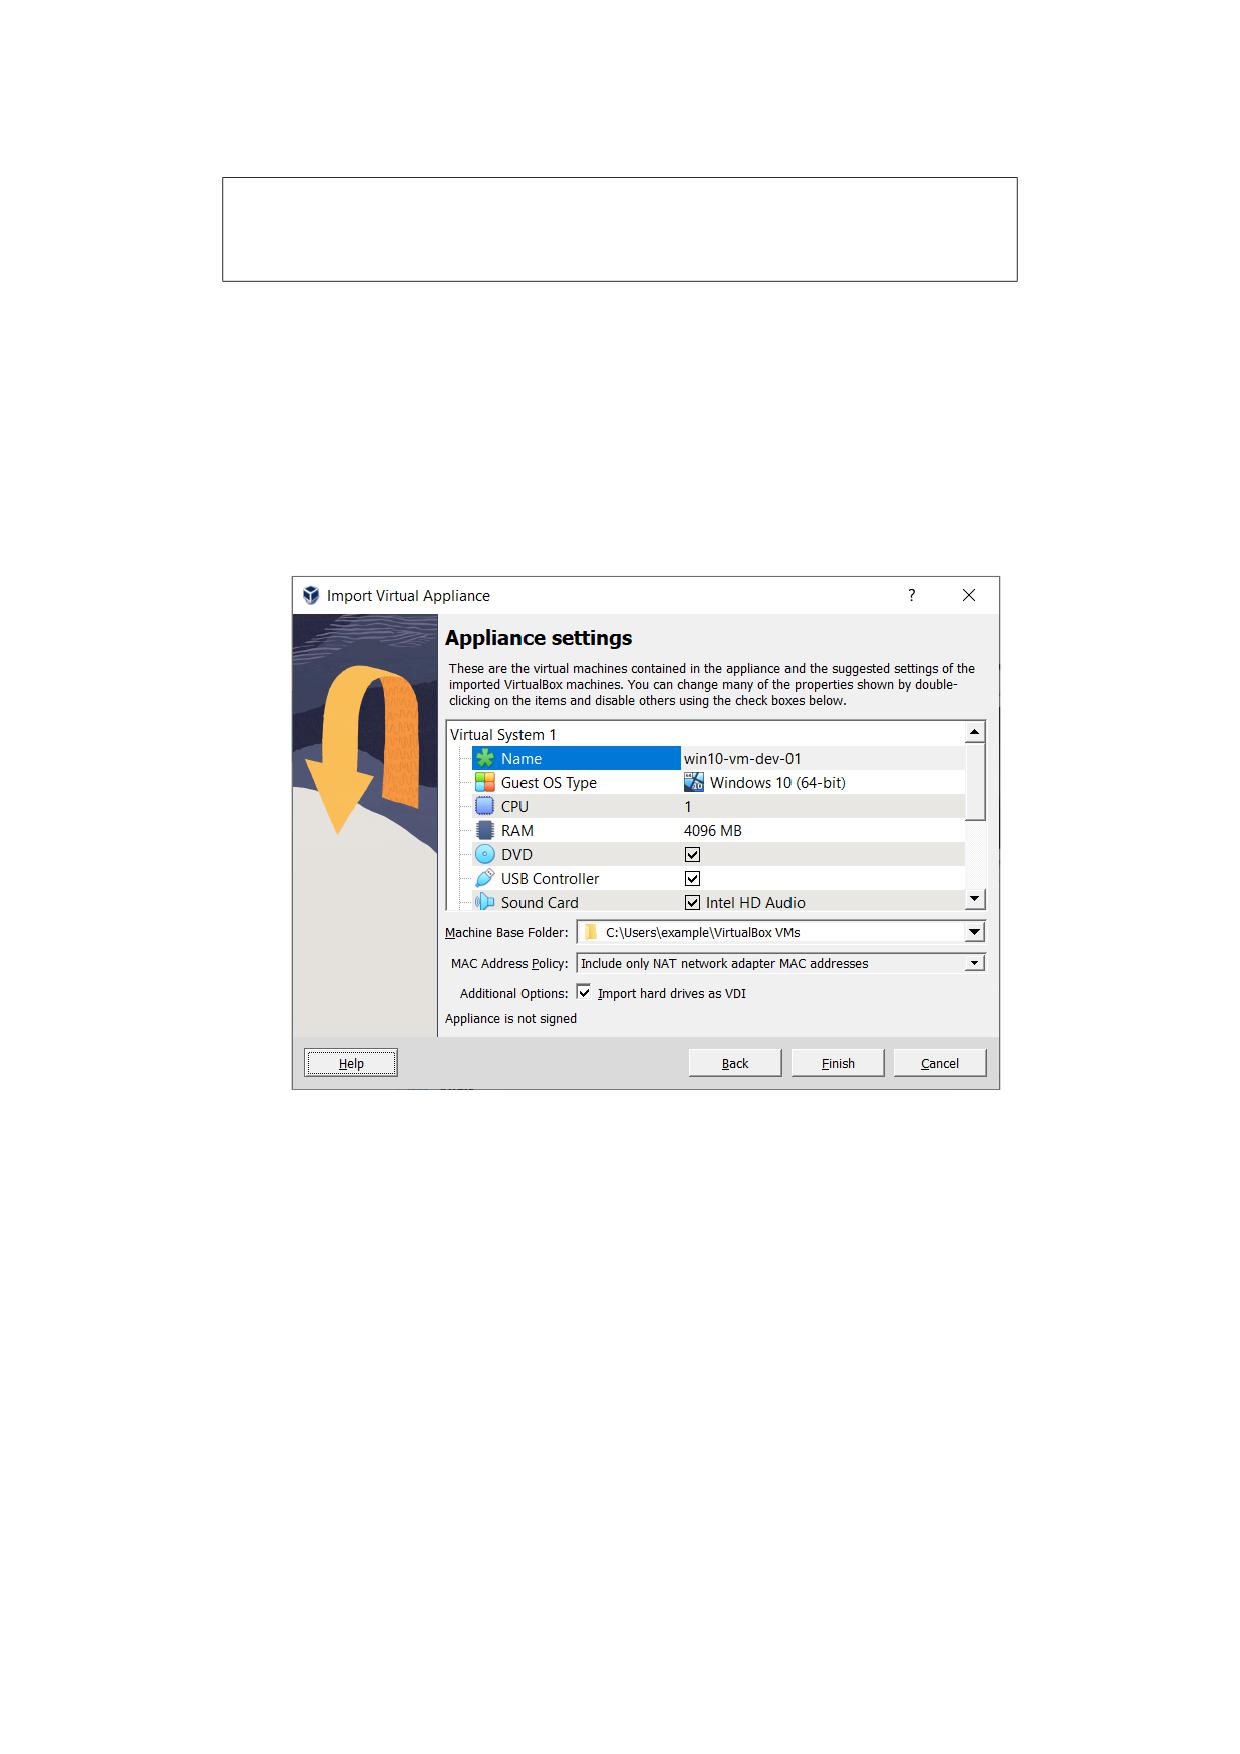
2 First Steps
Note: OVF cannot describe snapshots that were taken for a virtual machine. As a
result, when you export a virtual machine that has snapshots, only the current state of
the machine will be exported. The disk images in the export will have a flattened state
identical to the current state of the virtual machine.
2.15.2 Importing an Appliance in OVF Format
The following steps show how to import an appliance in OVF format.
1. Double-click on the OVF or OVA file.
Oracle VM VirtualBox creates file type associations automatically for any OVF and OVA files
on your host OS.
The Appliance Settings page of the Import Virtual Appliance wizard is shown.
2. The Appliance Settings page shows the VMs described in the OVF or OVA file and enables
you to change the VM settings.
By default, membership of VM groups is preserved on import for VMs that were initially
exported from Oracle VM VirtualBox. You can change this behavior by using the Primary
Group setting for the VM.
The following global settings apply to all of the VMs that you import:
• Base Folder: Specifies the directory on the host in which to store the imported VMs.
If an appliance has multiple VMs, you can specify a different directory for each VM by
editing the Base Folder setting for the VM.
• MAC Address Policy: Reinitializes the MAC addresses of network cards in your VMs
prior to import, by default. You can override the default behavior and preserve the
MAC addresses on import.
• Import Hard Drives as VDI: Imports hard drives in the VDI format rather than in the
default VMDK format.
31
2 First Steps
3. Click Finish to import the appliance.
Oracle VM VirtualBox copies the disk images and creates local VMs with the settings de-
scribed on the Appliance Settings page. The imported VMs are shown in the list of VMs
in VirtualBox Manager.
Because disk images are large, the VMDK images that are included with virtual appliances
are shipped in a compressed format that cannot be used directly by VMs. So, the images
are first unpacked and copied, which might take several minutes.
You can use the VBoxManage import command to import an appliance. See chapter 9.16,
VBoxManage import, page 216.
2.15.3 Exporting an Appliance in OVF Format
The following steps show how to export an appliance in OVF format.
1. Select File, Export Appliance to display the Export Virtual Appliance wizard.
On the initial Virtual Machines page, you can combine several VMs into an OVF appliance.
Select one or more VMs to export, and click Next.
2. The Format Settings page enables you to configure the following settings:
• Format: Selects the Open Virtualization Format value for the output files.
The Oracle Cloud Infrastructure value exports the appliance to Oracle Cloud Infras-
tructure. See chapter 2.16.8, Exporting an Appliance to Oracle Cloud Infrastructure,
page 42.
• File: Selects the location in which to store the exported files.
• MAC Address Policy: Specifies whether to retain or reassign network card MAC ad-
dresses on export.
• Write Manifest File: Enables you to include a manifest file in the exported archive
file.
• Include ISO Image Files: Enables you to include ISO image files in the exported
archive file.
3. Click Next to show the Appliance Settings page.
You can edit settings for the virtual appliance. For example, you can change the name of
the virtual appliance or add product information, such as vendor details or license text.
Double-click the appropriate field to change its value.
4. Click Finish to begin the export process. Note that this operation might take several min-
utes.
You can use the VBoxManage export command to export an appliance. See chapter 9.17,
VBoxManage export, page 220.
2.16 Integrating with Oracle Cloud Infrastructure
This section describes how to use the features of Oracle VM VirtualBox to integrate with Oracle
Cloud Infrastructure.
Integrating with Oracle Cloud Infrastructure involves the following steps:
• Prepare for Oracle Cloud Infrastructure Integration. Before using Oracle VM VirtualBox
with Oracle Cloud Infrastructure there are some initial configuration steps you may need
to do. See chapter 2.16.1, Preparing for Oracle Cloud Infrastructure Integration, page 33.
32
2 First Steps
• Use Oracle VM VirtualBox with Oracle Cloud Infrastructure. chapter 2.16.6, Using
Oracle VM VirtualBox With Oracle Cloud Infrastructure, page 37 describes how you can use
Oracle VM VirtualBox with Oracle Cloud Infrastructure.
2.16.1 Preparing for Oracle Cloud Infrastructure Integration
Perform the following configuration steps before using Oracle VM VirtualBox to integrate with
your Oracle Cloud Infrastructure account.
1. Install the Extension Pack. Cloud integration features are only available when you install
the Oracle VM VirtualBox Extension Pack. See chapter 2.5, Installing Oracle VM VirtualBox
and Extension Packs, page 6.
2. Create a key pair. Generate an API signing key pair that is used for API requests to Oracle
Cloud Infrastructure. See chapter 2.16.2, Creating an API Signing Key Pair, page 33.
Upload the public key of the key pair from your client device to the cloud service. See
chapter 2.16.3, Uploading the Public Key to Oracle Cloud Infrastructure, page 34.
3. Create a cloud profile. The cloud profile contains resource identifiers for your cloud
account, such as your user OCID, and details of your key pair. See chapter 2.16.4, Creating
a Cloud Profile, page 34.
2.16.2 Creating an API Signing Key Pair
To use the cloud integration features of Oracle VM VirtualBox, you must generate an API signing
key pair that is used for API requests to Oracle Cloud Infrastructure.
Your API requests are signed with your private key, and Oracle Cloud Infrastructure uses the
public key to verify the authenticity of the request. You must upload the public key to the Oracle
Cloud Infrastructure Console.
Note: This key pair is not the same SSH key that you use to access compute instances
on Oracle Cloud Infrastructure.
1. (Optional) Create a .oci directory to store the key pair.
$ mkdir ~/.oci
The key pair is usually installed in the .oci folder in your home directory. For example,
~/.oci on a Linux system.
2. Generate the private key.
Use the openssl command.
• To generate a private key with a passphrase:
$ openssl genrsa -out ~/.oci/oci_api_key.pem -aes128 2048
• To generate a private key without a passphrase:
$ openssl genrsa -out ~/.oci/oci_api_key.pem 2048
3. Change permissions for the private key.
$ chmod 600 ~/.oci/oci_api_key.pem
Generate the public key.
$ openssl rsa -pubout -in ~/.oci/oci_api_key.pem -out ~/.oci/oci_api_key_public.pem
33
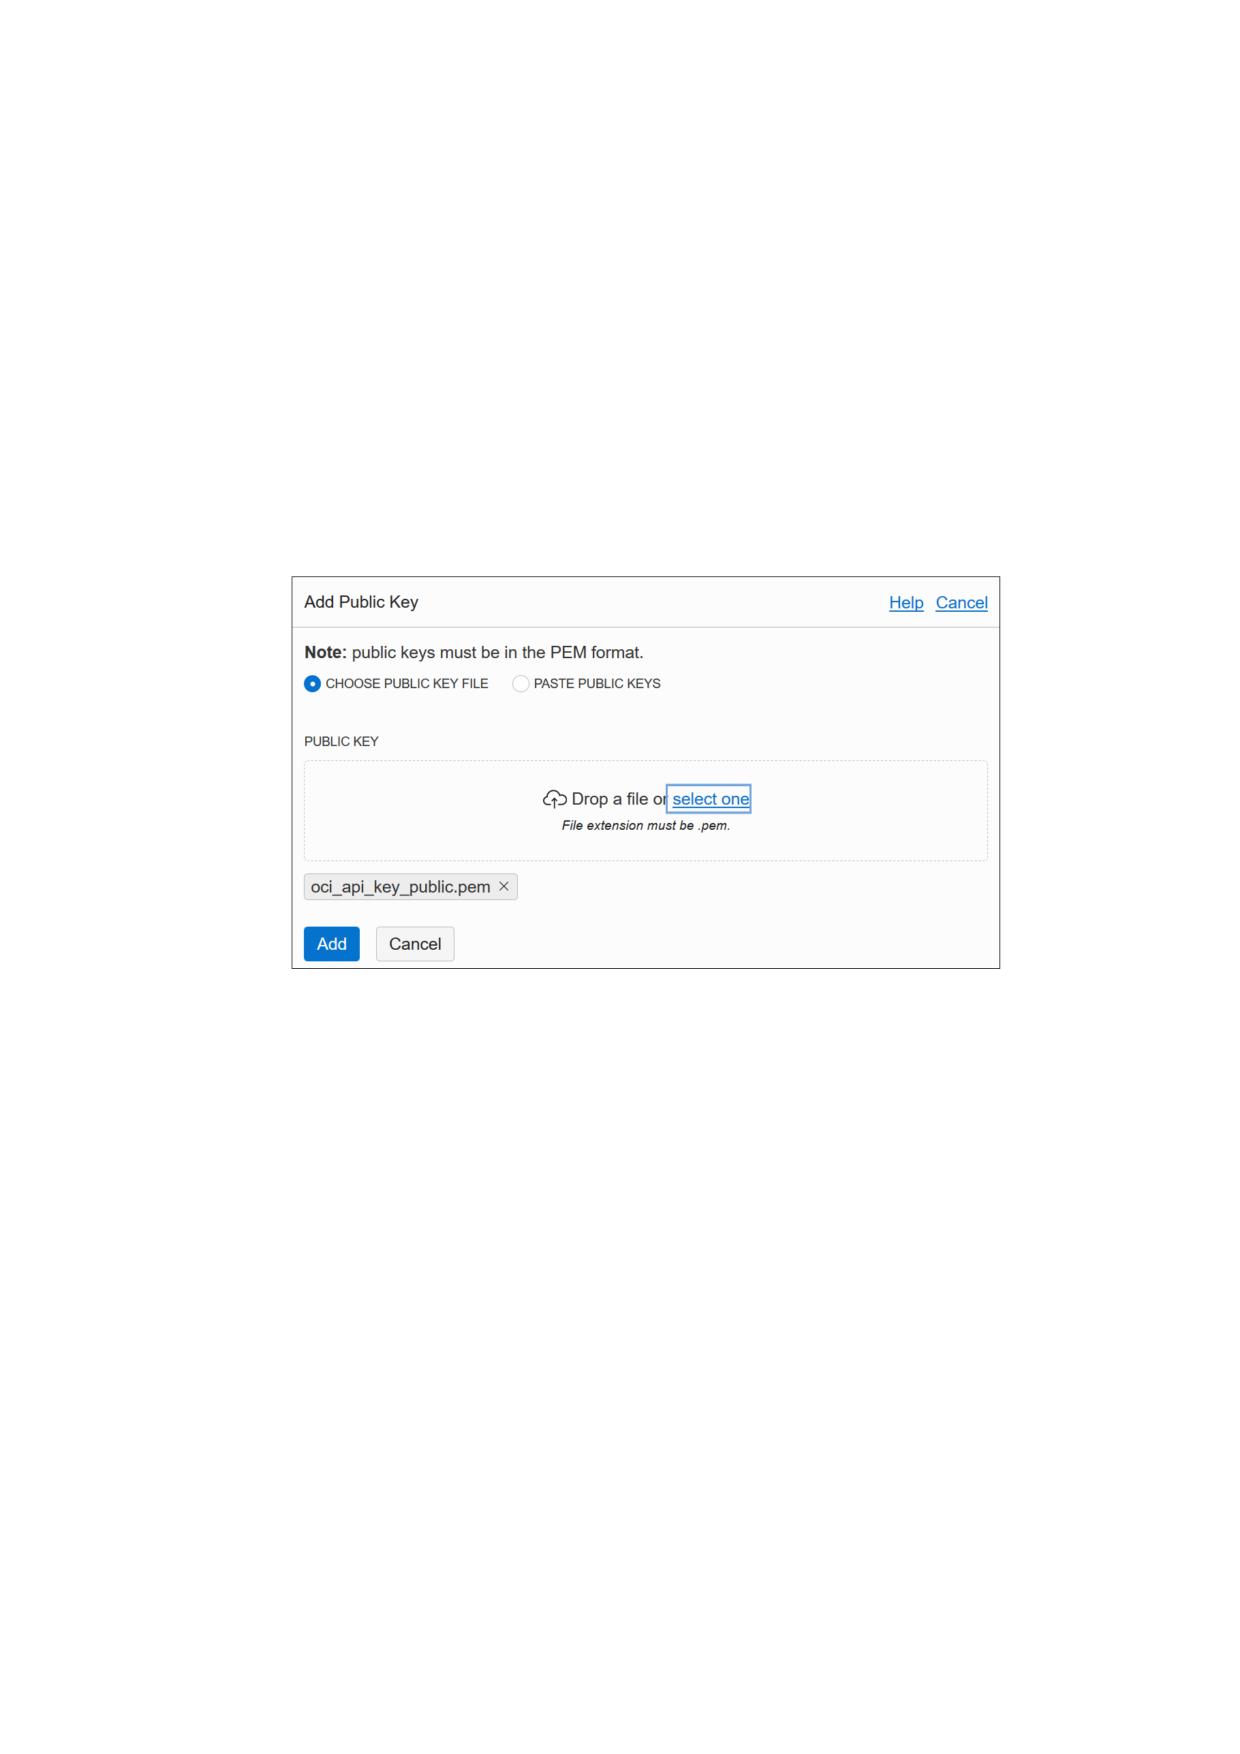
2 First Steps
2.16.3 Uploading the Public Key to Oracle Cloud Infrastructure
Use the following steps to upload your public key to Oracle Cloud Infrastructure.
1. Log in to the Oracle Cloud Infrastructure Console.
2. Display the User Settings page.
Click Profile, User Settings.
3. Display your current API signing keys.
Click Resources, API Keys.
4. Upload the public key.
Click Add Public Key.
The Add Public Key dialog is displayed.
Select one of the following options:
• Choose Public Key File. This option enables you to browse to the public key file on
your local hard disk.
• Paste Public Keys. This option enables you to paste the contents of the public key file
into the window in the dialog box.
Click Add to upload the public key.
2.16.4 Creating a Cloud Profile
Oracle VM VirtualBox uses a cloud profile to connect to Oracle Cloud Infrastructure. A cloud
profile is a text file that contains details of your key files and Oracle Cloud Identifier (OCID)
resource identifiers for your cloud account, such as the following:
• Fingerprint of the public key. To obtain the fingerprint, you can use the openssl com-
mand:
$ openssl rsa -pubout -outform DER -in ~/.oci/oci_api_key.pem | openssl md5 -c
• Location of the private key on the client device. Specify the full path to the private key.
34
2 First Steps
• (Optional) Passphrase for the private key. This is only required if the key is encrypted.
• Region. Shown on the Oracle Cloud Infrastructure Console. Click Administration, Ten-
ancy Details.
• Tenancy OCID. Shown on the Oracle Cloud Infrastructure Console. Click Administration,
Tenancy Details.
A link enables you to copy the Tenancy OCID.
• Compartment OCID. Shown on the Oracle Cloud Infrastructure Console. Click Identity,
Compartments.
A link enables you to copy the Compartment OCID.
• User OCID. Shown on the Oracle Cloud Infrastructure Console. Click Profile, User Set-
tings.
A link enables you to copy the User OCID.
You can create a cloud profile in the following ways:
• Automatically, by using the Cloud Profile Manager. See chapter 2.16.5, Using the Cloud
Profile Manager, page 35.
The Cloud Profile Manager is a VirtualBox Manager tool that enables you to create, edit,
and manage cloud profiles for your cloud service accounts.
• Automatically, by using the VBoxManage cloudprofile command. See chapter 9.15,
VBoxManage cloudprofile, page 214.
• Manually, by creating an oci_config file in your Oracle VM VirtualBox global configura-
tion directory. For example, this is $HOME/.config/VirtualBox/oci_config on a Linux
host.
• Manually, by creating a config file in your Oracle Cloud Infrastructure configuration di-
rectory. For example, this is $HOME/.oci/config on a Linux host.
This is the same file that is used by the Oracle Cloud Infrastructure command line interface.
Oracle VM VirtualBox automatically uses the config file if no cloud profile file is present
in your global configuration directory. Alternatively, you can import this file manually into
the Cloud Profile Manager.
2.16.5 Using the Cloud Profile Manager
This section describes how to use the Cloud Profile Manager to create a cloud profile.
To open the Cloud Profile Manager click File, Cloud Profile Manager in VirtualBox Manager.
35
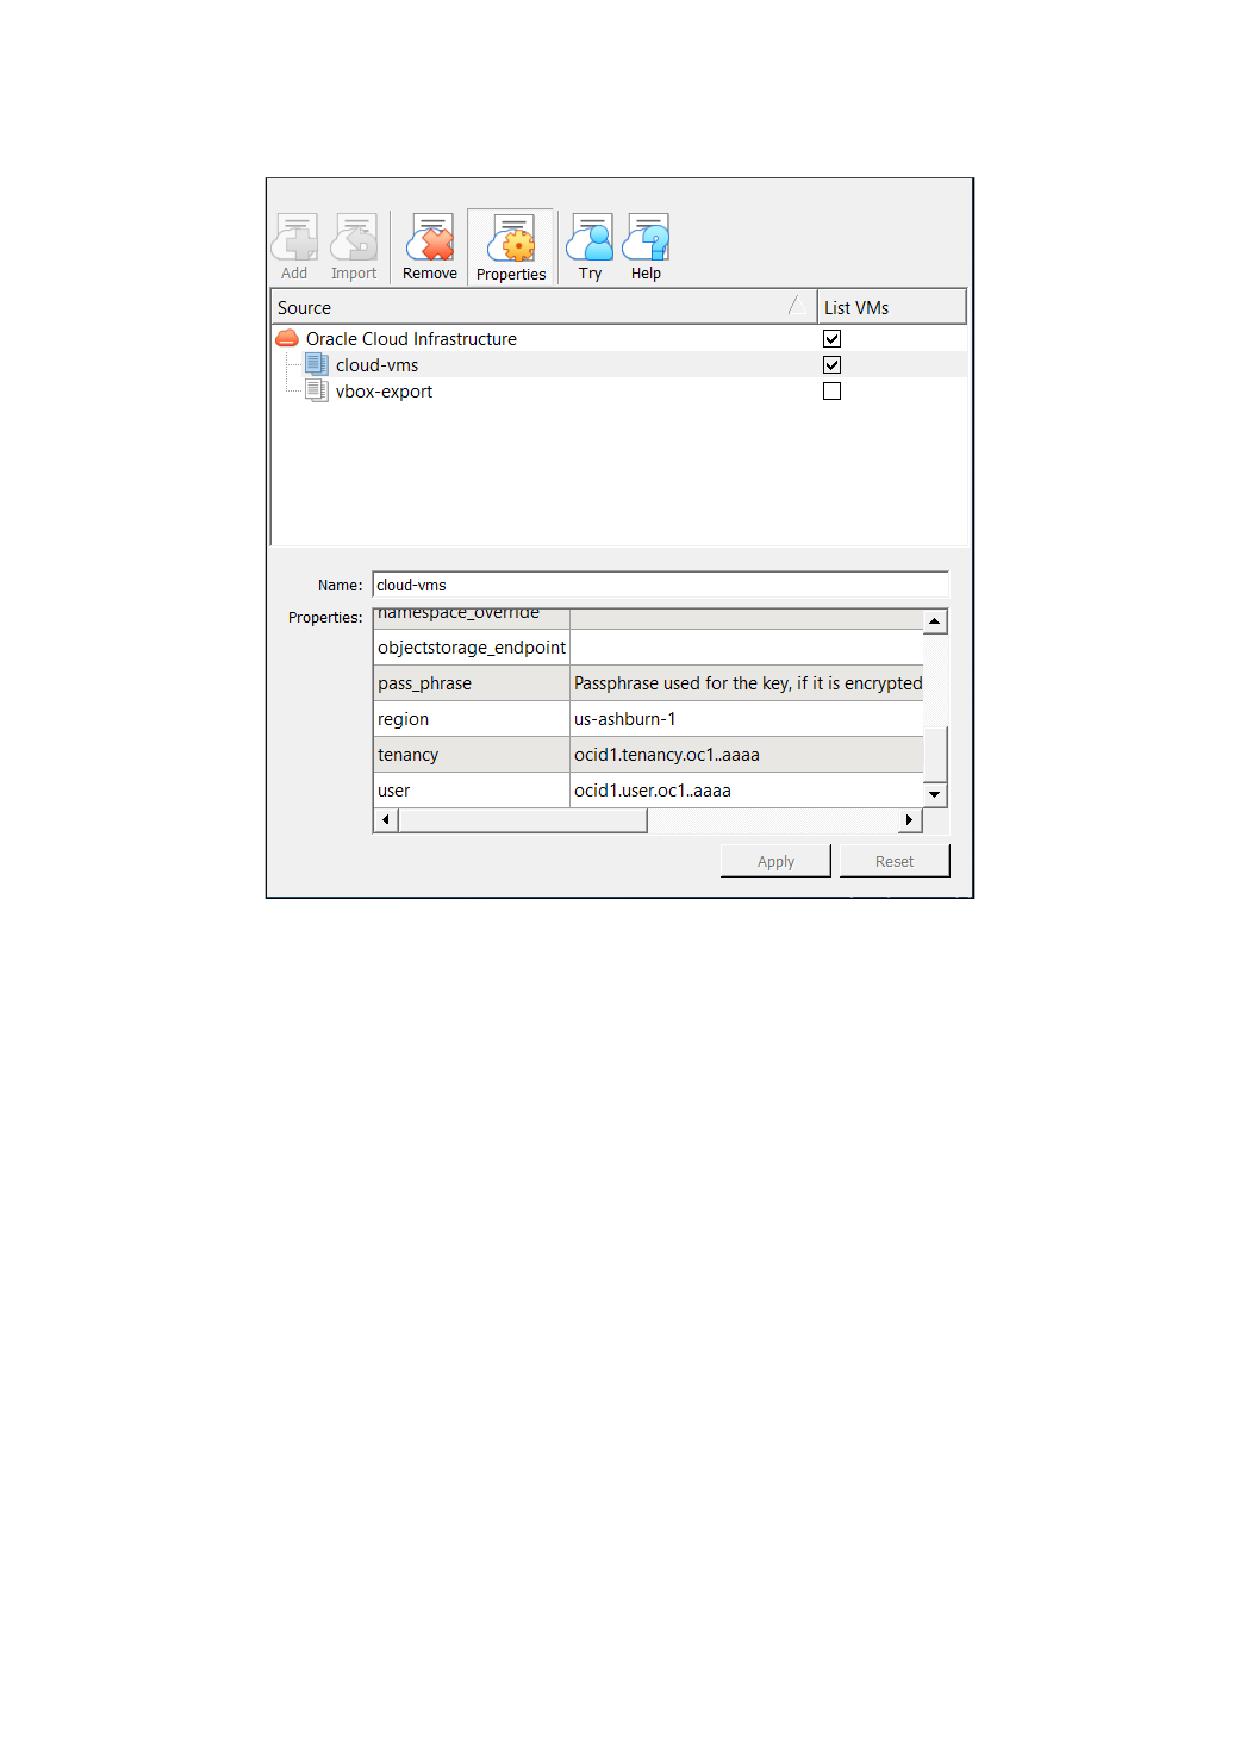
2 First Steps
You can use the Cloud Profile Manager in the following ways:
• To create a new cloud profile automatically
• To create a cloud profile by importing settings from your Oracle Cloud Infrastructure con-
figuration file.
Perform the following steps to create a new cloud profile automatically, using the Cloud Profile
Manager:
1. Click the Add icon and specify a Name for the profile.
2. Click Properties and specify the following property values for the profile:
• Compartment OCID
• Fingerprint of the public key
• Location of the private key on the client device
• Region OCID
• Tenancy OCID
• User OCID
Some of these are settings for your Oracle Cloud Infrastructure account, which you can
view from the Oracle Cloud Infrastructure Console.
36
2 First Steps
3. (Optional) If you are using the cloud profile to connect to cloud virtual machines, select
the Show VMs check box.
This creates a new subgroup of the OCI group in VirtualBox Manager. See chapter 2.16.7.1,
About the OCI VM Group, page 38.
4. Click Apply to save your changes.
The cloud profile settings are saved to the oci_config file in your Oracle VM VirtualBox
global settings directory.
Perform the following steps to import an existing Oracle Cloud Infrastructure configuration
file into the Cloud Profile Manager:
1. Ensure that a config file is present in your Oracle Cloud Infrastructure configuration di-
rectory. For example, this is $HOME/.oci/config on a Linux host.
2. Click the Import icon to open a dialog that prompts you to import cloud profiles from
external files.
Warning: This action overwrites any cloud profiles that are in your Oracle VM
VirtualBox global settings directory.
3. Click Import.
Your cloud profile settings are saved to the oci_config file in your Oracle VM VirtualBox
global settings directory.
4. Click Properties to show the cloud profile settings.
Double-click on the appropriate field to change the value.
5. Click Apply to save your changes.
2.16.6 Using Oracle VM VirtualBox With Oracle Cloud Infrastructure
This section describes how you can use Oracle VM VirtualBox with Oracle Cloud Infrastructure
to do the following tasks:
• Create, add, and manage Oracle Cloud Infrastructure cloud instances using VirtualBox
Manager. See chapter 2.16.7, Using Cloud Virtual Machines, page 38.
• Export an Oracle VM VirtualBox VM to Oracle Cloud Infrastructure. See chapter 2.16.8,
Exporting an Appliance to Oracle Cloud Infrastructure, page 42.
• Import a cloud instance into Oracle VM VirtualBox. See chapter 2.16.9, Importing an
Instance from Oracle Cloud Infrastructure, page 45.
• Connect from a local VM to an Oracle Cloud Infrastructure cloud subnet. See chapter
2.16.10, Using a Cloud Network, page 46.
• Use the VBoxManage commands to integrate with Oracle Cloud Infrastructure and perform
cloud operations. See chapter 2.16.11, Using VBoxManage Commands With Oracle Cloud
Infrastructure, page 46.
37
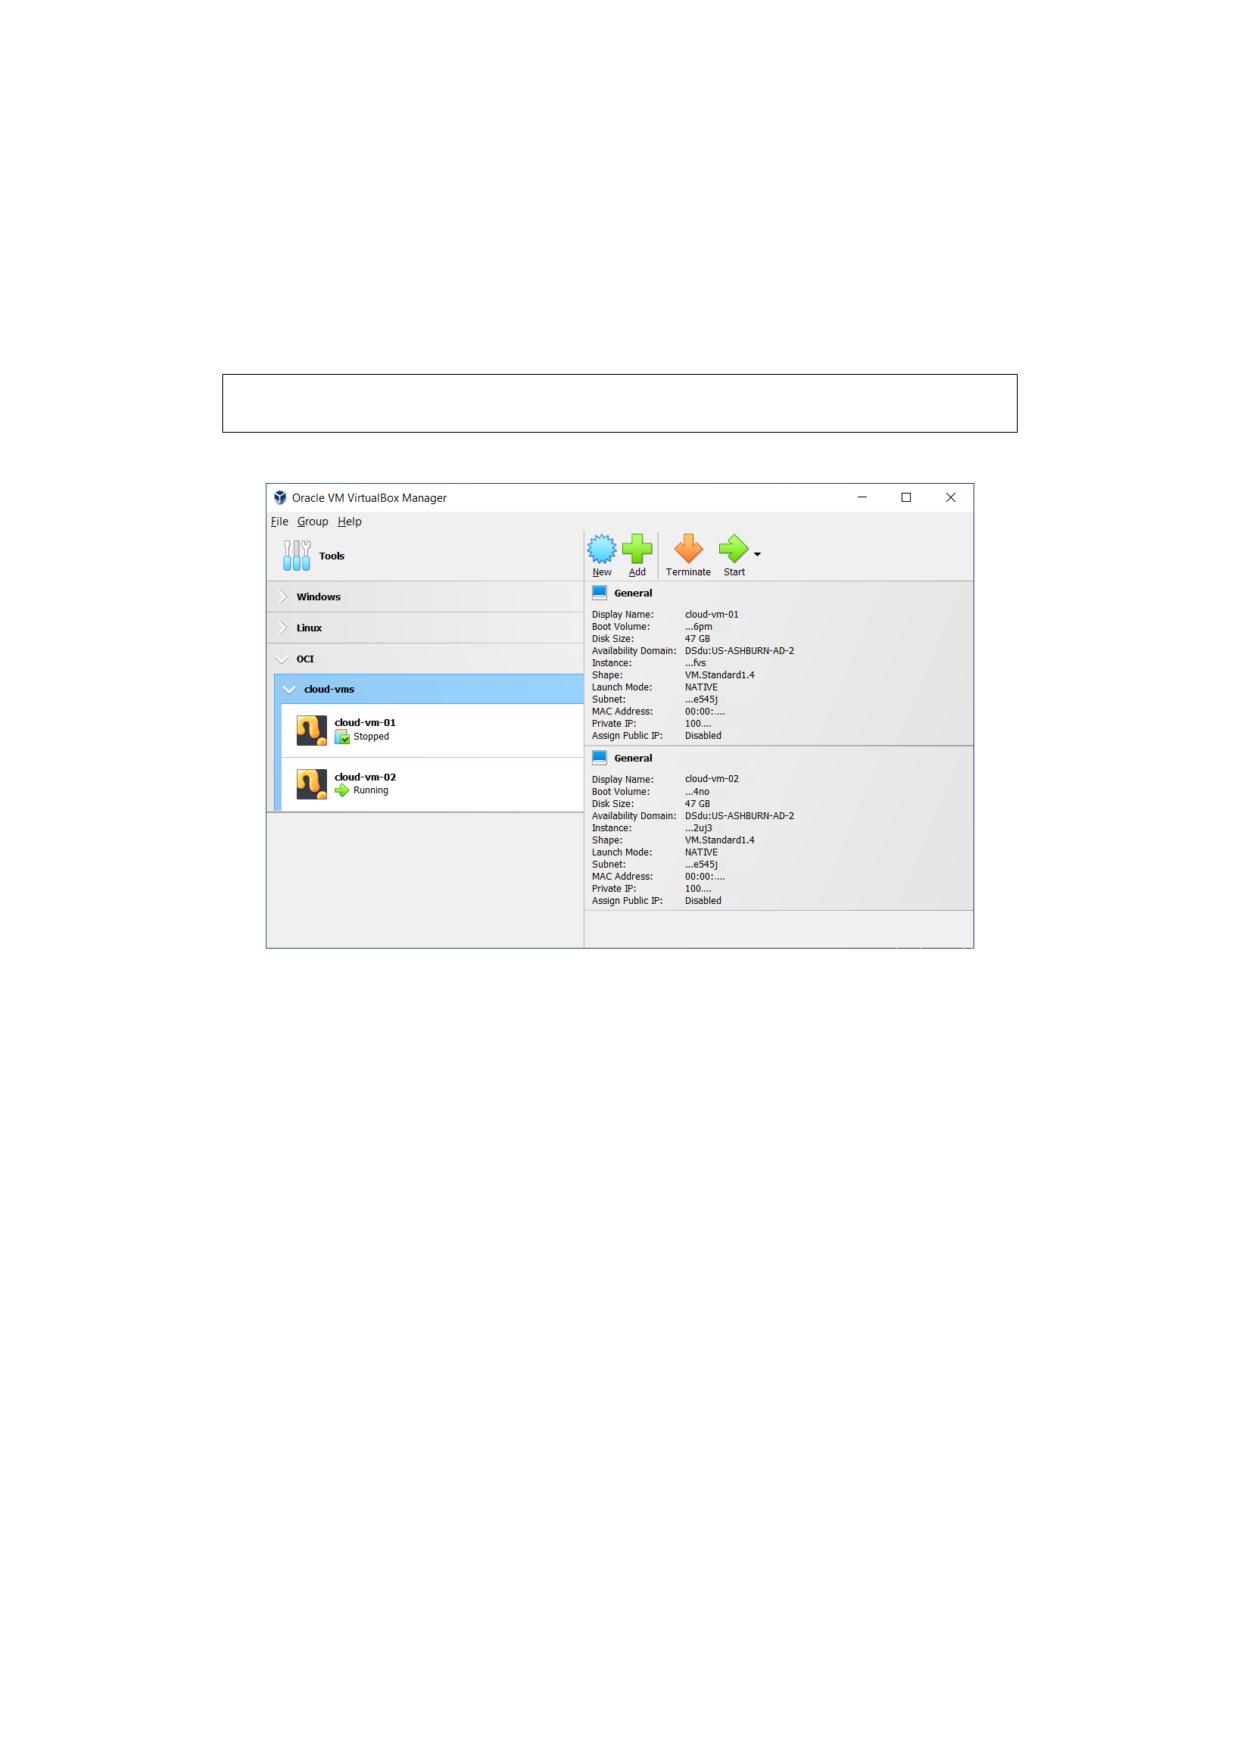
2 First Steps
2.16.7 Using Cloud Virtual Machines
A cloud virtual machine (cloud VM) is a type of VM that represents an instance on a cloud service.
Cloud VMs are shown in the machine list in VirtualBox Manager, in the same way as local VMs
are.
By using cloud VMs you can create, manage, and control your Oracle Cloud Infrastructure
instances from VirtualBox Manager.
Note: Cloud VMs do not install, export, or import instances to the Oracle VM
VirtualBox host. All operations are done remotely on the cloud service.
Cloud VMs can be used to do the following tasks in Oracle Cloud Infrastructure:
• Create a new Oracle Cloud Infrastructure instance. See chapter 2.16.7.2, Creating a
New Cloud VM, page 39.
• Use an existing Oracle Cloud Infrastructure instance. See chapter 2.16.7.3, Adding a
Cloud VM, page 40.
• Configure an Oracle Cloud Infrastructure instance. You can change settings for the
instance, such as display name and shape. See chapter 2.16.7.4, Changing Settings for a
Cloud VM, page 41.
• Control an Oracle Cloud Infrastructure instance. Stop, start, and terminate the instance.
See chapter 2.16.7.5, Controlling a Cloud VM, page 41
• Create a console connection to an Oracle Cloud Infrastructure instance. See chapter
2.16.7.7, Creating an Instance Console Connection for a Cloud VM, page 42.
2.16.7.1 About the OCI VM Group
All cloud VMs are shown in the machine list in VirtualBox Manager, in a special VM group called
OCI.
Cloud VMs are further grouped according to the cloud profile used to connect to them. The
cloud profile identifies the user and compartment for the cloud VM and includes details of the
38
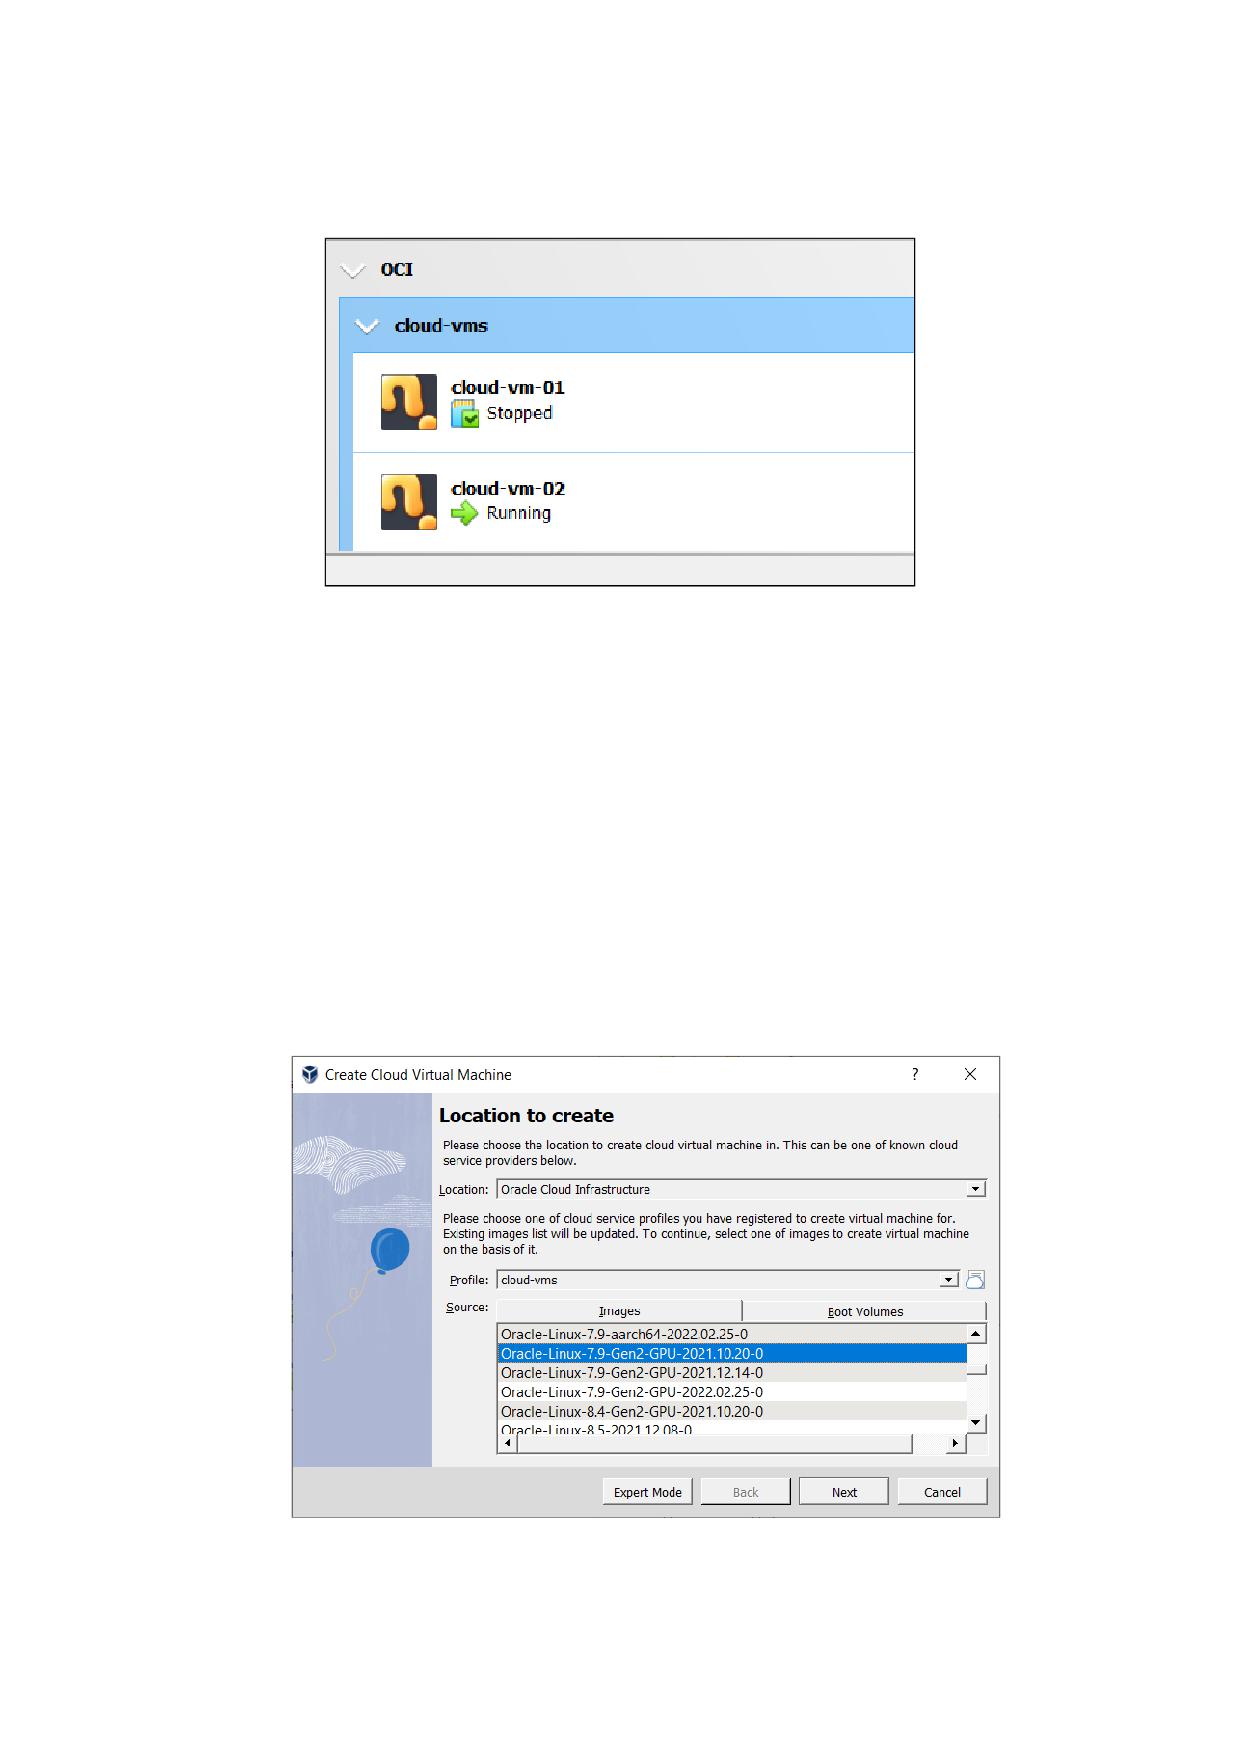
2 First Steps
key pair used to connect to cloud instances. See chapter 2.16.4, Creating a Cloud Profile, page
34.
All cloud profiles registered with Oracle VM VirtualBox are listed automatically in the OCI
group.
To enable or disable listing of cloud VMs in VirtualBox Manager for a specific cloud profile, do
the following:
Display the Cloud Profile Manager and select or deselect the List VMs check box for each
cloud profile.
2.16.7.2 Creating a New Cloud VM
When you create a new cloud VM, a new Oracle Cloud Infrastructure instance is created and
associated with the cloud VM.
Perform the following steps to create a new cloud VM:
1. Click on a cloud profile in the OCI group.
The cloud VMs for the selected cloud profile are displayed.
2. Select Group, New Machine.
The Create Cloud Virtual Machine wizard is displayed.
39
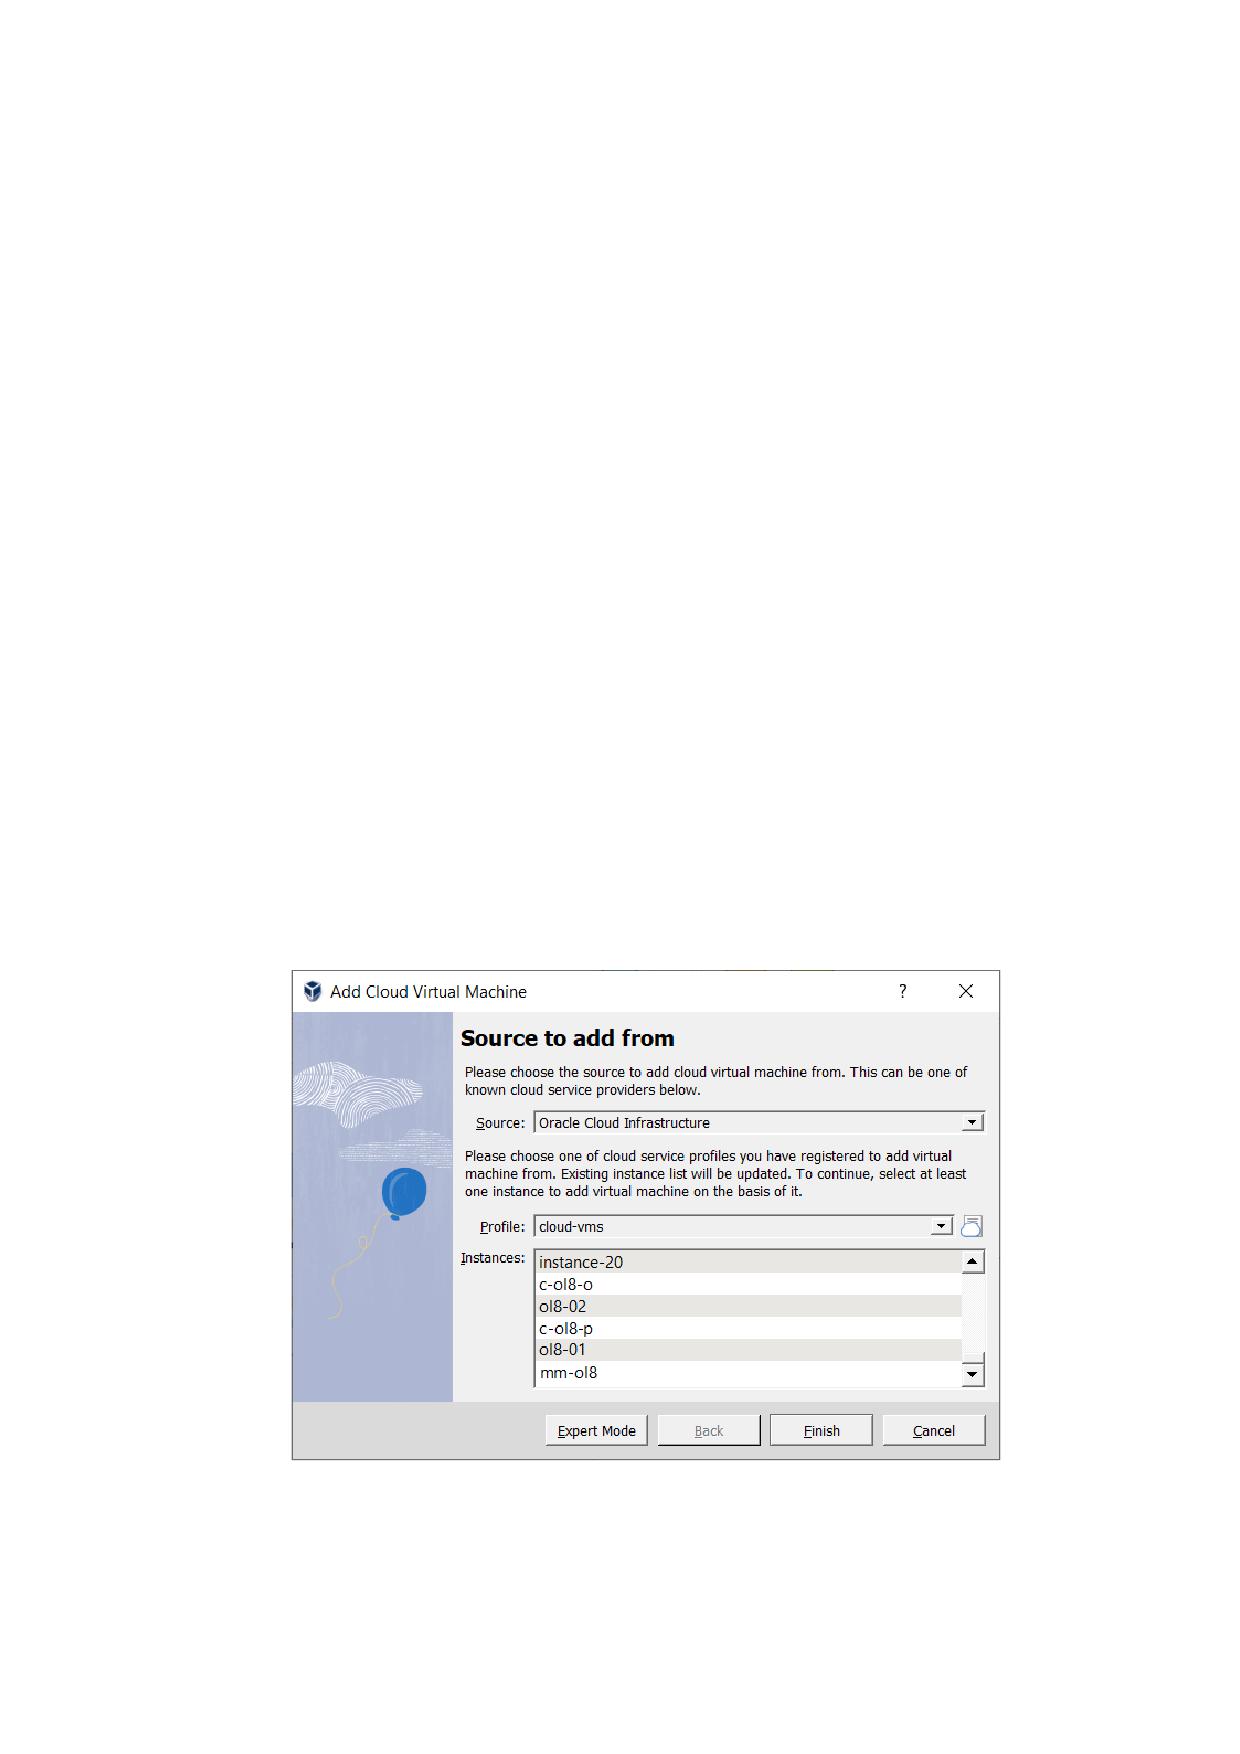
2 First Steps
3. On the initial page, configure the following settings for the new cloud VM:
• Location: The cloud service provider that will host the new instance. Select Oracle
Cloud Infrastructure.
• Profile: The cloud profile used to connect to the new instance. Select from the avail-
able cloud profiles.
• Source: The image that the new instance is based on. Choose from the available
images and boot volumes.
4. Click Next to display the Cloud Virtual Machine Settings page.
You can use this page to change the default settings for the new Oracle Cloud Infrastructure
instance, such as the display name, shape, and networking configuration.
To add an SSH key to the instance, click the SSH Authorised Keys field and paste the
public key into the displayed dialog.
5. Click Finish to create a new Oracle Cloud Infrastructure instance using the selected image
or boot volume. The new instance is started automatically.
The new cloud VM is shown in the OCI group in VirtualBox Manager.
2.16.7.3 Adding a Cloud VM
When you add a cloud VM, an existing Oracle Cloud Infrastructure instance is associated with
the cloud VM. You can only add one cloud VM for each instance.
Perform the following steps to add a cloud VM:
1. Click on a cloud profile in the OCI group.
The cloud VMs for the selected cloud profile are displayed.
2. Select Group, Add Machine.
The Add Cloud Virtual Machine wizard is displayed.
3. Configure the following settings:
40
2 First Steps
• Source: The cloud service provider that hosts the instance used for the cloud VM.
Select Oracle Cloud Infrastructure.
• Profile: The cloud profile used to connect to the running instance. Select from the
available cloud profiles.
• Instances: The instance to use for the cloud VM. Choose from the available instances
on your cloud service.
4. Click Finish to add a cloud VM based on the selected instance.
A cloud VM with the same name as the instance is added to the OCI group in VirtualBox
Manager.
5. (Optional) To change the display name for the instance, click Settings and edit the Display
Name field.
The cloud VM name in VirtualBox Manager is updated automatically.
2.16.7.4 Changing Settings for a Cloud VM
Select the cloud VM in VirtualBox Manager and click Settings.
• For a new cloud VM, you can change many settings for the Oracle Cloud Infrastructure
instance, such as the display name, shape, and disk size.
• When you add a cloud VM based on an existing Oracle Cloud Infrastructure instance you
can only change the display name.
2.16.7.5 Controlling a Cloud VM
You can use VirtualBox Manager to control a cloud VM as follows:
• Start. Use the Start button in the VirtualBox Manager toolbar.
• Stop. Right-click on the cloud VM name, to display the Close menu. Options to shut down
and power off the cloud VM are available.
• Terminate. Use the Terminate button in the VirtualBox Manager toolbar.
This action deletes the instance from Oracle Cloud Infrastructure.
When you control a cloud VM in VirtualBox Manager the machine list is updated automatically
with the current instance state, such as Stopped or Running.
When you control an instance using the Oracle Cloud Infrastructure console, VirtualBox Man-
ager updates the status for the corresponding cloud VM automatically.
2.16.7.6 Removing a Cloud VM
You can use VirtualBox Manager to remove a cloud VM as follows:
Right-click on the cloud VM name and select Remove.
• Click Remove Only to remove the cloud VM from the machine list in VirtualBox Manager.
• Click Delete Everything to remove the cloud VM from VirtualBox Manager and also to
delete the Oracle Cloud Infrastructure instance and any associated boot volumes.
41
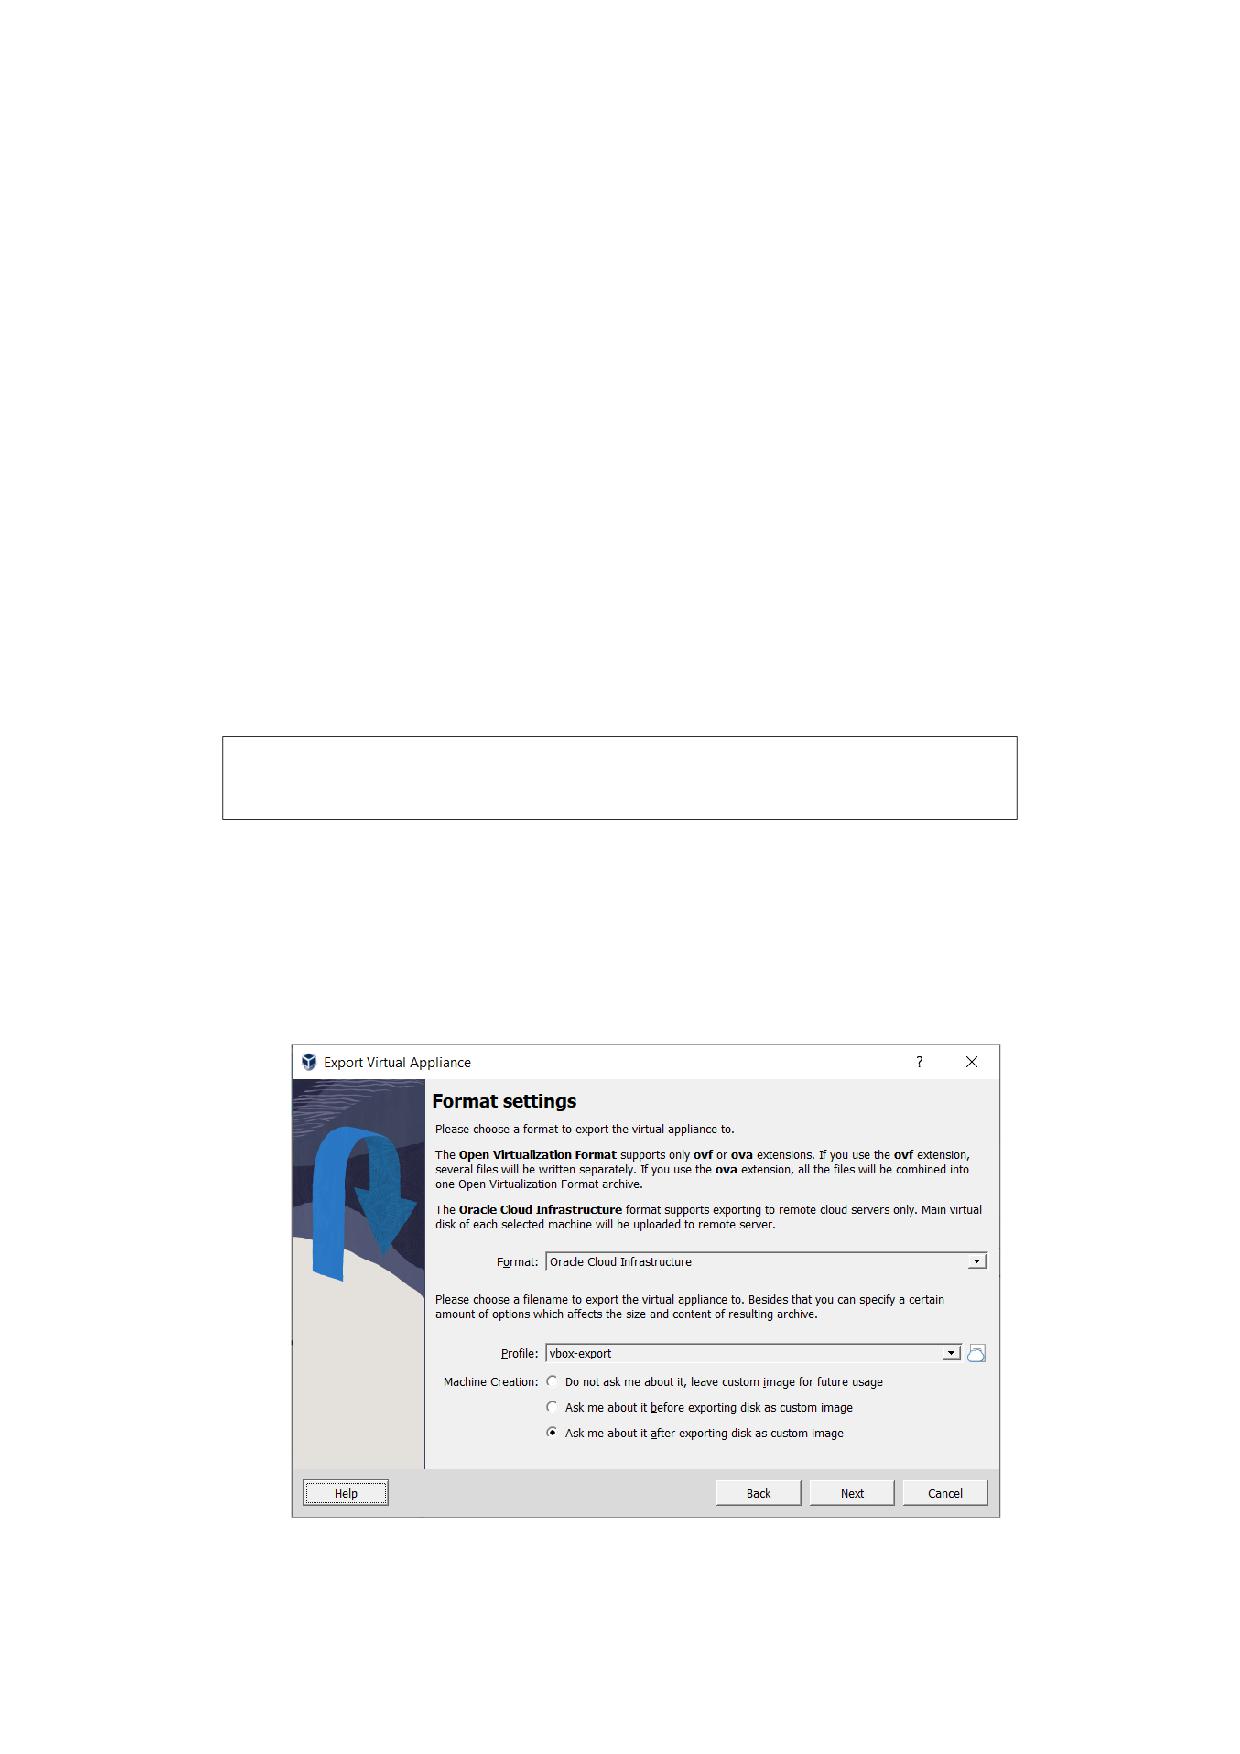
2 First Steps
2.16.7.7 Creating an Instance Console Connection for a Cloud VM
To create a instance console connection, the cloud VM must be in Running state.
1. Right-click on the cloud VM name and select Console, Create Connection.
2. The Public Key dialog is displayed. Paste the public key used for the instance connection
into the dialog and click OK.
By default, either the first entry in your SSH keys folder or the public key used for your
previous instance console connection is used.
3. Click Connect to connect to the instance. An instance console is displayed automatically
on the host.
4. (Optional) Click Show Log to display log messages for the instance console connection.
See the Oracle Cloud Infrastructure documentation for details about how you can use an
instance console connection to troubleshoot instance problems.
2.16.8 Exporting an Appliance to Oracle Cloud Infrastructure
Oracle VM VirtualBox supports the export of VMs to an Oracle Cloud Infrastructure service. The
exported VM is stored on Oracle Cloud Infrastructure as a custom Linux image. You can configure
whether a cloud instance is created and started after the export process has completed.
Note: Before you export a VM to Oracle Cloud Infrastructure, you must prepare the
VM as described in chapter 2.16.8.1, Preparing a VM for Export to Oracle Cloud Infras-
tructure, page 43.
Use the following steps to export a VM to Oracle Cloud Infrastructure:
1. Select File, Export Appliance to open the Export Virtual Appliance wizard.
Select a VM to export and click Next to display the Format Settings page.
2. From the Format drop-down list, select Oracle Cloud Infrastructure.
In the Profile drop-down list, select the cloud profile used for your Oracle Cloud Infras-
tructure account.
42
2 First Steps
In the Machine Creation field, select an option to configure settings for the cloud instance
created when you export to Oracle Cloud Infrastructure. The options enable you to do one
of the following:
• Configure settings for the cloud instance after you have finished exporting the VM.
• Configure settings for the cloud instance before you start to export the VM.
• Do not create a cloud instance when you export the VM.
Click Next to make an API request to the Oracle Cloud Infrastructure service and open the
Appliance Settings page.
3. (Optional) Edit storage settings used for the exported virtual machine in Oracle Cloud
Infrastructure. You can change the following settings:
• The name of the bucket used to store the exported files.
• Whether to store the custom image in Oracle Cloud Infrastructure.
• The display name for the custom image in Oracle Cloud Infrastructure.
• The launch mode for the custom image.
Paravirtualized mode gives improved performance and should be suitable for most
Oracle VM VirtualBox VMs.
Emulated mode is suitable for legacy OS images.
Click Finish to continue.
4. (Optional) Depending on the selection in the Machine Creation field, the Appliance Set-
tings page may be displayed before or after export. This screen enables you to configure
settings for the cloud instance, such as Shape and Disk Size.
Click Finish. The VM is exported to Oracle Cloud Infrastructure.
Depending on the Machine Creation setting, a cloud instance may be started after upload
to Oracle Cloud Infrastructure is completed.
5. Monitor the export process by using the Oracle Cloud Infrastructure Console.
You can also use the VBoxManage export command to export a VM to Oracle Cloud Infras-
tructure. See chapter 9.17, Export a Virtual Machine to Oracle Cloud Infrastructure, page 222.
2.16.8.1 Preparing a VM for Export to Oracle Cloud Infrastructure
Oracle Cloud Infrastructure provides the option to import a custom Linux image. Before an
Oracle VM VirtualBox image can be exported to Oracle Cloud Infrastructure, the custom image
needs to be prepared to ensure that instances launched from the custom image can boot correctly
and that network connections will work. This section provides advice on how to prepare a Linux
image for export from Oracle VM VirtualBox.
The following list shows some tasks to consider when preparing an Oracle Linux VM for export:
• Use DHCP for network addresses. Configure the VM to use a DHCP server to allocate
network addresses, rather than using a static IP address. The Oracle Cloud Infrastructure
instance will then be allocated an IP address automatically.
• Do not specify a MAC address. The network interface configuration for the VM must not
specify the MAC address.
Remove the HWADDR setting from the /etc/sysconfig/ifcfg-devicename network
script.
43
2 First Steps
•
Disable persistent network device naming rules. This means that the Oracle Cloud
Infrastructure instance will use the same network device names as the VM.
1. Change the GRUB kernel parameters.
Add net.ifnames=0 and biosdevname=0 as kernel parameter values to the
GRUB_CMDLINE_LINUX variable.
2. Update the GRUB configuration.
# grub2-mkconfig -o /boot/grub2/grub.cfg
3. Disable any udev rules for network device naming.
For example, if an automated udev rule exists for net-persistence:
# cd /etc/udev/rules.d
# rm -f 70-persistent-net.rules
# ln -s /dev/null /etc/udev/rules.d/70-persistent-net.rules
•
Enable the serial console. This enables you to troubleshoot the instance when it is running
on Oracle Cloud Infrastructure.
1. Edit the /etc/default/grub file, as follows:
- Remove the resume setting from the kernel parameters. This setting slows down
boot time significantly.
- Replace GRUB_TERMINAL="gfxterm" with GRUB_TERMINAL="console serial".
This configures use of the serial console instead of a graphical terminal.
- Add GRUB_SERIAL_COMMAND="serial -unit=0 -speed=115200". This config-
ures the serial connection.
- Add console=tty0 console=ttyS0,115200 to the GRUB_CMDLINE_LINUX vari-
able. This adds the serial console to the Linux kernel boot parameters.
2. Regenerate the GRUB configuration.
# grub2-mkconfig -o /boot/grub2/grub.cfg
3. To verify the changes, reboot the machine and run the dmesg command to look for
the updated kernel parameters.
# dmesg |grep console=ttyS0
•
Enable paravirtualized device support. You do this by adding the virtio drivers to the
initrd for the VM.
1. This procedure works only on machines with a Linux kernel of version 3.4 or later.
Check that the VM is running a supported kernel:
# uname -a
2. Use the dracut tool to rebuild initrd. Add the qemu module, as follows:
# dracut âĂS-logfile /var/log/Dracut.log --force --add qemu
3. Verify that the virtio drivers are now present in initrd.
# lsinitrd |grep virtio
For more information about importing a custom Linux image into Oracle Cloud Infrastructure,
see also:
importingcustomimagelinux.htm
44
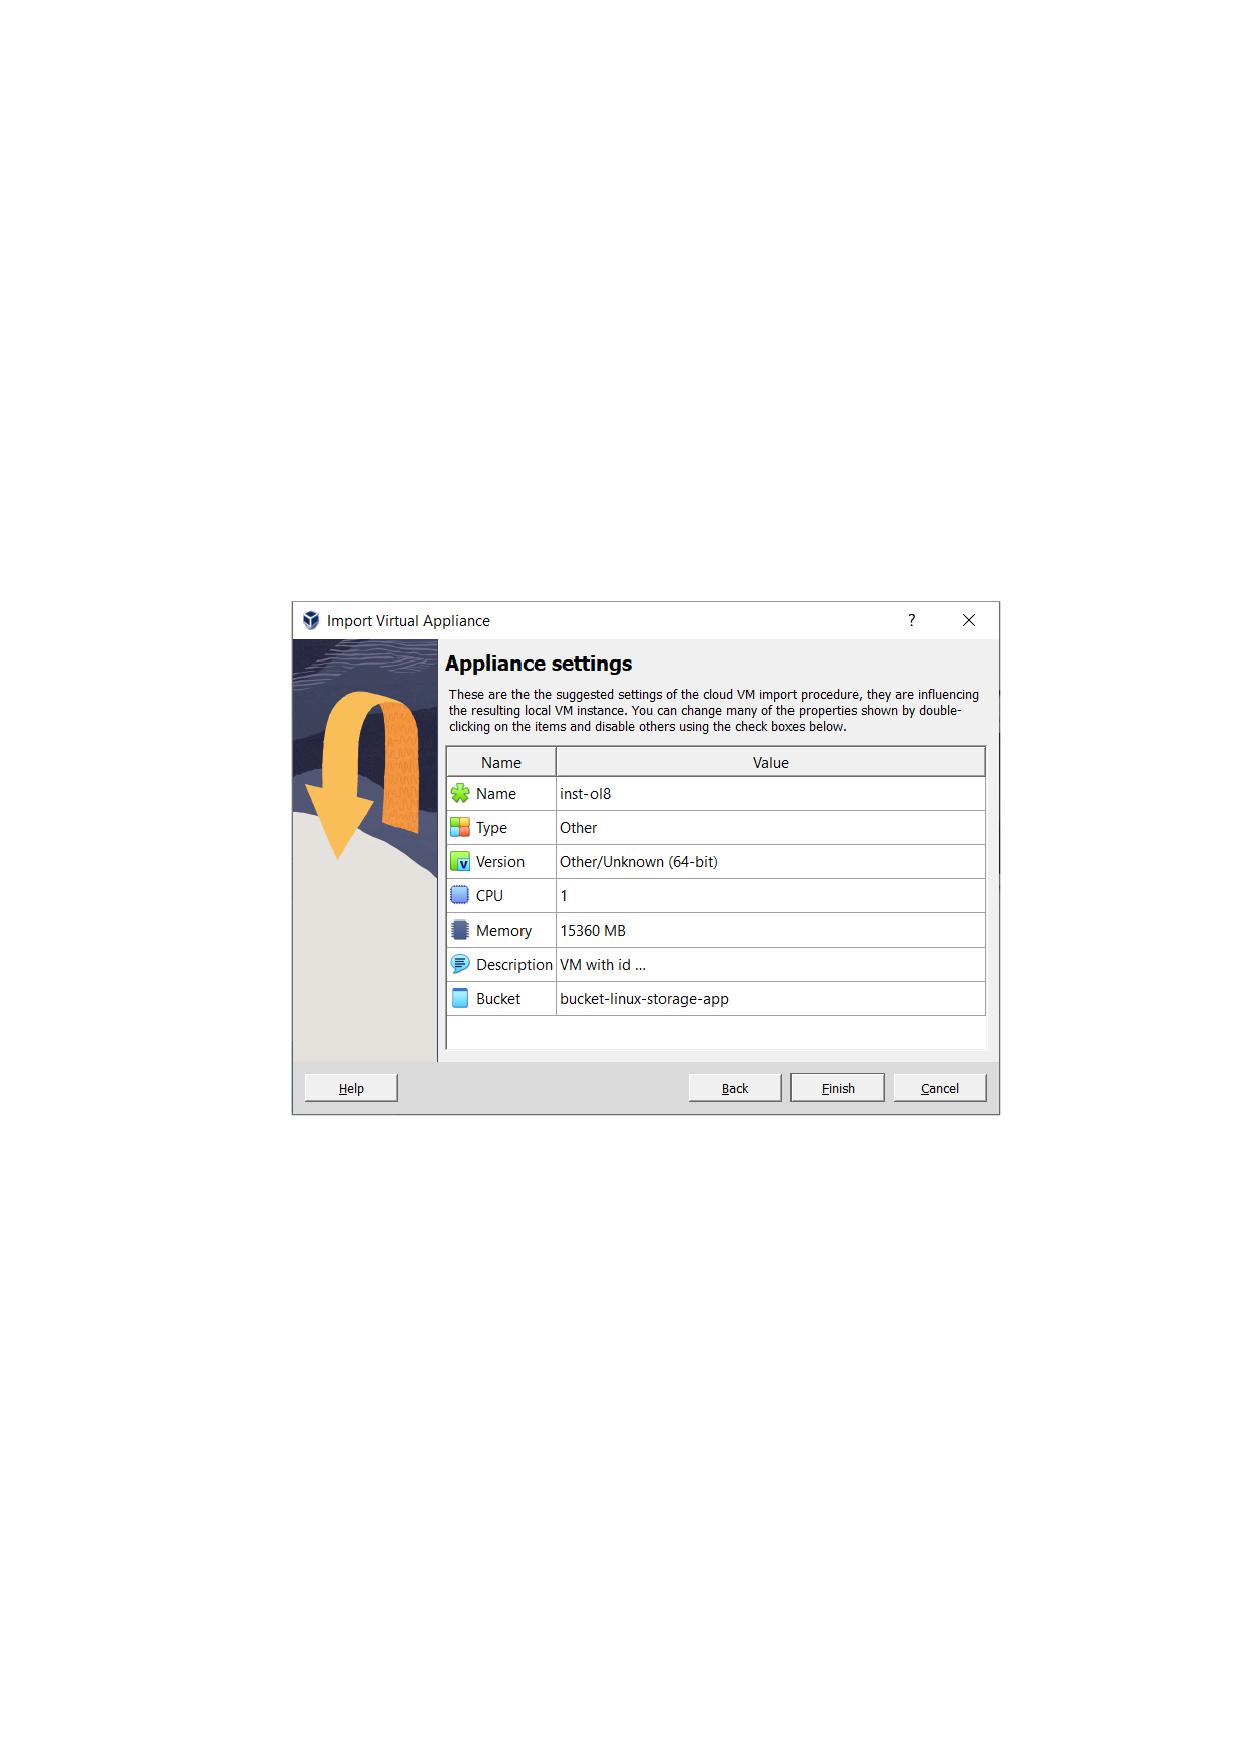
2 First Steps
2.16.9 Importing an Instance from Oracle Cloud Infrastructure
Perform the following steps to import a cloud instance from Oracle Cloud Infrastructure into
Oracle VM VirtualBox:
1. Select File, Import Appliance to open the Import Virtual Appliance wizard.
In the Source drop-down list, select Oracle Cloud Infrastructure.
In the Profile drop-down list, select the cloud profile for your Oracle Cloud Infrastructure
account.
Choose the required cloud instance from the list in the Machines field.
Click Next to make an API request to the Oracle Cloud Infrastructure service and display
the Appliance Settings page.
2. (Optional) Edit settings for the new local virtual machine.
For example, you can edit the VM name and description.
Click Finish to import the instance from Oracle Cloud Infrastructure.
3. Monitor the import process by using the Oracle Cloud Infrastructure Console.
You can also use the VBoxManage import command to import an instance from Oracle Cloud
Infrastructure. See chapter 9.16, Cloud Import Options, page 218.
Importing an Instance: Overview of Events
The following describes the sequence of events when you import an instance from Oracle Cloud
Infrastructure.
• A custom image is created from the boot volume of the instance.
• The custom image is exported to an Oracle Cloud Infrastructure object and is stored using
Object Storage in the bucket specified by the user.
45
2 First Steps
• The Oracle Cloud Infrastructure object is downloaded to the local host. The object is a TAR
archive which contains a boot volume of the instance in QCOW2 format and a JSON file
containing metadata related to the instance.
• The boot volume of the instance is extracted from the archive and a new VMDK image
is created by converting the boot volume into the VMDK format. The VMDK image is
registered with Oracle VM VirtualBox.
• A new VM is created using the VMDK image for the cloud instance.
By default, the new VM is not started after import from Oracle Cloud Infrastructure.
• The downloaded TAR archive is deleted after a successful import.
2.16.10 Using a Cloud Network
A cloud network is a type of network that can be used for connections from a local VM to a
remote Oracle Cloud Infrastructure cloud instance.
To create and use a cloud network, do the following:
1. Set up a virtual cloud network on Oracle Cloud Infrastructure.
The following steps create and configure a virtual cloud network (VCN) on Oracle Cloud
Infrastructure. The VCN is used to tunnel network traffic across the cloud.
a) Ensure that you have a cloud profile for connecting to Oracle Cloud Infrastructure.
See chapter 2.16.4, Creating a Cloud Profile, page 34.
b) Run the following VBoxManage cloud command:
VBoxManage cloud --provider="OCI" --profile="vbox-oci" network setup
where vbox-oci is the name of your cloud profile.
Other options are available for the VBoxManage cloud network setup command,
to enable you to configure details for the VCN. For example, you can configure the
operating system used for the cloud gateway instance and the IP address range used
by the tunneling network. See chapter 9.14, VBoxManage cloud, page 207.
For best results, use an Oracle Linux 7 instance for the cloud gateway. This is the
default option.
2. Register the new cloud network with Oracle VM VirtualBox.
Use the Cloud Networks tab in the Network Manager tool. See chapter 7.11.3, Cloud
Networks Tab, page 140.
3. Add cloud network adaptors to the local VMs that will use the cloud network. See chapter
7.10, Cloud Networks, page 139.
2.16.11 Using VBoxManage Commands With Oracle Cloud Infrastructure
This section includes some examples of how VBoxManage commands can be used to integrate
with Oracle Cloud Infrastructure and perform common cloud operations.
Creating a Cloud Profile
To create a cloud profile called vbox-oci:
VBoxManage cloudprofile --provider "OCI" --profile="vbox-oci" add \
--clouduser="ocid1.user.oc1..."
--keyfile="/home/username/.oci/oci_api_key.pem" \
--tenancy="ocid1.tenancy.oc1..."
--compartment="ocid1.compartment.oc1..."
--region="us-ashburn-1"
46
2 First Steps
The new cloud profile is added to the oci_config file in your Oracle VM VirtualBox global
configuration directory. For example, this is $HOME/.VirtualBox/oci_config on a Windows
host.
Listing Cloud Instances
To list the instances in your Oracle Cloud Infrastructure compartment:
VBoxManage cloud --provider="OCI" --profile="vbox-oci" list instances
Exporting an Oracle VM VirtualBox VM to the Cloud
To export a VM called myVM and create a cloud instance called myVM_Cloud:
VBoxManage export myVM --output OCI:// --cloud 0 --vmname myVM_Cloud \
--cloudprofile "vbox-oci" --cloudbucket myBucket \
--cloudshape VM.Standard2.1 --clouddomain US-ASHBURN-AD-1 --clouddisksize 50
\
--cloudocivcn ocid1.vcn.oc1... --cloudocisubnet ocid1.subnet.oc1... \
--cloudkeepobject true --cloudlaunchinstance true --cloudpublicip true
Importing a Cloud Instance Into Oracle VM VirtualBox
To import a cloud instance and create an Oracle VM VirtualBox VM called oci_Import:
VBoxManage import OCI:// --cloud --vmname oci_Import --memory 4000
--cpus 3 --ostype FreeBSD_64 --cloudprofile "vbox-oci"
--cloudinstanceid ocid1.instance.oc1... --cloudbucket myBucket
Creating a New Cloud Instance From a Custom Image
To create a new cloud instance from a custom image on Oracle Cloud Infrastructure:
VBoxManage cloud --provider="OCI" --profile="vbox-oci" instance create \
--domain-name="oraclecloud.com" --image-id="ocid1.image.oc1..." --display-name="myInstance" \
--shape="VM.Standard2.1" --subnet="ocid1.subnet.oc1..."
Terminating a Cloud Instance
To terminate an instance in your compartment on Oracle Cloud Infrastructure:
VBoxManage cloud --provider="OCI" --profile="vbox-oci" instance terminate \
--id="ocid1.instance.oc1..."
For more details about the available commands for cloud operations, see chapter 9.14, VBox-
Manage cloud, page 207.
2.17 Preferences
The Preferences window offers a selection of settings, which apply to all virtual machines of the
current user.
To display the Preferences window, do either of the following:
• Select File, Preferences.
• Click Preferences on the Welcome screen in VirtualBox Manager.
The following settings are available:
• General. Enables you to specify the default folder or directory for VM files, and the VRDP
Authentication Library.
47
2 First Steps
• Input. Enables you to specify keyboard shortcuts, such as the Host key. This is the key that
toggles whether the cursor is in the focus of the VM or the Host OS windows, see chapter
2.9.2, Capturing and Releasing Keyboard and Mouse, page 19. The Host key is also used to
trigger certain VM actions, see chapter 2.9.3, Typing Special Characters, page 20.
• Update. Enables you to specify various settings for Automatic Updates.
• Language. Enables you to specify the language used for menus, labels, and text in
VirtualBox Manager.
• Display. Enables you to specify the screen resolution, and its width and height. A default
scale factor can be specified for all guest screens.
• Proxy. Enables you to configure an HTTP Proxy Server.
• Interface. Enables you to select a color theme for the VirtualBox Manager user interface.
Note: This setting is only available on Windows host platforms.
2.18 Alternative Front-Ends
As briefly mentioned in chapter 2.3, Features Overview, page 3, Oracle VM VirtualBox has a very
flexible internal design that enables you to use multiple interfaces to control the same virtual
machines. For example, you can start a virtual machine with the VirtualBox Manager window
and then stop it from the command line. With Oracle VM VirtualBox’s support for the Remote
Desktop Protocol (RDP), you can even run virtual machines remotely on a headless server and
have all the graphical output redirected over the network.
The following front-ends are shipped in the standard Oracle VM VirtualBox package:
• VirtualBox. This is the VirtualBox Manager, a graphical user interface that uses the Qt
toolkit. This interface is described throughout this manual. While this is the simplest and
easiest front-end to use, some of the more advanced Oracle VM VirtualBox features are not
included.
• VBoxManage. A command-line interface for automated and detailed control of every as-
pect of Oracle VM VirtualBox. See chapter 9, VBoxManage, page 154.
• VBoxHeadless. A front-end that produces no visible output on the host at all, but can
act as a RDP server if the VirtualBox Remote Desktop Extension (VRDE) is installed and
enabled for the VM. As opposed to the other graphical interfaces, the headless front-end
requires no graphics support. This is useful, for example, if you want to host your virtual
machines on a headless Linux server that has no X Window system installed. See chapter
8.1.2, VBoxHeadless, the Remote Desktop Server, page 144.
If the above front-ends still do not satisfy your particular needs, it is possible to create yet
another front-end to the complex virtualization engine that is the core of Oracle VM VirtualBox,
as the Oracle VM VirtualBox core neatly exposes all of its features in a clean API. See chapter 12,
Oracle VM VirtualBox Programming Interfaces, page 398.
48
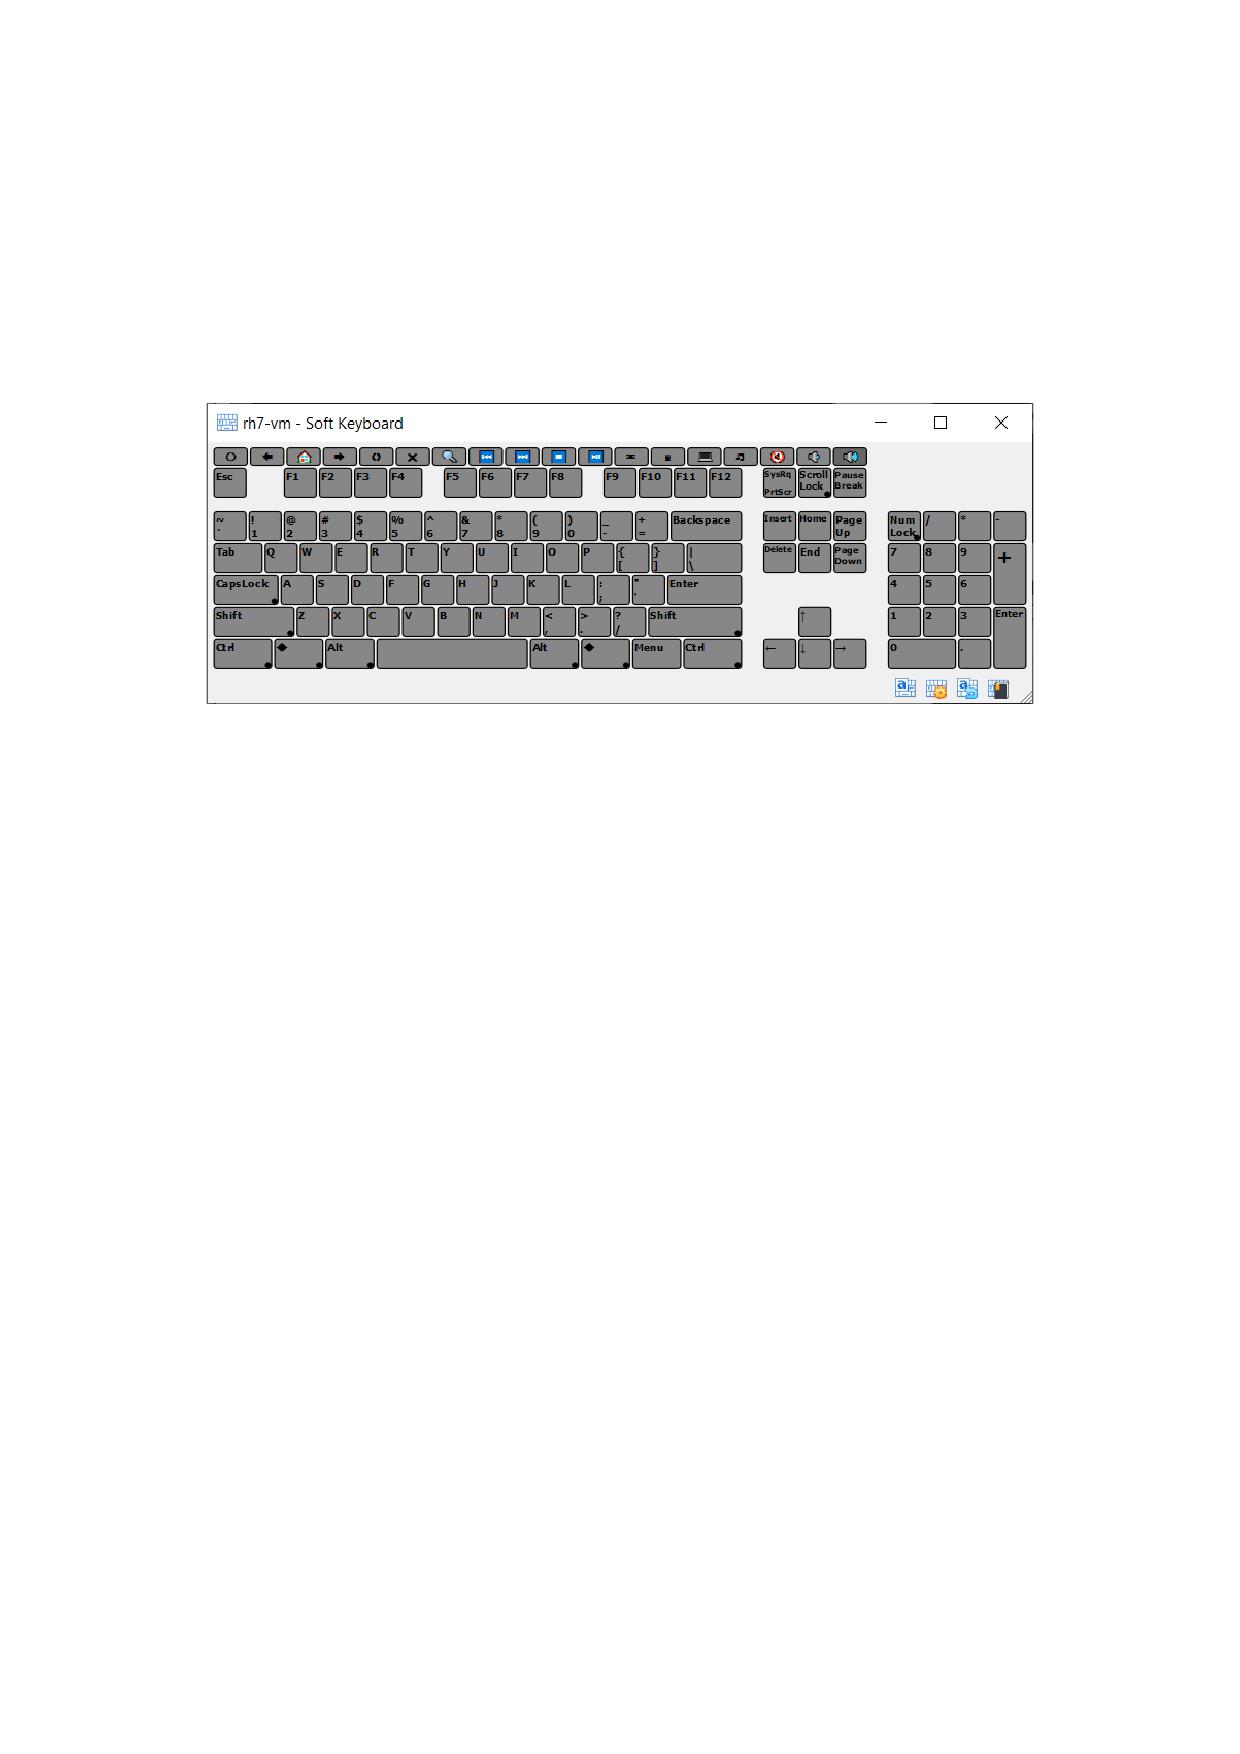
2 First Steps
2.19 Soft Keyboard
Oracle VM VirtualBox provides a soft keyboard that enables you to input keyboard characters
on the guest. A soft keyboard is an on-screen keyboard that can be used as an alternative to a
physical keyboard. See chapter 2.19.1, Using the Soft Keyboard, page 49 for details of how to use
the soft keyboard.
For best results, ensure that the keyboard layout configured on the guest OS matches the
keyboard layout used by the soft keyboard. Oracle VM VirtualBox does not do this automatically.
The soft keyboard can be used in the following scenarios:
• When the physical keyboard on the host is not the same as the keyboard layout configured
on the guest. For example, if the guest is configured to use an international keyboard, but
the host keyboard is US English.
• To send special key combinations to the guest. Note that some common key combinations
are also available in the Input, Keyboard menu of the guest VM window. See chapter
2.9.3, Typing Special Characters, page 20.
• For guests in kiosk mode, where a physical keyboard is not present.
• When using nested virtualization, the soft keyboard provides a method of sending key
presses to a guest.
By default, the soft keyboard includes some common international keyboard layouts. You can
copy and modify these to meet your own requirements. See chapter 2.19.2, Creating a Custom
Keyboard Layout, page 50.
2.19.1 Using the Soft Keyboard
1. Display the soft keyboard.
In the guest VM window, select Input, Keyboard, Soft Keyboard.
2. Select the required keyboard layout.
The name of the current keyboard layout is displayed in the toolbar of the soft keyboard
window. This is the previous keyboard layout that was used.
Click the Layout List icon in the toolbar of the soft keyboard window. The Layout List
window is displayed.
Select the required keyboard layout from the entries in the Layout List window.
The keyboard display graphic is updated to show the available input keys.
49
2 First Steps
3. Use the soft keyboard to enter keyboard characters on the guest.
• Modifier keys such as Shift, Ctrl, and Alt are available on the soft keyboard. Click
once to select the modifier key, click twice to lock the modifier key.
The Reset the Keyboard and Release All Keys icon can be used to release all pressed
modifier keys, both on the host and the guest.
• To change the look of the soft keyboard, click the Settings icon in the toolbar. You
can change colors used in the keyboard graphic, and can hide or show sections of the
keyboard, such as the NumPad or multimedia keys.
2.19.2 Creating a Custom Keyboard Layout
You can use one of the supplied default keyboard layouts as the starting point to create a custom
keyboard layout.
Note: To permananently save a custom keyboard layout, you must save it to a file. Oth-
erwise, any changes you make are discarded when you close down the Soft Keyboard
window.
Custom keyboard layouts that you save are stored as an XML file on the host, in the
keyboardLayouts folder in the global configuration data directory. For example, in
$HOME/.config/VirtualBox/keyboardLayouts on a Linux host.
1. Display the Layout List.
Click the Layout List icon in the toolbar of the soft keyboard window.
2. Make a copy of an existing keyboard layout.
Highlight the required layout and click the Copy the Selected Layout icon.
A new layout entry with a name suffix of -Copy is created.
3. Edit the new keyboard layout.
Highlight the new layout in the Layout List and click the Edit the Selected Layout icon.
Enter a new name for the layout.
Edit keys in the new layout. Click on the key that you want to edit and enter new key
captions in the Captions fields.
The keyboard graphic is updated with the new captions.
4. (Optional) Save the layout to a file. This means that your custom keyboard layout will be
available for future use.
Highlight the new layout in the Layout List and click the Save the Selected Layout into
File icon.
Any custom layouts that you create can later be removed from the Layout List, by high-
lighting and clicking the Delete the Selected Layout icon.
2.20 Monitoring of Virtual Machines
VirtualBox Manager includes the following tools for viewing runtime information and changing
the configuration of virtual machines.
• VM Activity Overview. Displays an overview of performance metrics for all running VMs.
See chapter 2.20.1, VM Activity Overview, page 51.
50
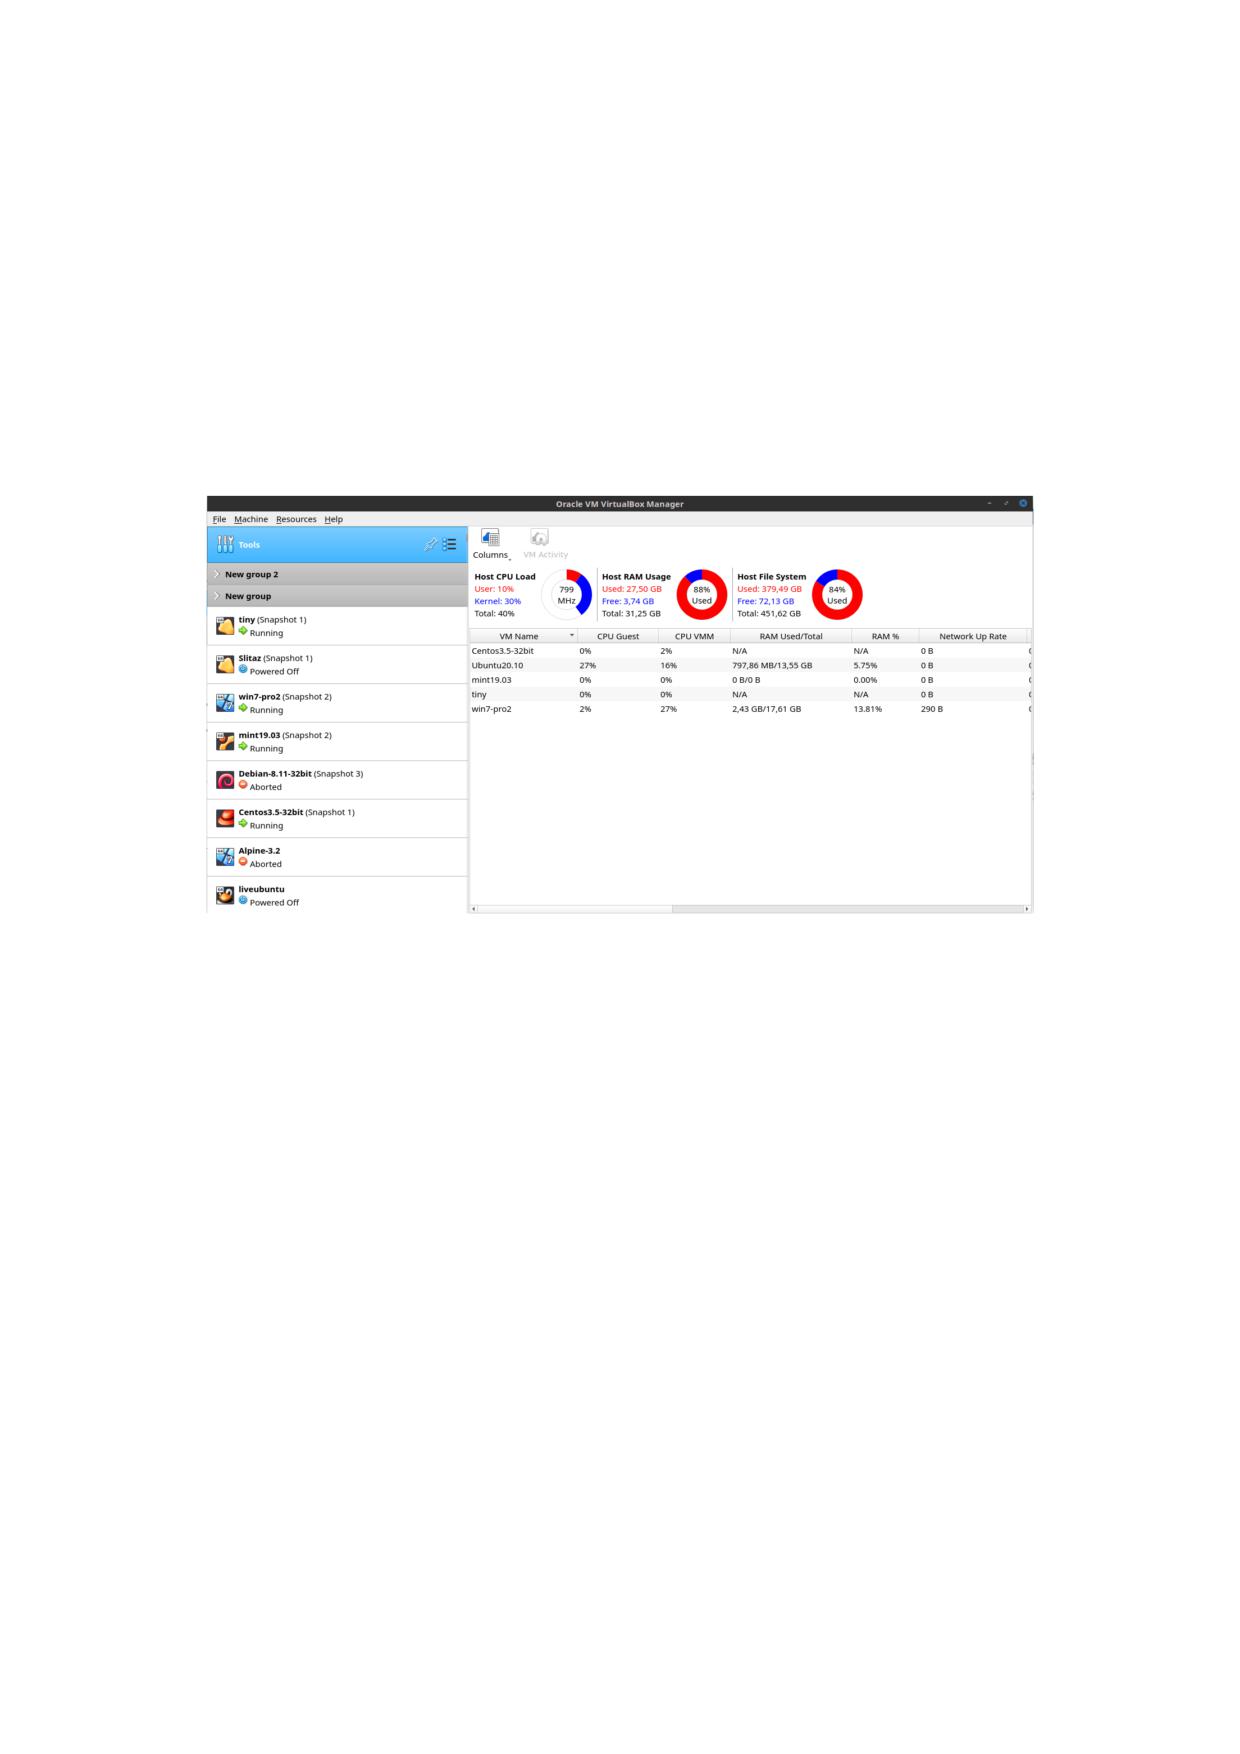
2 First Steps
• Session Information Dialog. Displays configuration and runtime information for the se-
lected guest system.
See chapter 2.20.2, Session Information Dialog, page 51
2.20.1 VM Activity Overview
The VM Activity Overview tool displays several performance metrics for all running virtual ma-
chines and for the host system. This provides an overview of system resources used by individual
virtual machines and the host system.
To display the VM Activity Overview tool, do the following:
Go to the global Tools menu and click Activities. The VM Activity Overview window is
shown.
To show metrics for all virtual machines, including those that are not running, right-click on
the list of virtual machines and select List All Virtual Machines.
To configure the set of metrics to be shown, click Columns in the toolbar. You can then sort
the list of virtual machines by a particular metric.
To see more performance information for a virtual machine, select the VM name and click VM
Activity in the toolbar. The VM Activity tab of the Session Information dialog is shown, see
chapter 2.20.2, Session Information Dialog, page 51.
2.20.2 Session Information Dialog
The Session Information dialog includes multiple tabs which show important configuration and
runtime information for the guest system. The tabs of the dialog are as follows:
• Configuration Details. Displays the system configuration of the virtual machine in a tab-
ular format. The displayed information includes details such as storage configuration and
audio settings.
• Runtime Information. Displays runtime information for the guest session in a tabular
format similar to the Configuration Details tab.
• VM Activity. Includes several time series charts which monitor guest resource usage in-
cluding CPU, RAM, Disk I/O, and Network. Note that the RAM chart requires the Guest
Additions to be running on the guest system. The VM Activity tab can also be accessed di-
rectly from the VM Activity Overview tool. See chapter 2.20.1, VM Activity Overview, page
51.
51
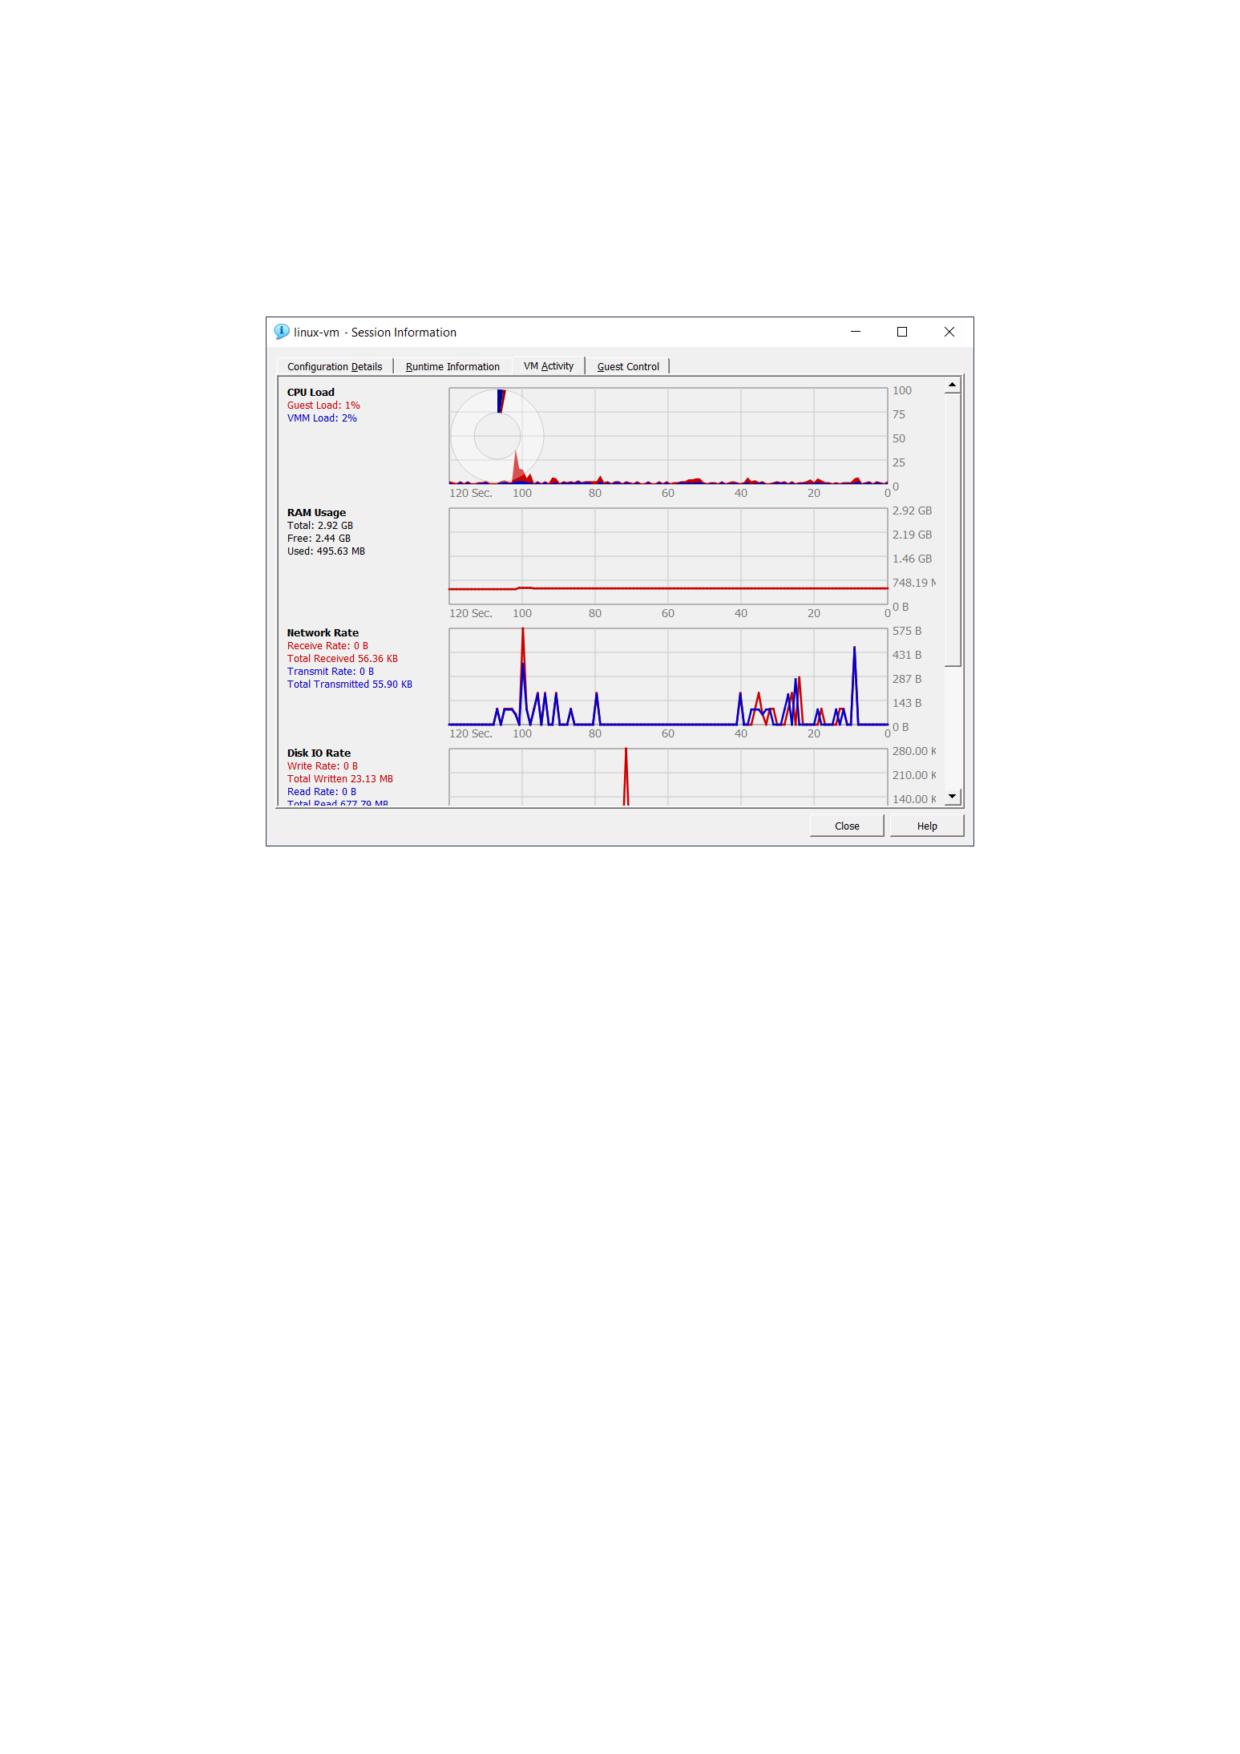
2 First Steps
• Guest Control. Details of processes used by the Guest Control File Manager. See chapter
5.8, Guest Control File Manager, page 106.
To display the Session Information dialog, select Machine, Session Information in the guest
VM.
2.21 The Log Viewer
Every time you start up a VM, Oracle VM VirtualBox creates a log file that records system config-
uration and events. The Log Viewer is a VirtualBox Manager tool that enables you to view and
analyze system logs.
52
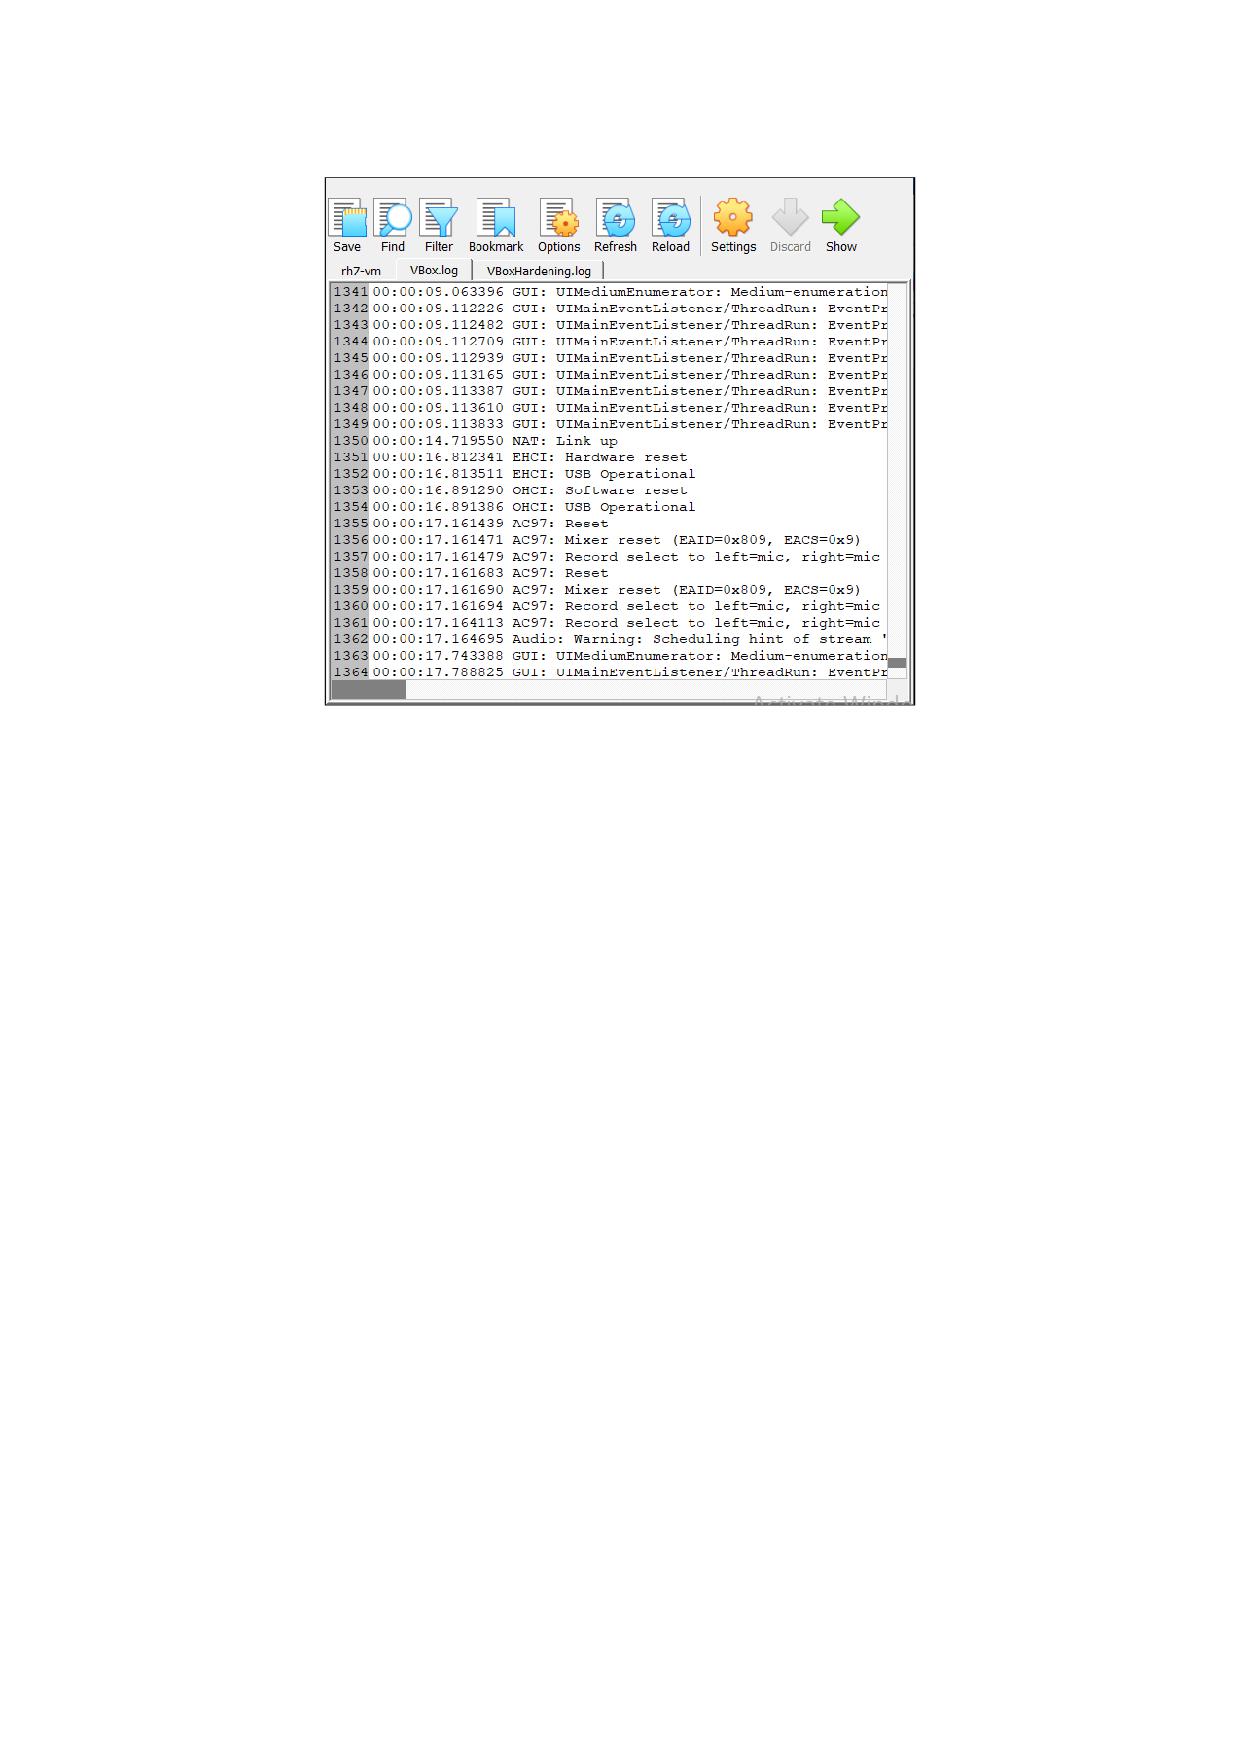
2 First Steps
To display the Log Viewer, do either of the following:
• Click the VM name in the machine list and select Logs from the machine tools menu.
• In the guest VM, select Machine, Show Log.
Log messages for the VM are displayed in tabs in the Log Viewer window. See chapter 13.1.2,
Collecting Debugging Information, page 400 for details of the various log files generated by Oracle
VM VirtualBox.
If you select multiple VMs in the machine list, logs are listed for each VM.
The toolbar of the Log Viewer includes the following options:
• Save: Exports the contents of the selected log file to a text file. Specify the destination
filename and location in the displayed dialog.
• Find: Searches for a text string in the log file.
• Filter: Uses filter terms to display specific types of log messages. Common log message
terms used by Oracle VM VirtualBox, such as Audio and NAT, are included by default.
Select one or more terms from the drop-down list. To add your own filter term, enter the
text string in the text box field.
• Bookmark: Saves the location of a log message, enabling you to find it quickly. To create
a bookmark, either click on the line number, or select some text and then click Bookmark.
• Options: Configures the text display used in the log message window.
• Refresh: Refreshes the log file you are currently viewing. Only log messages in the current
tab are updated.
• Reload: Refreshes all log files. Log messages in every tab are updated.
• Settings: Displays the Settings window for the VM, enabling you to make configuration
changes.
• Discard: For a running VM, discards the saved state for the VM and closes it down.
53
2 First Steps
• Show/Start: For a running VM, Show displays the VM window. For a stopped VM, Start
displays options for powering up the VM.
54
3 Installation Details
As installation of Oracle VM VirtualBox varies depending on your host operating system, the fol-
lowing sections provide installation instructions for Windows, macOS, Linux, and Oracle Solaris.
3.1 Installing on Windows Hosts
3.1.1 Prerequisites
For the various versions of Windows that are supported as host operating systems, please refer
to chapter 2.4, Supported Host Operating Systems, page 5.
In addition, Windows Installer must be present on your system. This should be the case for all
supported Windows platforms.
3.1.2 Windows Installation Directory Security Requirements
The installation directory on Windows hosts must meet certain security requirements, in order
to be accepted by the Windows installer.
This also applies for upgrades of Oracle VM VirtualBox.
For example, when installing Oracle VM VirtualBox into a custom location at
X:\Data\MyPrograms\Oracle VM VirtualBox, all parent directories of this path (namely X:\Data
and X:\Data\MyPrograms) have to meet the following Discretionary Access Control List (DACL):
Users
S-1-5-32-545:(OI)(CI)(RX)
Users
S-1-5-32-545:(DE,WD,AD,WEA,WA)
Authenticated Users S-1-5-11:(OI)(CI)(RX)
Authenticated Users S-1-5-11:(DE,WD,AD,WEA,WA)
Directory inheritance must also be disabled for all parent directories.
You can use the icacls Windows command line tool to meet the security requirements. For
example:
icacls <Directory> /reset /t /c
icacls <Directory> /inheritance:d /t /c
icacls <Directory> /grant *S-1-5-32-545:(OI)(CI)(RX)
icacls <Directory> /deny *S-1-5-32-545:(DE,WD,AD,WEA,WA)
icacls <Directory> /grant *S-1-5-11:(OI)(CI)(RX)
icacls <Directory> /deny *S-1-5-11:(DE,WD,AD,WEA,WA)
Note that these commands must be repeated for all parent directories (X:\Data and
X:\Data\MyPrograms in this example).
3.1.3 Performing the Installation
The Oracle VM VirtualBox installation can be started in either of the following ways:
• By double-clicking on the executable file.
55
3 Installation Details
• By entering the following command:
VirtualBox-<version>-<revision>-Win.exe -extract
This will extract the installer into a temporary directory, along with the .MSI file. Run the
following command to perform the installation:
msiexec /i VirtualBox-<version>-<revision>-Win.msi
Using either way displays the installation Welcome dialog and enables you to choose where
to install Oracle VM VirtualBox, and which components to install. In addition to the Oracle VM
VirtualBox application, the following components are available:
• USB support. This package contains special drivers for your Windows host that Oracle VM
VirtualBox requires to fully support USB devices inside your virtual machines.
• Networking. This package contains extra networking drivers for your Windows host that
Oracle VM VirtualBox needs to support Bridged Networking. This enables your VM’s virtual
network cards to be accessed from other machines on your physical network.
• Python support. This package contains Python scripting support for the Oracle VM
VirtualBox API, see chapter 12, Oracle VM VirtualBox Programming Interfaces, page 398.
For this to work, an already working Windows Python installation on the system is re-
quired.
See, for example: http://www.python.org/download/windows/.
Note: Python version at least 2.6 is required. Python 3 is also supported.
Depending on your Windows configuration, you may see warnings about unsigned drivers,
or similar. Click Continue for these warnings, as otherwise Oracle VM VirtualBox might not
function correctly after installation.
The installer will create an Oracle VM VirtualBox group in the Windows Start menu, which
enables you to launch the application and access its documentation.
With standard settings, Oracle VM VirtualBox will be installed for all users on the local system.
If this is not wanted, you must invoke the installer by first extracting as follows:
VirtualBox.exe -extract
Then, run either of the following commands on the extracted .MSI file. This will install Oracle
VM VirtualBox only for the current user.
VirtualBox.exe -msiparams ALLUSERS=2
msiexec /i VirtualBox-<version>-Win.msi ALLUSERS=2
If you do not want to install all features of Oracle VM VirtualBox, you can set the optional
ADDLOCAL parameter to explicitly name the features to be installed. The following features are
available:
VBoxApplication
Main binaries of Oracle VM VirtualBox.
Note: This feature must not be absent, since it contains the minimum set of files to
have working Oracle VM VirtualBox installation.
56
3 Installation Details
VBoxUSB
USB support.
VBoxNetwork
All networking support. This includes the VBoxNetworkFlt and VBoxNetworkAdp features.
VBoxNetworkFlt
Bridged networking support.
VBoxNetworkAdp
Host-only networking support
VBoxPython
Python support
For example, to only install USB support along with the main binaries, run either of the fol-
lowing commands:
VirtualBox.exe -msiparams ADDLOCAL=VBoxApplication,VBoxUSB
msiexec /i VirtualBox-<version>-Win.msi ADDLOCAL=VBoxApplication,VBoxUSB
The user is able to choose between NDIS5 and NDIS6 host network filter drivers during the
installation. This is done using a command line parameter, NETWORKTYPE. The NDIS6 driver is
the default for most supported Windows hosts. For some legacy Windows versions, the installer
will automatically select the NDIS5 driver and this cannot be changed.
You can force an install of the legacy NDIS5 host network filter driver by specifying
NETWORKTYPE=NDIS5. For example, to install the NDIS5 driver on Windows 7 use either of
the following commands:
VirtualBox.exe -msiparams NETWORKTYPE=NDIS5
msiexec /i VirtualBox-<version>-Win;.msi NETWORKTYPE=NDIS5
3.1.4 Uninstallation
As Oracle VM VirtualBox uses the standard Microsoft Windows installer, Oracle VM VirtualBox
can be safely uninstalled at any time. Click the program entry in the Add/Remove Programs
list in the Windows Control Panel.
3.1.5 Unattended Installation
Unattended installations can be performed using the standard MSI support.
3.1.6 Public Properties
Public properties can be specified with the MSI API, to control additional behavior and features
of the Windows host installer. Use either of the following commands:
VirtualBox.exe -msiparams NAME=VALUE [...]
msiexec /i VirtualBox-<version>-Win.msi NAME=VALUE [...]
The following public properties are available.
• VBOX_INSTALLDESKTOPSHORTCUT
Specifies whether or not an Oracle VM VirtualBox icon on the desktop should be created.
Set to 1 to enable, 0 to disable. Default is 1.
57
3 Installation Details
• VBOX_INSTALLQUICKLAUNCHSHORTCUT
Specifies whether or not an Oracle VM VirtualBox icon in the Quick Launch Bar should be
created.
Set to 1 to enable, 0 to disable. Default is 1.
• VBOX_REGISTERFILEEXTENSIONS
Specifies whether or not the file extensions .vbox, .vbox-extpack, .ovf, .ova, .vdi, .vmdk,
.vhd and .vdd should be associated with Oracle VM VirtualBox. Files of these types then
will be opened with Oracle VM VirtualBox.
Set to 1 to enable, 0 to disable. Default is 1.
• VBOX_START
Specifies whether to start Oracle VM VirtualBox right after successful installation.
Set to 1 to enable, 0 to disable. Default is 1.
3.2 Installing on macOS Hosts
3.2.1 Performing the Installation
For macOS hosts, Oracle VM VirtualBox ships in a dmg disk image file. Perform the following
steps to install on a macOS host:
1. Double-click on the dmg file, to mount the contents.
2. A window opens, prompting you to double-click on the VirtualBox.pkg installer file dis-
played in that window.
3. This starts the installer, which enables you to select where to install Oracle VM VirtualBox.
4. An Oracle VM VirtualBox icon is added to the Applications folder in the Finder.
3.2.2 Uninstallation
To uninstall Oracle VM VirtualBox, open the disk image dmg file and double-click on the uninstall
icon shown.
3.2.3 Unattended Installation
To perform a non-interactive installation of Oracle VM VirtualBox you can use the command line
version of the installer application.
Mount the dmg disk image file, as described in the installation procedure, or use the following
command line:
hdiutil attach /path/to/VirtualBox-xyz.dmg
Open a terminal session and run the following command:
sudo installer -pkg /Volumes/VirtualBox/VirtualBox.pkg -target /Volumes/Macintosh\ HD
58
3 Installation Details
3.3 Installing on Linux Hosts
3.3.1 Prerequisites
For the various versions of Linux that are supported as host operating systems, see chapter 2.4,
Supported Host Operating Systems, page 5.
You may need to install the following packages on your Linux system before starting the instal-
lation. Some systems will do this for you automatically when you install Oracle VM VirtualBox.
• Qt 5.3.2 or later. Qt 5.6.2 or later is recommended.
• SDL 1.2.7 or later. This graphics library is typically called libsdl or similar.
Note: These packages are only required if you want to run the Oracle VM VirtualBox
graphical user interfaces. In particular, VirtualBox, the graphical VirtualBox Manager,
requires both Qt and SDL. If you only want to run VBoxHeadless, neither Qt nor SDL
are required.
3.3.2 The Oracle VM VirtualBox Kernel Modules
In order to run other operating systems in virtual machines alongside your main operating sys-
tem, Oracle VM VirtualBox needs to integrate very tightly with your system. To do this it installs
a driver module called vboxdrv into the system kernel. The kernel is the part of the operating
system which controls your processor and physical hardware. Without this kernel module, you
can still use VirtualBox Manager to configure virtual machines, but they will not start.
Network drivers called vboxnetflt and vboxnetadp are also installed. They enable virtual
machines to make more use of your computer’s network capabilities and are needed for any
virtual machine networking beyond the basic NAT mode.
Since distributing driver modules separately from the kernel is not something which Linux
supports well, the Oracle VM VirtualBox install process creates the modules on the system where
they will be used. This means that you may need to install some software packages from the dis-
tribution which are needed for the build process. Required packages may include the following:
• GNU compiler (GCC)
• GNU Make (make)
• Kernel header files
Also ensure that all system updates have been installed and that your system is running the
most up-to-date kernel for the distribution.
Note: The running kernel and the kernel header files must be updated to matching
versions.
The following list includes some details of the required files for some common distributions.
Start by finding the version name of your kernel, using the command uname -r in a terminal.
The list assumes that you have not changed too much from the original installation, in particular
that you have not installed a different kernel type.
59
3 Installation Details
• With Debian and Ubuntu-based distributions, you must install the correct version of the
linux-headers, usually whichever of linux-headers-generic, linux-headers-amd64,
linux-headers-i686 or linux-headers-i686-pae best matches the kernel version
name. Also, the linux-kbuild package if it exists. Basic Ubuntu releases should have
the correct packages installed by default.
• On Fedora, Red Hat, Oracle Linux and many other RPM-based systems, the kernel version
sometimes has a code of letters or a word close to the end of the version name. For
example “uek” for the Oracle Unbreakable Enterprise Kernel or “default” or “desktop” for
the standard kernels. In this case, the package name is kernel-uek-devel or equivalent.
If there is no such code, it is usually kernel-devel.
• On some SUSE and openSUSE Linux versions, you may need to install the kernel-source
and kernel-syms packages.
If you suspect that something has gone wrong with module installation, check that your system
is set up as described above and try running the following command, as root:
rcvboxdrv setup
3.3.2.1 Kernel Modules and UEFI Secure Boot
If you are running on a system using UEFI (Unified Extensible Firmware Interface) Secure Boot,
you may need to sign the following kernel modules before you can load them:
• vboxdrv
• vboxnetadp
• vboxnetflt
• vboxpci
See your system documentation for details of the kernel module signing process.
3.3.3 Performing the Installation
Oracle VM VirtualBox is available in a number of package formats native to various common
Linux distributions. See chapter 2.4, Supported Host Operating Systems, page 5. In addition, there
is an alternative generic installer (.run) which you can use on supported Linux distributions.
3.3.3.1 Installing Oracle VM VirtualBox from a Debian or Ubuntu Package
Download the appropriate package for your distribution. The following example assumes that
you are installing to a 64-bit Ubuntu Xenial system. Use dpkg to install the Debian package,as
follows:
sudo dpkg -i virtualbox-<version-number>_Ubuntu_xenial_amd64.deb
The installer will also try to build kernel modules suitable for the current running kernel. If
the build process is not successful you will be shown a warning and the package will be left
unconfigured. Look at /var/log/vbox-install.log to find out why the compilation failed.
You may have to install the appropriate Linux kernel headers, see chapter 3.3.2, The Oracle VM
VirtualBox Kernel Modules, page 59. After correcting any problems, run the following command:
sudo rcvboxdrv setup
60
3 Installation Details
This will start a second attempt to build the module.
If a suitable kernel module was found in the package or the module was successfully built, the
installation script will attempt to load that module. If this fails, please see chapter 13.7.1, Linux
Kernel Module Refuses to Load, page 412 for further information.
Once Oracle VM VirtualBox has been successfully installed and configured, you can start it by
clicking VirtualBox in your Start menu or from the command line. See chapter 3.3.5, Starting
Oracle VM VirtualBox on Linux, page 64.
3.3.3.2 Using the Alternative Generic Installer (VirtualBox.run)
The alternative generic installer performs the following steps:
• Unpacks the application files to the target directory /opt/VirtualBox/, which cannot be
changed.
• Builds and installs the Oracle VM VirtualBox kernel modules: vboxdrv, vboxnetflt, and
vboxnetadp.
• Creates /sbin/rcvboxdrv, an init script to start the Oracle VM VirtualBox kernel module.
• Creates a new system group called vboxusers.
• Creates symbolic links in /usr/bin to a shell script /opt/VirtualBox/VBox which does
some sanity checks and dispatches to the actual executables: VirtualBox, VBoxVRDP,
VBoxHeadless and VBoxManage.
• Creates /etc/udev/rules.d/60-vboxdrv.rules, a description file for udev, if that is
present, which makes the USB devices accessible to all users in the vboxusers group.
• Writes the installation directory to /etc/vbox/vbox.cfg.
The installer must be executed as root with either install or uninstall as the first parame-
ter. For example:
sudo ./VirtualBox.run install
Or if you do not have the sudo command available, run the following as root instead:
./VirtualBox.run install
Add every user who needs to access USB devices from a VirtualBox guests to the group
vboxusers. Either use the OS user management tools or run the following command as root:
sudo usermod -a -G vboxusers username
Note: The usermod command of some older Linux distributions does not support the
-a option, which adds the user to the given group without affecting membership of
other groups. In this case, find out the current group memberships with the groups
command and add all these groups in a comma-separated list to the command line after
the -G option. For example: usermod -G group1,group2,vboxusers username.
61
3 Installation Details
3.3.3.3 Performing a Manual Installation
If you cannot use the shell script installer described in chapter 3.3.3.2, Using the Alternative
Generic Installer (VirtualBox.run), page 61, you can perform a manual installation. Run the
installer as follows:
./VirtualBox.run --keep --noexec
This will unpack all the files needed for installation in the directory install under the current
directory. The Oracle VM VirtualBox application files are contained in VirtualBox.tar.bz2
which you can unpack to any directory on your system. For example:
sudo mkdir /opt/VirtualBox
sudo tar jxf ./install/VirtualBox.tar.bz2 -C /opt/VirtualBox
To run the same example as root, use the following commands:
mkdir /opt/VirtualBox
tar jxf ./install/VirtualBox.tar.bz2 -C /opt/VirtualBox
The sources for Oracle VM VirtualBox’s kernel module are provided in the src directory. To
build the module, change to the directory and use the following command:
make
If everything builds correctly, run the following command to install the module to the appro-
priate module directory:
sudo make install
In case you do not have sudo, switch the user account to root and run the following command:
make install
The Oracle VM VirtualBox kernel module needs a device node to operate. The above make
command will tell you how to create the device node, depending on your Linux system. The
procedure is slightly different for a classical Linux setup with a /dev directory, a system with the
now deprecated devfs and a modern Linux system with udev.
On certain Linux distributions, you might experience difficulties building the module. You will
have to analyze the error messages from the build system to diagnose the cause of the problems.
In general, make sure that the correct Linux kernel sources are used for the build process.
Note that the /dev/vboxdrv kernel module device node must be owned by root:root and must
be read/writable only for the user.
Next, you install the system initialization script for the kernel module and activate the initial-
ization script using the right method for your distribution, as follows:
cp /opt/VirtualBox/vboxdrv.sh /sbin/rcvboxdrv
This example assumes you installed Oracle VM VirtualBox to the /opt/VirtualBox directory.
Create a configuration file for Oracle VM VirtualBox, as follows:
mkdir /etc/vbox
echo INSTALL_DIR=/opt/VirtualBox > /etc/vbox/vbox.cfg
Create the following symbolic links:
ln -sf /opt/VirtualBox/VBox.sh /usr/bin/VirtualBox
ln -sf /opt/VirtualBox/VBox.sh /usr/bin/VBoxManage
ln -sf /opt/VirtualBox/VBox.sh /usr/bin/VBoxHeadless
62
3 Installation Details
3.3.3.4 Updating and Uninstalling Oracle VM VirtualBox
Before updating or uninstalling Oracle VM VirtualBox, you must terminate any virtual machines
which are currently running and exit the Oracle VM VirtualBox or VBoxSVC applications. To
update Oracle VM VirtualBox, simply run the installer of the updated version. To uninstall Oracle
VM VirtualBox, run the installer as follows:
sudo ./VirtualBox.run uninstall
As root, you can use the following command:
./VirtualBox.run uninstall
You can uninstall the .run package as follows:
/opt/VirtualBox/uninstall.sh
To manually uninstall Oracle VM VirtualBox, perform the manual installation steps in reverse
order.
3.3.3.5 Automatic Installation of Debian Packages
The Debian packages will request some user feedback when installed for the first time. The
debconf system is used to perform this task. To prevent any user interaction during installation,
default values can be defined. A file vboxconf can contain the following debconf settings:
virtualbox virtualbox/module-compilation-allowed boolean true
virtualbox virtualbox/delete-old-modules boolean true
The first line enables compilation of the vboxdrv kernel module if no module was found for the
current kernel. The second line enables the package to delete any old vboxdrv kernel modules
compiled by previous installations.
These default settings can be applied prior to the installation of the Oracle VM VirtualBox
Debian package, as follows:
debconf-set-selections vboxconf
In addition there are some common configuration options that can be set prior to the installa-
tion. See chapter 3.3.3.7, Automatic Installation Options, page 63.
3.3.3.6 Automatic Installation of RPM Packages
The RPM format does not provide a configuration system comparable to the debconf system. See
chapter 3.3.3.7, Automatic Installation Options, page 63 for how to set some common installation
options provided by Oracle VM VirtualBox.
3.3.3.7 Automatic Installation Options
To configure the installation process for .deb and .rpm packages, you can create a response file
named /etc/default/virtualbox. The automatic generation of the udev rule can be pre-
vented with the following setting:
INSTALL_NO_UDEV=1
The creation of the group vboxusers can be prevented as follows:
INSTALL_NO_GROUP=1
If the following line is specified, the package installer will not try to build the vboxdrv kernel
module if no module fitting the current kernel was found.
INSTALL_NO_VBOXDRV=1
63
3 Installation Details
3.3.4 The vboxusers Group
The Linux installers create the system user group vboxusers during installation. Any system
user who is going to use USB devices from Oracle VM VirtualBox guests must be a member of
that group. A user can be made a member of the group vboxusers either by using the desktop
user and group tools, or with the following command:
sudo usermod -a -G vboxusers username
3.3.5 Starting Oracle VM VirtualBox on Linux
The easiest way to start an Oracle VM VirtualBox program is by running the program of your
choice (VirtualBox, VBoxManage, or VBoxHeadless) from a terminal. These are symbolic links
to VBox.sh that start the required program for you.
The following detailed instructions should only be of interest if you wish to execute Oracle
VM VirtualBox without installing it first. You should start by compiling the vboxdrv kernel
module and inserting it into the Linux kernel. Oracle VM VirtualBox consists of a service daemon,
VBoxSVC, and several application programs. The daemon is automatically started if necessary.
All Oracle VM VirtualBox applications will communicate with the daemon through UNIX local
domain sockets. There can be multiple daemon instances under different user accounts and
applications can only communicate with the daemon running under the user account as the
application. The local domain socket resides in a subdirectory of your system’s directory for
temporary files called .vbox-<username>-ipc. In case of communication problems or server
startup problems, you may try to remove this directory.
All Oracle VM VirtualBox applications (VirtualBox, VBoxManage, and VBoxHeadless) require
the Oracle VM VirtualBox directory to be in the library path, as follows:
LD_LIBRARY_PATH=. ./VBoxManage showvminfo "Windows XP"
3.4 Installing on Oracle Solaris Hosts
For the specific versions of Oracle Solaris that are supported as host operating systems, see
chapter 2.4, Supported Host Operating Systems, page 5.
If you have a previously installed instance of Oracle VM VirtualBox on your Oracle Solaris host,
please uninstall it first before installing a new instance. See chapter 3.4.4, Uninstallation, page
65 for uninstall instructions.
3.4.1 Performing the Installation
Oracle VM VirtualBox is available as a standard Oracle Solaris package. Download the Oracle
VM VirtualBox SunOS package, which includes the 64-bit version of Oracle VM VirtualBox. The
installation must be performed as root and from the global zone. This is because the Oracle VM
VirtualBox installer loads kernel drivers, which cannot be done from non-global zones. To verify
which zone you are currently in, execute the zonename command.
To start installation, run the following commands:
gunzip -cd VirtualBox-<version-number>-SunOS.tar.gz | tar xvf -
The Oracle VM VirtualBox kernel package is integrated into the main package. Install the
Oracle VM VirtualBox package as follows:
pkgadd -d VirtualBox-<version-number>-SunOS.pkg
64
3 Installation Details
The installer will then prompt you to enter the package you wish to install. Choose 1 or all
and proceed. Next the installer will ask you if you want to allow the postinstall script to be
executed. Choose y and proceed, as it is essential to execute this script which installs the Oracle
VM VirtualBox kernel module. Following this confirmation the installer will install Oracle VM
VirtualBox and execute the postinstall setup script.
Once the postinstall script has been executed your installation is now complete. You may now
safely delete the uncompressed package and autoresponse files from your system. Oracle VM
VirtualBox is installed in /opt/VirtualBox.
Note: If you need to use Oracle VM VirtualBox from non-global zones, see chapter
3.4.6, Configuring a Non-Global Zone for Running Oracle VM VirtualBox, page 66.
3.4.2 The vboxuser Group
The installer creates the system user group vboxuser during installation for Oracle Solaris hosts
that support the USB features required by Oracle VM VirtualBox. Any system user who is going
to use USB devices from Oracle VM VirtualBox guests must be a member of this group. A user
can be made a member of this group either by using the desktop user and group tools or by
running the following command as root:
usermod -G vboxuser username
Note that adding an active user to the vboxuser group will require the user to log out and
then log in again. This should be done manually after successful installation of the package.
3.4.3 Starting Oracle VM VirtualBox on Oracle Solaris
The easiest way to start an Oracle VM VirtualBox program is by running the program of your
choice (VirtualBox, VBoxManage, or VBoxHeadless) from a terminal. These are symbolic links
to VBox.sh that start the required program for you.
Alternatively, you can directly invoke the required programs from /opt/VirtualBox. Using
the links provided is easier as you do not have to enter the full path.
You can configure some elements of the VirtualBox Qt GUI, such as fonts and colours, by
running VBoxQtconfig from the terminal.
3.4.4 Uninstallation
Uninstallation of Oracle VM VirtualBox on Oracle Solaris requires root permissions. To perform
the uninstallation, start a root terminal session and run the following command:
pkgrm SUNWvbox
After confirmation, this will remove Oracle VM VirtualBox from your system.
3.4.5 Unattended Installation
To perform a non-interactive installation of Oracle VM VirtualBox there is a response file named
autoresponse. The installer uses this for responses to inputs, rather than prompting the user.
Extract the tar.gz package as described in chapter 3.4.1, Performing the Installation, page 64.
Then open a root terminal session and run the following command:
pkgadd -d VirtualBox-<version-number>-SunOS-x86 -n -a autoresponse SUNWvbox
To perform a non-interactive uninstallation, open a root terminal session and run the following
command:
pkgrm -n -a /opt/VirtualBox/autoresponse SUNWvbox
65
3 Installation Details
3.4.6 Configuring a Non-Global Zone for Running Oracle VM VirtualBox
After installing Oracle VM VirtualBox in the global zone (see chapter 3.4, Installing on Oracle
Solaris Hosts, page 64 for the installation instructions) the first step required to run Oracle VM
VirtualBox in a non-global zone is to modify the zone’s configuration to be able to access the
Oracle VM VirtualBox device nodes located in the global zone. This is done by performing the
following steps as a zone administrator in the global zone.
global$ zonecfg -z <vboxzone>
Replace vboxzone with the name of the non-global zone where you plan to run Oracle VM
VirtualBox.
Use zonecfg(8) to add the device resource and the match property for each Oracle VM
VirtualBox device node in the global zone to the non-global zone as follows:
zonecfg:vboxzone> add device
zonecfg:vboxzone:device> set match=/dev/vboxdrv
zonecfg:vboxzone:device> end
zonecfg:vboxzone> add device
zonecfg:vboxzone:device> set match=/dev/vboxdrvu
zonecfg:vboxzone:device> end
zonecfg:vboxzone> exit
On Oracle Solaris 11 if you plan to use VMs configured to use a USB device, e.g. a USB pointing
device or a USB pass-through device, you should also pass through the /dev/vboxusbmon device
using the steps above.
Oracle Solaris 11 doesn’t support sparse root zones so you will need to loopback mount
/opt/VirtualBox from the global zone into the non-global zone at the same path. This is
done using zonecfg(8) to set the dir attribute and the special attribute for this directory. For
example:
zonecfg:vboxzone> add fs
zonecfg:vboxzone:fs> set dir=/opt/VirtualBox
zonecfg:vboxzone:fs> set special=/opt/VirtualBox
zonecfg:vboxzone:fs> set type=lofs
zonecfg:vboxzone:fs> add options [readonly]
zonecfg:vboxzone:fs> end
zonecfg:vboxzone>exit
After making the above changes using zonecfg(8), reboot the zone using zoneadm(8) as
follows:
global$ zoneadm -z <vboxzone> reboot
for the changes to take effect. You will then be able to run Oracle VM VirtualBox from
/opt/VirtualBox within the configured non-global zone.
3.5 Installing an Extension Pack
Extension packs provide extra functionality to the Oracle VM VirtualBox base package, such as
extended USB device support and cloud integration features. See chapter 2.5, Installing Oracle
VM VirtualBox and Extension Packs, page 6.
To install an Oracle VM VirtualBox extension pack, do the following:
1. Double-click on the extension package file name.
Oracle VM VirtualBox extension packs have a .vbox-extpack file name extension.
2. Follow the on-screen instructions to install the extension pack.
You can also use the Extension Pack Manager tool to install an extension pack. See chapter
3.5.1, The Extension Pack Manager, page 67.
66
3 Installation Details
3.5.1 The Extension Pack Manager
Extension packs can be installed and managed using the Extension Pack Manager tool in
VirtualBox Manager.
The Extension Pack Manager lists the extension packs that are currently installed on the host,
and enables you to install and uninstall extension packs.
To display the Extension Pack Manager, go to the global Tools menu and click Extensions.
The Extension Pack Manager is shown.
To install an extension pack using the Extension Pack Manager, click Install and select an
extension package file. The extension pack is installed on the host and listed in Extension Pack
Manager.
To uninstall an extension pack with the Extension Pack Manager, do the following:
1. Select the extension pack in the Extension Pack Manager window and click Uninstall.
2. Click Remove in the prompt dialog.
The extension pack is uninstalled from the host and removed from the Extension Pack
Manager.
Alternatively, you can use the VBoxManage command line to install and manage Oracle VM
VirtualBox extension packs. See chapter 9.52, VBoxManage extpack, page 322.
67
4 Configuring Virtual Machines
This chapter provides detailed steps for configuring an Oracle VM VirtualBox virtual machine
(VM). For an introduction to Oracle VM VirtualBox and steps to get your first virtual machine
running, see chapter 2, First Steps, page 1.
You have considerable latitude when deciding what virtual hardware to provide to the guest.
Use virtual hardware to communicate with the host system or with other guests. For example,
you can use virtual hardware in the following ways:
• Have Oracle VM VirtualBox present an ISO CD-ROM image to a guest system as if it were
a physical CD-ROM.
• Provide a guest system access to the physical network through its virtual network card.
• Provide the host system, other guests, and computers on the Internet access to the guest
system.
4.1 Supported Guest Operating Systems
Because Oracle VM VirtualBox is designed to provide a generic virtualization environment for
x86 systems, it can run guest operating systems (OSes) of any kind.
The following guest OS platforms are supported:
• Platforms With Full Support. These guest OS platforms qualify for Oracle Premier Sup-
port. See chapter 4.1, Supported Guest Operating Systems, page 68.
• Platforms With Limited Support. These legacy guest OS platforms can be used with
Oracle VM VirtualBox, but only qualify for best effort support. Therefore, resolution of
customer issues is not guaranteed. See chapter 4.1, Supported Guest Operating Systems,
page 69.
68

4 Configuring Virtual Machines
Operating System
Comments
Windows 11 (64-bit)
Insider preview builds are not supported
Windows 10 (32-bit and 64-bit)
Insider preview builds are not supported
Windows 8 and 8.1 (32-bit and 64-bit)
Windows Server 2019 (64-bit)
Windows Server 2016 (64-bit)
Windows Server 2012 and 2012 R2 (64-bit)
Solaris 11 (32-bit and 64-bit)
Solaris 10 8/11 Update 10 and later (32-bit and
64-bit)
Oracle Linux 8 (64-bit)
Includes Red Hat Enterprise Linux 8,
CentOS 8
Oracle Linux 7 (64-bit)
Includes Red Hat Enterprise Linux 7,
CentOS 7
Oracle Linux 6 (32-bit and 64-bit)
Includes Red Hat Enterprise Linux 6,
CentOS 6
Ubuntu 16.04 LTS (Xenial Xerus) (32-bit and
64-bit)
Ubuntu 18.04 LTS (Bionic Beaver) (64-bit)
Ubuntu 20.04 LTS (Focal Fossa) (64-bit)
SUSE Linux Enterprise Server 15 (64-bit)
SUSE Linux Enterprise Server 12 (64-bit)
Operating System
Comments
Windows 7 (32-bit and 64-bit)
Windows Vista SP2 and later (32-bit and 64-bit)
Windows XP (32-bit)
Windows Vista (32-bit)
Windows Server 2008 and 2008 R2 (32-bit and
64-bit)
Windows Server 2003 (32-bit and 64-bit)
Oracle Linux 5 (32-bit and 64-bit)
Includes Red Hat Enterprise Linux 5,
CentOS 5
Ubuntu 14.04.5 LTS (Trusty Tahr) (32-bit and
64-bit)
OS/2 Warp 4.5
4.1.1 Mac OS X Guests
Oracle VM VirtualBox enables you to install and execute unmodified versions of Mac OS X guests
on supported host hardware. Note that this feature is experimental and thus unsupported.
Oracle VM VirtualBox is the first product to provide the modern PC architecture expected by
OS X without requiring any of the modifications used by competing virtualization solutions. For
example, some competing solutions perform modifications to the Mac OS X install DVDs, such as
a different boot loader and replaced files.
Be aware of the following important issues before you attempt to install a Mac OS X guest:
• Mac OS X is commercial, licensed software and contains both license and technical re-
strictions that limit its use to certain hardware and usage scenarios. You must understand
and comply with these restrictions.
In particular, Apple prohibits the installation of most versions of Mac OS X on non-Apple
hardware.
These license restrictions are also enforced on a technical level. Mac OS X verifies that
it is running on Apple hardware. Most DVDs that accompany Apple hardware check for
69
4 Configuring Virtual Machines
the exact model. These restrictions are not circumvented by Oracle VM VirtualBox and
continue to apply.
• Only CPUs that are known and tested by Apple are supported. As a result, if your Intel CPU
is newer than the Mac OS X build, or if you have a non-Intel CPU, you will likely encounter
a panic during bootup with an “Unsupported CPU” exception.
Ensure that you use the Mac OS X DVD that comes with your Apple hardware.
• The Mac OS X installer expects the hard disk to be partitioned. So, the installer will not
offer a partition selection to you. Before you can install the software successfully, start the
Disk Utility from the Tools menu and partition the hard disk. Close the Disk Utility and
proceed with the installation.
• In addition, Mac OS X support in Oracle VM VirtualBox is an experimental feature. See
chapter 15, Known Limitations, page 421.
4.1.2 64-bit Guests
Warning: Be sure to enable I/O APIC for virtual machines that you intend to use
in 64-bit mode. This is especially true for 64-bit Windows VMs. See chapter 4.5.1,
Motherboard Tab, page 74. For 64-bit Windows guests, ensure that the VM uses the
Intel networking device because there is no 64-bit driver support for the AMD PCNet
card. See chapter 7.1, Virtual Networking Hardware, page 128.
If you use the Create VM wizard of VirtualBox Manager, Oracle VM VirtualBox automatically
uses the correct settings for each selected 64-bit OS type. See chapter 2.8, Creating Your First
Virtual Machine, page 13.
4.2 Unattended Guest Installation
Oracle VM VirtualBox can install a guest OS automatically. You only need to provide the instal-
lation medium and a few other parameters, such as the name of the default user.
You can perform an unattended guest installation in the following ways:
• Use the Create Virtual Machine wizard. An optional step in the wizard enables you to
configure unattended installation. You can specify the default user credentials for the guest
OS and also whether to install the Guest Additions automatically. See chapter 2.8, Creating
Your First Virtual Machine, page 13.
During this step, Oracle VM VirtualBox scans the installation medium and changes certain
parameters to ensure a seamless installation as a guest running on Oracle VM VirtualBox.
• Use the VBoxManage commands. chapter 4.2.1, Using VBoxManage Commands for Unat-
tended Guest Installation, page 71 describes how to perform an unattended guest installa-
tion for an Oracle Linux guest.
When you first start a VM that has been configured for unattended installation, the guest OS
installation is performed automatically.
The installation operation changes the boot device order to boot the virtual hard disk first and
then the virtual DVD drive. If the virtual hard disk is empty prior to the automatic installation,
the VM boots from the virtual DVD drive and begins the installation.
If the virtual hard disk contains a bootable OS, the installation operation exits. In this case,
change the boot device order manually by pressing F12 during the BIOS splash screen.
70
4 Configuring Virtual Machines
4.2.1 Using VBoxManage Commands for Unattended Guest Installation
The following example shows how to perform an unattended guest installation for an Oracle
Linux VM. The example uses various VBoxManage commands to prepare the guest VM. The
VBoxManage unattended install command is then used to install and configure the guest
OS.
1.
Create the virtual machine.
# VM="ol7-autoinstall"
# VBoxManage list ostypes
# VBoxManage createvm --name $VM --ostype "Oracle_64" --register
Note the following:
• The $VM variable represents the name of the VM.
• The VBoxManage list ostypes command lists the guest OSes supported by Oracle
VM VirtualBox, including the name used for each OS in the VBoxManage commands.
• A 64-bit Oracle Linux 7 VM is created and registered with Oracle VM VirtualBox.
• The VM has a unique UUID.
• An XML settings file is generated.
2.
Create a virtual hard disk and storage devices for the VM.
# VBoxManage createhd --filename /VirtualBox/$VM/$VM.vdi --size 32768
# VBoxManage storagectl $VM --name "SATA Controller" --add sata --controller IntelAHCI
# VBoxManage storageattach $VM --storagectl "SATA Controller" --port 0 --device 0 \
--type hdd --medium /VirtualBox/$VM/$VM.vdi
# VBoxManage storagectl $VM --name "IDE Controller" --add ide
# VBoxManage storageattach $VM --storagectl "IDE Controller" --port 0 --device 0 \
--type dvddrive --medium /u01/Software/OL/OracleLinux-R7-U6-Server-x86_64-dvd.iso
The previous commands do the following:
• Create a 32768 MB virtual hard disk.
• Create a SATA storage controller and attach the virtual hard disk.
• Create an IDE storage controller for a virtual DVD drive and attach an Oracle Linux
installation ISO.
3.
(Optional) Configure some settings for the VM.
# VBoxManage modifyvm $VM --ioapic on
# VBoxManage modifyvm $VM --boot1 dvd --boot2 disk --boot3 none --boot4 none
# VBoxManage modifyvm $VM --memory 8192 --vram 128
The previous commands do the following:
• Enable I/O APIC for the motherboard of the VM.
• Configure the boot device order for the VM.
• Allocate 8192 MB of RAM and 128 MB of video RAM to the VM.
4.
Perform an unattended install of the OS.
# VBoxManage unattended install $VM \
--iso=/u01/Software/OL/OracleLinux-R7-U6-Server-x86_64-dvd.iso \
--user=<login> --full-user-name=<name> --password <password> \
--install-additions --time-zone=CET
71
4 Configuring Virtual Machines
The previous command does the following:
• Specifies an Oracle Linux ISO as the installation ISO.
• Specifies a login name, full name, and login password for a default user on the guest
OS.
Note that the specified password is also used for the root user account on the guest.
• Installs the Guest Additions on the VM.
• Sets the time zone for the guest OS to Central European Time (CET).
5. Start the virtual machine.
This step completes the unattended installation process.
# VBoxManage startvm $VM --type headless
The VM starts in headless mode, which means that the VirtualBox Manager window does
not open.
6. (Optional) Update the guest OS to use the latest Oracle Linux packages.
On the guest VM, run the following command:
# yum update
4.3 Emulated Hardware
Oracle VM VirtualBox virtualizes nearly all hardware of the host. Depending on a VM’s configu-
ration, the guest will see the following virtual hardware:
• Input devices. Oracle VM VirtualBox can emulate a standard PS/2 keyboard and mouse.
These devices are supported by most guest OSes.
In addition, Oracle VM VirtualBox can provide virtual USB input devices to avoid having
to capture mouse and keyboard, as described in chapter 2.9.2, Capturing and Releasing
Keyboard and Mouse, page 19.
• Graphics. The default Oracle VM VirtualBox graphics device for Windows guests is an
SVGA device. For Linux guests, the default graphics device emulates a VMware SVGA
graphics device. See chapter 4.6.1, Screen Tab, page 77.
For legacy guest OSes, a VGA-compatible graphics device is available.
• Storage. Oracle VM VirtualBox emulates the most common types of hard disk controllers.
See chapter 6.1, Hard Disk Controllers, page 111. Whereas supporting only one of these
controllers would be enough for Oracle VM VirtualBox by itself, this multitude of storage
adapters is required for compatibility with other hypervisors. Windows is very selective
about its boot devices, and migrating VMs between hypervisors is very difficult or impossi-
ble if the storage controllers are different.
• Networking. See chapter 7.1, Virtual Networking Hardware, page 128.
• USB. Oracle VM VirtualBox emulates these types of USB host controllers: xHCI, EHCI, and
OHCI. While xHCI handles all USB transfer speeds, some legacy guest OSes may not sup-
port xHCI. Note that for some legacy Windows guests, third party drivers must be installed
for xHCI support.
Legacy guest OSes typically support OHCI and EHCI. These two controllers are needed
because OHCI only handles USB low-speed and full-speed devices (both USB 1.x and 2.0),
while EHCI only handles high-speed devices (USB 2.0 only).
72
4 Configuring Virtual Machines
The emulated USB controllers do not communicate directly with devices on the host. In-
stead they communicate with a virtual USB layer which abstracts the USB protocol and
enables the use of remote USB devices.
• Audio. See chapter 4.8, Audio Settings, page 81.
4.4 General Settings
In the Settings window, under General, you can configure the most fundamental aspects of the
virtual machine such as memory and essential hardware. The following tabs are available.
4.4.1 Basic Tab
In the Basic tab of the General settings category, you can find these settings:
• Name: The name of the the VM, as shown in the list of VMs in the main VirtualBox Manager
window. Using this name, Oracle VM VirtualBox also saves the VM’s configuration files. If
you change the name, Oracle VM VirtualBox renames these files as well. As a result, you
can only use characters which are allowed for file names on your host OS.
Note that internally, Oracle VM VirtualBox uses unique identifiers (UUIDs) to identify vir-
tual machines. You can display these using the VBoxManage commands.
• Type: The type of the guest OS for the VM. This is the same setting that is specified in the
New Virtual Machine wizard. See chapter 2.8, Creating Your First Virtual Machine, page
13.
Whereas the default settings of a newly created VM depend on the selected OS type, chang-
ing the type later has no effect on VM settings. This value is purely informational and
decorative.
• Version: The version of the guest OS for the VM. This is the same setting that is specified
in the New Virtual Machine wizard. See chapter 2.8, Creating Your First Virtual Machine,
page 13.
4.4.2 Advanced Tab
The following settings are available in the Advanced tab:
• Snapshot Folder: By default, Oracle VM VirtualBox saves snapshot data together with
your other Oracle VM VirtualBox configuration data. See chapter 11.1, Where Oracle VM
VirtualBox Stores its Files, page 391. With this setting, you can specify any other folder for
each VM.
• Shared Clipboard: You can select here whether the clipboard of the guest OS should be
shared with that of your host. If you select Bidirectional, then Oracle VM VirtualBox will
always make sure that both clipboards contain the same data. If you select Host to Guest
or Guest to Host, then Oracle VM VirtualBox will only ever copy clipboard data in one
direction.
Clipboard sharing requires that the Oracle VM VirtualBox Guest Additions be installed. In
such a case, this setting has no effect. See chapter 5, Guest Additions, page 89.
For security reasons, the shared clipboard is disabled by default. This setting can be
changed at any time using the Shared Clipboard menu item in the Devices menu of the
virtual machine.
73
4 Configuring Virtual Machines
• Drag and Drop: This setting enables support for drag and drop. Select an object, such as a
file, from the host or guest and directly copy or open it on the guest or host. Multiple drag
and drop modes for a VM enable restricting of access in either direction.
For drag and drop to work the Guest Additions need to be installed on the guest.
Note: Drag and drop is disabled by default. This setting can be changed at any time
using the Drag and Drop menu item in the Devices menu of the virtual machine.
See chapter 5.4, Drag and Drop, page 100.
4.4.3 Description Tab
On the Description tab you can enter a description for your virtual machine. This has no effect
on the functionality of the machine, but you may find this space useful to note down things such
as the configuration of a virtual machine and the software that has been installed into it.
To insert a line break into the Description text field, press Shift+Enter.
4.4.4 Disk Encryption Tab
The Disk Encryption tab enables you to encrypt disks that are attached to the virtual machine.
To enable disk encryption, select the Enable Disk Encryption check box.
Settings are available to configure the cipher used for encryption and the encryption password.
Note: All files related to the virtual machine except disk images are stored unencrypted.
To encrypt these files, use the VBoxManage encryptvm command as described in chap-
ter 10.22, Encryption of VMs, page 373.
4.5 System Settings
The System category groups various settings that are related to the basic hardware that is pre-
sented to the virtual machine.
Note: As the activation mechanism of Microsoft Windows is sensitive to hardware
changes, if you are changing hardware settings for a Windows guest, some of these
changes may trigger a request for another activation with Microsoft.
The following tabs are available.
4.5.1 Motherboard Tab
On the Motherboard tab, you can configure virtual hardware that would normally be on the
motherboard of a real computer.
• Base Memory: Sets the amount of RAM that is allocated and given to the VM when it is
running. The specified amount of memory will be requested from the host OS, so it must
be available or made available as free memory on the host when attempting to start the VM
and will not be available to the host while the VM is running. This is the same setting that
was specified in the New Virtual Machine wizard, as described in chapter 2.8, Creating
Your First Virtual Machine, page 13.
Generally, it is possible to change the memory size after installing the guest OS. But you
must not reduce the memory to an amount where the OS would no longer boot.
74
4 Configuring Virtual Machines
•
Boot Order: Determines the order in which the guest OS will attempt to boot from the
various virtual boot devices. Analogous to a real PC’s BIOS setting, Oracle VM VirtualBox
can tell a guest OS to start from the virtual floppy, the virtual CD/DVD drive, the virtual
hard drive (each of these as defined by the other VM settings), the network, or none of
these.
If you select Network, the VM will attempt to boot from a network using the PXE mech-
anism. This needs to be configured in detail on the command line. See chapter 9.10,
VBoxManage modifyvm, page 180.
•
Chipset: You can select which chipset will be presented to the virtual machine. PIIX3 is
the default chipset for most guests. For some guest OSes such as Mac OS X, the PIIX3
chipset is not well supported. As a result, Oracle VM VirtualBox supports an emulation
of the ICH9 chipset, which supports PCI express, three PCI buses, PCI-to-PCI bridges and
Message Signaled Interrupts (MSI). This enables modern OSes to address more PCI devices
and no longer requires IRQ sharing. Using the ICH9 chipset it is also possible to configure
up to 36 network cards, compared to a maximum of eight network adapters with PIIX3.
Note that ICH9 support is experimental and not recommended for guest OSes which do
not require it.
•
TPM: Enables support for a Trusted Platform Module (TPM) security processor. Choose
from the supported TPM versions.
•
Pointing Device: The default virtual pointing device for some guest OSes is the traditional
PS/2 mouse. If set to USB Tablet, Oracle VM VirtualBox reports to the virtual machine
that a USB tablet device is present and communicates mouse events to the virtual machine
through this device. Another setting is USB Multi-Touch Tablet, which is suitable for guests
running Windows 8 or later.
Using the virtual USB tablet has the advantage that movements are reported in absolute
coordinates, instead of as relative position changes. This enables Oracle VM VirtualBox to
translate mouse events over the VM window into tablet events without having to “capture”
the mouse in the guest as described in chapter 2.9.2, Capturing and Releasing Keyboard
and Mouse, page 19. This makes using the VM less tedious even if Guest Additions are not
installed.
•
Enable I/O APIC: Advanced Programmable Interrupt Controllers (APICs) are an x86 hard-
ware feature that have replaced Programmable Interrupt Controllers (PICs). With an I/O
APIC, OSes can use more than 16 interrupt requests (IRQs) and therefore avoid IRQ shar-
ing for improved reliability.
Note: Enabling the I/O APIC is required, especially for 64-bit Windows guest OSes. It
is also required if you want to use more than one virtual CPU in a virtual machine.
However, software support for I/O APICs has been unreliable with some OSes other than
Windows. Also, the use of an I/O APIC slightly increases the overhead of virtualization and
therefore slows down the guest OS a little.
Warning: All Windows OSes install different kernels, depending on whether an I/O
APIC is available. As with ACPI, the I/O APIC therefore must not be turned off after
installation of a Windows guest OS. Turning it on after installation will have no effect
however.
75
4 Configuring Virtual Machines
• Hardware Clock in UTC Time: If selected, Oracle VM VirtualBox will report the system
time in UTC format to the guest instead of the local (host) time. This affects how the virtual
real-time clock (RTC) operates and may be useful for UNIX-like guest OSes, which typically
expect the hardware clock to be set to UTC.
• Enable EFI: Enables Extensible Firmware Interface (EFI), which replaces the legacy BIOS
and may be useful for certain advanced use cases. See chapter 4.14, Alternative Firmware
(EFI), page 85.
• Enable Secure Boot: Enables Secure Boot, to provide a secure environment for starting
the guest OS.
In addition, you can turn off the Advanced Configuration and Power Interface (ACPI) which
Oracle VM VirtualBox presents to the guest OS by default.
ACPI is the current industry standard to allow OSes to recognize hardware, configure moth-
erboards and other devices and manage power. As most computers contain this feature and
Windows and Linux support ACPI, it is also enabled by default in Oracle VM VirtualBox. ACPI
can only be turned off using the command line. See chapter 9.10, VBoxManage modifyvm, page
180.
Warning: All Windows OSes install different kernels, depending on whether ACPI is
available. This means that ACPI must not be turned off after installation of a Windows
guest OS. However, turning it on after installation will have no effect.
4.5.2 Processor Tab
On the Processor tab, you can configure settings for the CPU used by the virtual machine.
• Processor(s): Sets the number of virtual CPU cores the guest OSes can see. Oracle VM
VirtualBox supports symmetrical multiprocessing (SMP) and can present up to 32 virtual
CPU cores to each virtual machine.
You should not configure virtual machines to use more CPU cores than are available physi-
cally. This includes real cores, with no hyperthreads.
• Execution Cap: Configures the CPU execution cap. This limits the amount of time a host
CPU spends to emulate a virtual CPU. The default setting is 100%, meaning that there is
no limitation. A setting of 50% implies a single virtual CPU can use up to 50% of a single
host CPU. Note that limiting the execution time of the virtual CPUs may cause guest timing
problems.
A warning is displayed at the bottom of the Processor tab if an Execution Cap setting is
made that may affect system performance.
• Enable PAE/NX: Determines whether the PAE and NX capabilities of the host CPU will be
exposed to the virtual machine.
PAE stands for Physical Address Extension. Normally, if enabled and supported by the OS,
then even a 32-bit x86 CPU can access more than 4 GB of RAM. This is made possible
by adding another 4 bits to memory addresses, so that with 36 bits, up to 64 GB can be
addressed. Some OSes, such as Ubuntu Server, require PAE support from the CPU and
cannot be run in a virtual machine without it.
• Enable Nested VT-x/AMD-V: Enables nested virtualization, with passthrough of hardware
virtualization functions to the guest VM.
With virtual machines running modern server OSes, Oracle VM VirtualBox also supports CPU
hot-plugging. For details, see chapter 10.4, CPU Hot-Plugging, page 338.
76
4 Configuring Virtual Machines
4.5.3 Acceleration Tab
On this tab, you can configure Oracle VM VirtualBox to use hardware virtualization extensions
that your host CPU supports.
• Paravirtualization Interface: Oracle VM VirtualBox provides paravirtualization interfaces
to improve time-keeping accuracy and performance of guest OSes. The options available
are documented under the --paravirt-provider option in chapter 9.10, VBoxManage
modifyvm, page 180. For further details on the paravirtualization providers, see chapter
11.5, Paravirtualization Providers, page 396.
• Hardware Virtualization: You can configure hardware virtualization features for each
virtual machine.
- Enable Nested Paging: If the host CPU supports the nested paging (AMD-V) or EPT
(Intel VT-x) features, then you can expect a significant performance increase by en-
abling nested paging in addition to hardware virtualization. For technical details, see
chapter 11.6, Nested Paging and VPIDs, page 397. For Intel EPT security recommen-
dations, see chapter 14.4.1, CVE-2018-3646, page 419.
Advanced users may be interested in technical details about hardware virtualization. See
chapter 11.3, Hardware Virtualization, page 395.
In most cases, the default settings on the Acceleration tab will work well. Oracle VM
VirtualBox selects sensible defaults, depending on the OS that you selected when you created
the virtual machine. In certain situations, however, you may want to change the preconfigured
defaults.
4.6 Display Settings
The following tabs are available for configuring the display for a virtual machine.
4.6.1 Screen Tab
• Video Memory: Sets the size of the memory provided by the virtual graphics card available
to the guest, in MB. As with the main memory, the specified amount will be allocated from
the host’s resident memory. Based on the amount of video memory, higher resolutions and
color depths may be available.
VirtualBox Manager will show a warning if the amount of video memory is too small to be
able to switch the VM into full screen mode. The minimum value depends on the number
of virtual monitors, the screen resolution and the color depth of the host display as well as
on the use of 3D acceleration and 2D video acceleration. A rough estimate is (color depth /
8) x vertical pixels x horizontal pixels x number of screens = number of bytes. Extra memory
may be required if display acceleration is used.
• Monitor Count: With this setting, Oracle VM VirtualBox can provide more than one virtual
monitor to a virtual machine. If a guest OS supports multiple attached monitors, Oracle
VM VirtualBox can pretend that multiple virtual monitors are present. Up to eight such
virtual monitors are supported.
The output of the multiple monitors are displayed on the host in multiple VM windows
which are running side by side. However, in full screen and seamless mode, they use the
available physical monitors attached to the host. As a result, for full screen and seamless
modes to work with multiple monitors, you will need at least as many physical monitors as
you have virtual monitors configured, or Oracle VM VirtualBox will report an error.
77
4 Configuring Virtual Machines
You can configure the relationship between guest and host monitors using the View menu
by pressing Host key + Home when you are in full screen or seamless mode.
See also chapter 15, Known Limitations, page 421.
• Scale Factor: Enables scaling of the display size. For multiple monitor displays, you can set
the scale factor for individual monitors, or globally for all of the monitors. Use the slider
to select a scaling factor up to 200%.
You can set a default scale factor for all VMs. Use the Display tab in the Preferences
window.
• Graphics Controller: Specifies the graphics adapter type used by the guest VM. Note that
you must install the Guest Additions on the guest VM to specify the VBoxSVGA or VMSVGA
graphics controller. The following options are available:
- VBoxSVGA: The default graphics controller for new VMs that use Windows 7 or later.
This graphics controller improves performance and 3D support when compared to the
legacy VBoxVGA option.
- VBoxVGA: Use this graphics controller for legacy guest OSes. This is the default
graphics controller for Windows versions before Windows 7 and for Oracle Solaris.
3D acceleration is not supported for this graphics controller.
- VMSVGA: Use this graphics controller to emulate a VMware SVGA graphics device.
This is the default graphics controller for Linux guests.
- None: Does not emulate a graphics adapter type.
• Enable 3D Acceleration: If a virtual machine has Guest Additions installed, you can se-
lect here whether the guest should support accelerated 3D graphics. See chapter 5.5.1,
Hardware 3D Acceleration (OpenGL and Direct3D 8/9), page 102.
4.6.2 Remote Display Tab
On the Remote Display tab, if the VirtualBox Remote Display Extension (VRDE) is installed,
you can enable the VRDP server that is built into Oracle VM VirtualBox. This enables you to
connect to the console of the virtual machine remotely with any standard RDP viewer, such as
mstsc.exe that comes with Microsoft Windows. On Linux and Oracle Solaris systems you can
use the standard open source rdesktop program. These features are described in chapter 8.1,
Remote Display (VRDP Support), page 143.
• Enable Server: Select this check box and configure settings for the remote display connec-
tion.
4.6.3 Recording Tab
On the Recording tab you can enable video and audio recording for a virtual machine and
change related settings. Note that these features can be enabled and disabled while a VM is
running.
• Enable Recording: Select this check box and select a Recording Mode option.
• Recording Mode: You can choose to record video, audio, or both video and audio.
Some settings on the Recording tab may be grayed out, depending on the Recording Mode
setting.
• File Path: The file where the recording is saved.
78
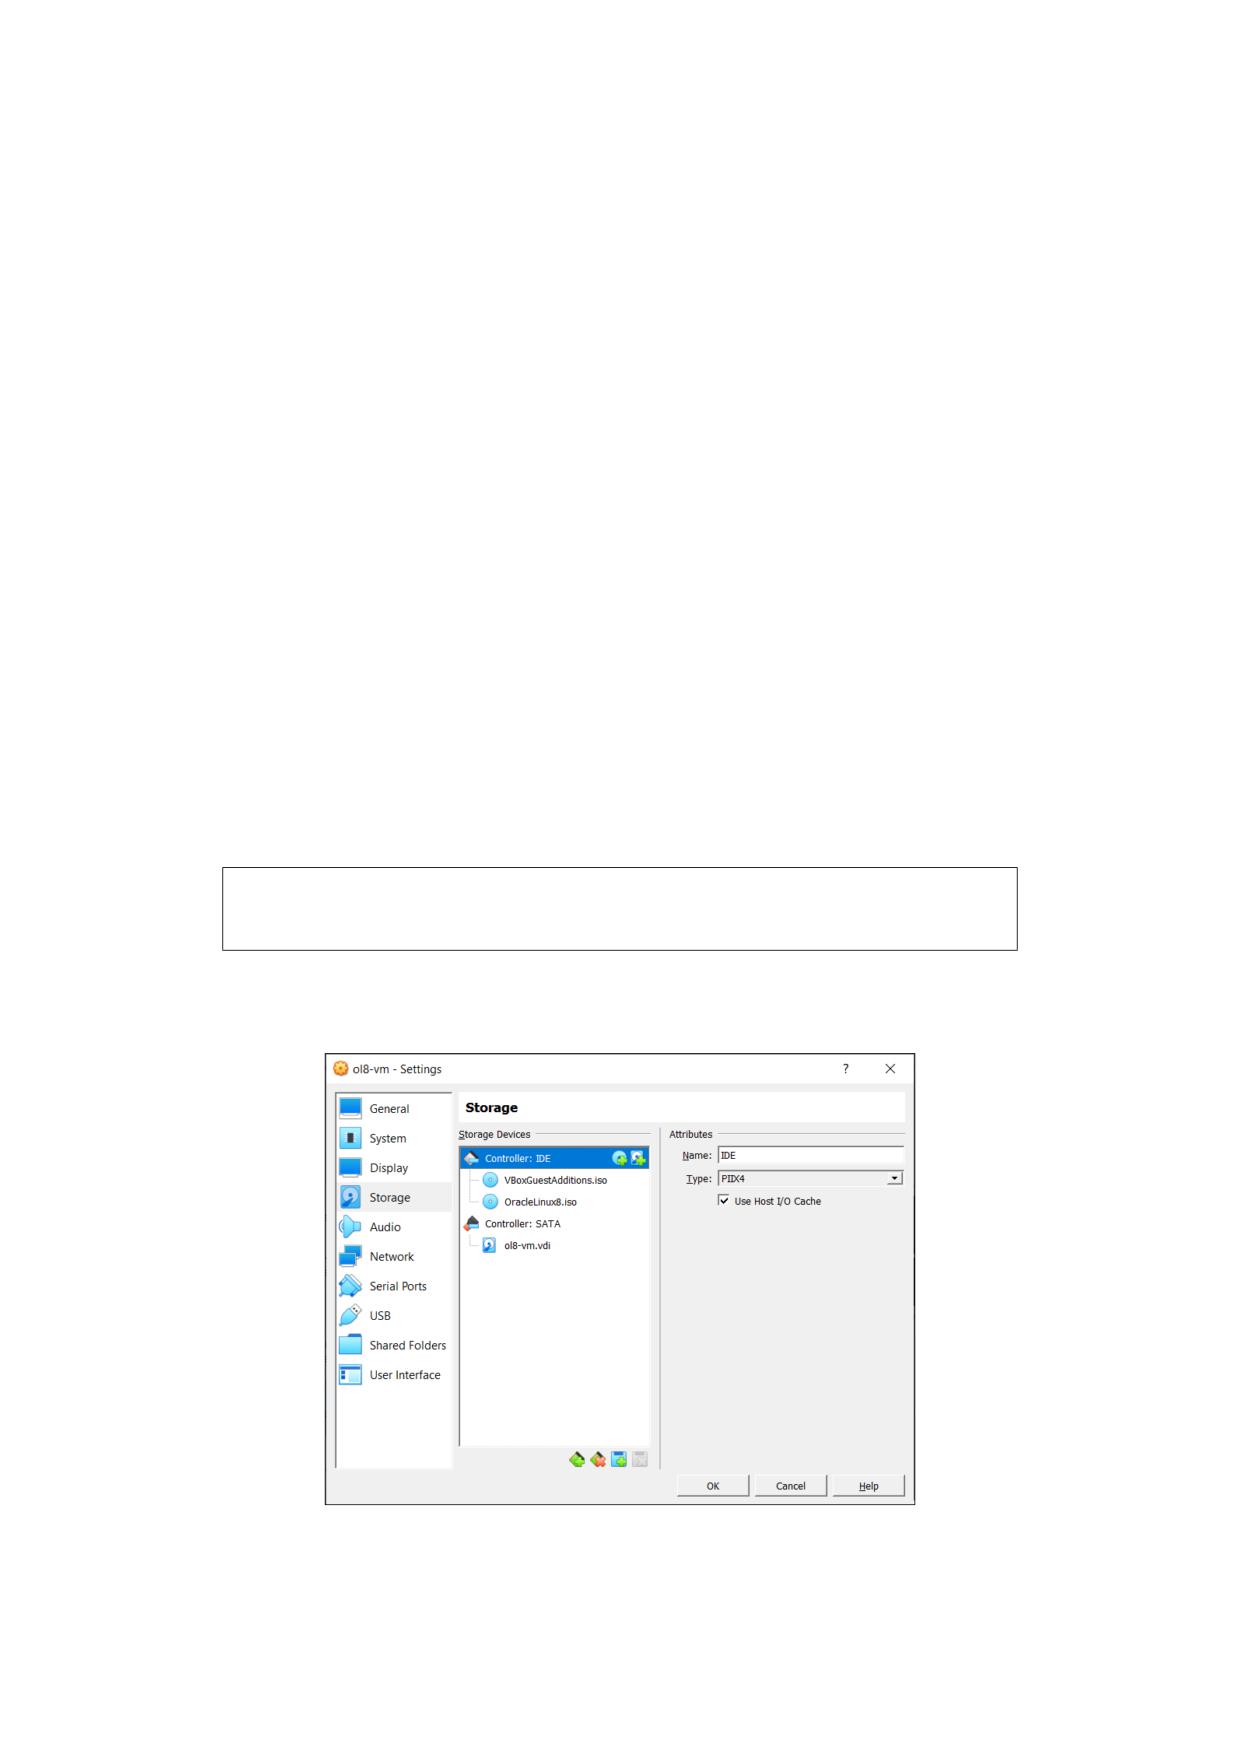
4 Configuring Virtual Machines
• Frame Size: The video resolution of the recorded video, in pixels. The drop-down list
enables you to select from common frame sizes.
• Frame Rate: Use the slider to set the maximum number of video frames per second (FPS)
to record. Frames that have a higher frequency are skipped. Increasing this value reduces
the number of skipped frames and increases the file size.
• Video Quality: Use the slider to set the the bit rate of the video in kilobits per second.
Increasing this value improves the appearance of the video at the cost of an increased file
size.
• Audio Quality: Use the slider to set the quality of the audio recording. Increasing this
value improves the audio quality at the cost of an increased file size.
• Screens: For a multiple monitor display, you can select which screens to record video from.
As you adjust the video and audio recording settings, the approximate output file size for a
five minute video is shown.
4.7 Storage Settings
The Storage category in the VM settings enables you to connect virtual hard disk, CD/DVD, and
floppy images and drives to your virtual machine.
In a real computer, so-called storage controllers connect physical disk drives to the rest of
the computer. Similarly, Oracle VM VirtualBox presents virtual storage controllers to a virtual
machine. Under each controller, the virtual devices, such as hard disks, CD/DVD or floppy
drives, attached to the controller are shown.
Note: This section gives a quick introduction to the Oracle VM VirtualBox storage
settings. See chapter 6, Virtual Storage, page 111 for a full description of the available
storage settings in Oracle VM VirtualBox.
If you have used the Create Virtual Machine wizard to create a machine, you will normally
see something like the following:
79
4 Configuring Virtual Machines
Depending on the guest OS type that you selected when you created the VM, a new VM
includes the following storage devices:
• IDE controller. A virtual CD/DVD drive is attached to device 0 on the secondary channel
of the IDE controller.
• SATA controller. This is a modern type of storage controller for higher hard disk data
throughput, to which the virtual hard disks are attached. Initially you will normally have
one such virtual disk, but as shown in the previous screenshot, you can have more than
one. Each is represented by a disk image file, such as a VDI file in this example.
If you created your VM with an older version of Oracle VM VirtualBox, the default storage
layout may differ. You might then only have an IDE controller to which both the CD/DVD drive
and the hard disks have been attached. This might also apply if you selected an older OS type
when you created the VM. Since older OSes do not support SATA without additional drivers,
Oracle VM VirtualBox will make sure that no such devices are present initially. See chapter 6.1,
Hard Disk Controllers, page 111.
Oracle VM VirtualBox also provides a floppy controller. You cannot add devices other than
floppy drives to this controller. Virtual floppy drives, like virtual CD/DVD drives, can be con-
nected to either a host floppy drive, if you have one, or a disk image, which in this case must be
in RAW format.
You can modify these media attachments freely. For example, if you wish to copy some files
from another virtual disk that you created, you can connect that disk as a second hard disk, as in
the above screenshot. You could also add a second virtual CD/DVD drive, or change where these
items are attached. The following options are available:
• To add another virtual hard disk, or a CD/DVD or floppy drive, select the storage con-
troller to which it should be added (such as IDE, SATA, SCSI, SAS, floppy controller) and
then click the Add Disk button below the tree. You can then either select Optical Drive
or Hard Disk. If you clicked on a floppy controller, you can add a floppy drive instead.
Alternatively, right-click on the storage controller and select a menu item there.
A dialog is displayed, enabling you to select an existing disk image file or to create a new
disk image file. Depending on the type of disk image, the dialog is called Hard Disk
Selector, Optical Disk Selector, or Floppy Disk Selector.
See chapter 6.2, Disk Image Files (VDI, VMDK, VHD, HDD), page 114 for information on the
image file types that are supported by Oracle VM VirtualBox.
For virtual CD/DVD drives, the image files will typically be in the standard ISO format
instead. Most commonly, you will select this option when installing an OS from an ISO
file that you have obtained from the Internet. For example, most Linux distributions are
available in this way.
Depending on the type of disk image, you can set the following Attributes for the disk
image in the right part of the Storage settings page:
- The device slot of the controller that the virtual disk is connected to. IDE controllers
have four slots: primary device 0, primary device 1, secondary device 0, and sec-
ondary device 1. By contrast, SATA and SCSI controllers offer you up to 30 slots for
attaching virtual devices.
- Solid-state Drive presents a virtual disk to the guest as a solid-state device.
- Hot-pluggable presents a virtual disk to the guest as a hot-pluggable device.
- For virtual CD/DVD drives, you can select Live CD/DVD. This means that the virtual
optical disk is not removed from when the guest system ejects it.
• To remove an attachment, either select it and click on the Remove icon at the bottom, or
right-click on it and select the menu item.
80
4 Configuring Virtual Machines
Removable media, such as CD/DVDs and floppies, can be changed while the guest is running.
Since the Settings window is not available at that time, you can also access these settings from
the Devices menu of your virtual machine window.
4.8 Audio Settings
The Audio section in a virtual machine’s Settings window determines whether the VM will detect
a connected sound card, and if the audio output should be played on the host system.
To enable audio for a guest, select the Enable Audio check box. The following settings are
available:
• Host Audio Driver: The audio driver that Oracle VM VirtualBox uses on the host.
The Default option is enabled by default for all new VMs. This option selects the best
audio driver for the host platform automatically. This enables you to move VMs between
different platforms without having to change the audio driver.
On a Linux host, depending on your host configuration, you can select between the OSS,
ALSA, or the PulseAudio subsystem. On newer Linux distributions, the PulseAudio subsys-
tem is preferred.
Only OSS is supported on Oracle Solaris hosts. The Oracle Solaris Audio audio backend is
no longer supported on Oracle Solaris hosts.
• Audio Controller: You can choose between the emulation of an Intel AC’97 controller, an
Intel HD Audio controller, or a SoundBlaster 16 card.
• Enable Audio Output: Enables audio output only for the VM.
• Enable Audio Input: Enables audio input only for the VM.
4.9 Network Settings
The Network section in a virtual machine’s Settings window enables you to configure how
Oracle VM VirtualBox presents virtual network cards to your VM, and how they operate.
When you first create a virtual machine, Oracle VM VirtualBox by default enables one virtual
network card and selects the Network Address Translation (NAT) mode for it. This way the guest
can connect to the outside world using the host’s networking and the outside world can connect
to services on the guest which you choose to make visible outside of the virtual machine.
This default setup is good for the majority of Oracle VM VirtualBox users. However, Oracle
VM VirtualBox is extremely flexible in how it can virtualize networking. It supports many virtual
network cards per virtual machine. The first four virtual network cards can be configured in
detail in VirtualBox Manager. Additional network cards can be configured using the VBoxManage
command.
Many networking options are available. See chapter 7, Virtual Networking, page 128 for more
information.
4.10 Serial Ports
Oracle VM VirtualBox supports the use of virtual serial ports in a virtual machine.
Ever since the original IBM PC, personal computers have been equipped with one or two
serial ports, also called COM ports by DOS and Windows. Serial ports were commonly used
with modems, and some computer mice used to be connected to serial ports before USB became
commonplace.
81
4 Configuring Virtual Machines
While serial ports are no longer as common as they used to be, there are still some important
uses left for them. For example, serial ports can be used to set up a primitive network over
a null-modem cable, in case Ethernet is not available. Also, serial ports are indispensable for
system programmers needing to do kernel debugging, since kernel debugging software usually
interacts with developers over a serial port. With virtual serial ports, system programmers can
do kernel debugging on a virtual machine instead of needing a real computer to connect to.
If a virtual serial port is enabled, the guest OS sees a standard 16550A compatible UART
device. Other UART types can be configured using the VBoxManage modifyvm command. Both
receiving and transmitting data is supported. How this virtual serial port is then connected to
the host is configurable, and the details depend on your host OS.
You can use either the Settings tabs or the VBoxManage command to set up virtual serial ports.
For the latter, see chapter 9.10, VBoxManage modifyvm, page 180 for information on the --uart,
--uart-mode and --uart-type options.
You can configure up to four virtual serial ports per virtual machine. For each device, you must
set the following:
1.
Port Number: This determines the serial port that the virtual machine should see. For best
results, use the traditional values as follows:
• COM1: I/O base 0x3F8, IRQ 4
• COM2: I/O base 0x2F8, IRQ 3
• COM3: I/O base 0x3E8, IRQ 4
• COM4: I/O base 0x2E8, IRQ 3
You can also configure a user-defined serial port. Enter an I/O base address and interrupt
(IRQ).
2.
Port Mode: What the virtual port is connected to. For each virtual serial port, you have
the following options:
• Disconnected: The guest will see the device, but it will behave as if no cable had
been connected to it.
• Host Device: Connects the virtual serial port to a physical serial port on your host.
On a Windows host, this will be a name like COM1. On Linux or Oracle Solaris hosts, it
will be a device node like /dev/ttyS0. Oracle VM VirtualBox will then simply redirect
all data received from and sent to the virtual serial port to the physical device.
• Host Pipe: Configure Oracle VM VirtualBox to connect the virtual serial port to a
software pipe on the host. This depends on your host OS, as follows:
- On a Windows host, data will be sent and received through a named pipe. The
pipe name must be in the format \\.\pipe\name where name should identify the
virtual machine but may be freely chosen.
- On a Mac OS, Linux, or Oracle Solaris host, a local domain socket is used in-
stead. The socket filename must be chosen such that the user running Oracle VM
VirtualBox has sufficient privileges to create and write to it. The /tmp directory is
often a good candidate.
On Linux there are various tools which can connect to a local domain socket or
create one in server mode. The most flexible tool is socat and is available as part
of many distributions.
In this case, you can configure whether Oracle VM VirtualBox should create the named
pipe, or the local domain socket non-Windows hosts, itself or whether Oracle VM
VirtualBox should assume that the pipe or socket exists already. With the VBoxManage
command-line options, this is referred to as server mode or client mode, respectively.
For a direct connection between two virtual machines, corresponding to a null-modem
cable, simply configure one VM to create a pipe or socket and another to attach to it.
82
4 Configuring Virtual Machines
• Raw File: Send the virtual serial port output to a file. This option is very useful for
capturing diagnostic output from a guest. Any file may be used for this purpose, as
long as the user running Oracle VM VirtualBox has sufficient privileges to create and
write to the file.
• TCP: Useful for forwarding serial traffic over TCP/IP, acting as a server, or it can act
as a TCP client connecting to other servers. This option enables a remote machine to
directly connect to the guest’s serial port using TCP.
- TCP Server: Deselect the Connect to Existing Pipe/Socket check box and spec-
ify the port number in the Path/Address field. This is typically 23 or 2023. Note
that on UNIX-like systems you will have to use a port a number greater than 1024
for regular users.
The client can use software such as PuTTY or the telnet command line tool to
access the TCP Server.
- TCP Client: To create a virtual null-modem cable over the Internet or LAN,
the other side can connect using TCP by specifying hostname:port in the
Path/Address field. The TCP socket will act in client mode if you select the
Connect to Existing Pipe/Socket check box.
Up to four serial ports can be configured per virtual machine, but you can pick any port
numbers out of the above. However, serial ports cannot reliably share interrupts. If both ports
are to be used at the same time, they must use different interrupt levels, for example COM1 and
COM2, but not COM1 and COM3.
4.11 USB Support
4.11.1 USB Settings
The USB section in a virtual machine’s Settings window enables you to configure Oracle VM
VirtualBox’s sophisticated USB support.
Oracle VM VirtualBox can enable virtual machines to access the USB devices on your host di-
rectly. To achieve this, Oracle VM VirtualBox presents the guest OS with a virtual USB controller.
As soon as the guest system starts using a USB device, it will appear as unavailable on the host.
Note:
• Be careful with USB devices that are currently in use on the host. For example, if
you allow your guest to connect to your USB hard disk that is currently mounted
on the host, when the guest is activated, it will be disconnected from the host
without a proper shutdown. This may cause data loss.
• Oracle Solaris hosts have a few known limitations regarding USB support. See
chapter 15, Known Limitations, page 421.
In addition to allowing a guest access to your local USB devices, Oracle VM VirtualBox even
enables your guests to connect to remote USB devices by use of the VirtualBox Remote Desktop
Extension (VRDE). See chapter 8.1.4, Remote USB, page 147.
To enable USB for a VM, select the Enable USB Controller check box. The following settings
are available:
• USB Controller: Selects a controller with the specified level of USB support, as follows:
- OHCI for USB 1.1
83
4 Configuring Virtual Machines
- EHCI for USB 2.0. This also enables OHCI.
- xHCI for USB 3.0. This supports all USB speeds.
• USB Device Filters: When USB support is enabled for a VM, you can determine in detail
which devices will be automatically attached to the guest. For this, you can create filters by
specifying certain properties of the USB device. USB devices with a matching filter will be
automatically passed to the guest once they are attached to the host. USB devices without
a matching filter can be passed manually to the guest, for example by using the Devices,
USB menu.
Clicking on the + button to the right of the USB Device Filters window creates a new
filter. You can give the filter a name, for later reference, and specify the filter criteria. The
more criteria you specify, the more precisely devices will be selected. For instance, if you
specify only a vendor ID of 046d, all devices produced by Logitech will be available to the
guest. If you fill in all fields, on the other hand, the filter will only apply to a particular
device model from a particular vendor, and not even to other devices of the same type with
a different revision and serial number.
In detail, the following criteria are available:
- Vendor and Product ID. With USB, each vendor of USB products carries an identi-
fication number that is unique world-wide, called the vendor ID. Similarly, each line
of products is assigned a product ID number. Both numbers are commonly written
in hexadecimal, and a colon separates the vendor from the product ID. For example,
046d:c016 stands for Logitech as a vendor, and the M-UV69a Optical Wheel Mouse
product.
Alternatively, you can also specify Manufacturer and Product by name.
To list all the USB devices that are connected to your host machine with their respec-
tive vendor IDs and product IDs, use the following command:
VBoxManage list usbhost
On Windows, you can also see all USB devices that are attached to your system in the
Device Manager. On Linux, you can use the lsusb command.
- Serial Number. While vendor ID and product ID are quite specific to identify USB
devices, if you have two identical devices of the same brand and product line, you
will also need their serial numbers to filter them out correctly.
- Remote. This setting specifies whether the device will be local only, remote only, such
as over VRDP, or either.
On a Windows host, you will need to unplug and reconnect a USB device to use it after
creating a filter for it.
As an example, you could create a new USB filter and specify a vendor ID of 046d for
Logitech, Inc, a manufacturer index of 1, and “not remote”. Then any USB devices on the
host system produced by Logitech, Inc with a manufacturer index of 1 will be visible to the
guest system.
Several filters can select a single device. For example, a filter which selects all Logitech
devices, and one which selects a particular webcam.
You can deactivate filters without deleting them by deselecting the check box next to the
filter name.
4.11.2 Implementation Notes for Windows and Linux Hosts
On Windows hosts, a kernel mode device driver provides USB proxy support. It implements both
a USB monitor, which enables Oracle VM VirtualBox to capture devices when they are plugged
84
4 Configuring Virtual Machines
in, and a USB device driver to claim USB devices for a particular virtual machine. System reboots
are not necessary after installing the driver. Also, you do not need to replug devices for Oracle
VM VirtualBox to claim them.
On supported Linux hosts, Oracle VM VirtualBox accesses USB devices through special files in
the file system. When Oracle VM VirtualBox is installed, these are made available to all users in
the vboxusers system group. In order to be able to access USB from guest systems, make sure
that you are a member of this group.
4.12 Shared Folders
Shared folders enable you to easily exchange data between a virtual machine and your host. This
feature requires that the Oracle VM VirtualBox Guest Additions be installed in a virtual machine
and is described in detail in chapter 5.3, Shared Folders, page 97.
4.13 User Interface
The User Interface section enables you to change certain aspects of the user interface of the
selected VM.
• Menu Bar: This widget enables you to disable a complete menu, by clicking on the menu
name to deselect it. Menu entries can be disabled, by deselecting the check box next to the
entry. On Windows and Linux hosts, the complete menu bar can be disabled by deselecting
the check box on the right.
• Mini ToolBar: In full screen or seamless mode, Oracle VM VirtualBox can display a small
toolbar that contains some of the items that are normally available from the virtual ma-
chine’s menu bar. This toolbar reduces itself to a small gray line unless you move the
mouse over it. With the toolbar, you can return from full screen or seamless mode, control
machine execution, or enable certain devices. If you do not want to see the toolbar, disable
the Show in Full Screen/Seamless setting.
The Show at Top of Screen setting enables you to show the toolbar at the top of the screen,
instead of showing it at the bottom.
The Mini Toolbar is not available on macOS hosts.
• Status Bar: This widget enables you to disable and reorder icons on the status bar. Deselect
the check box of an icon to disable it, or rearrange icons by dragging and dropping the icon.
To disable the complete status bar deselect the check box on the left.
4.14 Alternative Firmware (EFI)
Oracle VM VirtualBox includes experimental support for the Extensible Firmware Interface (EFI),
which is an industry standard intended to replace the legacy BIOS as the primary interface for
bootstrapping computers and certain system services later.
By default, Oracle VM VirtualBox uses the BIOS firmware for virtual machines. To use EFI
for a given virtual machine, you can enable EFI in the machine’s Settings window. See chapter
4.5.1, Motherboard Tab, page 74. Alternatively, use the VBoxManage command line interface as
follows:
VBoxManage modifyvm "VM name" --firmware efi
To switch back to using the BIOS:
VBoxManage modifyvm "VM name" --firmware bios
85
//////////////////////////////////////////