Kia Sorento (2024 year). Manual in english - page 16
 

  Index      Kia     Kia Sorento (2024 year). Manual in english


Search            copyright infringement  


Content      ..     14      15      16      17     ..


Kia Sorento (2024 year). Manual in english - page 16


25

6

6

What to do in an emergency

If you have a flat tire (with tire mobility kit)

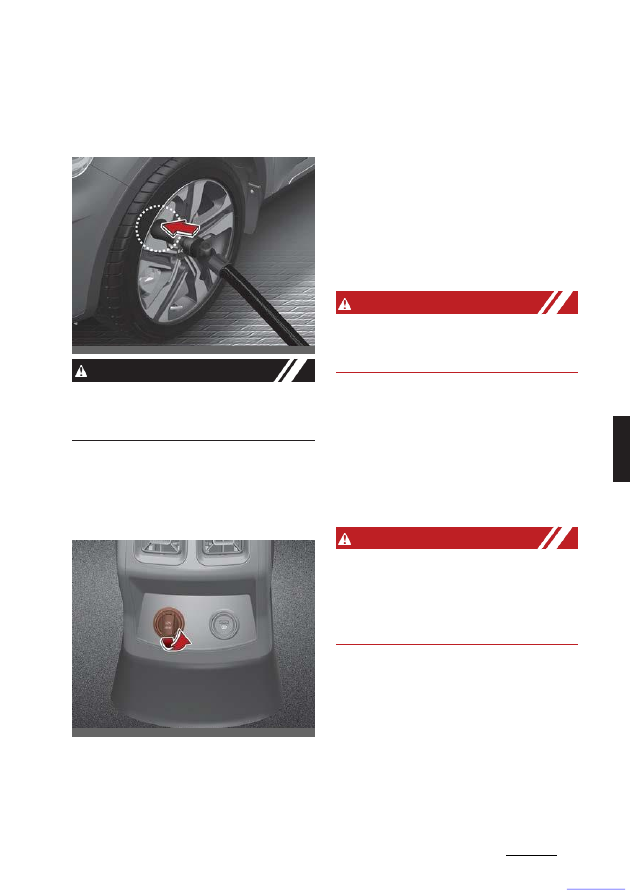
4. Unscrew the valve cap from the valve

of the defective tire and screw the fill

-

ing hose of the sealant bottle onto the
tire valve.

CAUTION

Securely install the sealant filling hose to
the valve. If not, sealant may flow back

-

ward, possibly clogging the filling hose.

5. Ensure that the compressor is 

switched off, position 0.

6. Connect between compressor and the 

vehicle power outlet using the cable 
and connectors.

7. Make the ENGINE START/STOP

but

-

ton position on or ignition switch

posi

-

tion on.

8. Switch on the compressor and let it run

for approximately 5~7 minutes to fill the
sealant up to proper pressure. (refer to
"Tires and wheels" on page 7- 44). The 
inflation pressure of the tire after filling
is unimportant and will be 
checked/corrected later. Be careful not
to overinflate the tire and stay away
from the tire when filling it. When the
tire and wheel are dam

-

aged, do not

use Tire Mobility Kit for your safety.

W ARNING

If the tire pressure is below 
26psi(180kPa), do not drive the vehicle. 
The tire may cause accident.

9.

Switch off the compressor.

10.

Detach the sealant feeling hoses from 

the sealant bottle connector and from 
the tire valve. After using, leave the 
sealant bottle and the compressor 
attached together.

Return the TMK to its storage location in 
the vehicle.

W ARNING

Carbon monoxide
Do not leave your vehicle running in a
poorly ventilated area for extended peri

-

ods of time. Carbon monoxide poisoning 
and suffocation can occur.

OMQ4H061007

OMQ4040076L

CarManuals2.com

What to do in an emergency

26

6

If you have a flat tire (with tire mobility kit)

Distributing the sealant

• Immediately drive approximately 7~10

km (4~6 miles or, about 10min) to
evenly distribute the sealant in the tire.

CAUTION

Do not exceed a speed of 80 km/h (50 
mph). If possible, do not fall below a
speed of 20 km/h (12 mph).

While driving, if you experience any 
unusual vibration, ride disturbance or 
noise, reduce your speed and drive with 
caution until you can safely pull off of the
side of the road. Call for road side 
service or towing.

When you use the Tire Mobility Kit, the 
wheel may be stained by sealant. There

-

fore, remove the wheel stained by seal

-

ant and have the vehicle inspected at a
professional workshop. Kia recommends 
to visit an authorized Kia dealer/service 
partner.

Checking the tire inflation pres

-

sure

1. After driving approximately 7~10 km 

(4~6 miles or about 10 min), stop at a
safety location.

2. Connect the filling hose of the com

-

pressor directly to the tire valve.

3. Connect between compressor and the 

vehicle power outlet using the cable 
and connectors.

4. Adjust the tire inflation pressure to the 

recommended tire inflation.

With the ignition switched on, proceed 
as follows.
• To increase the inflation pressure: 

Switch on the compressor. To
check the current inflation pressure 
setting, briefly switch off the com

-

pressor.

• To reduce the inflation pressure: 

Turn the valve on the compressor.

W ARNING

Do not let the compressor run for more 
than 10 minutes, otherwise the device 
will overheat and may be damaged.

OMQ4060011

OMQ4H061005

CarManuals2.com

27

6

6

What to do in an emergency

If you have a flat tire (with tire mobility kit)

CAUTION

If the inflation pressure is not main

-

tained, drive the vehicle a second time, 
refer to "Distributing the sealant" on 
page 6-26. Then repeat steps 1 to 4.

Use of the TMK may be ineffectual for 
tire damage larger than approximately 4
mm (0.16 of an inch).

We recommend that you contact a pro

-

fessional workshop if the tire cannot be
made roadworthy with the Tire Mobility 
Kit.

W ARNING

The tire inflation pressure must be at 
least 180 kPa (26 psi). If it is not, do not 
continue driving. Call for road side ser

-

vice or towing.

NOTICE

When reinstalling the repaired or 
replaced tire and wheel on the vehicle, 
tighten the wheel lug nut to 11~13 kgf·m 
(79~94 lbf·ft).

Notes on the safe use of the Tire 
Mobility Kit

• Park your car at the side of the road 

so that you can work with the TMK 
away from moving traffic. Place your 
warning triangle in a prominent place 
to make passing vehicles aware of 
your location.

• To be sure your vehicle will not move, 

even when you're on fairly level 
ground, always set your parking 
brake.

• Only use the TMK for sealing/inflation 

passenger car tires. Do not use on

CarManuals2.com

motorcycles, bicycles or any other 
type of tires.

• Do not remove any foreign objects-

such as nails or screws -that have 
penetrated the tire.

• Before using the TMK, read the pre

-

cautionary advice printed on the seal

-

ant bottle!

• Provided the car is outdoors, leave the 

engine running. Otherwise operating 
the compressor may eventually drain 
the car battery.

• Never leave the TMK unattended 

while it is being used.

• Do not leave the compressor running 

for more than 10 min. at a time or it 
may overheat.

• Do not use the TMK if the ambient 

temperature is below -30

°C (-22°F).

• When the tire and wheel are dam

-

aged, do not use Tire Mobility Kit for 
your safety.

Technical Data

• System voltage: DC 12 V

Working voltage: DC 12

V
• Amperage rating: max. 15 A
• Suitable for use at temperatures: -30 

to 70

°C (-22 to 158 °F)

• Max. working pressure: 7 bar (101 psi)

Size

- Compressor: 150 x 130 x 60 mm

(5.9 x 5.1 x 2.4 in.)

- Sealant bottle: 115.3 x 87.3 ø mm 

(4.5 x 3.4 ø in.)

- Compressor weight: 620 g (1.36 lbs)
- Sealant volume: 400 ml (24.4 cu. 

in.)

What to do in an emergency

28

6

Towing

*Sealant and spare parts can be 

obtained and replaced at an autho

-

rized vehicle or tire dealer. Empty seal

-

ant bottles may be disposed of at 
home. Liquid residue from the sealant 
should be disposed of by your vehicle 
or tire dealer or in accordance with local
waste disposal regulations.

Towing

Towing service

If emergency towing is necessary, have 
it done by authorized Kia dealer or a
commercial tow-truck service.

Proper lifting and towing procedures are 
necessary to prevent damage to the 
vehicle. The use of wheel dollies (1) or 
flatbed is recommended.

CAUTION

The AWD vehicle should never be towed 
with the wheels on the ground. This can 
cause serious damage to the transmis

-

sion or the AWD system.

W ARNING

Side and curtain air bag
If your vehicle is equipped with side and 
curtain air bag, set the ENGINE START/ 
STOP button to ACC position when the 
vehicle is being towed.

The side and curtain air bag may deploy 
when the ENGINE START/STOP
button

OMQ4060013

CarManuals2.com

29

6

6

What to do in an emergency

Towing

to ON position and the rollover sensor 
detects the situation as a rollover.

NOTICE

If the EPB does not release normally, 
take your vehicle to an authorized Kia 
dealer by loading the vehicle on a flat

-

bed tow truck and have the system 
checked.

Towing without wheel dollies 
when using a towing service

When towing your vehicle in an emer

-

gency without wheel dollies:

1. Set the ignition switch or ENGINE 

START/STOP button to ACC
position.

2. Place the shift lever in N (Neutral).

3. Release the parking brake.

2-wheel drive vehicle (front wheel drive)

CAUTION

Towing gear position
Failure to shift to N (Neutral) may cause 
internal damage to the vehicle.

CAUTION

• If any of the loaded wheels or suspen

-

sion components are damaged or the 
vehicle is being towed with the front 
wheels on the ground, use a towing 
dolly under the front wheels.

• Do not tow the vehicle backwards 

with the front wheels on the ground, 
as this may cause damage to the 
transmission.

2-wheel drive vehicle (front wheeldrive)

• Attaching straps to the chassis, sus

-

pension or other parts of the body can 
cause damage.

• Do not tow with sling-type equipment. 

Use wheel lift or flatbed equipment.

• Do not tow the vehicle with four wheels

in contact with the ground if it is the
vehicle equipped with AT or DCT.
Otherwise, the transmission will be
seriously damaged. Also, make sure
not to tow the vehicle connecting it with
other vehicles including camper vans.

W ARNING

• If you tow the vehicle while the front 

wheels are touching the ground, the 
vehicle motor may generate electricity 
and the motor components may be 
damaged or a fire may occur.

• When a vehicle fire occurs due to the 

battery, there is a risk of a second fire.

OMQ4060014

OMQ4060015

OMQ4060016

CarManuals2.com

What to do in an emergency

30

6

Towing

Contact the fire department when 
towing the vehicle.

CarManuals2.com

Maintenance

7

CarManuals2.com

Engine

compartment..................................................................... 7-5

Maintenance services.................................................................... 7-6

Owner maintenance ...................................................................... 7-7

Owner maintenance schedule ....................................................................7-
7

Scheduled maintenance service .................................................. 7-9

Scheduled maintenance service precaution........................................ 7-9

Explanation of scheduled maintenance items......................... 7-13

Engine oil and filter ........................................................................................7-13

Drive

belts...........................................................................................................7-

13

Fuel filter .............................................................................................................7-
13

Fuel lines, fuel hoses and connections ..................................................7-13

Fuel tank and fuel cap ................................................................................. 7-

14

Vacuum crankcase ventilation hoses.................................................... 7-

14

Air cleaner filter............................................................................................... 

7-14

Spark

plugs ....................................................................................................... 7-

14

Cooling

system................................................................................................ 7-

14

Coolant................................................................................................................ 7-

14

Dual clutch transmission fluid .................................................................. 7-14

Automatic transmission fluid .................................................................... 7-14

Brake hoses and lines .................................................................................. 7-
15

Parking brake .................................................................................................. 7-
15

Brake fluid ......................................................................................................... 7-
15

Exhaust pipe and muffler ........................................................................... 7-
15

Brake discs, pads and calipers................................................................. 7-
15

Suspension mounting bolts ....................................................................... 7-
15

Steering gear box, linkage & boots/lower arm ball joint............... 7-15

7

Maintenance

CarManuals2.com

Engine oil ...................................................................................... 7-16

Checking the engine oil level.....................................................................7-
16

Changing the engine oil and filter...........................................................7-17

Engine coolant ............................................................................. 7-18

Checking the coolant level......................................................................... 7-
18

Changing

the

coolant...................................................................................7-

20

Brake fluid .................................................................................... 7-21

Checking the brake fluid level................................................................... 7-
21

Washer fluid ................................................................................. 7-22

Checking the washer fluid level .............................................................. 7-
22

Parking brake ...............................................................................7-23

Checking the parking brake...................................................................... 7-
23

Air cleaner.....................................................................................7-23

Filter

replacement.......................................................................................... 7-

23 Climate control air filter..............................................................7-25

Filter inspection .............................................................................................. 7-

25

Wiper blades.................................................................................7-26

Blade inspection ............................................................................................. 7-
26

Blade replacement ........................................................................................ 7-
26

Battery...........................................................................................7-29

For best battery service .............................................................................. 7-
29

Battery recharging ........................................................................................7-
30

Reset

items ........................................................................................................7-

31

Tires and wheels .......................................................................... 7-31

Checking tire inflation pressure .............................................................. 7-32

Tire rotation ...................................................................................................... 7-33

Maintenance

7

CarManuals2.com

Tire maintenance ...........................................................................................7-
34

Tire sidewall labeling ....................................................................................7-
35

Tire terminology and definitions ............................................................. 7-37

All season tires.................................................................................................7-39

Summer

tires....................................................................................................7-

39

Snow tires ..........................................................................................................7-
39

Radial-ply tires................................................................................................ 7-
40

Low aspect ratio tires .................................................................................. 7-
40

Fuses ............................................................................................. 7-41

Inner panel fuse replacement ..................................................................7-43

Engine compartment fuse replacement ..............................................7-43

Fuse/relay panel description.................................................................... 7-44

Light

bulbs.................................................................................... 7-55

Bulb replacement precaution ...................................................................7-55

Light bulb position (Front)..........................................................................7-56

Light bulb position (Rear) ...........................................................................7-
57

Light bulb position (Side)............................................................................7-
58

Replacing headlamp (Low beam/High beam), position lamp/ 

daytime running lamp, turn signal lamp (LED type).......................7-58

Replacing front turn signal lamp (Bulb type) ....................................7-58

Replacing front fog lamp (LED type).....................................................7-59

Replacing front side marker lamp bulb (LED type) ........................7-59

Replacing side repeater lamp (LED type)............................................7-

59

Replacing stop and taillamp (Bulb type) ............................................ 7-60

Replacing rear turn signal lamp (Bulb type) ...................................... 7-61

Replacing rear turn signal lamp, stop and taillamp, rear side

marker lamp (LED type) .............................................................................. 7-
62

Replacing reversing lamp (bulb type)................................................... 7-62

Replacing high mounted stop lamp (LED type) ...............................7-63

Replacing license plate lamp (LED type) .............................................7-

7

Maintenance

CarManuals2.com

Replacing room lamp (Bulb type)...........................................................7-
64

Replacing personal lamp (LED type).....................................................7-
65

Replacing vanity mirror lamp (Bulb type)...........................................7-65

Replacing glove box lamp (Bulb type) .................................................7-
66

Replacing luggage lamp (Bulb type).....................................................7-
66

Replacing luggage lamp (LED type)...................................................... 7-
67

Appearance care..........................................................................7-67

Exterior

care ..................................................................................................... 7-

67

Interior care ...................................................................................................... 7-
72

Emission control system .............................................................7-74

5

7

7

Maintenance

Engine compartment

Maintenance

Engine compartment

Smartstream G2.5 GDi (Gasoline)

Smartstream G2.5 T-GDi (Gasoline)

*The actual engine room in the vehicle may differ from the illustration.

1. Engine coolant reservoir

2. Brake fluid reservoir

3. Air cleaner

4. Engine oil dipstick

5. Engine oil filler cap

6. Windshield washer fluid reservoir

7. Fuse box

8. Negative battery terminal

9. Positive battery terminal

OMQ4A070113

OMQ4070001

CarManuals2.com

Maintenance

6

7

Maintenance services

Maintenance services

You should exercise the utmost care to 
prevent damage to your vehicle and 
injury to yourself whenever performing 
any maintenance or inspection proce

-

dures.

Should you have any doubts concerning 
the inspection or servicing of your vehi

-

cle, have an authorized Kia dealer per

-

form this work.

An authorized Kia dealer has factory-
trained technicians and genuine Kia 
parts to service your vehicle properly. 
For expert advice and quality service, 
see an authorized Kia dealer.

Inadequate, incomplete or insufficient 
servicing may result in operational prob

-

lems with your vehicle that could lead to 
vehicle damage, an accident, or personal 
injury.

Owner's responsibility

NOTICE

Maintenance Service and Record Reten

-

tion are the owner's responsibility.

You should retain documents that show 
proper maintenance has been per

-

formed on your vehicle in accordance 
with the scheduled maintenance service 
charts shown on the following pages.
You need this information to establish 
your compliance with the servicing and 
maintenance requirements of your vehi

-

cle warranties.
Detailed warranty information is pro

-

vided in your Warranty & Consumer 
Information manual.

Repairs and adjustments required as a
result of improper maintenance or a lack 
of required maintenance are not cov

-

ered.

Have your vehicle maintained and 
repaired by an authorized Kia dealer. 
Authorized Kia dealers meet Kia's high 
service quality standards and receive 
technical support from Kia in order to 
provide you with a high level of service 
satisfaction.

Owner maintenance precautions

Improper or incomplete service may
result in problems. This section gives
instructions only for the maintenance
items that are easy to perform.

As explained earlier in this section, sev

-

eral procedures can be done only by an
authorized Kia dealer with special tools.

NOTICE

Improper owner maintenance during the 
warranty period may affect warranty 
coverage. For details, read the separate 
Warranty & Consumer Information man

-

ual provided with the vehicle. If you're 
unsure about any servicing or mainte

-

nance procedure, have it done by an 
authorized Kia dealer.

W ARNING

Maintenance work
Do not wear jewelry or loose clothing 
while working under the hood of your 
vehicle with the engine running. These 
items can become entangled in moving 
parts, if you must run the engine while 
working under the hood, make certain 
that you remove all jewelry (especially 
rings, bracelets, watches, and necklaces) 
and all neckties, scarves, and similar 
loose clothing before getting near cool

-

ing fans.

CarManuals2.com

7

7

7

Maintenance

Owner maintenance

W ARNING

Touching metal parts
Do not touch metal parts (including strut 
bars) while the vehicle is operating or hot.
Doing so could result in serious bodily
injury. Turn the vehicle off and wait until
the metal parts cool down to
perform maintenance work on the vehi

-

cle.

Owner maintenance

The following lists are vehicle checks 
and inspections that should be per

-

formed by the owner or an authorized 
Kia dealer at the frequencies indicated 
to help ensure safe, dependable opera

-

tion of your vehicle.

Any adverse conditions should be 
brought to the attention of your dealer 
as soon as possible.

These owner maintenance checks are 
generally not covered by warranties and 
you may be charged for labor, parts and 
lubricants used.

Owner maintenance schedule

When you stop for fuel:

• Check the coolant level in coolant res

-

ervoir.

• Check the windshield washer fluid 

level.

• Look for low or under-inflated tires.

Check if the front of the radiator and
condenser are clean and not blocked 
with leaves, dirt or insects etc. If any
of the above parts are extremely dirty
or you are not sure of their condition,
take your vehicle to an authorized Kia
dealer.

W ARNING

Hot coolant

Be careful when checking your 
engine coolant level when the 
engine is hot. Scalding hot cool

-

ant and steam may blow out

under pressure.

CarManuals2.com

Maintenance

8

CarManuals2.com

7

Owner maintenance

While operating your vehicle:

• Note any changes in the sound of the 

exhaust or any smell of exhaust fumes
in the vehicle.

• Check for vibrations in the steering 

wheel. Notice any increased steering 
effort or looseness in the steering 
wheel, or change in its straight-ahead 
position.

• Notice if your vehicle constantly turns 

slightly or "pulls" to one side when 
traveling on smooth, level road.

• When stopping, listen and check for 

unusual sounds, pulling to one side, 
increased brake pedal travel or "hard-
to-push" brake pedal.

• If any slipping or changes in the oper

-

ation of your transmission occurs,
take your vehicle to an authorized Kia 
dealer.

• Check the transmission P (Park) func

-

tion.

• Check the parking brake.
• Check for fluid leaks under your vehi

-

cle (water dripping from the air condi

-

tioning system during or after use is 
normal).

At least monthly:

• Check the coolant level in the coolant 

reservoir.

• Check the operation of all exterior 

lights, including the stoplights, turn 
signals and hazard warning flashers.

• Check the inflation pressures of all 

tires including the spare for tires that 
are worn, show uneven wear, or are 
damaged.

• Check for loose wheel lug nuts.

At least once every 6 months:

• Check the radiator, heater and air 

conditioning hoses for leaks or dam

-

age.

• Check the windshield washer spray 

and wiper operation. Clean the wiper 
blades with clean cloth dampened 
with washer fluid.

• Check the headlamp alignment.
• Check the muffler, exhaust pipes, 

shields and clamps.

• Check the lap/shoulder belts for wear 

and function.

At least once a year:

• Clean the body and door drain holes.

Lubricate the door hinges and check
the hood hinges.

• Lubricate the door and hood locks 

and latches.

• Lubricate the door rubber weather

-

strips.

• Check the air conditioning system.

Inspect and lubricate transmission
linkage and controls.

• Clean the battery and terminals.

Check the brake fluid level.

• Visually inspect steering, suspension, 

and chassis components for dam

-

aged, loose, or missing parts or signs 
of wear.

9

7

7

Maintenance

Scheduled maintenance service

Scheduled maintenance ser

-

vice

Scheduled maintenance service 
precaution

Follow the Normal Maintenance Sched

-

ule if the vehicle is usually operated 
where none of the following conditions 
apply. If any of the following conditions 
apply, follow the Maintenance Under 
Severe Usage Conditions.
• Repeated driving short distance of

less than 8 km (5 miles) in normal
temperature or less than 16 km (10
miles) in freezing temperature

• Extensive engine idling or low speed

driving for long distances

• Driving on rough, dusty, muddy, 

unpaved, graveled or salt-spread 
roads

• Driving in areas using salt or other

corrosive materials or in very cold
weather

• Driving in heavy dust condition

Driving in heavy traffic area

• Driving on uphill, downhill, or moun

-

tain road repeatedly

• Using for towing or camping and driv

-

ing with loading on the roof

• Driving as a patrol car, taxi, other 

commercial use of vehicle towing

• Frequently driving under high speed 

or rapid acceleration/deceleration.

• Frequently driving in stop-and-go 

condition

If your vehicle operates under the fol

-

lowing conditions, you should inspect, 
replace or refill more frequently or follow 
the 'Severe' Maintenance schedule. After 
the periods or distance shown in the 
chart, continue to follow the prescribed 
maintenance intervals.

NOTICE

The vehicle may be equipped with the 
Oil Life Management System that pre

-

dicts engine oil life based on the

driver’s 

driving history and alerts the driver to 
change engine oil.
• If the deterioration of the engine oil 

increases depending on the

driver’s 

driving severity, the remaining oil life 
alert appears on the instrument clus

-

ter before the normal engine oil 
replacement interval. Have the engine 
oil and filter be changed by an autho

-

rized Kia dealer.

• Oil Life Management System when 

the recommended engine oil is used. 
So, if recommended engine oil is not 
used, replace the engine oil according 
to the maintenance schedule under 
severe usage condition.

Also, check the amount of engine oil 
regularly as this system assumes that 
the engine oil is being filled normally.

• Always reset the remaining engine oil 

life whenever the engine oil is 
changed. Otherwise, the Oil Life Man

-

agement System will not be correct.

• If there is no alert until the maximum

maintenance interval, have vehicle be
checked by an authorized Kia dealer.

CarManuals2.com

Maintenance

10

CarManuals2.com

7

Scheduled maintenance service

Normal maintenance schedule

The following maintenance services must be performed to ensure good emission 
control and performance. Keep receipts for all vehicle services to protect your war

-

ranty. Where both mileage and date are shown, the frequency of service is deter

-

mined by whichever occurs first.

I: Inspect and if necessary, adjust, correct, clean or replace.

R: Replace or change.

Number of months or driving distance, whichever comes first

Months

12

24

36

48

60

72

84

96

108 120 132 144

Miles

×1,000

8

16

24

32

40

48

56

64

72

80

88

96

Km

×1,000

13

26

39

52

65

78

91

104 117 130 143 156

Tire rotation

Rotate every 13,000 km (8,000 miles)

Fuel additives

*1

Add every 13,000 km (8,000 miles) or 12months

Engine oil and

engine oil filter

*2

Smartstream G2.5 GDi

R

R

R

R

R

R

R

R

R

R

R

R

Smartstream G2.5 T-GDi

Climate control air filter

I

R

I

R

I

R

I

R

I

R

I

R

Air cleaner filter(Engine)

I

I

R

I

I

R

I

I

R

I

I

R

Brake fluid

lnspect every 12,000 km (7,500 miles) or 12months,

Replace every 48,000 km (30,000 miles) or 48 months

Spark plugs

Smartstream G2.5 GDi

Replace every 156,000 km (96,000 miles)

Smartstream G2.5 T-GDi

Replace every 78,000 km (48,000 miles)

Coolant (Engine)

*3

At first, replace at 195,000 km (120,000 miles) or 120 months

After that, replace every 39,000 km (24,000 miles) or 24 months

Air conditioner refrigerant

I

I

I

I

I

I

I

I

I

I

I

I

Air conditioner compressor

Battery condition

Vacuum hoses

Brake discs and pads

Brake lines, hoses and connections

Suspension ball joints

Steering gear rack, linkage and boots

Exhaust system

Intercooler in/out
hose, air intake hose

Smartstream G2.5 T-GDi

I

-

I

-

I

-

I

-

I

-

I

-

Drive shaft and boots

-

I

-

I

-

I

-

I

-

I

-

I

Propeller shaft (AWD)

Parking brake (Foot type)

Fuel tank and fuel cap

Fuel tank air filter

Fuel lines, hoses and connections

Cooling system

I

I

I

I

I

I

I

I

I

I

I

I

Drive belts (Engine)

*5

-

-

-

-

-

I

I

I

I

I

I

I

11

7

7

Maintenance

Scheduled maintenance service

*1. Fuel additives

Kia recommends that you use Tier 1
unleaded gasoline which has an octane 
rating of RON (Research Octane Num

-

ber) 95/AKI (Anti Knock Index) 91 or 
higher.

For customers who do not use good 
quality gasolines including fuel addi

-

tives

regularly, and have problems start

-

ing or

the engine does not run smoothly, one
bottle of additives should be added to the
fuel tank at every 8,000 miles (13,000
km).

Additives are available from an autho

-

rized Kia dealer. Do not mix with other
additives.

CarManuals2.com

*2. Engine oil and engine oil filter

As it is normal for engine oil to be con

-

sumed during driving, the engine oil 
level should be checked on regular 
basis.

The engine oil change interval for nor

-

mal operating conditions is based on the 
use of the recommended engine specifi

-

cation. If the recommended engine oil 
specification is not used, then replace the
engine oil according to the mainte

-

nance

schedule under severe operating 
conditions.

*3. Coolant (Engine)

When adding coolant, use only deion

-

ized water or soft water for your vehicle 
and never mix hard water in the coolant 
filled at the factory. An improper coolant 
mixture can result in serious malfunction 
or engine damage.

*4. Dual clutch transmission 
(DCT) fluid

If the vehicle has been submerged in 
water or in a flooded area, the fluids 
should be changed as a precaution.

*5. Drive belts (Engine)

Inspect alternator, water pump and air
conditioner drive belt and if necessary,
repair or replace. Inspect drive belt ten

-

sioner, idler and alternator pulley and if
necessary correct or replace.

*6. Differential oil (rear) (AW D)

If the vehicle has been submerged in 
water or in a flooded area, the fluids 
should be changed as a precaution.

*7. Transfer case oil (AW D)

If the vehicle has been submerged in 
water or in a flooded area, the fluids 
should be changed as a precaution.

Number of months or driving distance, whichever comes first

Months

12

24

36

48

60

72

84

96

108 120 132

144

Miles

×1,000

8

16

24

32

40

48

56

64

72

80

88

96

Km

×1,000

13

26

39

52

65

78

91

104

117 130 143 156

Differential oil (rear) (AWD)

*6

Inspect every 65,000 km (40,000 miles) or 48 months

Transfer case oil (AWD)

*7

Automatic transmis

-

sion (AT) fluid

Smartstream G2.5 GDi

No service required

Dual clutch trans

-

mission (DCT) fluid

*4

Smartstream G2.5 T-GDi

-

-

-

I

-

-

-

I

-

-

-

I

Maintenance

12

CarManuals2.com

7

Scheduled maintenance service

Fuel filter (Gasoline engine)

The fuel filter is considered to be main

-

tenance free but periodic inspection is 
recommended for this maintenance 
schedule depends on fuel quality.

• If there are some important safety 

matters like fuel flow restriction, surg

-

ing, loss of power, hard starting prob

-

lem etc, replace the fuel filter 
immediately regardless of mainte

-

nance schedule and consult an autho

-

rized Kia dealer for details.

Maintenance under severe usage conditions

I: Inspect and if necessary, adjust, correct, clean or replace.

R: Replace or change.

Maintenance item

Maintenance

operation

Maintenance intervals

Driving condition

Engine oil and engine oil
filter

Smartstream G2.5
GDi

R

Every 8,000 km(5,000

miles) or 6 months

D, H, I

Smartstream G2.5 T-
GDi

Spark plugs

Smartstream G2.5
GDi

R

More frequently

A, B, F, G, H, I,K

Smartstream G2.5 T-
GDi

Air cleaner filter

R

More frequently

C, E

Climate control air filter

R

More frequently

C, E, G

Automatic transmission
(AT) fluid

Smartstream G2.5
GDi

R

Every 91,000 km

(56,000 miles)

A, C, F, G, H, I,J, K

Dual clutch transmission
(DCT) fluid

Smartstream G2.5 T-
GDi

R

A, C, D, E, F, G, H, I,J, K

Differential oil (rear) (AWD)

R

Every 117,000 km (72,000

miles)

C, E, G, H, I,J

Transfer case oil (AWD)

R

Every 117,000 km (72,000

miles)

C, E, G, H, I,J

Steering gear rack, linkage and boots

I

More frequently

C, D, E, F, G, H, I

Suspension ball joints

I

More frequently

C, D, E, G, H, I

Brake discs, pads and calipers

I

More frequently

C, D, E, G, H, I,J, K

Parking brake (Foot type)

I

More frequently

C, D, G, H

Drive shaft and boots

I

More frequently

C, D, E, F, G, H, I,J

Propeller shaft (AWD)

I

More frequently

C, D, E, F, G, H, I,J

13

7

7

Maintenance

Explanation of scheduled maintenance items

Severe driving conditions

A: Repeatedly driving short distance of 
less than 8 km (5 miles) in normal tem

-

perature or less than 16 km (10 miles) in 
freezing temperature.

B: Extensive engine idling or low speed 
driving for long distances.

C: Driving on rough, dusty, muddy, 
unpaved, graveled or saltspread roads.

D: Driving in areas using salt or other 
corrosive materials or in very cold 
weather

E: Driving in heavy dust condition. 

F: Driving in heavy traffic area.

G: Driving on uphill, downhill, or moun

-

tain roads repeatedly.

H: Using for towing or camping and driv

-

ing with loading on the roof

I: Driving for patrol car, taxi, other com

-

mercial use of vehicle towing.

J: Frequently driving under high speed 
or rapid acceleration/deceleration

K: Frequently driving in stop-and-go 
conditions.

Explanation of scheduled 
maintenance items

Engine oil and filter

The engine oil and filter should be 
changed at the intervals specified in the 
maintenance schedule. If the vehicle is 
being driven in severe conditions, more 
frequent oil and filter changes are 
required.

Drive belts

Inspect all drive belts for evidence of 
cuts, cracks, excessive wear or oil satu

-

ration and replace if necessary. Drive 
belts should be checked periodically for 
proper tension and adjusted as neces

-

sary.

CAUTION

When you are inspecting the belt, place 
the ignition switch or ENGINE START/ 
STOP button in the LOCK/OFF or ACC 
position.

Fuel filter

The fuel filter is considered to be main

-

tenance free but periodic inspection is 
recommended for this maintenance 
schedule depends on fuel quality.

If there are some important safety mat

-

ters like fuel flow restriction, surging,
loss of power, hard starting problem etc., 
replace the fuel filter immediately 
regardless of maintenance schedule and 
consult an authorized Kia dealer for 
details.

Fuel lines, fuel hoses and connec

-

tions

Check the fuel lines, fuel hoses and con

-

nections for leakage and damage. Have
the fuel lines, fuel hoses and connec

-

CarManuals2.com

Maintenance

14

7

Explanation of scheduled maintenance items

tions replaced by an authorized Kia 
dealer.

Fuel tank and fuel cap

The fuel tank and fuel cap should be 
inspected at those intervals specified in 
the maintenance schedule. Make sure 
that a new fuel tank and fuel cap is cor

-

rectly replaced.

Vacuum crankcase ventilation 
hoses

Inspect the surface of hoses for evi

-

dence of heat and/or mechanical dam

-

age. Hard and brittle rubber, cracking, 
tears, cuts, abrasions, and excessive 
swelling indicate deterioration. Particular 
attention should be paid to examine 
those hose surfaces nearest to high heat 
sources, such as the exhaust manifold.

Inspect the hose routing to assure that 
the hoses do not come in contact with 
any heat source, sharp edges or moving 
component which might cause heat 
damage or mechanical wear. Inspect all 
hose connections, such as clamps and 
couplings, to make sure they are secure, 
and that no leaks are present. Hoses 
should be replaced immediately if there is
any evidence of deterioration or dam

-

age.

Air cleaner filter

Have the air cleaner filter replaced by an 
authorized Kia dealer.

Spark plugs

Make sure to install new spark plugs of 
the correct heat range.

When assembling parts, be sure to wipe 
the inside and outside of the boot bot

-

tom of the ignition coil and the insulator of
the spark plug with a soft cloth to pre

-

vent contamination of the spark plug 
insulator.

W ARNING

Do not disconnect and inspect spark 
plugs when the engine is hot. You may 
burn yourself.

Cooling system

Check the cooling system components, 
such as the radiator, coolant reservoir, 
hoses and connections for leakage and 
damage. Replace any damaged parts.

Coolant

The coolant should be changed at the
intervals specified in the maintenance
schedule.

Dual clutch transmission fluid (if
equipped)

Inspect the dual clutch transmission fluid 
according to the maintenance schedule.

Automatic transmission fluid (if
equipped)

Automatic transmission fluid should not 
be checked under normal usage condi

-

tions. Have the automatic transmission 
fluid changed by an authorized Kia 
dealer.

NOTICE

Automatic transmission fluid color is 
basically red.

As the vehicle is driven, the automatic 
transmission fluid will begin to look 
darker. It is normal condition and you 
should not judge the need to replace the 
fluid based upon the changed color.

CAUTION

CarManuals2.com

The use of a non-specified fluid could
result in transmission malfunction and
failure.

15

7

7

Maintenance

Explanation of scheduled maintenance items

Use only specified automatic transmis

-

sion fluid. (Refer to "Recommended 
lubricants and capacities" on page 8-7.)

Brake hoses and lines

Visually check for proper installation, 
chafing, cracks, deterioration and any 
leakage. Replace any deteriorated or 
damaged parts immediately.

Parking brake

Inspect the parking brake system includ

-

ing the parking brake lever (or pedal) and
cables.

Brake fluid

Check the brake fluid level in the brake 
fluid reservoir. The level should be 
between "MIN" and "MAX" marks on the 
side of the reservoir. Use only hydraulic 
brake fluid conforming to DOT 4 specifi

-

cation.

Exhaust pipe and muffler

Visually inspect the exhaust pipes, muf

-

fler and hangers for cracks, deteriora

-

tion, or damage. Start the engine and 
listen carefully for any exhaust gas leak

-

age. Tighten connections or replace 
parts as necessary.

Brake discs, pads and calipers

Check the pads for excessive wear, discs 
for run out and wear, and calipers for fluid
leakage.

Suspension mounting bolts

Check the suspension connections for
looseness or damage. Retighten to the
specified torque.

Steering gear box, linkage &
boots/lower arm ball joint

With the vehicle stopped and engine off, 
check for excessive free-play in the 
steering wheel.

CarManuals2.com

Check the linkage for bends or damage. 
Check the dust boots and ball joints for 
deterioration, cracks, or damage.
Replace any damaged parts.

Drive shafts and boots

Check the drive shafts, boots and
clamps for cracks, deterioration, or dam

-

age. Replace any damaged parts and, if 
necessary, repack the grease.

Air conditioning refrigerant

Check the air conditioning lines and con

-

nections for leakage and damage.

Propeller shaft

Check the propeller shaft, boots, clamps, 
rubber coupling and center bearing rub

-

ber for cracks, deterioration, or damage. 
Replace any damaged parts and if nec

-

essary, repack the grease.

Checking fluid levels

When checking engine oil, engine cool

-

ant, brake fluid, and washer fluid, always 
be sure to clean the area around any filler
plug, drain plug, or dipstick before 
checking or draining any lubricant or fluid. 
This is especially important in dusty or 
sandy areas and when the vehi

-

cle is

used on unpaved roads. Cleaning the
plug and dipstick areas will prevent dirt
and grit from entering the engine and
other mechanisms that could be 
damaged.

Maintenance

16

7

Engine oil

Engine oil

Checking the engine oil level

Engine oil is used for lubricating, cooling, 
and operating various hydraulic compo

-

nents in the engine. Engine oil consump

-

tion while driving is normal, and it is 
necessary to check and refill the engine 
oil regularly. Also, check and refill the oil 
level within the recommended mainte

-

nance schedule to prevent deterioration 
of oil performance.

Check the engine oil following the below 
procedure.

Smartstream G2.5 GDi

Smartstream G2.5 T-GDi

1. Be sure the vehicle is on level ground.

2. Start the engine and allow it to reach 

normal operating temperature.

3. Turn the engine off, remove the oil 

filler cap and pull the dipstick out. 
Wait for 15 minutes for the oil to 
return to the oil pan.

4. Pull the dipstick out again and check 

the level. Check if the oil level is 
between the F-L line, and if it is below 
the L line, add enough oil to bring the 
level to F line.

5. Wipe the dipstick clean and re-insert it 

fully.

W ARNING

Radiator hose
Be very careful not to touch the radiator 
hose when checking or adding the 
engine oil as it may be hot enough to 
burn you.

CAUTION

When you wipe the oil level gauge, you 
should wipe it with a clean cloth. When 
mixed with debris, it can cause engine 
damage.

Smartstream G2.5 GDi

OMQ4A070003

OMQ4A041592

OMQ4A071004

CarManuals2.com

17

7

7

Maintenance

Engine oil

Smartstream G2.5 T-GDi

Use a funnel to help prevent oil from
being spilled on engine components.

Use only the specified engine oil. (Refer 
to "Recommended lubricants and capac

-

ities" on page 8-7.)
• Do not spill engine oil when adding or 

changing engine oil. Wipe off spilled 
oil immediately.

• The engine oil consumption may 

increase while you break in a new 
vehicle and it will be stabilized after 
driving 6,000 km (4,000 miles).

• The engine oil consumption can be 

affected by driving habits, climate 
conditions, traffic conditions, oil qual

-

ity, etc. Therefore, it is recommended 
that you inspect the engine oil level 
regularly and refill it if necessary.

Changing the engine oil and filter

The lubrication, rust prevention, cooling, 
and cleaning effect of the engine oil will 
gradually degrade during its use. Have 
the engine oil and filter changed by an 
authorized Kia dealer according to the 
Engine Oil Life Management System 
instructions or the maintenance sched

-

ule.
• If the maintenance schedule to 

replace engine oil is exceeded, the

engine oil performance may deterio

-

rate, and the engine condition may be 
affected. Therefore, replace the 
engine oil according to the mainte

-

nance schedule.

• To keep the engine in optimal condi

-

tion, use the recommended engine oil 
and filter. If the recommended engine 
oil and filter are not used replace it 
according to the maintenance sched

-

ule under severe usage conditions.

• The purpose of the maintenance 

schedule for engine oil replacement is 
to prevent oil deterioration and it is 
irrelevant to oil consumption. Check 
and refill engine oil regularly.

W ARNING

Used engine oil
Used engine oil may cause irritation or 
cancer of the skin if left in contact with 
the skin for prolonged periods of time. 
Always protect your skin by washing 
your hands thoroughly with soap and 
warm water as soon as possible after 
handling used oil. Do not leave used 
engine oil within the reach of children.

NOTICE

• When the oil pressure is low due to 

insufficient engine oil, the Engine Oil 
Pressure (

) warning light will illu

-

minate.

In addition, the enhanced engine pro

-

tection system, which limits the 
engine's power is activated and the
Malfunction Indicator Lamp (

)

will illuminate when the vehicle is 
driven in this state continuously.

• When oil pressure is restored, the 

Engine Oil Pressure warning light will 
turn off and the engine power will no 
longer be limited.

OMQA4071087

CarManuals2.com

Maintenance

18

7

Engine coolant

• When the engine oil pressure is 

restored, the warning light and the 
enhanced engine protection system 
will turn off after the engine is 
restarted.

CAUTION

The engine oil is very hot immediately 
after the vehicle has been driven and 
can cause burns during replacement. 
Replace the engine oil after the engine 
oil has cooled down.

Engine coolant

The high-pressure cooling system has a
reservoir filled with year round anti

-

freeze coolant. The reservoir is filled at 
the factory.

Check the antifreeze protection and 
coolant level at least once a year, at the 
beginning of the winter season, and 
before traveling to a colder climate.

CAUTION

• When the engine overheats from low 

engine coolant, suddenly adding 
engine coolant may cause cracks in 
the engine. To prevent damage, add 
engine coolant slowly in small quanti

-

ties.

• Do not drive with no engine coolant. It 

may cause water pump failure and 
engine seizure, etc.

Checking the coolant level

CAUTION

Removing engine
coolant reservoir cap

Never attempt to 
remove the engine 
coolant reservoir cap

while the engine is operating or hot. 
Doing so might lead to cooling system 
and engine damage. Also, hot coolant or 
steam could cause serious personal 
injury.

Turn the engine off and wait until it cools 
down. Use extreme care when removing 
the engine coolant reservoir cap. Wrap a
thick towel around it, and turn it counter

-

clockwise slowly to the first stop. Step 
back while the pressure is released from 
the cooling system.

When you are sure all the pressure has 
been released, press down on the cap,

CarManuals2.com

19

7

7

Maintenance

Engine coolant

using a thick towel, and continue turning 
counterclockwise to remove it.

Even if the engine is not operating, do 
not remove the engine coolant reservoir 
cap or the drain plug while the engine 
and radiator are hot. Hot coolant and 
steam may still blow out under pressure, 
causing serious injury.

W ARNING

The electric motor 
(cooling fan) is con

-

trolled by engine cool

-

ant temperature, 
refrigerant pressure 
and vehicle speed. It

may sometimes operate even when the 
engine is not running. Use extreme cau

-

tion when working near the blades of the
cooling fan so that you are not injured by 
a rotating fan blades. As the engine
coolant temperature decreases, the
electric motor will automatically shut off.
This is a normal condition.

The electric motor (cooling fan) may 
operate until you disconnect the nega

-

tive battery cable.

Check the condition and connections of 
all cooling system hoses and heater 
hoses. Replace any swollen or deterio

-

rated hoses.

The coolant level should be filled 
between MAX and MIN (F and L) marks 
on the side of the coolant reservoir when 
the engine is cool.

If the coolant level is low, add enough 
distilled (deionized) or soft water. Bring 
the level to MAX (F), but do not overfill.

If frequent additions are required, have
the system inspected by an authorized
Kia dealer.

NOTICE

Make sure the coolant cap is properly 
closed after refill of coolant. Otherwise 
the engine could be overheated while 
driving.

1. Check if the engine coolant reservoir 

cap label is straight In front.

2. Make sure that the tiny protrusions

inside the coolant cap are securely
interlocked.

Recommended engine coolant

• When adding coolant, use only deion

-

ized water or soft water for your vehi

-

cle and never mix hard water in the 
coolant filled at the factory. An 
improper coolant mixture can result in

OMQ4A060054

OMQ4070006

CarManuals2.com

Maintenance

20

7

Engine coolant

serious malfunction or engine dam

-

age.

• The engine in your vehicle has alumi

-

num engine parts and must be pro

-

tected by an ethylene-glycol with 
phosphate based coolant to prevent 
corrosion and freezing.

• DO NOT USE alcohol or methanol 

coolant or mix them with the specified 
coolant.

• Do not use a solution that contains 

more than 60% antifreeze or less than 
35% antifreeze, which would reduce 
the effectiveness of the solution.

For mixture percentage, refer to the fol

-

lowing table.

W ARNING

Engine coolant reser

-

voir cap

Do not remove the 
engine coolant reser

-

voir cap when the

engine and radiator are hot. Scalding hot 
coolant and steam may blow out under 
pressure causing serious injury.

Changing the coolant

Have the coolant replaced by an autho

-

rized Kia dealer.

CAUTION

Put a thick cloth around the radiator cap 
before refilling the coolant in order to

prevent the coolant from overflowing into
engine parts such as the alternator.

W ARNING

Coolant
• Do not use engine coolant or anti

-

freeze in the washer fluid reservoir.

• Radiator coolant can severely obscure 

visibility when sprayed on the wind

-

shield and may cause loss of vehicle 
control or damage the paint and body 
trim.

Ambient Tem

-

perature

Mixture Percentage (volume)

Antifreeze

Water

-15

°C (5°F)

35

65

-25

°C (-13°F)

40

60

-35

°C (-31°F)

50

50

-45

°C (-49°F)

60

40

CarManuals2.com

21

7

7

Maintenance

Brake fluid

Brake fluid

Checking the brake fluid level

Check the fluid level in the reservoir 
periodically. The fluid level should be 
between MAX and MIN marks on the 
side of the reservoir.

1. Before removing the reservoir cap

and adding brake fluid, clean the area 
around the reservoir cap thoroughly to
prevent brake fluid contamination.

2. Periodically check that the fluid level in

the brake fluid reservoir is between 
MIN and MAX. The level will fall with 
accumulated mileage. This is a normal 
condition associated with the wear of 
the brake linings.

If the fluid level is excessively low, 
have the system checked by an 
authorized Kia dealer.

Use only the specified brake fluid. (Refer
to "Recommended lubricants and capac

-

ities" on page 8-7.)

Never mix different types of fluid.

W ARNING

Loss of brake fluid
In the event the brake system requires 
frequent additions of fluid, have the sys

-

tem inspected by an authorized Kia 
dealer.

W ARNING

Brake fluid
When changing and adding brake fluid, 
handle it carefully. Do not let it come in 
contact with your eyes. If brake fluid 
should come in contact with your eyes, 
immediately flush them with a large 
quantity of fresh tap water. Have your 
eyes examined by a doctor as soon as 
possible.

CAUTION

Do not allow brake fluid to contact the 
vehicle's body paint, as paint damage will
result. Brake fluid, which has been 
exposed to open air for an extended time
should never be used as its quality 
cannot be guaranteed. It should be 
properly disposed. Don't put in the wrong
kind of fluid. A few drops of min

-

eral-

based oil, such as engine oil, in your 
brake system can damage brake system 
parts.

OMQ4070069

CarManuals2.com

Maintenance

22

7

Washer fluid

Washer fluid

Checking the washer fluid level

The reservoir is translucent so that you 
can check the level with a quick visual 
inspection.

• Check the fluid level in the washer 

fluid reservoir and add fluid if neces

-

sary. Plain water may be used if 
washer fluid is not available.

However, use washer solvent with 
antifreeze characteristics in cold cli

-

mates to prevent freezing.

W ARNING

Washer fluid
• Do not use radiator coolant or anti

-

freeze in the washer fluid reservoir.

• Radiator coolant can severely obscure 

visibility when sprayed on the wind

-

shield and may cause loss of vehicle 
control or damage to paint and body 
trim.

• Windshield Washer fluid agents con

-

tain some amounts of alcohol and can 
be flammable under certain circum

-

stances. Do not allow sparks or flame 
to contact the washer fluid or the 
washer fluid reservoir. Damage to the 
vehicle or occupants could occur.

• Windshield washer fluid is poisonous 

to humans and animals. Do not drink 
and avoid contacting windshield 
washer fluid. Serious injury or death 
could occur.

OMQ4070007

CarManuals2.com

23

7

7

Maintenance

Parking brake

Parking brake

Checking the parking brake

• Check whether the stroke is within 

specification when the parking brake 
pedal is depressed with 30 kg (66 lbs., 
294 N) of force. Also, the parking 
brake alone should securely hold the 
vehicle on a fairly steep grade. If the 
stroke is more or less than specified, 
have the system serviced by an 
authorized Kia dealer.

Stroke: 8 ~ 9 notch

Air cleaner

Filter replacement

Air cleaner filter must be replaced when 
necessary, and should not be washed.

You can clean the filter when inspecting 
the air cleaner compartment. Clean the 
filter by using compressed air.

1. Pull up the lever (1) on the air cleaner 

cover and release the lock.

2. Pull up the air cleaner cover (2) and 

open.

OMQ4070008

OMQ4070009

OMQ4070014

CarManuals2.com

Maintenance

24

7

Air cleaner

3. Rotate the fixed lever on the filter and 

loosen the lock.

4. Replace the air cleaner filter.

5. Assemble in reverse order.
Replace the filter according to the Main

-

tenance Schedule.

If the vehicle is operated in extremely 
dusty or sandy areas, replace the ele

-

ment more often than the usual recom

-

mended intervals. (Refer to 
"Maintenance under severe usage con

-

ditions" on page 7-12)

CAUTION

• Do not drive with the air cleaner 

removed; this will result in excessive 
engine wear.

• When removing the air cleaner filter, 

be careful that dust or dirt does not

enter the air intake, or damage may 
result.

• Use parts for replacement from an 

authorized Kia dealer.

OMQ4070015

OMQ4070016

CarManuals2.com

25

7

7

Maintenance

Climate control air filter

Climate control air filter

Filter inspection

The climate control air filter should be 
replaced according to the maintenance 
schedule. If the vehicle is operated in 
severely air-polluted cities or on dusty 
rough roads for a long period, it should 
be inspected more frequently and 
replaced earlier. When you replace the 
climate control air filter, replace it per

-

forming the following procedure, and be 
careful to avoid damaging other compo

-

nents.

1. Open the glove box and remove the 

stoppers on both sides.

2. With the glove box open, pull the sup

-

port strap (1).

3. Remove the climate control air filter 

cover by pulling out both sides of the 
cover.

4. Replace the climate control air filter.

5. Reassemble in the reverse order of 

disassembly.

NOTICE

When replacing the climate control air 
filter install it properly. Otherwise, the 
system may produce noise and the 
effectiveness of the filter may be 
reduced.

OMQ4070017

OMQ4070018

OMQ4070019

ODEEV098011NR

CarManuals2.com

Maintenance

26

7

Wiper blades

Wiper blades

When the wipers no longer clean ade

-

quately, the blades may be worn or 
cracked, and require replacement.

To prevent damage to the wiper arms or 
other components, do not attempt to 
move the wipers manually.

The use of a non-specified wiper blade 
could result in wiper malfunction and 
failure.

Blade inspection

NOTICE

Commercial hot waxes applied by auto

-

matic car washes have been known to 
make the windshield difficult to clean.

Contamination of either the windshield or
the wiper blades with foreign matter can
reduce the effectiveness of the 
windshield wipers. Common sources of 
contamination are insects, tree sap, and 
hot wax treatments used by some com

-

mercial car washes. If the blades are not 
wiping properly, clean both the window 
and the blades with a good cleaner or 
mild detergent, and rinse thoroughly with
clean water.

CAUTION

To prevent damage to the wiper blades, 
do not use gasoline, kerosene, paint 
thinner, or other solvents on or near 
them.

Blade replacement

When the wipers no longer clean ade

-

quately, the blades may be worn or 
cracked, and require replacement.

CAUTION

To prevent damage to the wiper arms or 
other components, do not attempt to 
move the wipers manually.

CAUTION

The use of a non-specified wiper blade 
could result in wiper malfunction and 
failure.

Front wiper blade replacement

For your convenience and to prevent 
hood paint damage, you must move the 
windshield wiper blades to the service 
position as follows.

After turning off the engine, move the 
wiper switch to the single wiping (MIST) 
position within 20 seconds and hold the

OMQ4A071022

OMQ4070023L

CarManuals2.com


Content      ..     14      15      16      17     ..