Kia Forte (2024 year). Manual in english - page 2
Safety features of your vehicle
20
3
Seat belts
To adjust the height of the seat belt
anchor, lower or raise the height
adjuster into an appropriate position.
• To raise the height adjuster, pull it up
(1).
• To lower it, push it down (3) while
pressing the height adjuster button
(2).
Release the button to lock the anchor
into position. Try sliding the height
adjuster to make sure that it has locked
into position.
Improperly positioned seat belts can
cause serious injuries in an accident.
W ARNING
Shoulder belt positioning
Verify the shoulder belt anchor is locked
into position at the appropriate height.
Never position the shoulder belt across
your neck or face. Improperly positioned
seat belts can cause serious injuries in
an accident.
W ARNING
Seat belt replacement
After a collision, the seat belt system
should be inspected to ensure it is oper
-
ating normally. Replace any belts that
are not functioning appropriately.
Seat belts - Front passenger and
rear seat 3-point system with
combination locking retractor
The following explains how to fasten the
passenger's and rear seat belts.
Fastening your seat belt:
Combination retractor type seat belts are
installed in the rear seat positions to help
accommodate the installation of
Child Restraint System. Although a com
-
bination retractor is also installed in the
front passenger seat position, it is
strongly recommended that children
always be seated in the rear seat. NEVER
place any infant restraint system in the
front seat of the vehicle.
This type of seat belt combines the fea
-
tures of both an emergency and auto
-
matic locking retractor.
• Pull it out of the retractor and insert the
metal tab into the buckle. There will be
an audible "click" when the tab locks
into the buckle. When not secur
-
ing a
child restraint, the seat belt operates in
the same way as the driver's seat belt
(emergency locking retractor type).
It automatically adjusts to the proper
length only after the lap belt portion of the
seat belt is adjusted manually so that it
fits snugly across your hips.
When the seat belt is fully extended from
the retractor to allow the installa
-
tion of a
Child Restraint System, the seat belt
operation changes to allow the belt to
retract, but not to extend (automatic
locking retractor type).
NOTICE
Although the combination retractor pro
-
vides the same level of protection for
seated passengers in either emergency
or automatic locking modes, have the
seated passengers use the emergency
locking feature. The automatic locking
function is intended only for child restraint
installation. To convert from the automatic
locking feature to the emer
-
gency
locking operation mode, allow the
unbuckled seat belt to fully retract.
21
3
3
Safety features of your vehicle
Seat belts
CAUTION
Do NOT fold down the left portion of the
rear seatback when the rear center seat
belt is buckled. ALWAYS UNBUCKLE
the rear center seat belt before folding
down the left portion of the rear seatback.
If the rear center seat belt is buckled
when the left portion of the rear seatback
is folded down, distortion and damage to
the top portion of the seatback and seat
belt webbing may result, causing the
seatback to lock into the folded down
position.
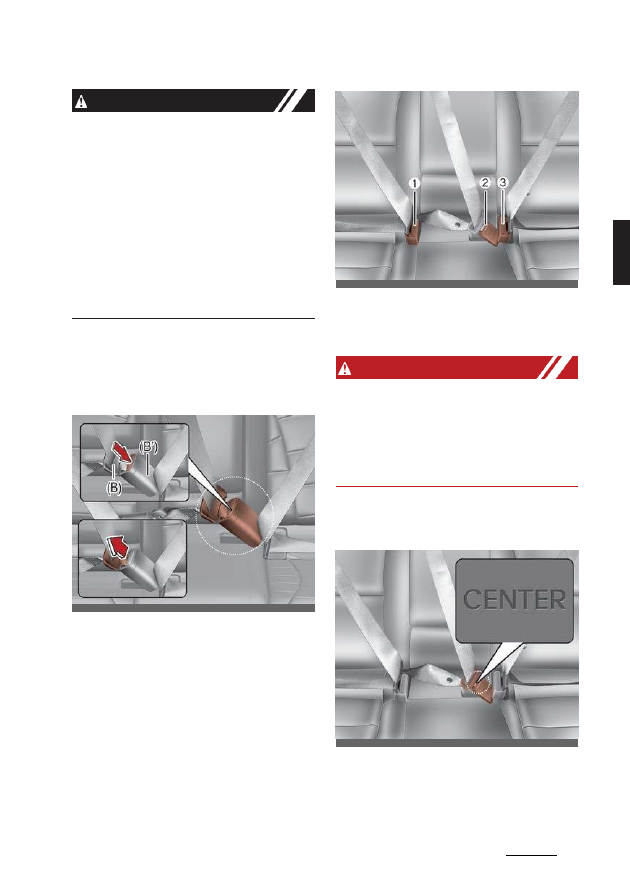
Pull the metal tab (B) and insert it (B)
into the buckle
(B’). There will be an
audible
“click“ when the tab locks into
the buckle. Make sure the belt is not
twisted.
The seat belt should be locked into the
buckle on each seat cushion to be prop
-
erly fastened.
1. Rear right seat belt fastening buckle
2. Rear center seat belt fastening buckle
3. Rear left seat belt fastening buckle
W ARNING
Prior to fastening the rear seat belts,
ensure the latch matches the seat belt
buckle. Forcefully fastening the left or
right seat belt to the center buckle can
result in an improper fastening scenario
that will not protect you in an accident.
When using the rear center seat belt, the
buckle with the "CENTER" mark must be
used.
OCK030025
OBD031022
OBD031023