FANUC Series 0i-MODEL D, Series 0i Mate-MODEL D. OPERATOR'S MANUAL - page 17
8.DATA INPUT/OUTPUT
OPERATION
B-64304EN/02
7
Type the name of the file that you want to input.
If the input file name is omitted, default input file name “MACRO.TXT” is assumed.
8
Press the soft key [EXEC].
This starts reading the custom macro common variables, and “INPUT” blinks in the lower right part
of the screen. When the read operation ends, the “INPUT” indication disappears.
To cancel the input of the program, press the soft key [CAN].
Explanation
-
Common variables
The common variables (#500 to 999) can be input and output.
#100 to #199 can be input when bit 3 (PV5) of parameter No. 6001 is set to 1.
8.2.5.2 Outputting custom macro common variables
Custom macro common variables stored in the memory of the CNC can be output in a defined output
format to an external device.
Outputting custom macro common variables
Procedure
1
Make sure the output device is ready for writing.
2
Press the function key
3
Press the continuous menu key
until soft key [MACRO] appears.
Press the soft key [MACRO].
4
Press the EDIT switch on the machine operator’s panel or enter state emergency stop.
5
Press the soft key [(OPRT)].
6
Press the continuous menu key
until soft key [F OUTPUT] appears.
Press the soft key [F OUTPUT].
7
Type the file name that you want to output.
If the file name is omitted, default file name “MACRO.TXT” is assumed.
8
Press the soft key [EXEC].
This starts outputting the custom macro common variables, and “OUTPUT” blinks in the lower right
part of the screen. When the write operation ends, the “OUTPUT” indication disappears.
To cancel the output, press the soft key [CAN].
Explanation
-
Output format
The output format is as follows:
The values of custom macro variables are output in a bit-image hexadecimal representation of
double-precision floating-point type data.
%
G10 L85 P500(4024000000000000)
G10 L85 P501(4021000000000000)
G10 L85 P502(0000000000000000)
・
SETVN500[ABC,DEF]
SETVN501[GHI,JKL]
SETVN502[MNO,PQR]
・
M02
%
- 456 -
B-64304EN/02
OPERATION
8.DATA INPUT/OUTPUT
NOTE
The conventional custom macro statement program format cannot be used for
output.
By setting bit 0 (MCO) of parameter No. 6019, it is possible to output macro variable numbers and
variable data values as comments after normally output data.
The output comments do not affect data input.
-
Common variable
The common variables (#500 to #999) can be input and output.
#100 to #199 can be output when bit 3 (PV5) of parameter No. 6001 is set to 1.
8.2.6
Inputting and Outputting Workpiece Coordinates System
Data
8.2.6.1 Inputting workpiece coordinate system data
Coordinate system variable data is loaded into the memory of the CNC from an external device. The
input format is the same as the output format. When coordinate system variable data with a data number
corresponding to existing coordinate system variable data registered in the memory is loaded, the loaded
coordinate system variable data replaces the existing coordinate system variable data.
Inputting workpiece coordinate system data
Procedure
1
Make sure the input device is ready for reading.
2
Press the function key
3
Press the continuous menu key
until soft key [WORK] appears.
Press the soft key [WORK].
4
Press the EDIT switch on the machine operator’s panel or enter state emergency stop.
5
Press the soft key [(OPRT)].
6
Press the continuous menu key
until soft key [F INPUT] appears.
Press the soft key [F INPUT].
7
Type the name of the file that you want to input.
If the input file name is omitted, default input file name “EXT_WKZ.TXT” is assumed.
8
Press the soft key [EXEC].
This starts reading the workpiece coordinate system data, and “INPUT” blinks in the lower right part
of the screen. When the read operation ends, the “INPUT” indication disappears.
To cancel the input of the program, press the soft key [CAN].
8.2.6.2 Outputting workpiece coordinate system data
All coordinate system variable data is output in the output format from the memory of the CNC to an
external device.
Outputting workpiece coordinate system data
Procedure
1
Make sure the output device is ready for writing.
2
Press the function key
- 457 -

8.DATA INPUT/OUTPUT
OPERATION
B-64304EN/02
3
Press the continuous menu key
until soft key [WORK] appears.
Press the soft key [WORK].
4
Press the EDIT switch on the machine operator’s panel or enter state emergency stop.
5
Press the soft key [(OPRT)].
6
Press the continuous menu key
until soft key [F OUTPUT] appears.
Press the soft key [F OUTPUT].
7
Type the file name that you want to output.
If the file name is omitted, default file name “EXT_WKZ.TXT” is assumed.
8
Press the soft key [EXEC].
This starts outputting the workpiece coordinate system data, and “OUTPUT” blinks in the lower
right part of the screen. When the write operation ends, the “OUTPUT” indication disappears.
To cancel the output, press the soft key [CAN].
8.2.7
Inputting and Outputting Operation History Data
Only output operation is permitted on operation history data.
The output data is in text format. So, to reference the output data you must use an application that can
handle text files on the personal computer.
8.2.7.1 Outputting operation history data
All operation history data is output in the output format form the memory of the CNC to an external
device.
Outputting operation history data
Procedure
1
Make sure the output device is ready for writing.
2
Press the function key
3
Press the MDI switch on the machine operator’s panel, make sure the display of the operation
history screen is enabled by setting "1" in bit 4 (OPH) of parameter No. 3106.
4
Press the continuous menu key
until soft key [OPERAT HISTRY] appears.
Press the soft key [OPERAT HISTRY].
5
Press the EDIT switch on the machine operator’s panel or enter state emergency stop.
6
Press the soft key [(OPRT)].
7
Press the soft key [F OUTPUT].
8
Type the file name that you want to output.
If the file name is omitted, default file name “OPRT_HIS.TXT” is assumed.
9
Press the soft key [EXEC].
This starts outputting the operation history data, and “OUTPUT” blinks in the lower right part of the
screen. When the write operation ends, the “OUTPUT” indication disappears.
To cancel the output, press the soft key [CAN].
- 458 -
B-64304EN/02
OPERATION
8.DATA INPUT/OUTPUT
8.3
INPUT/OUTPUT ON THE ALL IO SCREEN
Just by using the ALL IO screen, you can input and output programs, parameters, offset data, pitch error
compensation data, macro variables, and workpiece coordinate system data.
NOTE
The ALL IO screen can be operated only if a memory card interface is selected as
an external I/O device.
The following explains how to display the ALL IO screen:
Displaying the ALL IO screen
Procedure
1
Press the function key
2
Press the continuous menu key
several times.
3
Press the soft key [ALL IO] to display the ALL IO screen.
The subsequent steps to select data from the ALL IO screen will be explained for each type of data.
Configuration of this section
Section 8.3, "INPUT/OUTPUT ON THE ALL IO SCREEN", consists of the following subsections:
8.3.1 Inputting/Outputting a Program
459
8.3.2 Inputting and Outputting Parameters
460
8.3.3 Inputting and Outputting Offset Data
461
8.3.4 Inputting/Outputting Pitch Error Compensation Data
462
8.3.5 Inputting/Outputting Custom Macro Common Variables
463
8.3.6 Inputting and Outputting Workpiece Coordinates System Data
463
8.3.7 File Format
464
8.3.1
Inputting/Outputting a Program
A program can be input and output using the ALL IO screen.
Inputting a program
Procedure
1
Press the soft key [PROGRAM] on the ALL IO screen.
2
Press the EDIT switch on the machine operator’s panel or enter state emergency stop.
3
Press the soft key [(OPRT)].
4
Press the soft key [N INPUT].
5
Set the name of the file that you want to input.
Type a file name, and press the soft key [F-NAME].
If the input file name is omitted, default input file name “ALL-PROG.TXT” is assumed.
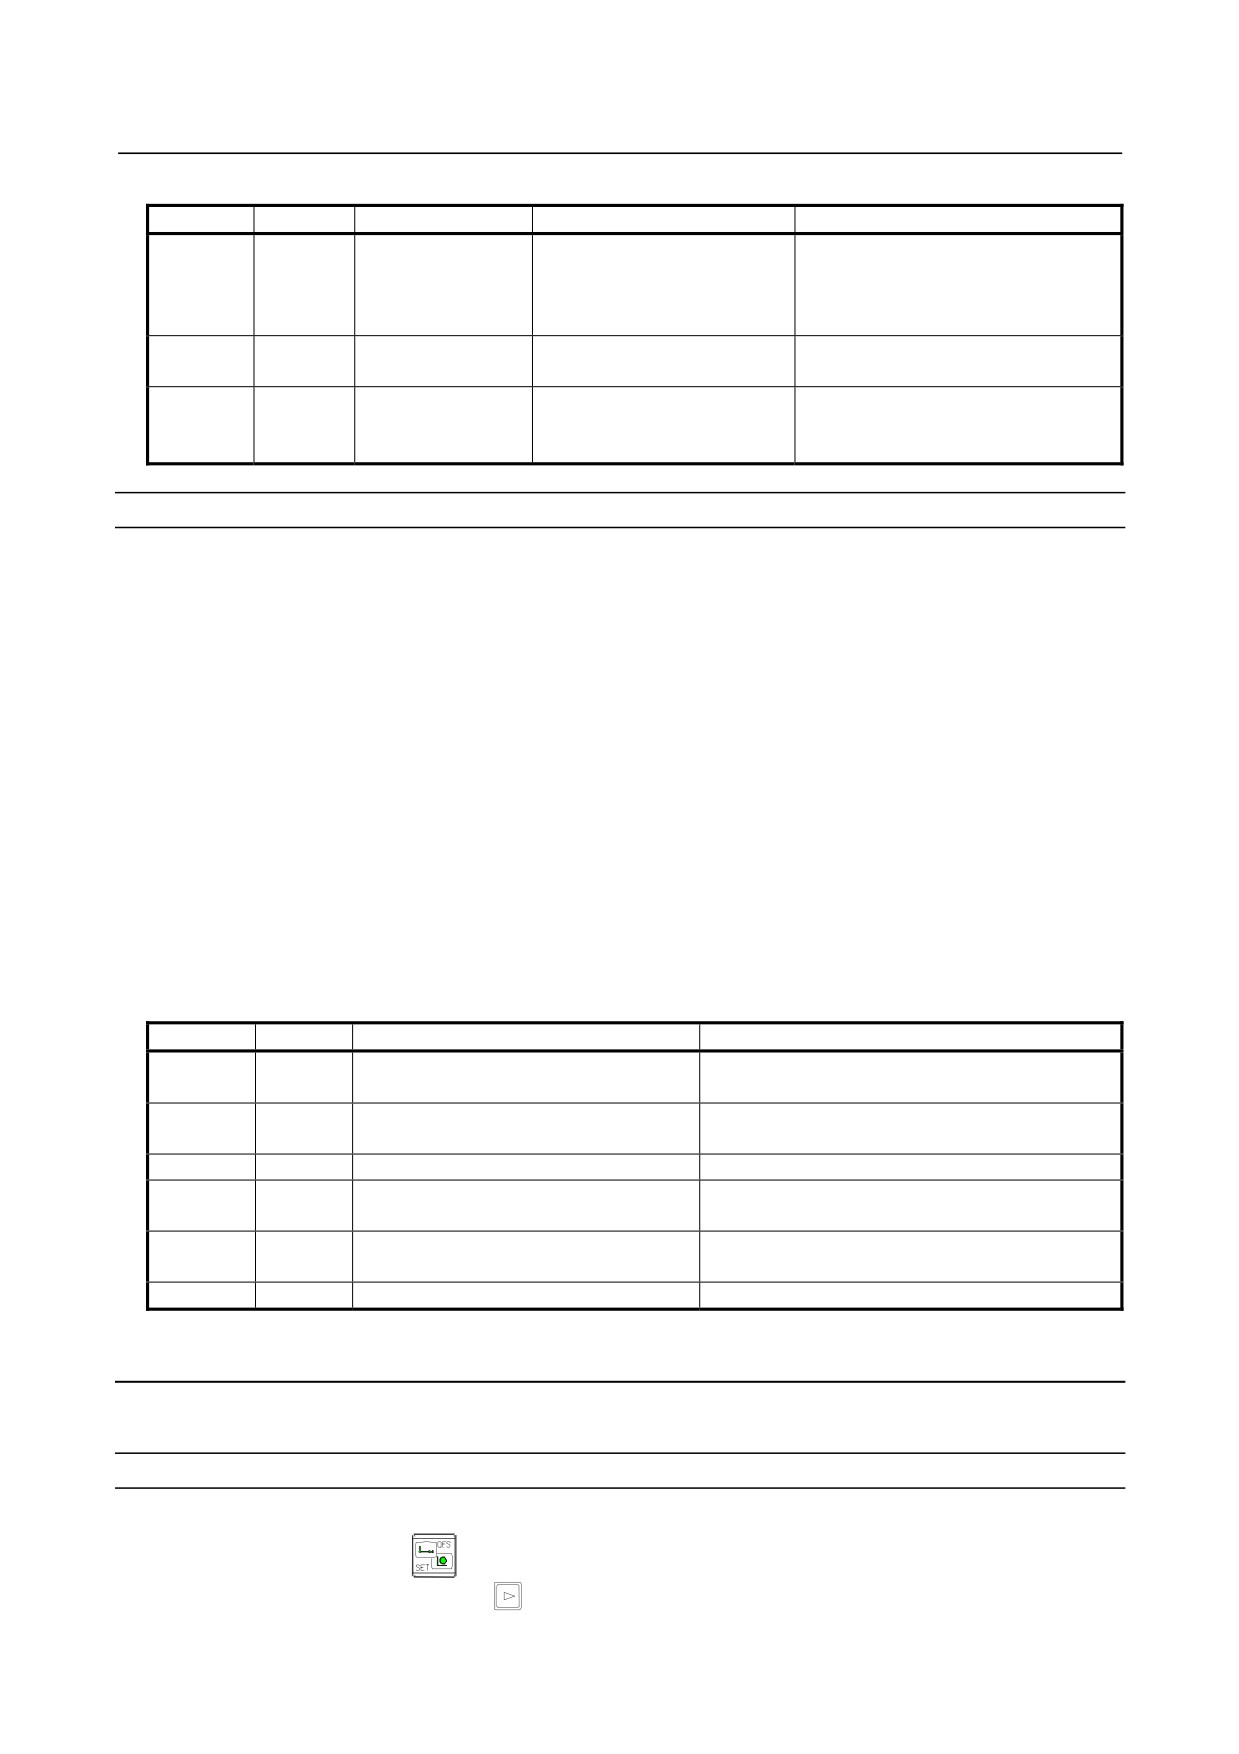
See the table below for details.
6
Set the program number to be used after the input.
Type a program number, and press the soft key [O SET].
If no program number is specified here, the program number in the file is adopted as is.
7
Press the soft key [EXEC].
This starts reading the program, and “INPUT” blinks in the lower right part of the screen. When the
read operation ends, the “INPUT” indication disappears.
To cancel the input of the program, press the soft key [CAN].
- 459 -
8.DATA INPUT/OUTPUT
OPERATION
B-64304EN/02
[F-NAME]
[O SET]
Input file name
Input program
Input program number
File for the
Continuous program numbers
program number
All programs in the program
BLANK
INPUT
starting at one specified with
specified with
specified with [O SET]
[O SET]
[O SET]
File name set with
All programs in the file
Program number at the time the file
INPUT
BLANK
[F-NAME]
specified with [F-NAME]
is saved
Continuous program numbers
File name set with
All programs in the file
INPUT
INPUT
starting at one specified with
[F-NAME]
specified with [F-NAME]
[O SET]
Outputting a program
Procedure
1
Press the soft key [PROGRAM] on the ALL IO screen.
2
Press the EDIT switch on the machine operator’s panel or enter state emergency stop.
3
Press the soft key [(OPRT)].
4
Press the soft key [F OUTPUT].
5
Set the program that you want to output.
Type a program number, and press the soft key [O SET].
If -9999 is typed, all programs in the memory are output.
6
Set the file name to be output.
Type a file name, and press the soft key [F-NAME].
When no file name is set, the output file name is assumed to be “O”“number” if a single program
number is specified; if -9999 is specified, the output file name is assumed to be “ALL-PROG.TXT”.
See the table below for details.
7
Press the soft key [EXEC].
This starts outputting the program, and “OUTPUT” blinks in the lower right part of the screen.
When the write operation ends, the “OUTPUT” indication disappears.
To cancel the output, press the soft key [CAN].
[F-NAME]
[O SET]
Output file name
Output program
Main program or program number
Main program or program being subjected to
BLANK
BLANK
being subjected to background editing
background editing
All programs in the program memory that are
BLANK
-9999
ALL-PROG.TXT
displayed in the program list
BLANK
INPUT
Program number set with [O SET]
Program in the NC that is set with [O SET]
Main program or program being subjected to
INPUT
BLANK
File name set with [F-NAME]
background editing
All programs in the program memory that are
INPUT
-9999
File name set with [F-NAME]
displayed in the program list
INPUT
INPUT
File name set with [F-NAME]
Program in the NC that is set with [O SET]
8.3.2
Inputting and Outputting Parameters
Parameters can be input and output using the ALL IO screen.
Inputting parameters
Procedure
1
Press the function key
2
Press the continuous menu key
until soft key [SETTING] appears.
Press the soft key [SETTING].
- 460 -

B-64304EN/02
OPERATION
8.DATA INPUT/OUTPUT
3
Press the MDI switch on the machine operator’s panel or enter state emergency stop.
4
Enter 1 in response to the prompt for “PARAMETER WRITE” in setting data. Alarm SW0100
appears.
5
Press the soft key [PARAMETER] on the ALL IO screen.
6
Press the EDIT switch on the machine operator’s panel or enter state emergency stop.
7
Press the soft key [(OPRT)].
8
Press the soft key [N INPUT].
9
Set the name of the file that you want to input.
Type a file name, and press the soft key [F-NAME].
If the input file name is omitted, default input file name “CNC-PARA.TXT” is assumed.
10 Press the soft key [EXEC].
This starts reading the parameter, and “INPUT” blinks in the lower right part of the screen. When
the read operation ends, the “INPUT” indication disappears.
To cancel the input of the program, press the soft key [CAN].
11 Press the function key
12 Press the soft key [SETTING].
13 Press the MDI switch on the machine operator’s panel or enter state emergency stop.
14 Enter 0 in response to the prompt for “PARAMETER WRITE” in setting data.
15 Turn the power of the CNC on again.
Outputting parameters
Procedure
1
Press the soft key [PARAMETER] on the ALL IO screen.
2
Press the EDIT switch on the machine operator’s panel or enter state emergency stop.
3
Press the soft key [(OPRT)].
4
Press the soft key [F OUTPUT].
5
Set the file name to be output.
Type a file name, and press the soft key [F-NAME].
If the file name is omitted, default file name “CNC-PARA.TXT” is assumed.
6
Press the soft key [EXEC].
This starts outputting the parameter, and “OUTPUT” blinks in the lower right part of the screen.
When the write operation ends, the “OUTPUT” indication disappears.
To cancel the output, press the soft key [CAN].
8.3.3
Inputting and Outputting Offset Data
Offset data can be input and output using the ALL IO screen.
Inputting offset data
Procedure
1
Press the soft key [OFFSET] on the ALL IO screen.
2
Press the EDIT switch on the machine operator’s panel or enter state emergency stop.
3
Press the soft key [(OPRT)].
4
Press the soft key [N INPUT].
5
Set the name of the file that you want to input.
Type a file name, and press the soft key [F-NAME].
If the input file name is omitted, default input file name “TOOLOFST.TXT” is assumed.
6
Press the soft key [EXEC].
This starts reading the offset data, and “INPUT” blinks in the lower right part of the screen. When
the read operation ends, the “INPUT” indication disappears.
To cancel the input of the program, press the soft key [CAN].
- 461 -

8.DATA INPUT/OUTPUT
OPERATION
B-64304EN/02
Outputting offset data
Procedure
1
Press the soft key [OFFSET] on the ALL IO screen.
2
Press the EDIT switch on the machine operator’s panel or enter state emergency stop.
3
Press the soft key [(OPRT)].
4
Press the soft key [F OUTPUT].
5
Set the file name to be output.
Type a file name, and press the soft key [F-NAME].
If the file name is omitted, default file name “TOOLOFST.TXT” is assumed.
6
Press the soft key [EXEC].
This starts outputting the offset data, and “OUTPUT” blinks in the lower right part of the screen.
When the write operation ends, the “OUTPUT” indication disappears.
To cancel the output, press the soft key [CAN].
8.3.4
Inputting/Outputting Pitch Error Compensation Data
Pitch error compensation data can be input and output using the ALL IO screen.
Inputting pitch error compensation data
Procedure
1
Press the function key
2
Press the continuous menu key
until soft key [SETTING] appears.
Press the soft key [SETTING].
3
Press the MDI switch on the machine operator’s panel or enter state emergency stop.
4
Enter 1 in response to the prompt for “PARAMETER WRITE” in setting data. Alarm SW0100
appears.
5
Press the soft key [PITCH] on the ALL IO screen.
6
Press the EDIT switch on the machine operator’s panel or enter state emergency stop.
7
Press the soft key [(OPRT)].
8
Press the soft key [N INPUT].
9
Set the name of the file that you want to input.
Type a file name, and press the soft key [F-NAME].
If the input file name is omitted, default input file name “PITCH.TXT” is assumed.
10 Press the soft key [EXEC].
This starts reading the pitch error compensation data, and “INPUT” blinks in the lower right part of
the screen. When the read operation ends, the “INPUT” indication disappears.
To cancel the input of the program, press the soft key [CAN].
11 Press the function key
12 Press the soft key [SETTING].
13 Press the MDI switch on the machine operator’s panel or enter state emergency stop.
14 Enter 0 in response to the prompt for “PARAMETER WRITE” in setting data.
15 Turn the power of the CNC on again.
Outputting pitch error compensation data
Procedure
1
Press the soft key [PITCH] on the ALL IO screen.
2
Press the EDIT switch on the machine operator’s panel or enter state emergency stop.
3
Press the soft key [(OPRT)].
4
Press the soft key [F OUTPUT].
- 462 -

B-64304EN/02
OPERATION
8.DATA INPUT/OUTPUT
5
Set the file name to be output.
Type a file name, and press the soft key [F-NAME].
If the file name is omitted, default file name “PITCH.TXT” is assumed.
6
Press the soft key [EXEC].
This starts outputting the pitch error compensation data, and “OUTPUT” blinks in the lower right
part of the screen. When the write operation ends, the “OUTPUT” indication disappears.
To cancel the output, press the soft key [CAN].
8.3.5
Inputting/Outputting Custom Macro Common Variables
Custom macro common variables can be input and output using the ALL IO screen.
Inputting custom macro common variables
Procedure
1
Press the soft key [MACRO] on the ALL IO screen.
2
Press the EDIT switch on the machine operator’s panel or enter state emergency stop.
3
Press the soft key [(OPRT)].
4
Press the soft key [N INPUT].
5
Set the name of the file that you want to input.
Type a file name, and press the soft key [F-NAME].
If the input file name is omitted, default input file name “MACRO.TXT” is assumed.
6
Press the soft key [EXEC].
This starts reading the custom macro common variables, and “INPUT” blinks in the lower right part
of the screen. When the read operation ends, the “INPUT” indication disappears.
To cancel the input of the program, press the soft key [CAN].
Outputting custom macro common variables
Procedure
1
Press the soft key [MACRO] on the ALL IO screen.
2
Press the EDIT switch on the machine operator’s panel or enter state emergency stop.
3
Press the soft key [(OPRT)].
4
Press the soft key [F OUTPUT].
5
Set the file name to be output.
Type a file name, and press the soft key [F-NAME].
If the file name is omitted, default file name “MACRO.TXT” is assumed.
6
Press the soft key [EXEC].
This starts outputting the custom macro common variables, and “OUTPUT” blinks in the lower right
part of the screen. When the write operation ends, the “OUTPUT” indication disappears.
To cancel the output, press the soft key [CAN].
8.3.6
Inputting and Outputting Workpiece Coordinates System
Data
Workpiece coordinates system data can be input and output using the ALL IO screen.
Inputting workpiece coordinate system data
Procedure
1
Press the soft key [WORK] on the ALL IO screen.
2
Press the EDIT switch on the machine operator’s panel or enter state emergency stop.
3
Press the soft key [(OPRT)].
4
Press the soft key [N INPUT].
- 463 -
8.DATA INPUT/OUTPUT
OPERATION
B-64304EN/02
5
Set the name of the file that you want to input.
Type a file name, and press the soft key [F-NAME].
If the input file name is omitted, default input file name “EXT_WKZ.TXT” is assumed.
6
Press the soft key [EXEC].
This starts reading the workpiece coordinate system data, and “INPUT” blinks in the lower right part
of the screen. When the read operation ends, the “INPUT” indication disappears.
To cancel the input of the program, press the soft key [CAN].
Outputting workpiece coordinate system data
Procedure
1
Press the soft key [WORK] on the ALL IO screen.
2
Press the EDIT switch on the machine operator’s panel or enter state emergency stop.
3
Press the soft key [(OPRT)].
4
Press the soft key [F OUTPUT].
5
Set the file name to be output.
Type a file name, and press the soft key [F-NAME].
If the file name is omitted, default file name “EXT_WKZ.TXT” is assumed.
6
Press the soft key [EXEC].
This starts outputting the workpiece coordinate system data, and “OUTPUT” blinks in the lower
right part of the screen. When the write operation ends, the “OUTPUT” indication disappears.
To cancel the output, press the soft key [CAN].
8.3.7
File Format
Explanation
-
File format
All files output to or input from external I/O devices are text files. The format is described below.
A file starts with % or LF, followed by the actual data. A file always ends with %. In an input
operation, data between the first % and the next LF is skipped. Each block ends with an LF, not a
semicolon (;).
• LF:
0A (hexadecimal) of ASCII code
• When a file containing lowercase letters, kana characters, and several special characters (such as $, \,
and !) is written, those letters and characters are ignored.
Example)
%
O0001(MEMORY CARD SAMPLE FILE)
G17 G49 G97
G92 X-11.3 Y2.33
:
:
M30
%
• ASCII codes are always used when data is input to or output from a memory card regardless of the
setting parameter (ISO/EIA).
• Bit 3 (NCR) of parameter No. 0100 can be used to specify whether the end of block code (EOB) is
output as "LF" only, or as "LF, CR, CR."
- 464 -
B-64304EN/02
OPERATION
8.DATA INPUT/OUTPUT
8.4
MEMORY CARD SCREEN
8.4.1
Displaying the Memory Card Screen
Procedure
1
Press the function key
2
Press the soft key [DIR]. The program list screen appears.
(If the soft key does not appear, press the continuous menu key
.)
3
Press the soft key [(OPRT)].
4
Press the soft key [DEVICE CHANGE].
5
Press the soft key [MEMORY CARD], then the memory card screen appears.
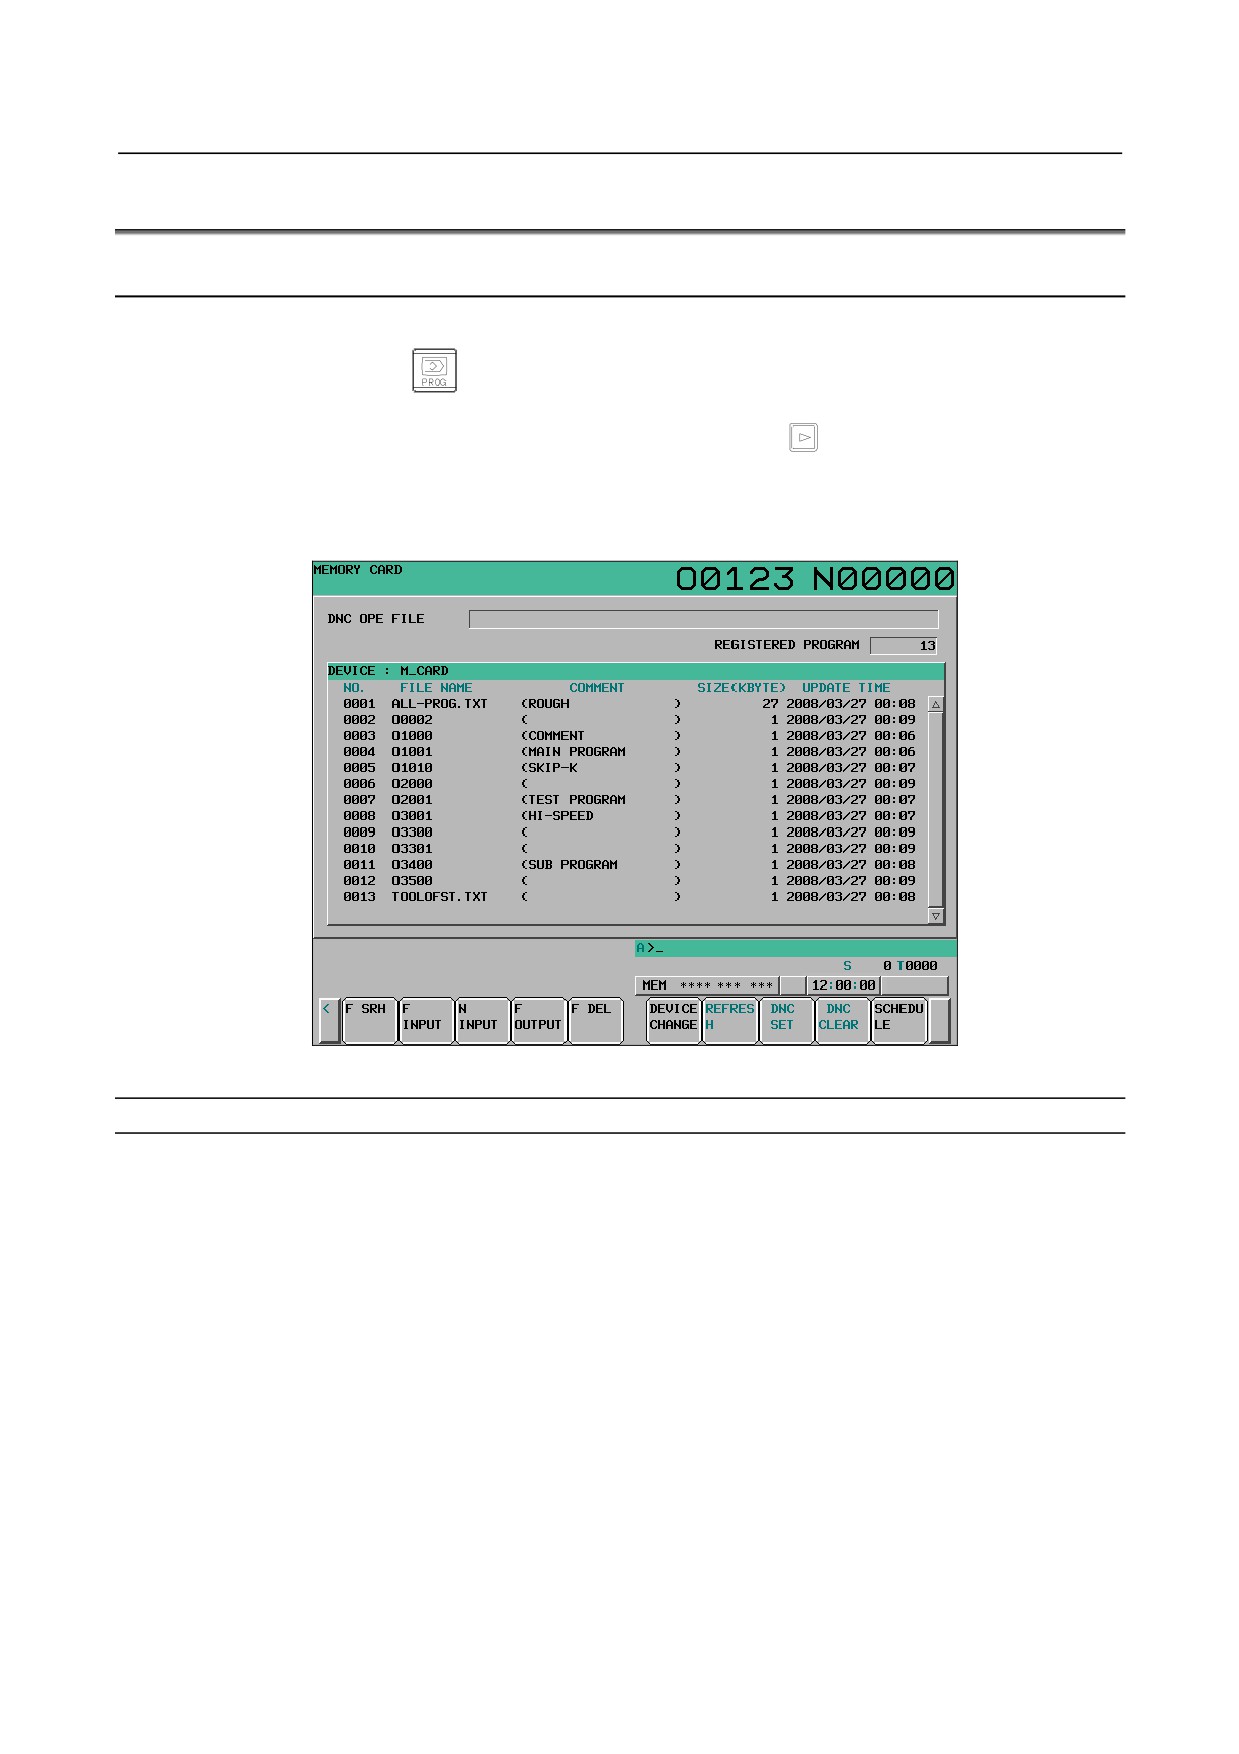
Fig. 8.4.1 (a) Memory card screen
Display item
DNC OPE FILE
The file name to be subjected to DNC operation is displayed.
REGISTERED PROGRAM
The number of registered files is displayed.
NO.
The file number is displayed.
FILE NAME
The file name is displayed.
COMMENT
The program comment is displayed.
SIZE(KBYTE)
The memory capacity the file takes is displayed.
- 465 -
8.DATA INPUT/OUTPUT
OPERATION
B-64304EN/02
UPDATE TIME
The update date of the file is displayed.
8.4.2
Displaying and Operating the File List
DIR +
For the 8.4-inch display unit, the displays can be changed between the comment and the size/date.
REFRESH
Display data can be updated.
F SRH
A file can be searched for. The file found is displayed at the beginning of the list.
1
Press the soft key [F SRH].
2
Enter the file number of a file to be searched for.
3
Press the soft key [F SET].
4
•
To execute the search request, press the soft key [EXEC].
•
To cancel the search request, press the soft key [CAN].
F DEL
A file can be deleted.
<Using a file number to specify a file to be deleted>
1
Press the soft key [F DEL].
2
Enter the file number of a file to be deleted.
3
Press the soft key [F SET].
4
•
To execute the delete request, press the soft key [EXEC].
•
To cancel the delete request, press the soft key [CAN].
<Using a file name to specify a file to be deleted>
1
Press the soft key [F DEL].
2
Enter the name of a file to be deleted.
3
Press the soft key [F-NAME].
4
•
To execute the delete request, press the soft key [EXEC].
•
To cancel the delete request, press the soft key [CAN].
DEVICE CHANGE
A device can be selected on the program list screen.
1
Press the soft key [CHANGE DEVICE].
2
Press the soft key for a device to be changed.
DNC SET
A file to be subjected to DNC operation can be selected.
See Section 4.3, “DNC OPERATION” for details.
DNC CLEAR
The selection of a file to be subjected to DNC operation can be canceled.
See Section 4.3, “DNC OPERATION” for details.
SCHEDULE
The schedule list screen can be displayed.
See Section 4.4, “SCHEDULE OPERATION” for details.
- 466 -
B-64304EN/02
OPERATION
8.DATA INPUT/OUTPUT
8.4.3
Inputting/Outputting a File
A program can be input and output using the memory card screen.
Inputting a program (F INPUT)
1
Press the EDIT switch on the machine operator’s panel or enter state emergency stop.
2
Press the soft key [(OPRT)].
3
Press the soft key [F INPUT].
4
Set the file number that you want to input.
Type a file number, and press the soft key [F SET].
See the table below for details.
5
Set the program number to be used after the input.
Type a program number, and press the soft key [O SET].
If no program number is specified here, the program number in the file is adopted as is.
6
Press the soft key [EXEC].
This starts reading the program, and “INPUT” blinks in the lower right part of the screen. When the
read operation ends, the “INPUT” indication disappears.
To cancel the input of the program, press the soft key [CAN].
[F SET]
[O SET]
Input file name
Input program
Input program number
Continuous program
File for the program number
All programs in the program
BLANK
INPUT
numbers starting at one
specified with [O SET]
specified with [O SET]
specified with [O SET]
File name for the file number
All programs in the file
Program number at the
INPUT
BLANK
specified with [F SET]
specified with [F SET]
time the file is saved
Continuous program
File name for the file number
All programs in the file
INPUT
INPUT
numbers starting at one
specified with [F SET]
specified with [F SET]
specified with [O SET]
Inputting a file (N INPUT)
1
Press the EDIT switch on the machine operator’s panel or enter state emergency stop.
2
Press the soft key [(OPRT)].
3
Press the soft key [N INPUT].
4
Set the name of the file that you want to input.
Type a file name, and press the soft key [F-NAME].
See the table below for details.
5
Set the program number to be used after the input.
Type a program number, and press the soft key [O SET].
If no program number is specified here, the program number in the file is adopted as is.
6
Press the soft key [EXEC].
This starts reading the program, and “INPUT” blinks in the lower right part of the screen. When the
read operation ends, the “INPUT” indication disappears.
To cancel the input of the program, press the soft key [CAN].
[F-NAME]
[O SET]
Input file name
Input program
Input program number
Continuous program
File for the program number
All programs in the program
BLANK
INPUT
numbers starting at one
specified with [O SET]
specified with [O SET]
specified with [O SET]
File name set with
All programs in the file
Program number at the time
INPUT
BLANK
[F-NAME]
specified with [F-NAME]
the file is saved
- 467 -
8.DATA INPUT/OUTPUT
OPERATION
B-64304EN/02
[F-NAME]
[O SET]
Input file name
Input program
Input program number
Continuous program
File name set with
All programs in the file
INPUT
INPUT
numbers starting at one
[F-NAME]
specified with [F-NAME]
specified with [O SET]
Outputting a file
1
Press the EDIT switch on the machine operator’s panel or enter state emergency stop.
2
Press the soft key [(OPRT)].
3
Press the soft key [F OUTPUT].
4
Set the program that you want to output.
Type a program number, and press the soft key [O SET].
If -9999 is typed, all programs in the memory are output.
5
Set the file name to be output.
Type a file name, and press the soft key [F-NAME].
When no file name is set, the output file name is assumed to be “O”“number” if a single program
number is specified; if -9999 is specified, the output file name is assumed to be “ALL-PROG.TXT”.
See the table below for details.
6
Press the soft key [EXEC].
This starts outputting the program, and “OUTPUT” blinks in the lower right part of the screen.
When the write operation ends, the “OUTPUT” indication disappears.
To cancel the output, press the soft key [CAN].
[F-NAME]
[O SET]
Output file name
Output program
Main program or program number
Main program or program being subjected to
BLANK
BLANK
being subjected to background editing
background editing
All programs in the program memory that are
BLANK
-9999
ALL-PROG.TXT
displayed in the program list
BLANK
INPUT
Program number set with [O SET]
Program in the NC that is set with [O SET]
Main program or program being subjected to
INPUT
BLANK
File name set with [F-NAME]
background editing
All programs in the program memory that are
INPUT
-9999
File name set with [F-NAME]
displayed in the program list
INPUT
INPUT
File name set with [F-NAME]
Program in the NC that is set with [O SET]
8.5
EMBEDDED ETHERNET OPERATIONS
8.5.1
FTP File Transfer Function
The operation of the FTP file transfer function is described below.
Host file list display
A list of the files held on the host computer is displayed.
Procedure
1
Press the function key
2
Press soft key [DIR+]. The program folder screen appears. (If the soft key does not appear, press the
continuous menu key.)
- 468 -
B-64304EN/02
OPERATION
8.DATA INPUT/OUTPUT
3
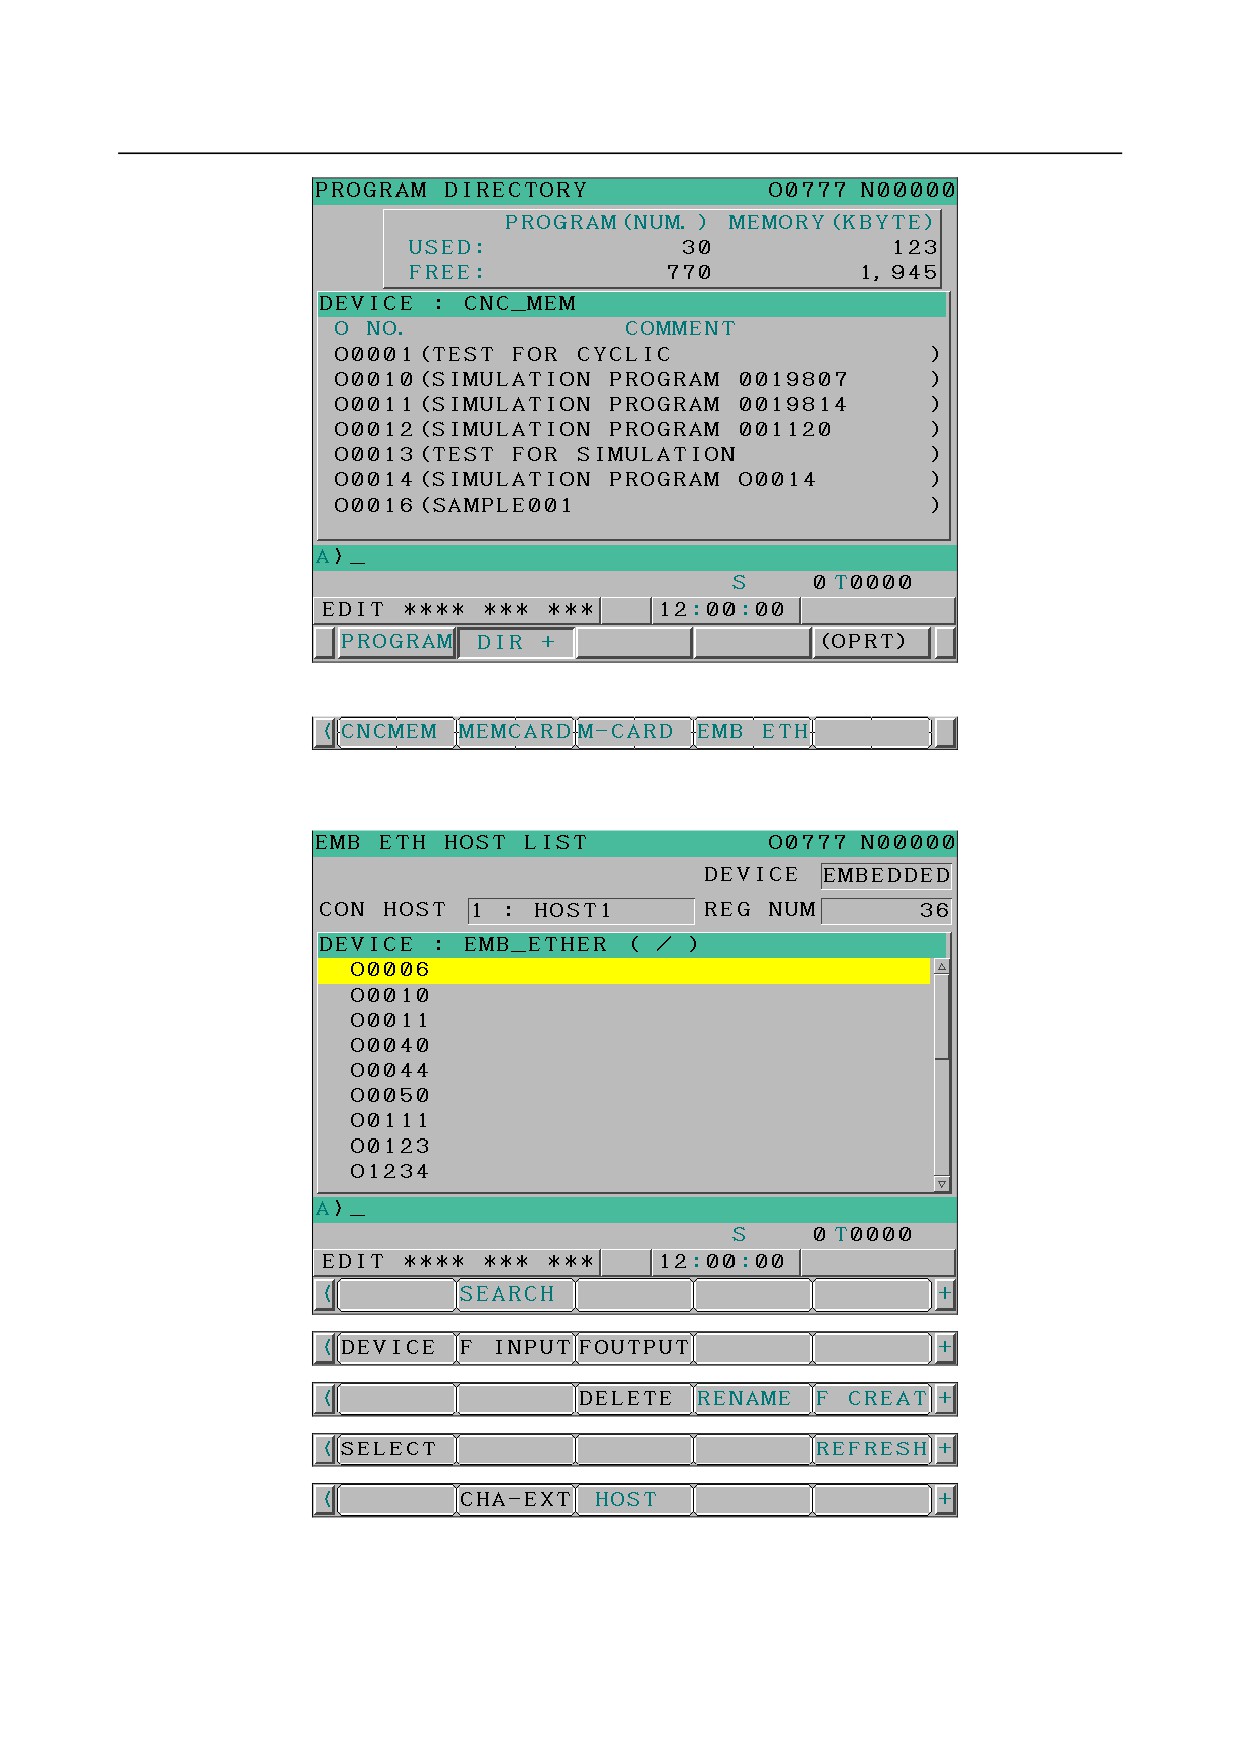
Press soft keys [(OPRT)] and [DEVICE] in that order. The soft keys for selectable devices appear.
4
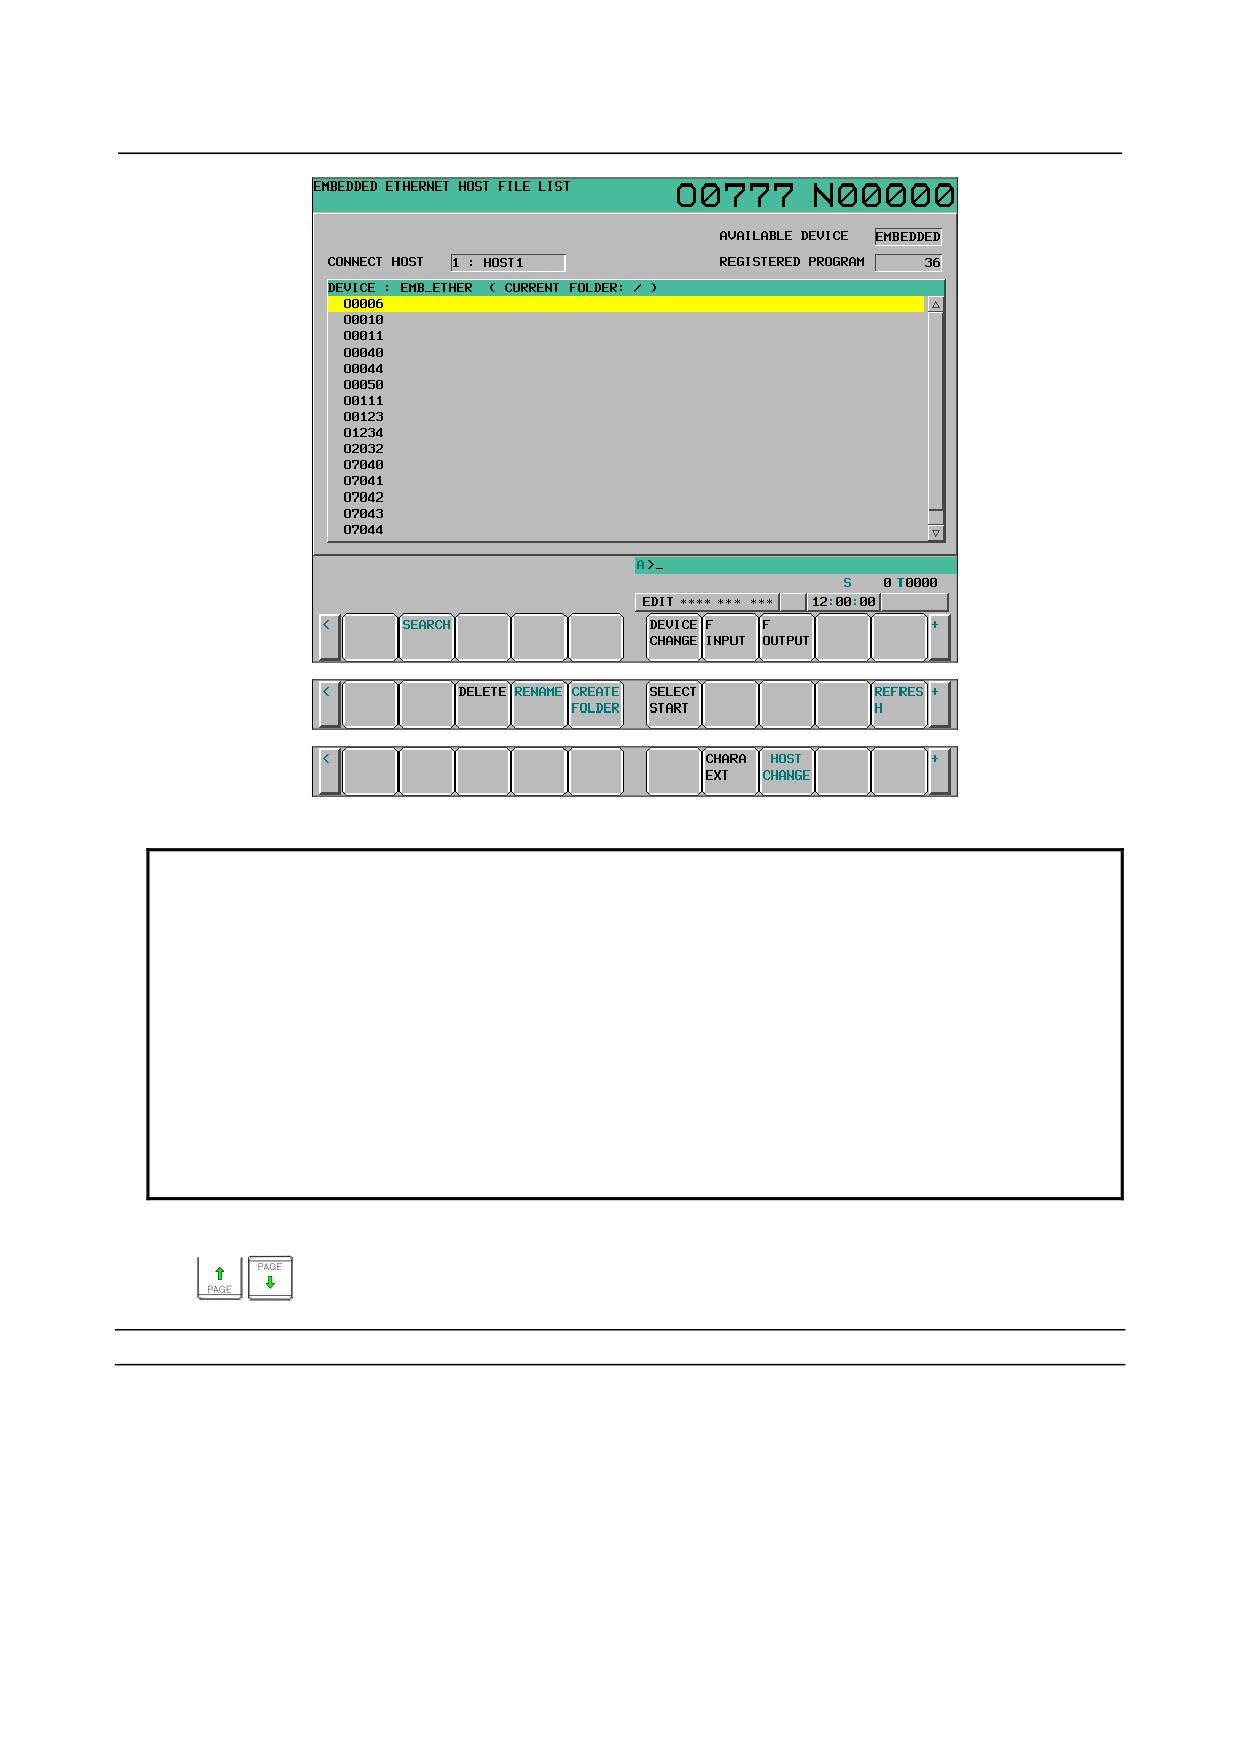
Pressing soft key [EMB ETH] displays the Embedded Ethernet host file list screen, on which a list
of files in the host computer connected with the embedded Ethernet port is displayed.
Embedded Ethernet host file list screen (8.4-inch LCD)
- 469 -
8.DATA INPUT/OUTPUT
OPERATION
B-64304EN/02
Embedded Ethernet host file list screen (10.4-inch LCD)
NOTE
When using the FTP file transfer function, check that the valid device is the
embedded Ethernet port.
The two conditions below determine a connection destination on the host file list
screen:
(1) Check that the valid device is the embedded Ethernet port. It is selected
using soft key [EMB/PCM] on the Ethernet setting screen.
(2) A host computer can be selected from connection destinations 1, 2, and 3.
A computer to be connected is selected using the operation procedure
described in Subsection 5.2.2.1, "Operation on the FTP file transfer setting
screen" or “HOST CHANGE” in the Subsection 5.4.1.1, "Displaying and
operating the file list" of MAINTENANCE MANUAL (B-64305EN).
5
When a list of files is larger than one page, the screen display can be switched using the page keys
Display item
DEVICE (AVAILABLE DEVICE)
The currently selected device is displayed.
CON HOST (CONNECT HOST)
Number of the currently connected host of the host computer
REG NUM (REGISTERED PROGRAM)
The number of files in the current folder.
DEVICE
Current device. When the embedded Ethernet host file list is selected, “EMB_ETHER” is displayed.
- 470 -

B-64304EN/02
OPERATION
8.DATA INPUT/OUTPUT
CURRENT FOLDER
Current work folder in the host computer
FILE LIST
Information of the files and folders in the host computer
Operation list
DEVICE (DEVICE CHANGE)
Enables a device to be selected from the program folder screen.
To select the embedded Ethernet host
file list, press soft key [EMB ETH].
DIR +
Switches between the outline and detailed file lists.
F CREAT (CREATE FOLDER)
Create a subfolder in the current work folder in the host computer.
DELETE
Deletes a file or folder in the host computer.
RENAME
Renames a file or folder in the host computer.
HOST (HOST CHANGE)
Changes the connected host computer.
SEARCH
Searches for a file through the current folder in the host computer.
REFRESH
Updates the information displayed on the embedded Ethernet host file list screen.
F INPUT
Transfers a program from the host computer to the CNC memory.
F OUTPUT
Transfers a program from the CNC memory to the host computer.
NOTE
The character strings enclosed in parentheses are those displayed when the
10.4-inch LCD unit is used.
Inputting programs
The following procedure can be used to transfer programs from the host computer to the CNC memory.
1
Press soft key [F INPUT].
2
Select a program in the host computer.
In the host computer, place the cursor on the file you want to input and press soft key [F GET], or
key in the file name.
3
Press soft key [F NAME].
4
If you want to rename a program when inputting it, key in the program number and press soft key [O
SET].
5
Press soft key [EXEC].
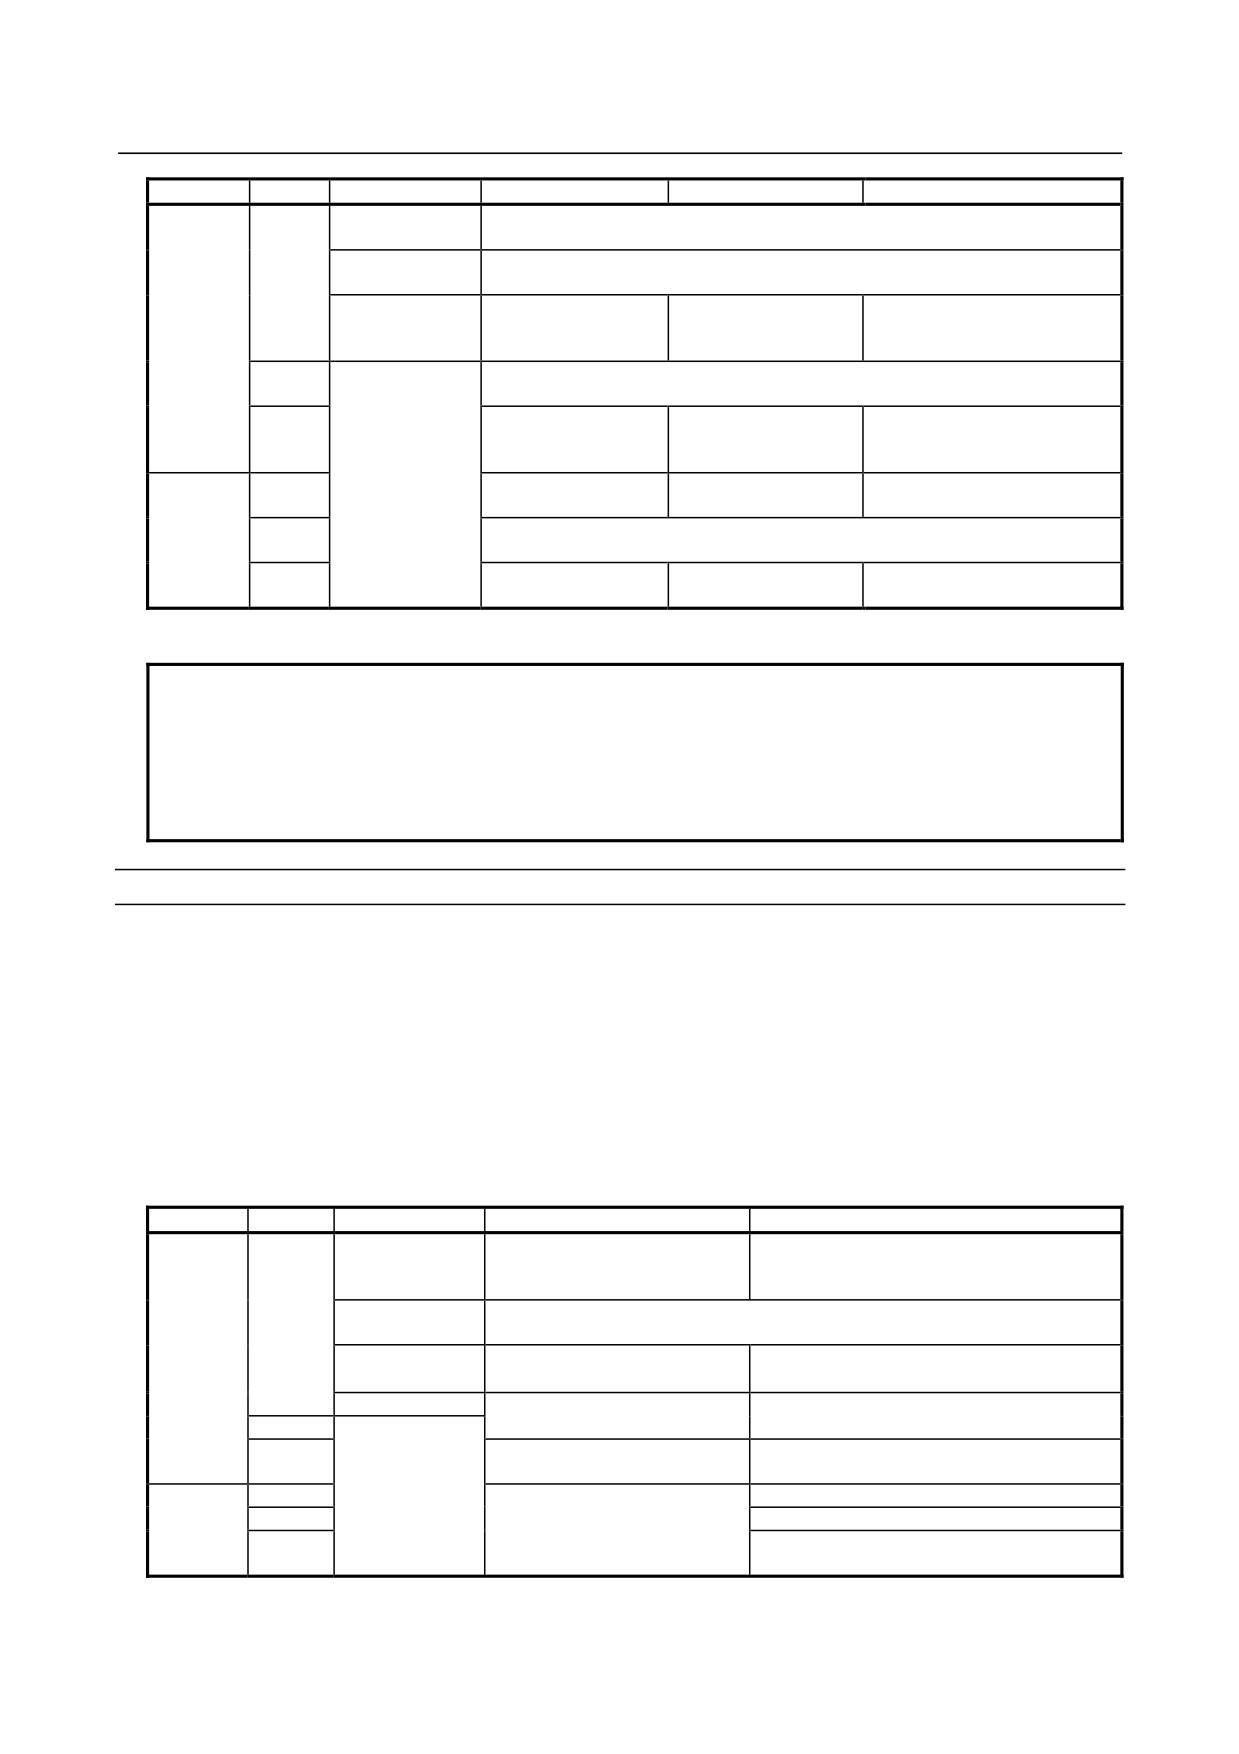
The following table summarizes what operation occurs when the input file name [F NAME] and input
program number [O SET] are omitted.
- 471 -
8.DATA INPUT/OUTPUT
OPERATION
B-64304EN/02
[F NAME]
[O SET]
Key input buffer
Input file name
Input program
Input program No.
Warning message “NO PROGRAM SELECTED” is displayed, and nothing is
–
input.
Warning message “THE WRONG DATA IS USED” is displayed, and nothing
Other than Oxxxx
-
is input.
File name set in the
Continuous program numbers
All programs in the
Oxxxx
key input buffer
starting at one (xxxx) set in
-
input file
(NOTE)
the key input buffer
Warning message “NO PROGRAM SELECTED” is displayed, and nothing is
-9999
input.
Same file name as
All programs in the
Continuous program numbers
O
program No. set by
input file
starting at one set by [O SET]
[O SET] (NOTE)
No relation
File name set by [F
All programs in a file
Program No. used when the
–
NAME]
specified by [F NAME]
program was saved
Warning message “THE WRONG DATA IS USED” is displayed, and nothing
O
-9999
is input.
File name set by [F
All programs in the file
Continuous program numbers
O
NAME]
specified by [F NAME]
starting at one set by [O SET]
O: Specified
- : Not specified
NOTE
The input file name consists of “O” followed by a 4-digit number.
If program input is executed by specifying program No. 1, for example, a file
whose file name is “O0001” is input.
If this operation is performed for path 2, the file name is suffixed with the file
extension “P-2” (for this example, “O0001.P-2”).
Outputting programs
The following procedure can be used to transfer programs from the CNC memory to the host computer.
1
Press soft key [FOUTPUT].
2
Select a program in the CNC.
Key in the program No. of the program to be output.
3
Press soft key [O SET].
4
If you want to rename a program when outputting it, key in the file name and press soft key [F
NAME].
5
Press soft key [EXEC].
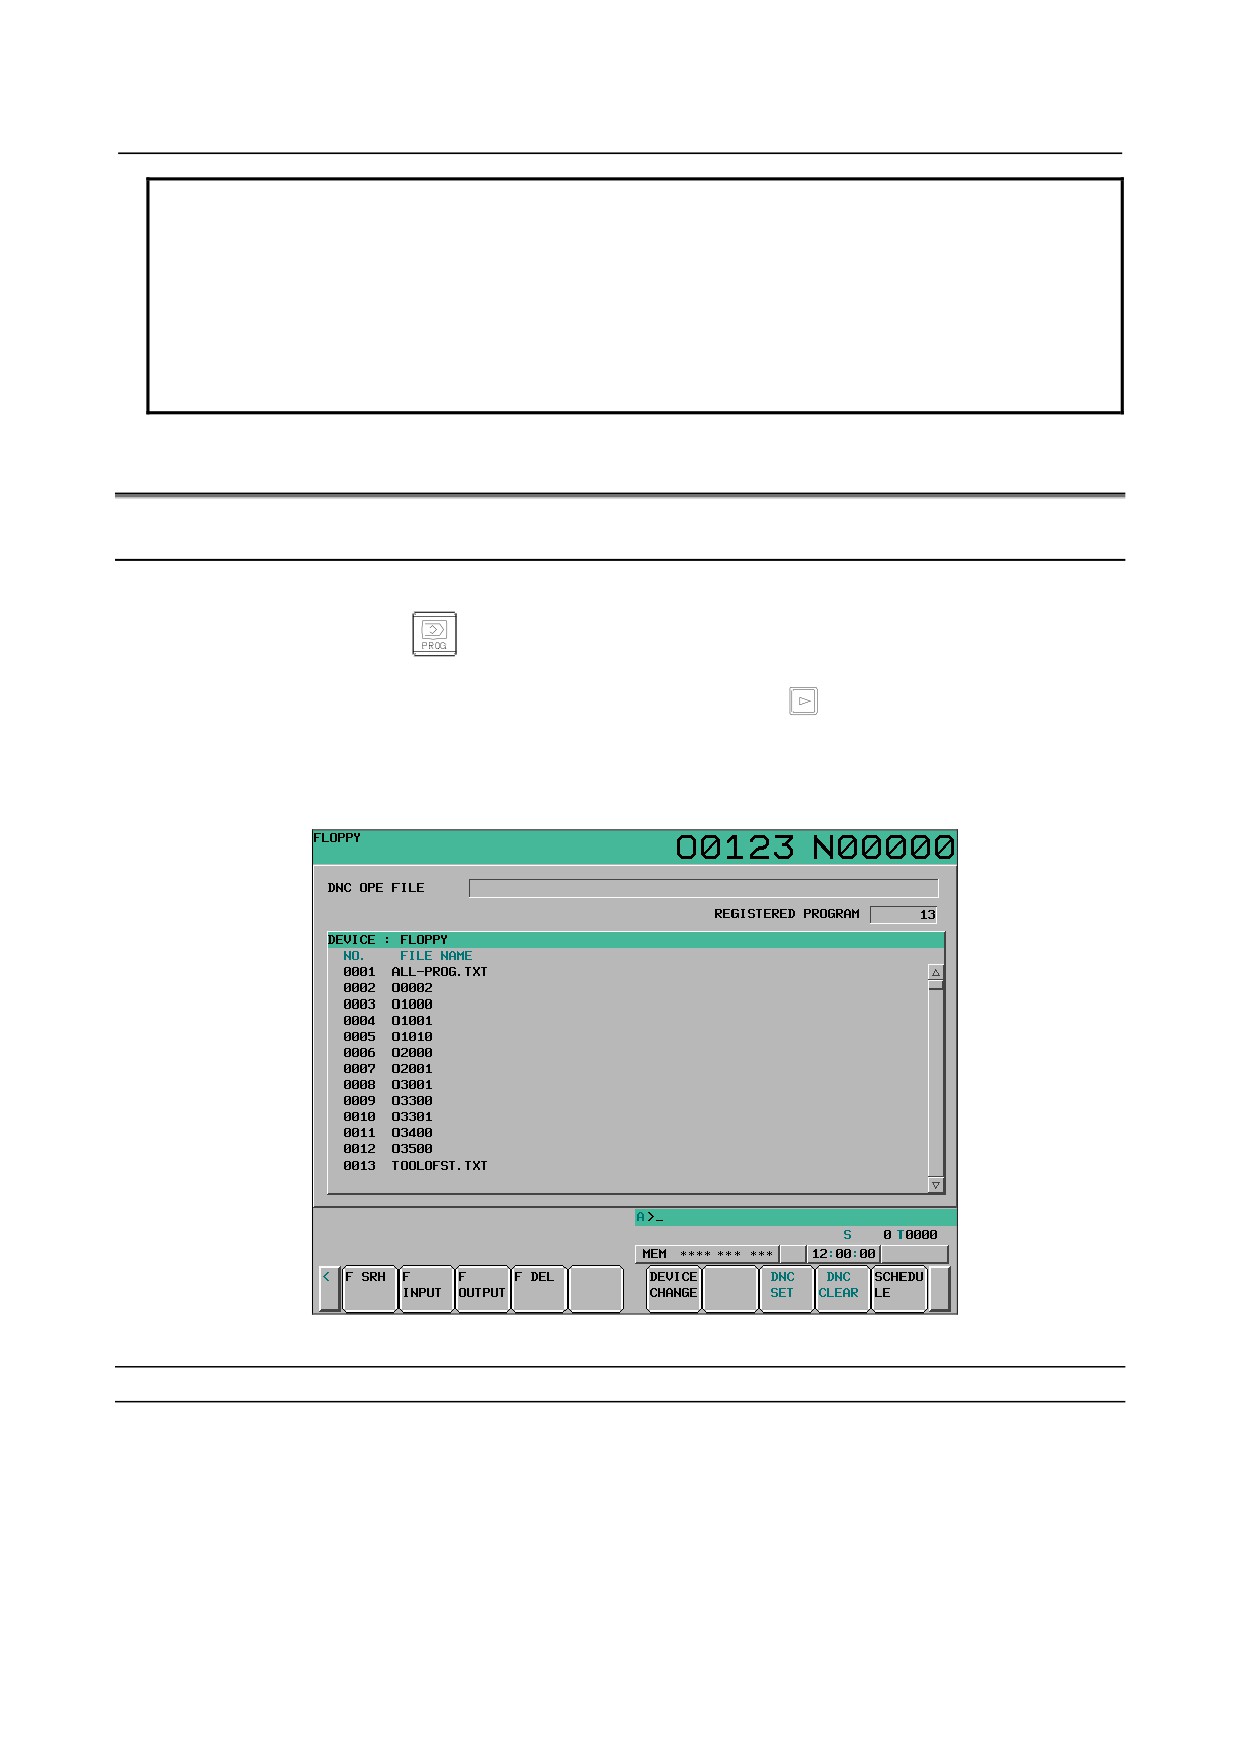
The following table summarizes what operation occurs when the output file name [F NAME] and output
program number [O SET] are omitted.
[F NAME]
[O SET]
Key input buffer
Output file name
Output program
Currently selected main
-
program name (NOTE 1 and
Currently selected main program (NOTE 1)
NOTE 2)
Other than
Warning message “THE WRONG DATA IS USED” is displayed, and
–
Oxxxx
nothing is output.
–
Program name set in the key
Program in the CNC memory set in the key
Oxxxx
input buffer (NOTE 2)
input butter
O-9999
ALL-PROG.TXT (NOTE 3)
All programs in the CNC memory
-9999
Same file name as program
Program in the CNC memory set by [O
O
No. set by [O SET] (NOTE 2)
SET]
–
No relation
Currently selected main program (NOTE 1)
-9999
All programs in the CNC memory
O
File name set by [F NAME]
Program in the CNC memory set by [O
O
SET]
O : Specified
- : Not specified
- 472 -
B-64304EN/02
OPERATION
8.DATA INPUT/OUTPUT
NOTE
1 If a file is undergoing background editing, it is output.
2 The output file name consists of “O” followed by a 4-digit number.
If a program whose program No. is 1 is output, for example, it is output under the
file name “O0001” to the host computer.
If this operation is performed for path 2, the file name is suffixed with the file
extension “P-2” (for this example, “O0001.P-2”).
3 If this operation is performed for path 2, the file name “ALL-PROG.P-2” is used.
8.6
FLOPPY CASSETTE SCREEN
8.6.1
Displaying the Floppy Cassette Screen
Procedure
1
Press the function key
2
Press the soft key [DIR]. The program list screen appears.
(If the soft key does not appear, press the continuous menu key
.)
3
Press the soft key [(OPRT)].
4
Press the soft key [DEVICE CHANGE].
5
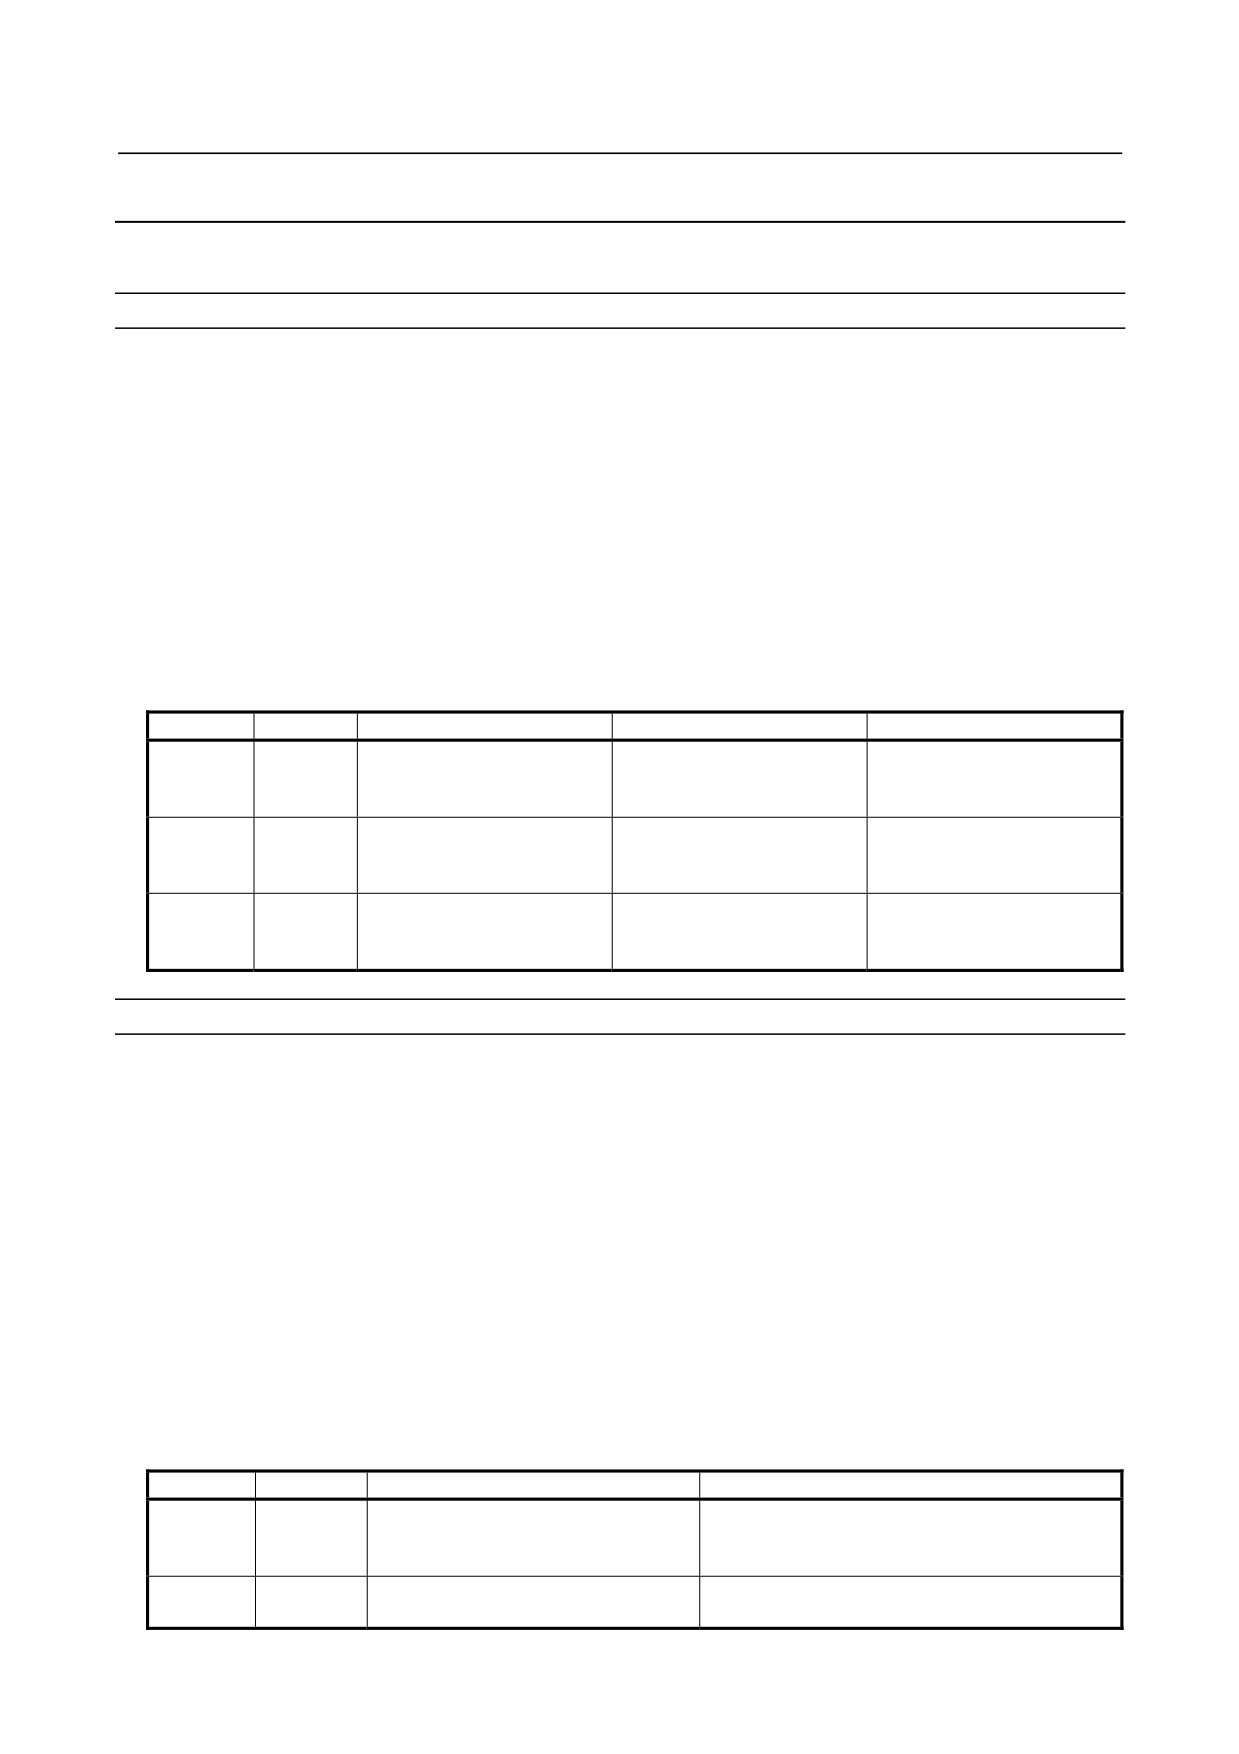
Press the soft key [FLOPPY], then the floppy cassette screen appears.
Fig. 8.6.1 (a) Floppy cassette screen
Display item
DNC OPE FILE
The file name to be subjected to DNC operation is displayed.
REGISTERED PROGRAM
The number of registered files is displayed.
NO.
The file number is displayed.
- 473 -
8.DATA INPUT/OUTPUT
OPERATION
B-64304EN/02
FILE NAME
The file name is displayed.
8.6.2
Displaying and Operating the File List
F SRH
A file can be searched for. The file found is displayed at the beginning of the list.
1
Press the soft key [F SRH].
2
Enter the file number of a file to be searched for.
3
Press the soft key [F SET].
4
•
To execute the search request, press the soft key [EXEC].
•
To cancel the search request, press the soft key [CAN].
F DEL
A file can be deleted.
<Using a file number to specify a file to be deleted>
1
Press the soft key [F DEL].
2
Enter the file number of a file to be deleted.
3
Press the soft key [F SET].
4
•
To execute the delete request, press the soft key [EXEC].
•
To cancel the delete request, press the soft key [CAN].
<Using a file name to specify a file to be deleted>
1
Press the soft key [F DEL].
2
Enter the name of a file to be deleted.
3
Press the soft key [F-NAME].
4
•
To execute the delete request, press the soft key [EXEC].
•
To cancel the delete request, press the soft key [CAN].
DEVICE CHANGE
A device can be selected on the program list screen.
1
Press the soft key [CHANGE DEVICE].
2
Press the soft key for a device to be changed.
DNC SET
A file to be subjected to DNC operation can be selected.
See Section 4.3, “DNC OPERATION” for details.
DNC CLEAR
The selection of a file to be subjected to DNC operation can be canceled.
See Section 4.3, “DNC OPERATION” for details.
SCHEDULE
The schedule list screen can be displayed.
See Section 4.4, “SCHEDULE OPERATION” for details.
- 474 -
B-64304EN/02
OPERATION
8.DATA INPUT/OUTPUT
8.6.3
Inputting/Outputting a File
A program can be input and output using the floppy cassette screen.
Inputting a file
1
Press the EDIT switch on the machine operator’s panel or enter state emergency stop.
2
Press the soft key [(OPRT)].
3
Press the soft key [F INPUT].
4
Set the file number that you want to input.
Type a file number, and press the soft key [F SET].
See the table below for details.
5
Set the program number to be used after the input.
Type a program number, and press the soft key [O SET].
If no program number is specified here, the program number in the file is adopted as is.
6
Press the soft key [EXEC].
This starts reading the program, and “INPUT” blinks in the lower right part of the screen. When the
read operation ends, the “INPUT” indication disappears.
To cancel the input of the program, press the soft key [CAN].
[F SET]
[O SET]
Input file name
Input program
Input program number
File for the program number
Continuous program
All programs in the program
BLANK
INPUT
specified with
numbers starting at one
specified with [O SET]
[O SET]
specified with [O SET]
File name for the file
All programs in the file
Program number at the time
INPUT
BLANK
number specified with
specified with [F SET]
the file is saved
[F SET]
File name for the file
Continuous program
All programs in the file
INPUT
INPUT
number specified with
numbers starting at one
specified with [F SET]
[F SET]
specified with [O SET]
Outputting a file
1
Press the EDIT switch on the machine operator’s panel or enter state emergency stop.
2
Press the soft key [(OPRT)].
3
Press the soft key [F OUTPUT].
4
Set the program that you want to output.
Type a program number, and press the soft key [O SET].
If -9999 is typed, all programs in the memory are output.
5
Set the file name to be output.
Type a file name, and press the soft key [F-NAME].
When no file name is set, the output file name is assumed to be “O”“number” if a single program
number is specified; if -9999 is specified, the output file name is assumed to be “ALL-PROG.TXT”.
See the table below for details.
6
Press the soft key [EXEC].
This starts outputting the program, and “OUTPUT” blinks in the lower right part of the screen.
When the write operation ends, the “OUTPUT” indication disappears.
To cancel the output, press the soft key [CAN].
[F-NAME]
[O SET]
Output file name
Output program
Main program or program number
Main program or program being subjected to
BLANK
BLANK
being subjected to background
background editing
editing
All programs in the program memory that are
BLANK
-9999
ALL-PROG.TXT
displayed in the program list
- 475 -
8.DATA INPUT/OUTPUT
OPERATION
B-64304EN/02
[F-NAME]
[O SET]
Output file name
Output program
BLANK
INPUT
Program number set with [O SET]
Program in the NC that is set with [O SET]
All programs in the program memory that are
INPUT
BLANK
File name set with [F-NAME]
displayed in the program list
Main program or program being subjected to
INPUT
-9999
File name set with [F-NAME]
background editing
INPUT
INPUT
File name set with [F-NAME]
Program in the NC that is set with [O SET]
8.7
SCREEN HARD COPY FUNCTION
Overview
This function converts screen information displayed on the CNC into bit map format data and output it to
a memory card. Once output, bit map format data can be displayed and edited on a personal computer.
Explanation
-
Start/cancellation methods
The screen hard copy function is started by pressing and holding down key
for five seconds. The
function can be canceled by pressing key
or by changing the hard copy cancellation request signal
HCABT<G067.6> to "1".
While the screen hard copy function is in progress, the hard copy execution status signal
HCEXE<F061.3> is "1", and upon completion, it is set to "0". When a screen hard copy cancellation
request is received, the hard copy cancellation request reception signal HCAB2<F061.2> is set to "1" and
remains in the "1" state until the hard copy function is started again or a reset is made.
-
Acquisition and output of screen data
When started, the screen hard copy function starts acquiring screen data. As soon as it has acquired it, the
function outputs bit map format data to the memory card inserted into the LCD unit. While screen data is
being acquired, the screen remains stationary for a few seconds. Acquired screen data can be output from
the memory card screen. Also, while screen data is being output, "OUTPUT" blinks in the status display.
-
Screen data file names
Bit map format screen data files created by this function are assigned the names below, starting with the
one created after the power is turned on.
"HDCPY000.BMP" (name of the first file output to the memory card after the power is turned on)
"HDCPY001.BMP" (name of the second file output to the memory card after the power is turned on)
:
:
"HDCPY999.BMP" (name of the 1000th file output to the memory card after the power is turned on)
If, after a file with "HDCPY999.BMP" is output, the screen hard copy function is executed, the file name
returns to "HDCPY000.BMP". If, however, a file with the same file name as the one to be output when
the screen hard copy function is executed exists on the memory card, alarm SR1973 is issued. If the
capacity of the memory card is exceeded, alarm SR1962 is issued.
Since no screen data in output in both cases, rename or delete the file or replace the memory card with a
new one.
Limitation
- Screens whose hard copies cannot be made
Hard copies of the BOOT screen, the IPL screen, and the system alarm screen cannot be made.
- Foreground I/O devices
During DNC operation, for example, screen data cannot be output while a foreground I/O device is in use.
- 476 -
B-64304EN/02
OPERATION
8.DATA INPUT/OUTPUT
- Canceling the hard copy function
If the hard copy function is canceled before a hard copy is completed, an incomplete bit map file of data
that has been output is created.
- 477 -
9.CREATING PROGRAMS
OPERATION
B-64304EN/02
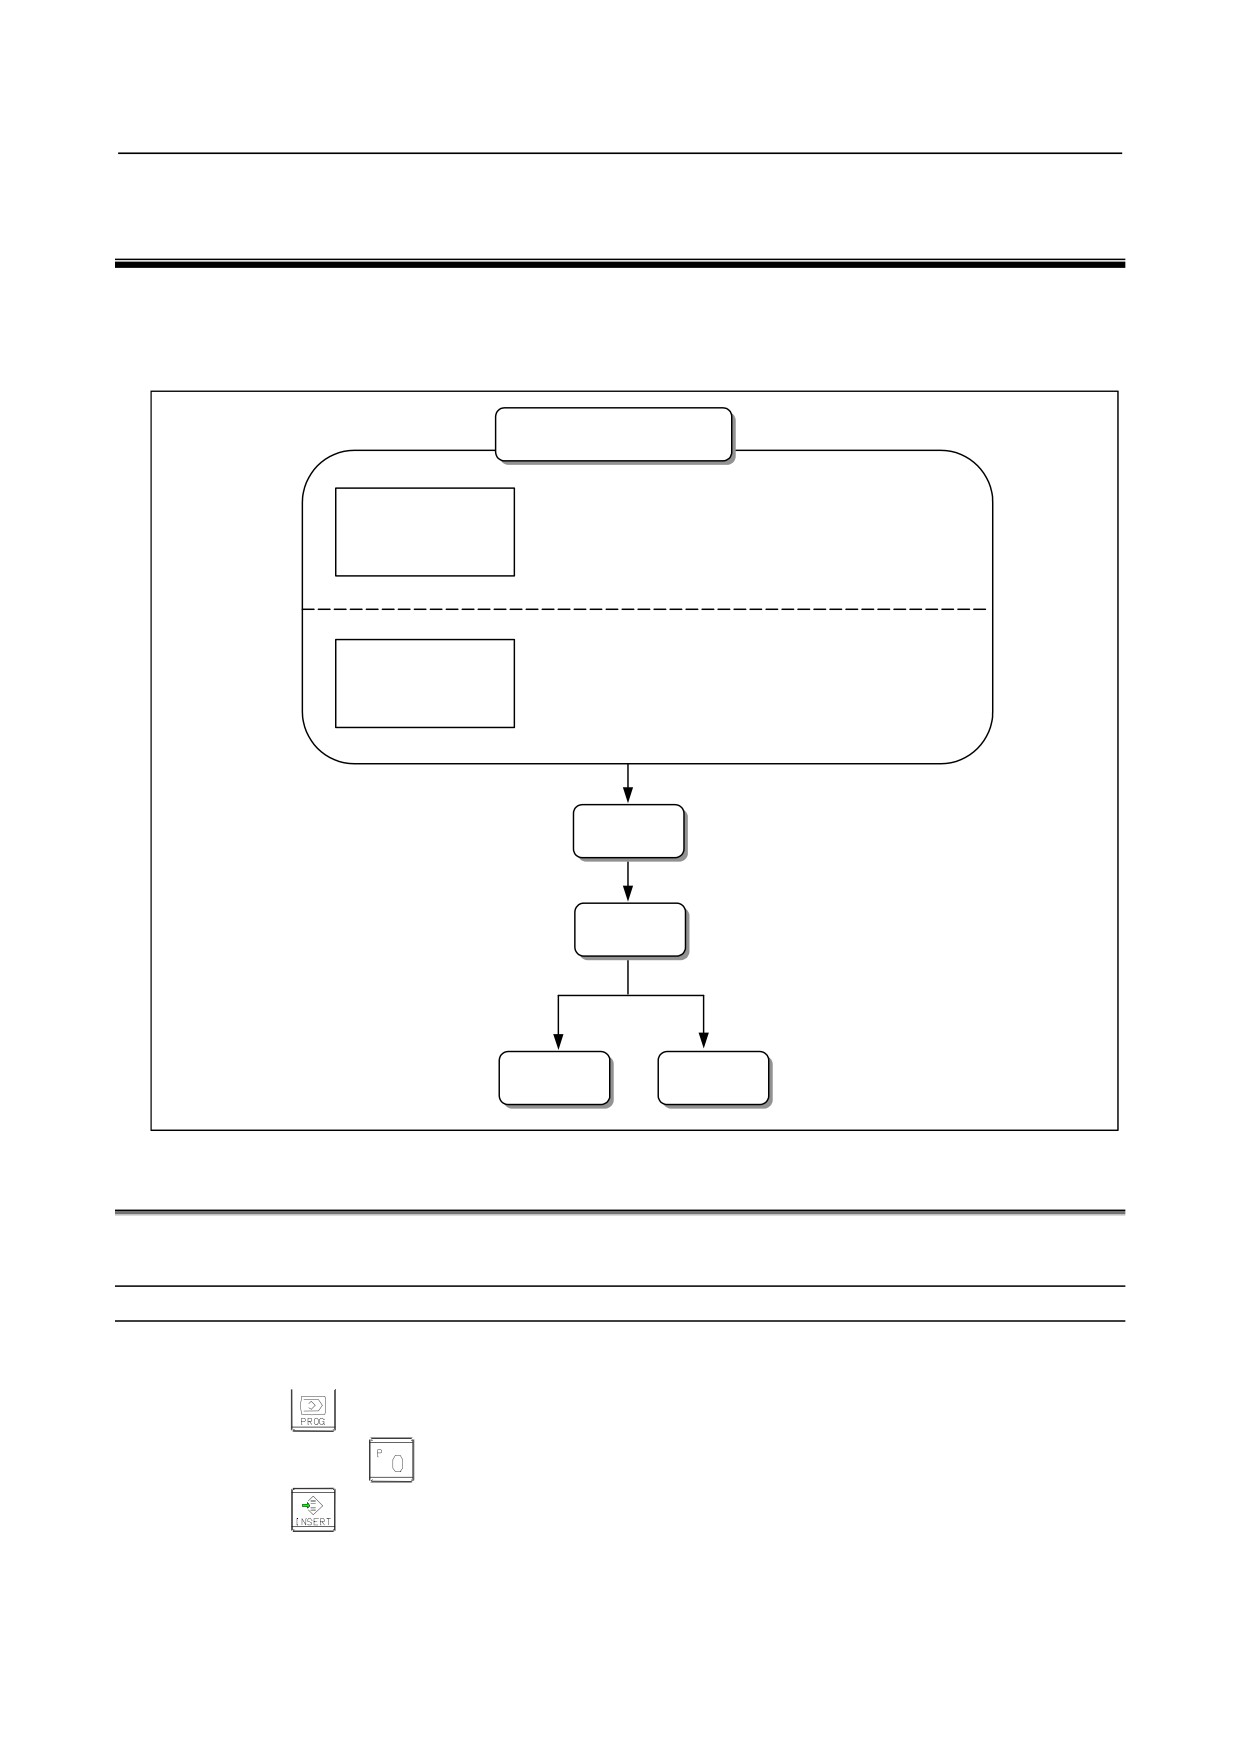
9 CREATING PROGRAMS
This chapter explains how to create programs by MDI of the CNC.
This chapter also explains automatic insertion of sequence numbers and how to create programs in
TEACH IN mode.
Creation/registration
Creating programs using MDI panel
See III-9.1
Program creation
Automatic insertion of sequence numbers
See III-9.2
Creating programs in TEACH IN mode
See III-9.3
Conversational programming
with graphic function
See III-9.4
Program
Registration from external input
See III-8.2.1
registration
See III-8.3.1
Editing
Management
Output
Execution
9.1
CREATING PROGRAMS USING THE MDI PANEL
Programs can be created in the EDIT mode using the program editing functions described in III-10.
Procedure for Creating Programs Using the MDI Panel
1
Enter the EDIT mode.
2
Press the
key.
3
Press address key
and enter the program number.
4
Press the
key.
5
Create a program using the program editing functions described in III-10.
- 478 -
B-64304EN/02
OPERATION
9.CREATING PROGRAMS
Explanation
-
Comments in a program
Comments can be written in a program using the control in/out codes.
Example) O0001 (TEST PROGRAM) ;
M08 (COOLANT ON) ;
• When the
key is pressed after the control-out code "(", comments, and control-in code ")"
have been typed, the typed comments are registered.
• When the
key is pressed midway through comments, to enter the rest of comments later, the
data typed before the
key is pressed may not be correctly registered (not entered, modified, or
lost) because the data is subject to an entry check which is performed in normal editing.
• Control-out code "(" or Control-in code ")" cannot be registered by itself.
9.2
AUTOMATIC INSERTION OF SEQUENCE NUMBERS
Sequence numbers can be automatically inserted in each block when a program is created using the MDI
keys in the EDIT mode.
Set the increment for sequence numbers in parameter No. 3216.
Procedure for automatic insertion of sequence numbers
Procedure
1
Enter 1 in response to the prompt for "SEQUENCE NO." in setting data. (see III-12.3.1).
2
Enter the EDIT mode.
3
Press
key to display the program screen.
4
Search for or register the number of a program to be edited and move the cursor to the EOB (;) of the
block after which automatic insertion of sequence numbers is started.
When a program number is registered and an EOB (;) is entered with the
key, sequence
numbers are automatically inserted starting with 0. Change the initial value, if required, according to
step 10, then skip to step 7.
5
Press address key
and enter the initial value of N.
6
Press
key.
7
Enter each word of a block.
8
Press
key.
- 479 -
9.CREATING PROGRAMS
OPERATION
B-64304EN/02
9
Press
key. The EOB is registered in memory and sequence numbers are automatically
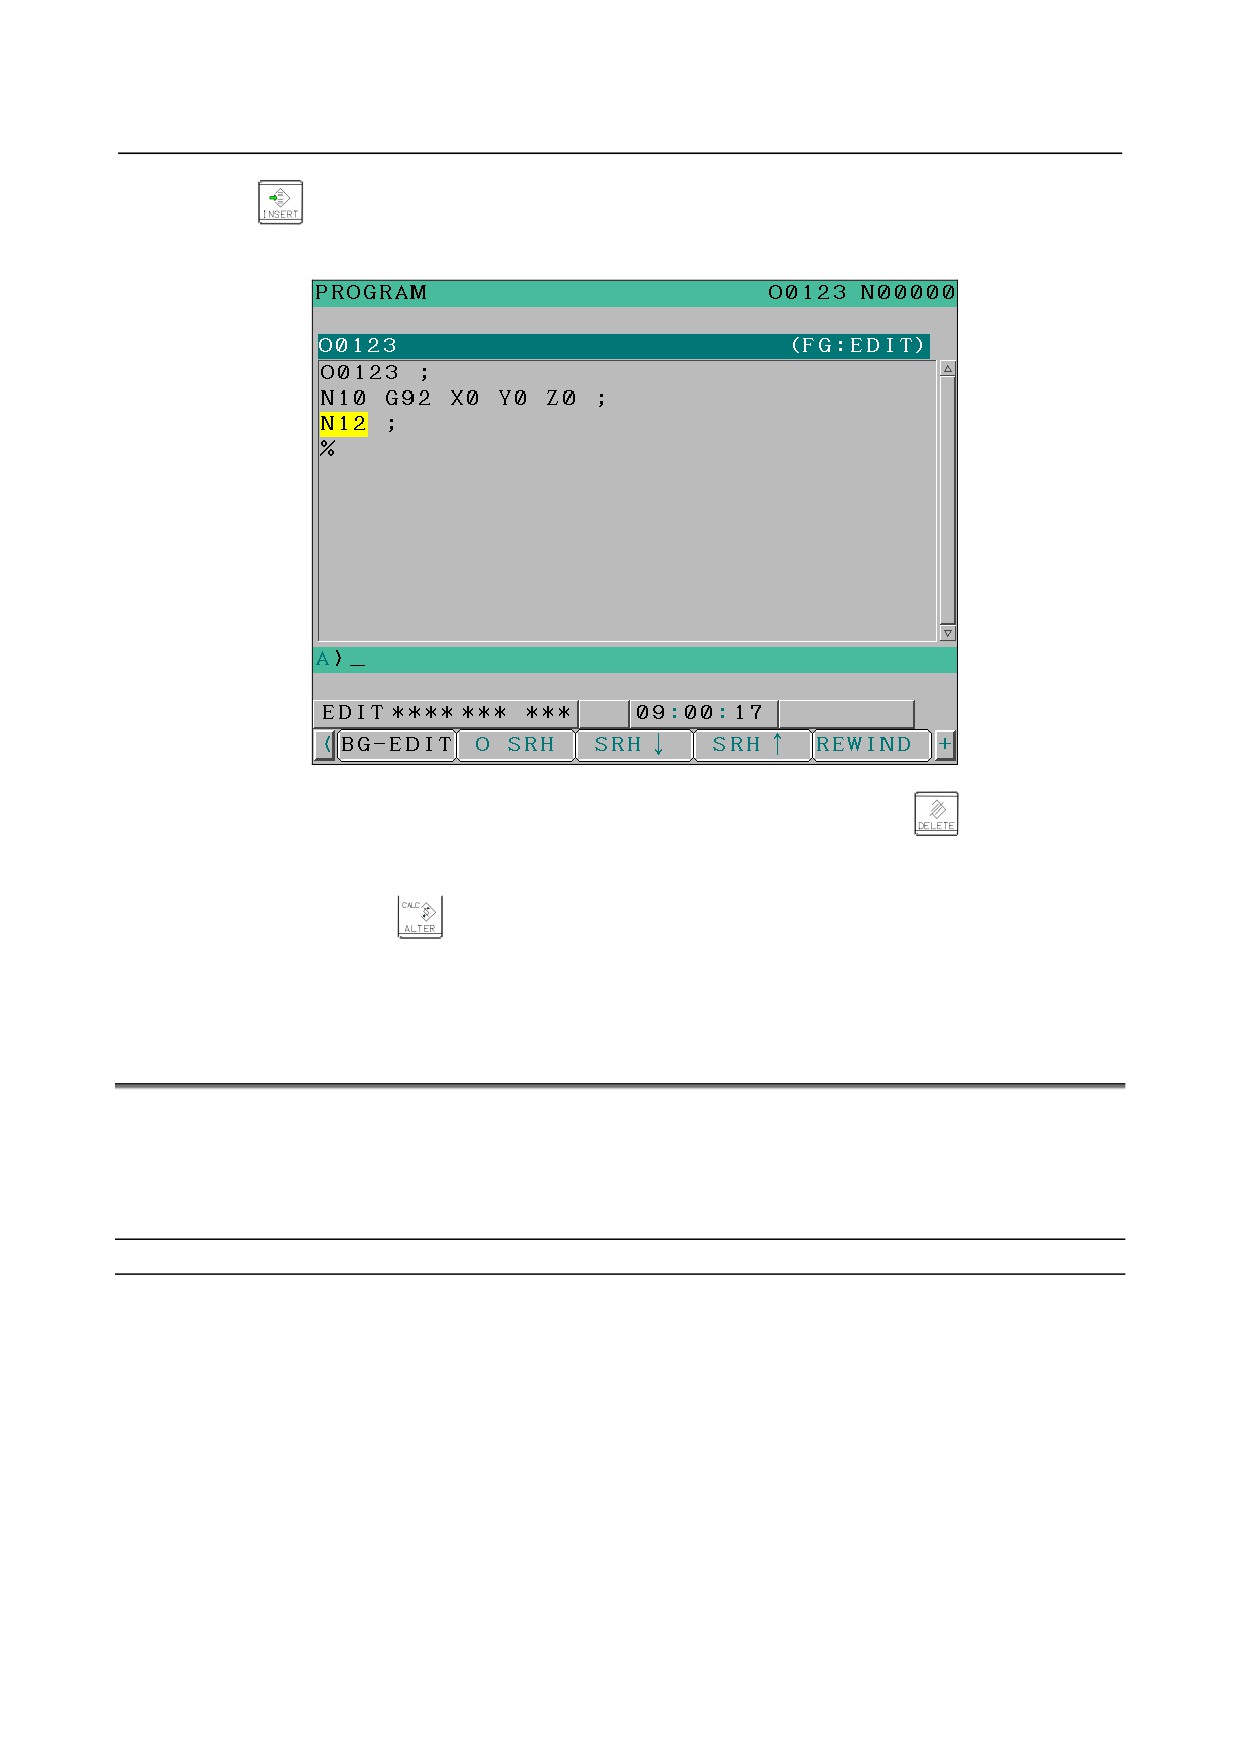
inserted. For example, if the initial value of N is 10 and the parameter for the increment is set to 2,
N12 inserted and displayed below the line where a new block is specified.
10 In the example above, if N12 is not necessary in the next block, pressing the
key after N12 is
displayed deletes N12.
If wishing to insert N100, not N12, into the next block, type N100 immediately after N12 is
displayed, and press
This causes N100 to be registered and the initial value to be changed
to 100.
9.3
CREATING PROGRAMS IN TEACH IN MODE
(PLAYBACK)
In the TEACH IN JOG or TEACH IN HANDLE mode, you can create a program while inserting the
coordinate of the current position along each axis in the absolute coordinate system when the tool is
moved by manual operation into the program.
You can input the words other than axis names in the same way as in the EDIT mode.
Program screen in the TEACH IN JOG or TEACH IN HANDLE mode
Displayed items
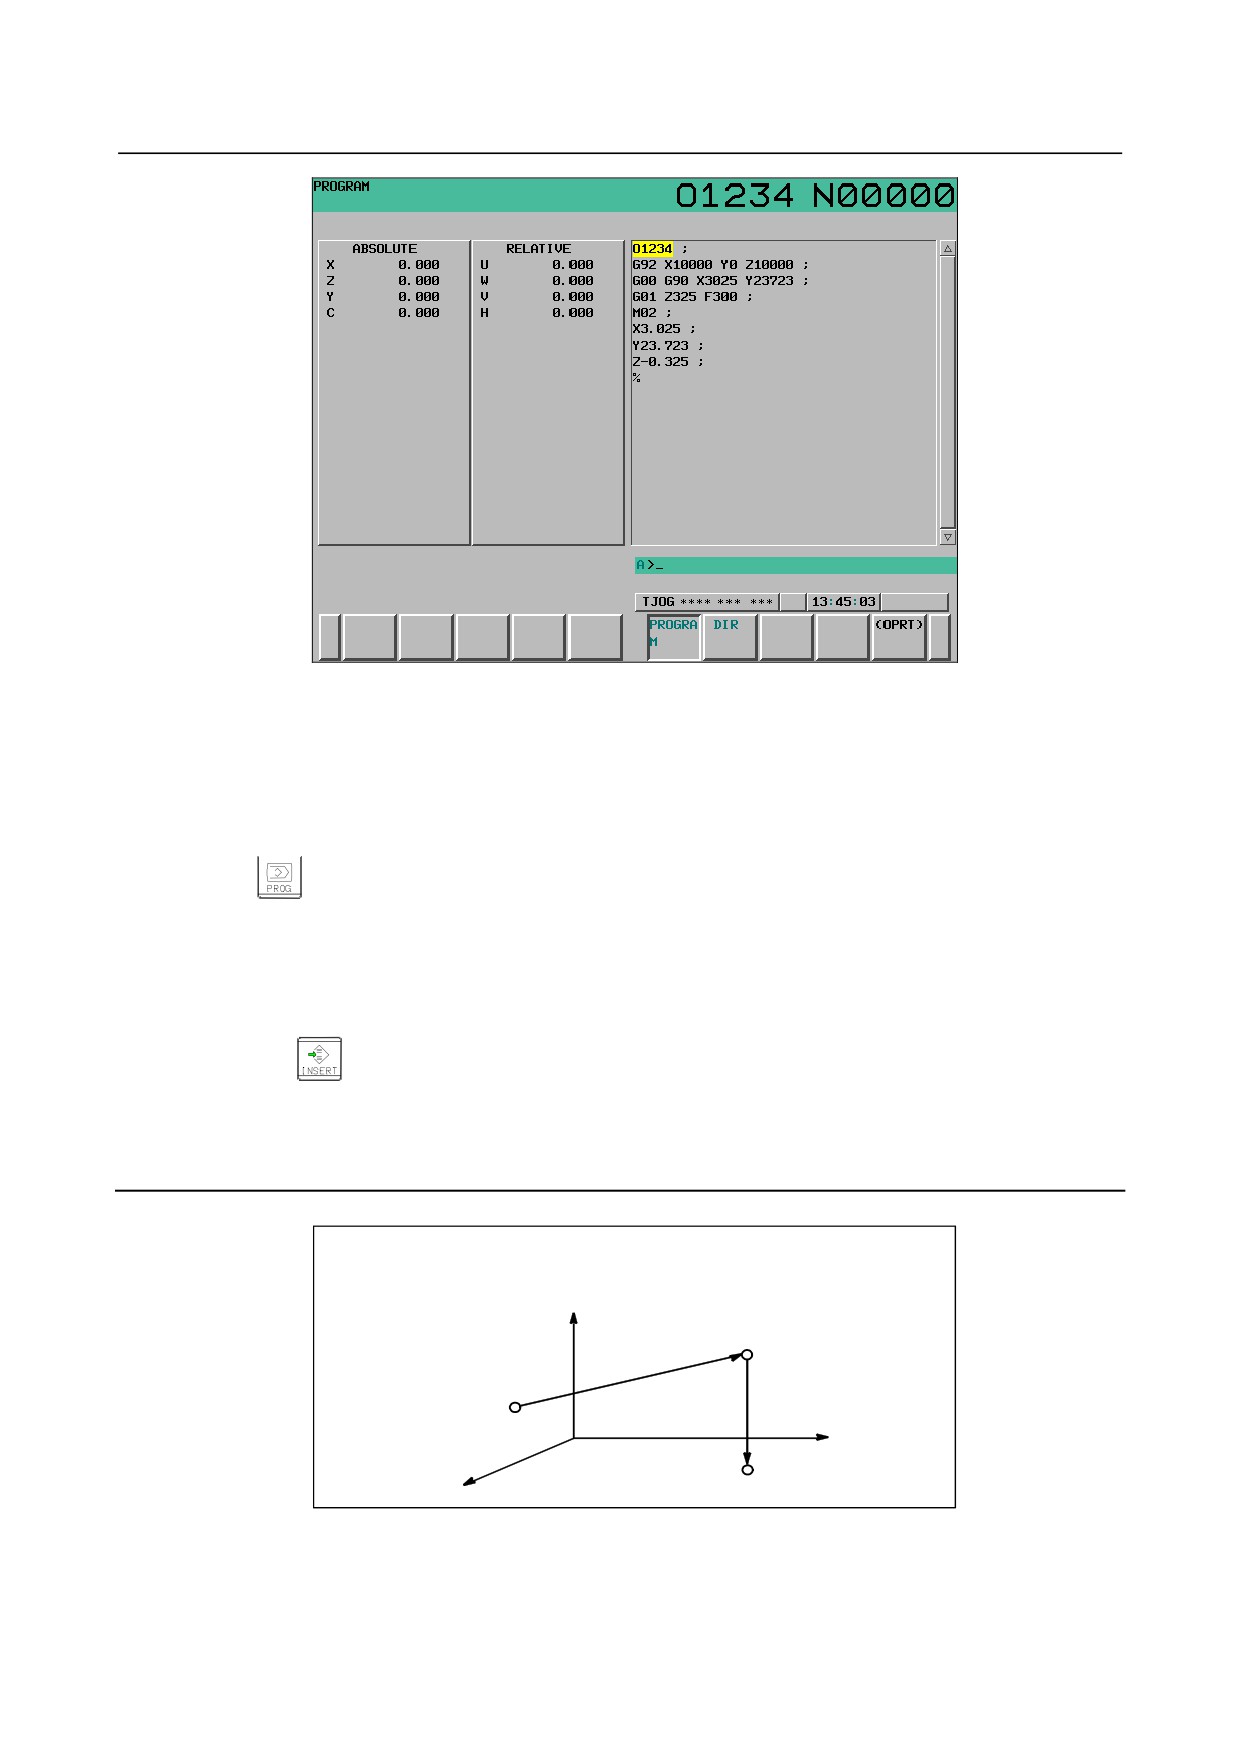
In the TEACH IN JOG or TEACH IN HANDLE MODE, the following program screen is displayed.
On the left of the screen, the coordinates of the current position in the absolute and relative coordinate
systems are displayed; on the right of the screen, the contents of a program are displayed. You can
create a program while checking the current position by manual operation.
- 480 -
B-64304EN/02
OPERATION
9.CREATING PROGRAMS
Fig. 9.3 (a) Program screen in the TEACH IN JOG mode
Inputting the coordinates of the current position
You can use the following procedure to insert the coordinate of the current position along each axis in the
absolute coordinate system:
1
Select the TEACH IN JOG mode or TEACH IN HANDLE mode.
2
Press
key to display the program screen. Search for or register the number of a program to
be edited and move the cursor to the position where the current position along each axis is to be
inserted.
3
Move the tool to the desired position with jog or handle.
4
Key in the axis name of an axis along which you want to insert the coordinate of the current
position.
5
Press the
key. Then, the coordinate of the current position along the specified axis is
inserted in the program.
(Example) X10.521 Coordinate of the current position
X10521 Data inserted in the program (For IS-B)
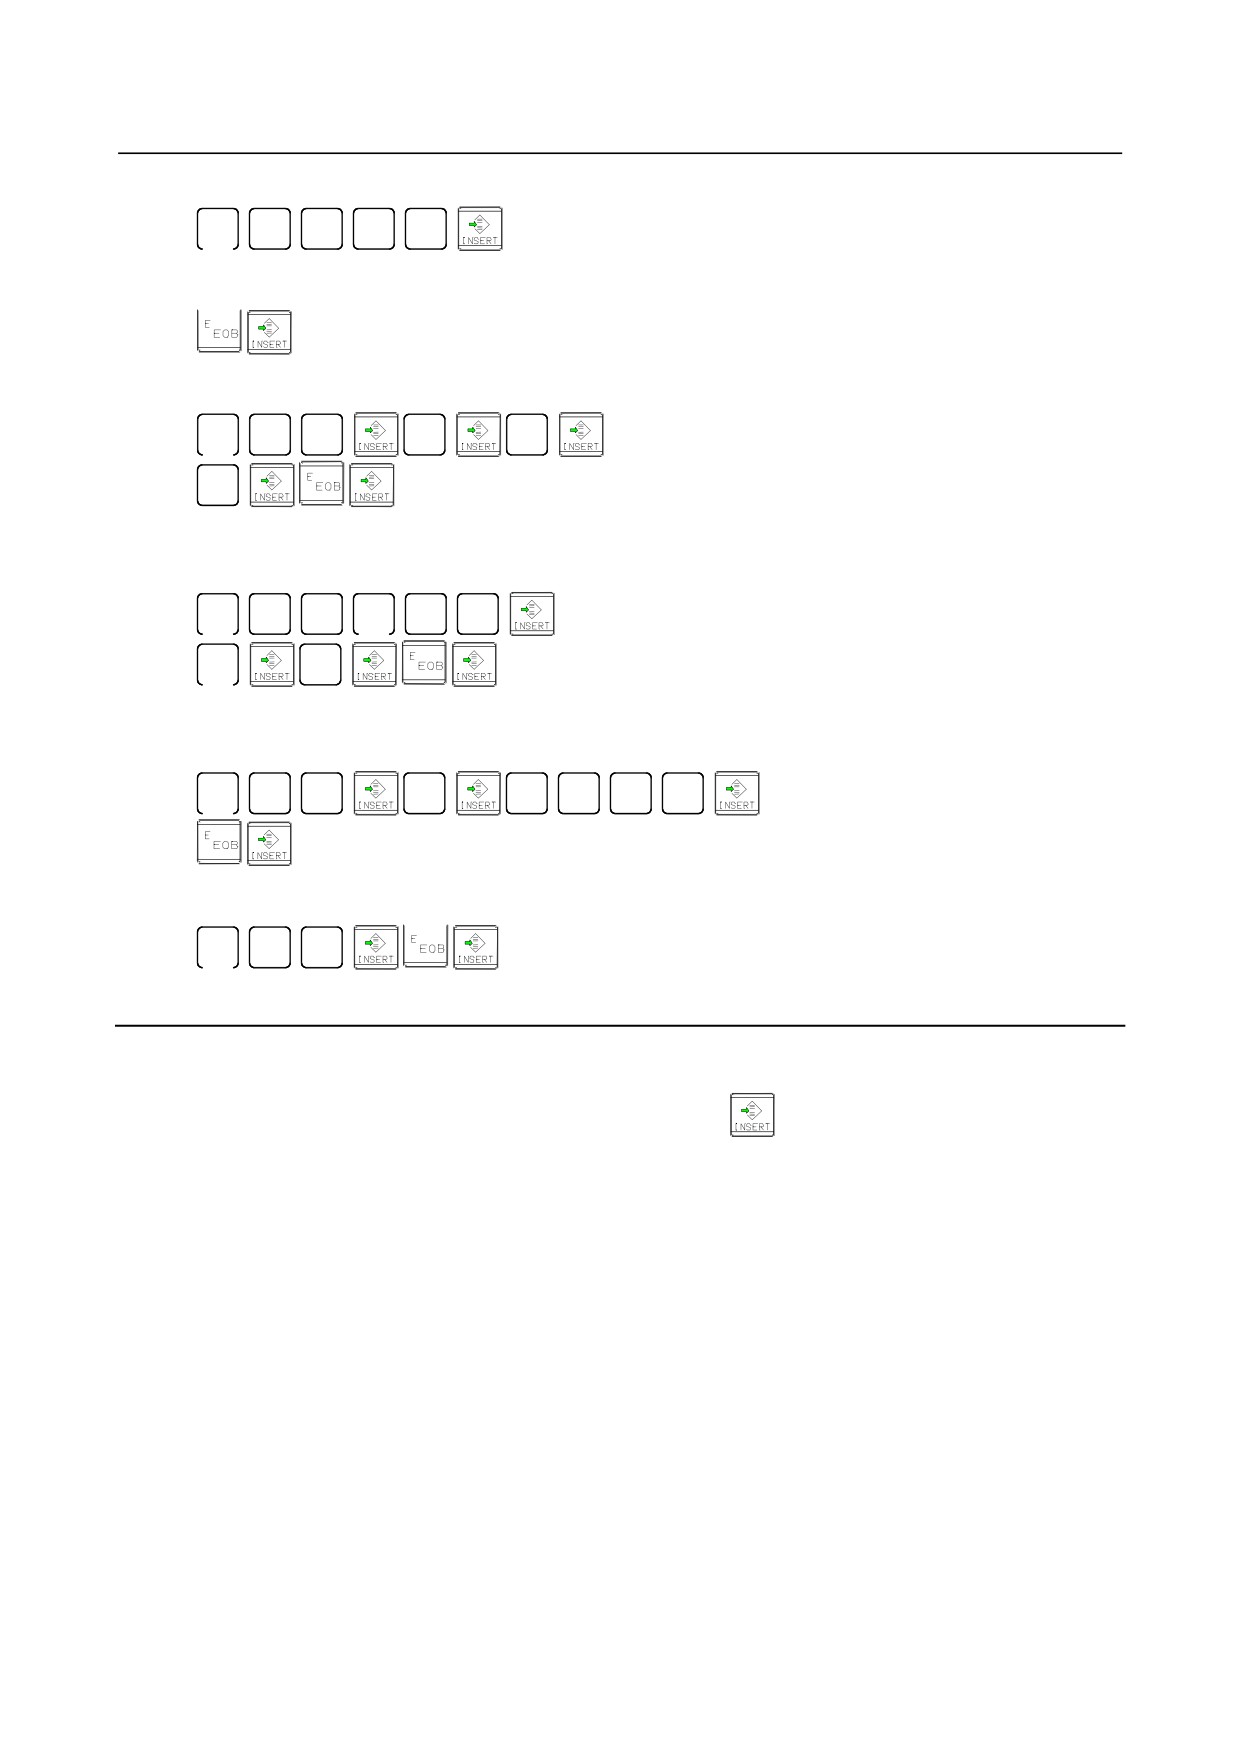
Example (For IS-B)
O1234 ;
G92 X10000 Y0 Z10000 ;
G00 G90 X3025 Y23723 ;
G01 Z-325 F300 ;
Z
M02 ;
P1
(3.025, 23.723, 10.0)
P0
Y
(10.0, 0, 10.0)
(3.025, 23.723, -0.325)
X
P2
1
Select the TEACH IN HANDLE mode.
2
Make positioning at position P0 by the manual pulse generator.
3
Select the program screen.
- 481 -
9.CREATING PROGRAMS
OPERATION
B-64304EN/02
4
Enter program number O1234 as follows:
O
1
2
3
4
This operation input program number O1234 in memory.
Next, press the following keys:
An EOB (;) is entered after program number O1234.
5
Enter the P0 machine position for data of the first block as follows:
G
9
2
X
Y
Z
This operation registers G92X10000Y0Z10000 ; in program.
6
Position the tool at P1 with the manual pulse generator.
7
Enter the P1 machine position for data of the second block as follows:
G
0
0
G
9
0
X
Y
This operation input G00G90X3025Z23723 ; in program.
8
Position the tool at P2 with the manual pulse generator.
9
Enter the P2 machine position for data of the third block as follows:
G
0
1
Z
F
3
0
0
This operation input G01Z-325F300 ; in program.
10 Input M02; in program as follows:
M
0
2
This completes the registration of the sample program.
Explanation
-
Registering a position with compensation
When an axis name and a numeric value are keyed in and the
key is pressed, the value keyed in is
added to the absolute coordinate of the current position and the coordinate is inserted. This operation
allows insertion of a corrected value for the absolute coordinate position.
-
Registering commands other than position commands
Commands to be entered before and after a position command must be entered before and after the
machine position is registered, by using the same operation as program editing in EDIT mode.
-
Pocket calculator type input
When the pocket calculator type input format is disabled (bit 0 (DPI) of parameter No. 3401 is set to 0),
the coordinate of the current position is inserted into the program in least input increments. When the
pocket calculator type input format is enabled (the bit is set to 1), the coordinate is inserted with a decimal
point.
(Example)
Coordinate of the current position
X10.521
At this time, the X-axis coordinate is inserted into the program as follows (For IS-B):
When the pocket calculator type input format is disabled
X10521
When the pocket calculator type input format is enabled
X10.521
- 482 -
B-64304EN/02
OPERATION
9.CREATING PROGRAMS
9.4
CONVERSATIONAL PROGRAMMING WITH GRAPHIC
FUNCTION
NC programs can be created on a block-by-block basis, viewing the displayed G code menu screen and G
code details screen.
Procedure for Conversational Programming with Graphic Function
Procedure 1: Creating a program
1
Enter the EDIT mode.
2
Press function key
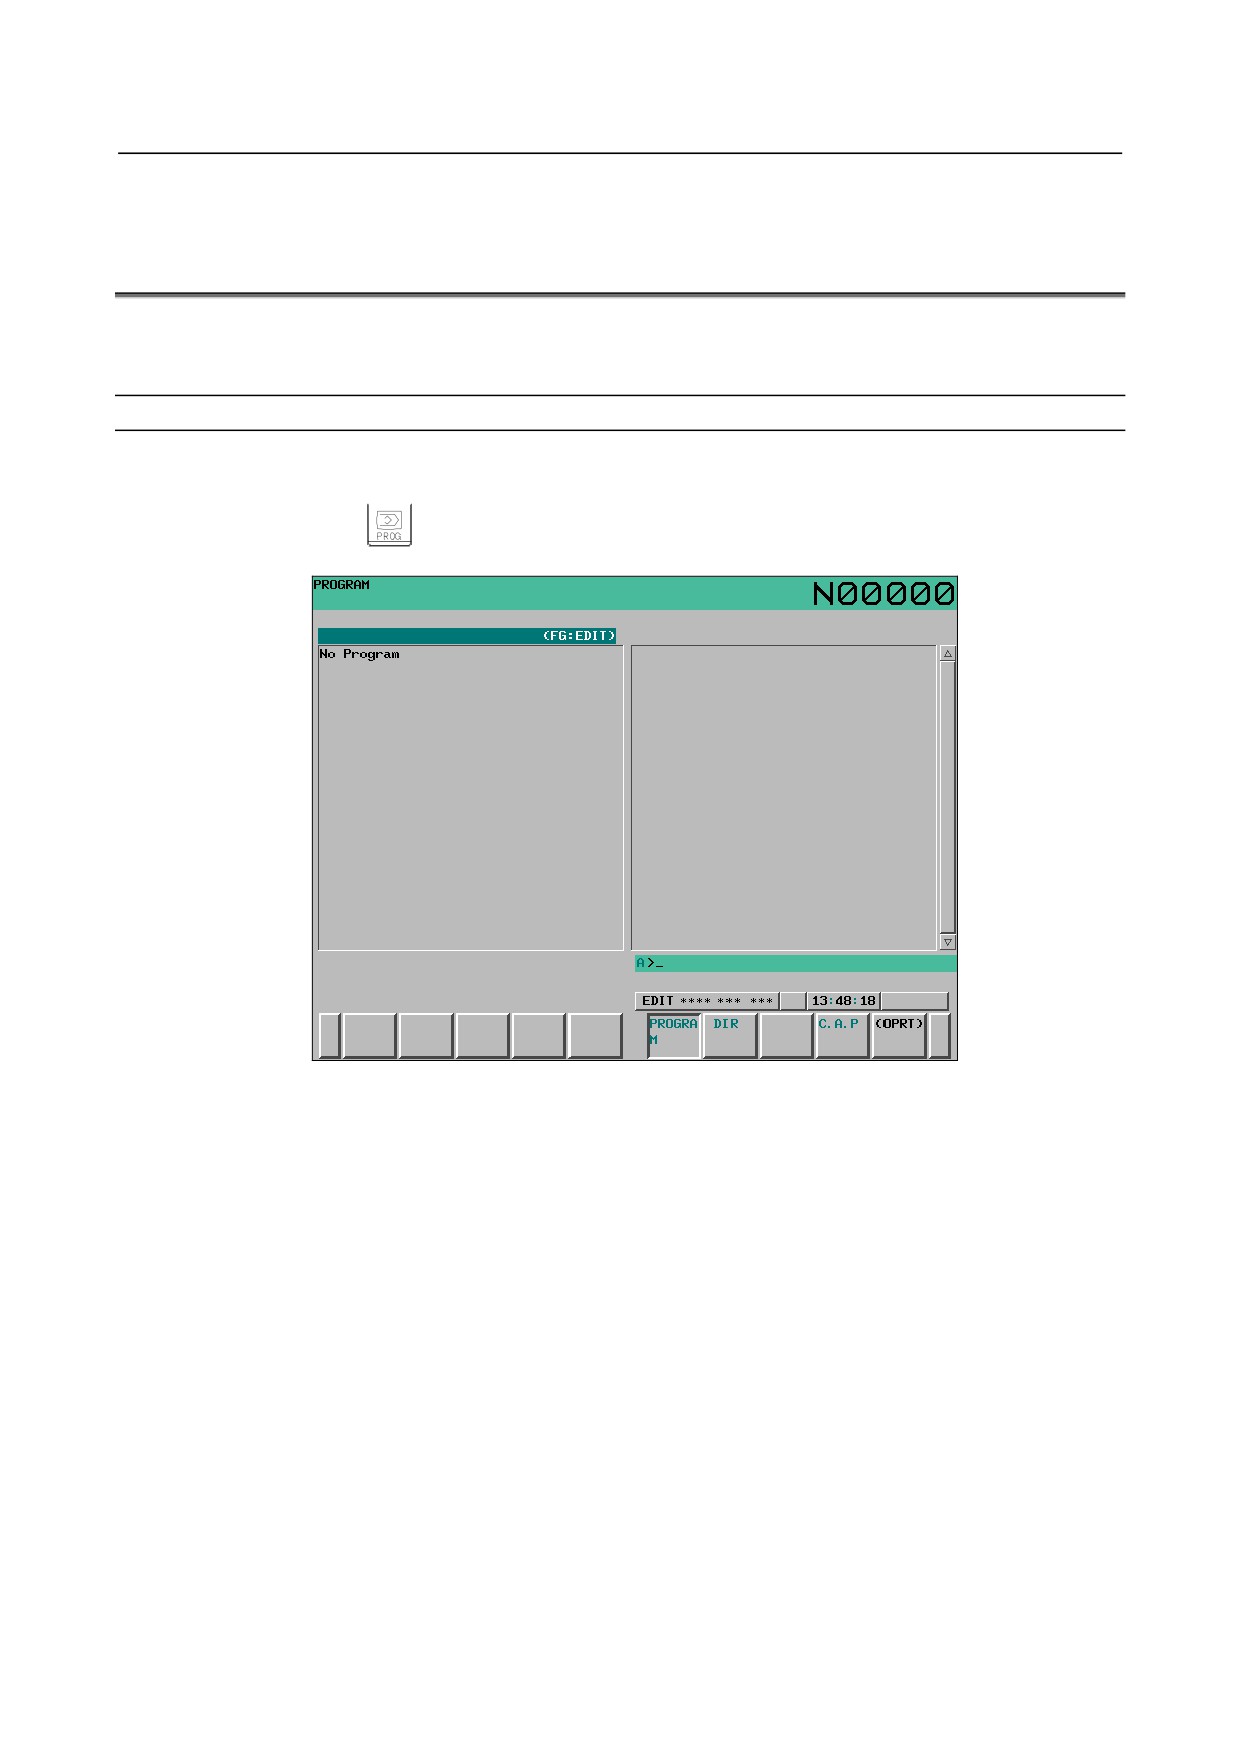
. If no program is registered, the following screen is displayed.
Fig. 9.4 (a) Program screen (with no program registered)
If a program is registered, the program currently selected is displayed.
- 483 -
9.CREATING PROGRAMS
OPERATION
B-64304EN/02
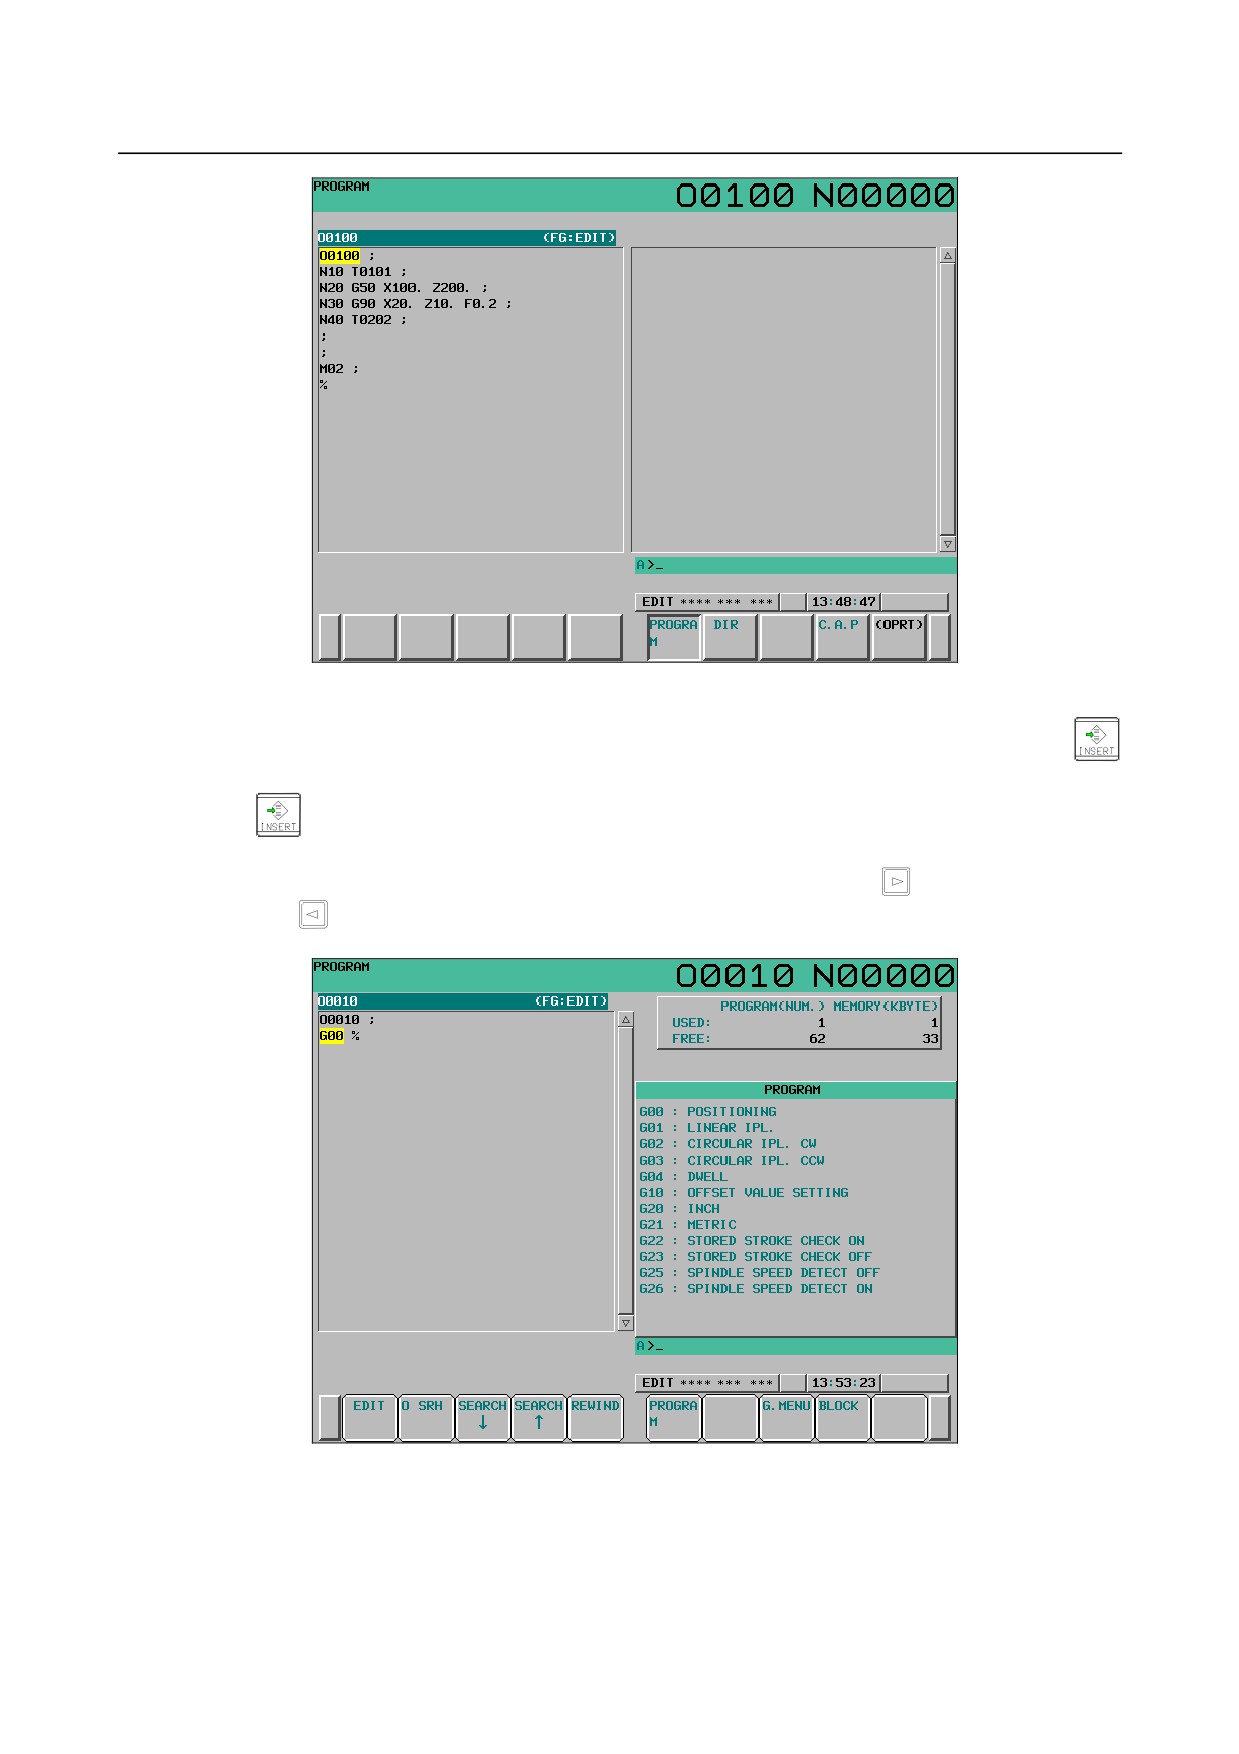
Fig. 9.4 (b) Program screen (with a program registered)
3
Key in the program number of a program to be registered after keying in address O, then press
key. For example, when a program with program number 10 is to be registered, key in O10 , then
press
key. This registers a new program O0010.
4
Press the [C.A.P] soft key. The following G code menu is displayed on the screen. (If the [C.A.P]
soft key is not displayed, hold down the rightmost continuous menu key
or the leftmost return
menu key
until the [C.A.P] soft key is displayed.)
Fig. 9.4 (c) G code menu screen
5
Key in the G code corresponding to a function to be programmed. When the positioning function is
desired, for example, the G code menu lists the function with the G code G00. So key in G00. If the
screen does not indicate a function to be programmed, press the page key to display the next G code
menu screen. Repeat this operation until a desired function appears. If a desired function is not a G
code, key in no data.
- 484 -
B-64304EN/02
OPERATION
9.CREATING PROGRAMS
6
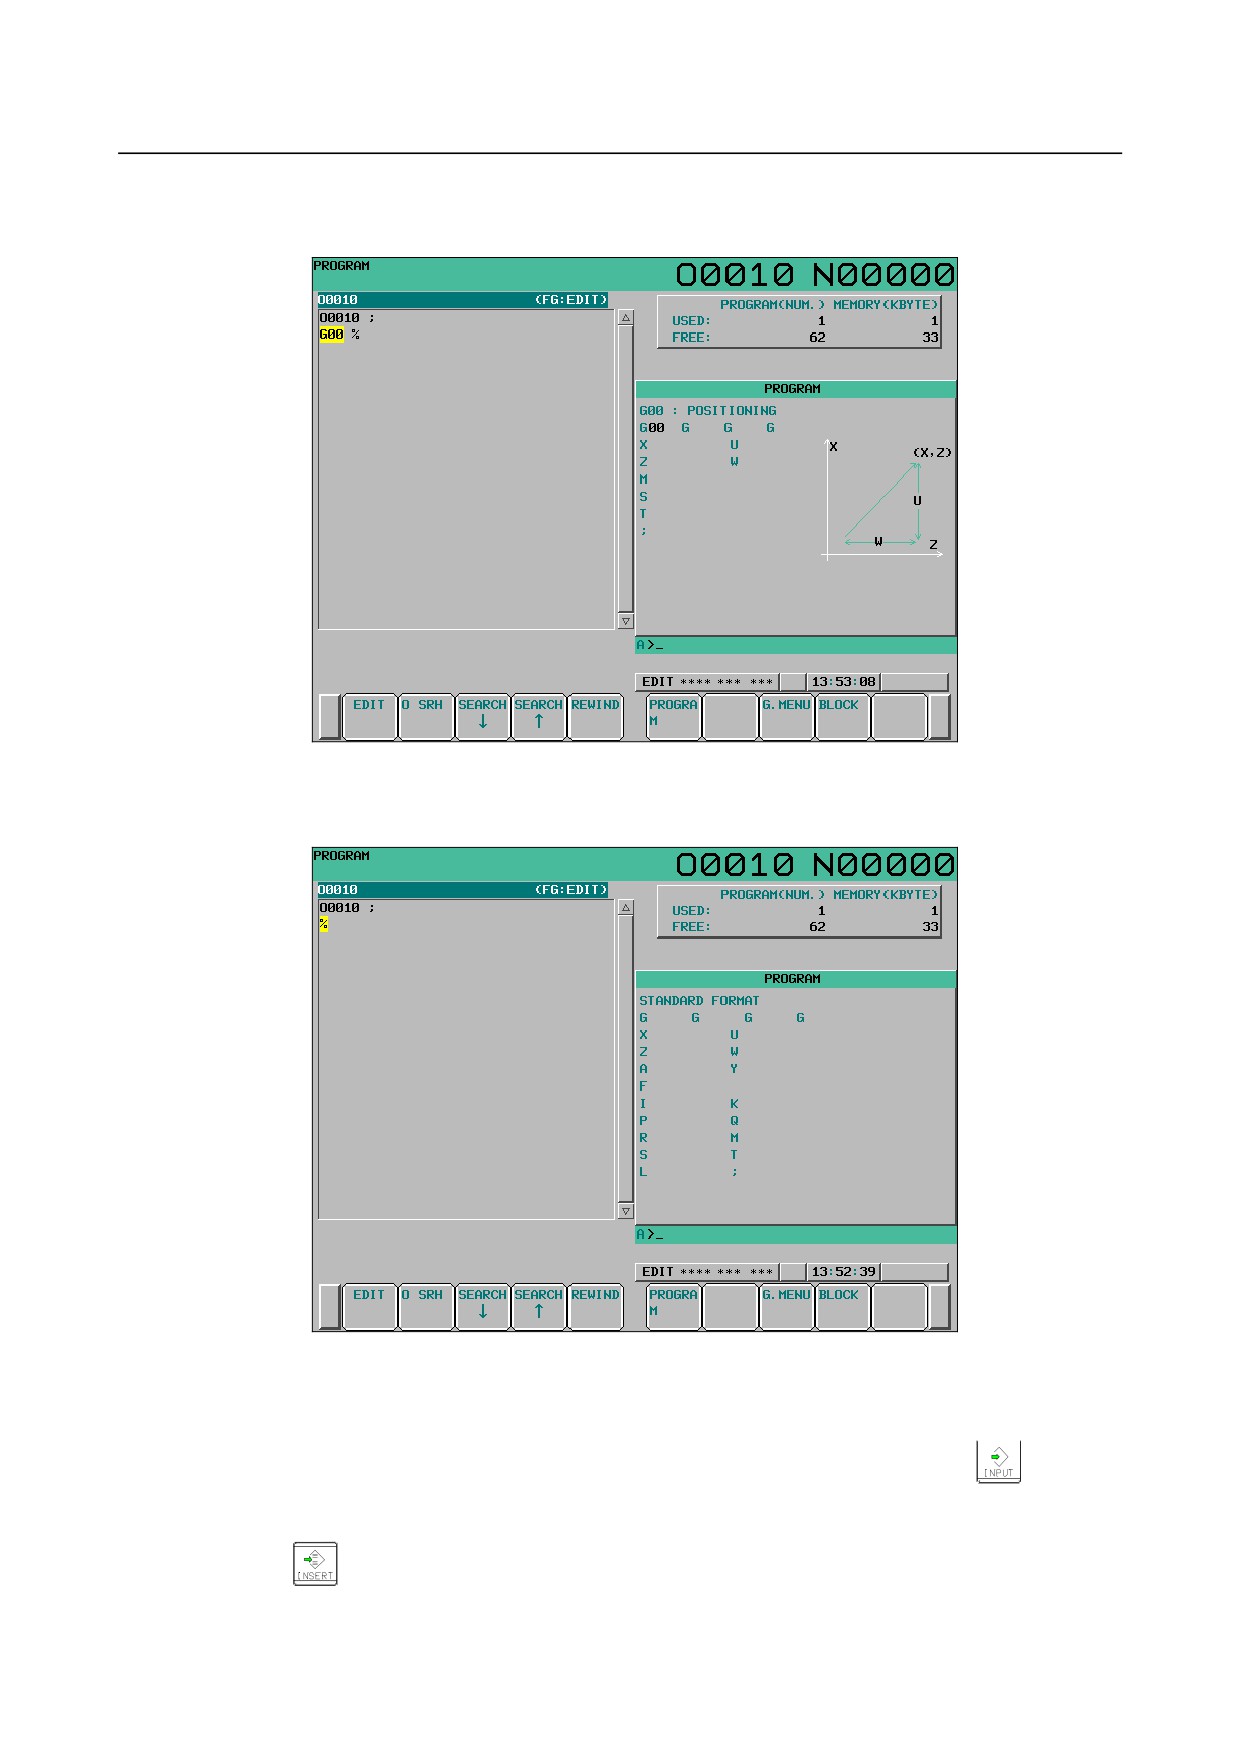
Press the soft key [BLOCK] to display a detailed screen for a keyed in G code. The figure below
shows an example of detailed screen for G00.
Fig. 9.4 (d) G code details screen (G00)
When no keys are pressed, the standard details screen is displayed.
Fig. 9.4 (e) G code details screen (standard details screen)
7
Move the cursor to the block to be modified on the program screen. If the address where the cursor
is placed on the program side is present on the figure side, the address on the figure side blinks.
8
Enter numeric data by pressing the numeric keys and press the [INPUT] soft key or
key. This
completes the input of one data item.
9
By repeating steps 7 and 8 above, enter all data necessary for the G code keyed in step 5 above.
10 Press the
key. This completes the registration of data of one block in program memory. On
the screen, the G code menu screen is displayed, allowing the user to enter data for another block.
Repeat the procedure starting with 5 as required.
- 485 -