KAWASAKI ROBOTS. ORIGINAL INSTRUCTION (v1.05) - page 2
 

  Index      Manuals     KAWASAKI ROBOTS. ORIGINAL INSTRUCTION (EN) v1.05


Search            copyright infringement  


Content      ..      1      2      3      ..


KAWASAKI ROBOTS. ORIGINAL INSTRUCTION (v1.05) - page 2


Installation 

34 

Return back in the menu to  

Signal Allocation

 > 

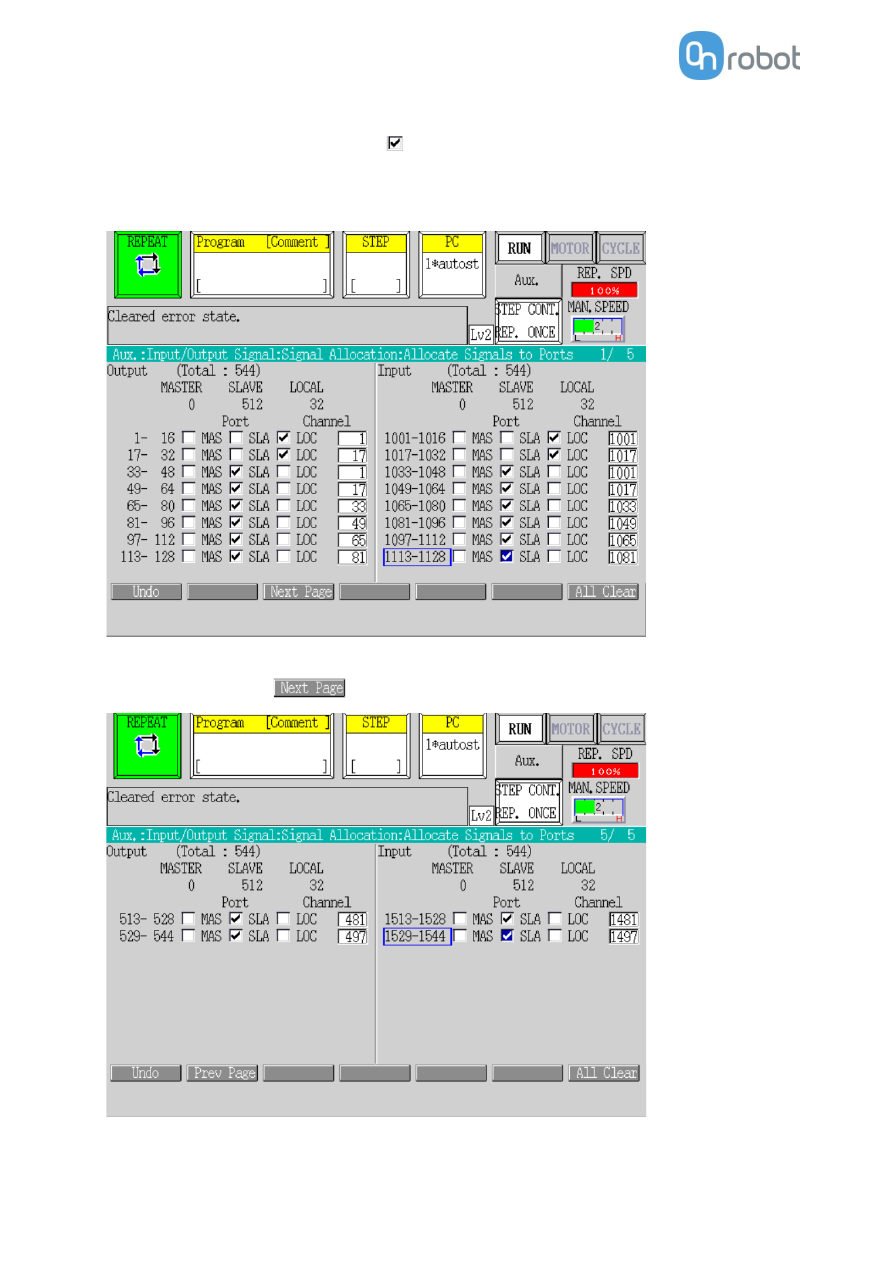
Allocate Signals to Ports

Ensure the following signals are selected ( ) as 

SLA

 (Slave) signals: 


33-545  to Output 


1033-1545  to Input 


To go to next page press 

 and continue all the way down to 545/1545. 


Installation 

35 

After this step, power cycle the controller. Once power cycling is complete, check status to ensure robot 
has been set up as Adapter. To check, go to 

Monitor 1

 > 

Software Ethernet IP Status


The status should show the 

Adapter

 as 

ONLINE

.  


Installation 

36 

F series controller 

Press the 

 button then go  to    

Aux  Function

 > 

Input/Output  Signal > Fieldbus Setting > Software 

Ethernet IP setting 

>

 IO Communication Setting 

>

 Setting 1 

and press

 ENTER. 


Ensure all fields are cleared in 

Setting 1

, there should not be any prior saved data. 


Installation 

37 

Return back in the menu to 

Software Ethernet IP settings 

>

 Port


Setting

.  

Set the IP address of the robot to 192.168.1.2  to match the settings entered in the Compute Box.  


NOTE: 

The robot IP address and the Compute Box IP address must be in the 
same subnet. 


Installation 

38 

Return back in the menu to

 Software Ethernet IP settings 

>


Assembly Display and Setting

Enter 64 bytes for 

OutputSignal

 and 

InputSignal

 size. 


Return back in the menu to 

Input/Output Signal > Fieldbus Setting

 > 

FB Ports Assignment.


Set 

FB1 Port 

to 0 and set the 

FB2 Port

 to 11. 


Installation 

39 

Return back in the menu to 

Input/Output Signal > Number of I/O Signals

.  

Set the 

Number of FB2

 to 512. 


Return back in the menu to 

Input/Output Signal > Signal Allocation

.  

Set the following values for the 

FB2


AS Start No

: 33 


Port Start No

: 1 


Num. of Sig

.:  512 


Installation 

40 


4.4.4


Upload the OnRobot Functions to the robot 

In  order  to  make  it  easier  to  use  the  OnRobot  products,  high  level  functions  have  been  written 
(

OR_Functions.as

)  and provided on the USB stick.  

Uploading the OnRobot 

OR_Functions.as

  to the robot using 

KRTerm

 application: 


Click 

File

 > 

Set Current Folder


Navigate to where the 

OR_Functions.as

  file is located and click 

OK


Connect to robot 


Type: 

load OR_Functions.as


Press 

Enter 


Installation is finished. 


Operation 

41 

5


Operation 


NOTE: 

It is assumed that the Installation has finished successfully. If not, first do 
the installation steps in the previous section. 


5.1


Overview 

In order to make it easier to use the OnRobot products, high level functions have been written into the 

OR_Functions.as

  file. Some mandatory parameters, which shall be configured, are stored in the first 

program (

OR_init.pc()

)  in that file

The mandatory parameters are:


  ;Select Fieldbus (Ethernet/IP) bit offset 

  OR_R_bitOffset = 32 

  OR_W_bitOffset = 32 

These are the offsets to where the gripper inputs and outputs start. Default is 32 for both.  

The

 OR_Functions.as

  is uploaded to the robot during the installation.  

These high-level functions can be used by calling these functions in your program: 


  CALL OR_RGx_move.pc(instance, width, force, waitfor) 


When a function reads information, the value is stored and returned in the last argument: 

  CALL OR_Gecko_isConn.pc(instance, retVal) 

  PRINT retVal 

All user program must start with calling the 

OR_init.pc()

  function. It is used to set up which tools are 

mounted on the robot, in which configuration. The table for the correct 

configNum

  value is shown in 

the 

OR_init.pc

  function. 

  CALL OR_init.pc(configNum) 


CAUTION: 

Calling  the 

OR_init.pc()

  with  parameters that does not match  the attached 

tool(s) can result abnormal behavior. 


Operation 

42 

5.2


List of functions 


Function name: 

OR_init.pc(toolCfgID) 


Name 

Type 

Description 

Input: 

toolCfgID 

integer 

Tool configuration ID: 


Primary  

Secondary 

101 

RG2-FT  

102 

RGx 


103 

VGx 


104 

Gecko   

105 

HEX 


106 

HEX 

RGx 


107 

HEX 

VGx 


108 

HEX 

Gecko   

109 

RGx 


VGx 

110 

RGx 


Gecko 

111 

RGx 


RGx 

112 

VGx 


RGx 

113 

VGx 


Gecko 

114 

VGx 


VGx 

Output: 


Behavior: 

Function to initialize the communication for the currently used tools. 
Make sure, that this function is called before using all other function. 

Example: 


CALL OR_init.pc(104) 


Gecko .............................................. 43 


HEX ................................................. 45 


RG2-FT ............................................ 46 


RG2/6.............................................. 50 


VG10 / VGC10.................................. 52 


Operation 

43 

Gecko 

Function name: 

OR_Gecko_padOut.pc(

instance

wait


Name 

Type 

Description 

Input: 

instance 

integer 

1: single or primary - in dual configuration 
2: secondary in dual configuration" 

wait 

integer 

0: return after command is executed 
1: return after pads reached the final position 

Output: 


Behavior: 

Command the pads to move out  

Example: 


CALL OR_Gecko_padOut.pc(1,0) 


Function name: 

OR_Gecko_padIn.pc(

instance

wait


Name 

Type 

Description 

Input: 

instance 

integer 

1: single or primary - in dual configuration 
2: secondary in dual configuration 

wait 

integer 

0: return after command is executed 
1: return after pads reached the final position 

Output: 


Behavior: 

Command the pads to move in 

Example: 

CALL OR_Gecko_padIn.pc(1,0) 


Function name: 

OR_Gecko_getF.pc(

instance

returnVal


Name 

Type 

Description 

Input: 

instance 

integer 

1: single or primary - in dual configuration 
2: secondary in dual configuration 

Output: 

returnVal 

integer 

Gripper measures the preload force in N 


Behavior: 

Command the gripper to get the preload force 

Example: 

CALL OR_Gecko_getF.pc(1, retVal) 


Function name: 

OR_Gecko_getUS.pc(

instance

returnVal


Name 

Type 

Description 

Input: 

instance 

integer 

1: single or primary - in dual configuration 
2: secondary in dual configuration" 

Output: 

returnVal 

integer 

Ultrasonic sensor measures the distance in mm 


Behavior: 

Command the ultrasonic sensor to get data 

Example: 

CALL OR_Gecko_getUS.pc(1, retVal) 


Operation 

44 

Function name: 

OR_Gecko_isConn.pc(

instance

returnVal


Name 

Type 

Description 

Input: 

instance 

integer 

1: single or primary - in dual configuration 
2: secondary in dual configuration" 

Output: 

returnVal 

integer 

0: gripper is not connected 
1: gripper is connected 


Behavior: 

Check the connection to the gripper 

Example: 

CALL OR_Gecko_isConn.pc(1, retVal) 


Function name: 

OR_Gecko_isPart.pc(

instance

returnVal


Name 

Type 

Description 

Input: 

instance 

integer 

1: single or primary - in dual configuration 
2: secondary in dual configuration" 

Output: 

returnVal 

integer 

0: part is not detected 
1: part is detected 


Behavior: 

Check the part detection 

Example: 


CALL OR_Gecko_isPart.pc(1,  retVal) 


Function name: 

OR_Gecko_padSt.pc(

instance

returnVal


Name 

Type 

Description 

Input: 

instance 

integer 

1: single or primary - in dual configuration 
2: secondary in dual configuration" 

Output: 

returnVal 

integer 

0: pads are good 
1: pads are worn-out 


Behavior: 

Check the pads worn-out state 

Example: 

CALL OR_Gecko_padSt.pc(1, retVal) 


Function name: 

OR_Gecko_padPos.pc(

instance

returnVal


Name 

Type 

Description 

Input: 

instance 

integer 

1: single or primary - in dual configuration 
2: secondary in dual configuration" 

Output: 

returnVal 

integer 

0: pads are moved in 
1: pads are moved out 


Behavior: 

Check the pads position 

Example: 

CALL OR_Gecko_padPos.pc(1, retVal) 


Operation 

45 

HEX 

Function name: 

OR_HEX_get.pc(

FT_type

returnVal


Name 

Type 

Description 

Input: 

FT_type 

string 

Requested force/torque value. Valid inputs: 

“Fx”, “Fy”, “Fz”, “Tx”, “Ty”, “Tz”


Output: 

returnVal 

integer 

Requested force/torque value. Forces are in N, torques 
are in Nm 


Behavior: 

Get actual force/torque value form the HEX sensor. 

Example: 

CALL OR_HEX_get.pc("Fx", retVal) 


Function name: 

OR_HEX_zero.pc() 


Name 

Type 

Description 

Input: 

-


Output: 


Behavior: 

Command the HEX sensor to set the values to zero. (The actual force/torque 
values will be zero.) 

Example: 

CALL OR_HEX_zero.pc 


Function name: 

OR_HEX_unzero.pc() 


Name 

Type 

Description 

Input: 

-


Output: 


Behavior: 

Command the HEX sensor to set the values to default 

Example: 

CALL OR_HEX_unzero.pc 


Function name: 

OR_HEX_isConn.pc(

returnVal

Input: 

Name 

Type 

Description 


Output: 

returnVal 

integer 

0: sensor is not connected 
1: sensor is connected 


Behavior: 

Check the connection to the sensor 

Example: 


CALL OR_HEX_isConn.pc(retVal) 


Operation 

46 

RG2-FT 

Function name: 

OR_RG2FT_move.pc(

width, force, wait


Name 

Type 

Description 

Input: 

width 

integer 

Define the distance in mm 

force 

integer 

Define the grip force in N 

wait 

integer 

0: return after command is executed (without waiting 
for gripper fingers move) 
1: return after fingers reached the position 

Output: 


Behavior: 

Move the gripper fingers  

Example: 

CALL OR_RG2FT_move.pc(70, 35, 1) 


Function name: 

OR_RG2FT_stop.pc() 


Name 

Type 

Description 

Input: 

Output: 


Behavior: 

Command to stop the gripper motion 

Example: 

CALL OR_RG2FT_stop.pc 


Function name: 

OR_RG2FT_pOfAct.pc() 


Name 

Type 

Description 

Input: 

Output: 


Behavior: 

Set the actual values as offset for proximity sensors. (The current distance value  

Example: 


CALL OR_RG2FT_pOfAct.pc 


Function name: 

OR_RG2FT_pOfVaL.pc(

valueL, valueR 


Name 

Type 

Description 

Input: 

valueL 

integer 

Left proximity custom offset value in mm 

valueR 

integer 

Right proximity custom offset value in mm 

Output: 


Behavior: 

Sets the custom offset values for proximity sensors 

Example: 


CALL OR_RG2FT_pOfVaL.pc(  10, 15) 


Operation 

47 

Function name: 

OR_RG2FT_hxZr.pc() 


Name 

Type 

Description 

Input: 

Output: 


Behavior: 

Zeroing the HEX sensors (actual force/torque values will be zero). 

Example: 


CALL OR_RG2FT_hxZr.pc 


Function name: 

OR_RG2FT_hxUnzr.pc() 


Name 

Type 

Description 

Input: 

Output: 


Behavior: 

Unzero 

the values of the HEX sensors (don’t use any offset, reset to the original 

values) 

Example: 

CALL OR_RG2FT_hxUnzr.pc 


Function name: 

OR_RG2FT_gtLPrx.pc(

returnVal


Name 

Type 

Description 

Input: 

Output: 

returnVal 

integer 

Left proximity sensor measured distance in mm 


Behavior: 

Get left proximity sensor value 

Example: 

CALL OR_RG2FT_gtLPrx.pc(retVal) 


Function name: 

OR_RG2FT_gtRPrx.pc(

returnVal


Name 

Type 

Description 

Input: 

Output: 

returnVal 

integer 

Right proximity sensor measured distance in mm 


Behavior: 

Get right proximity sensor value 

Example: 


CALL OR_RG2FT_gtRPrx.pc(retVal) 


Operation 

48 

Function name: 

OR_RG2FT_getHex.pc(

FT_type

returnVal


Name 

Type 

Description 

Input: 

FT_type 

string 

Requested force/torque value. Valid inputs: 

“Fx”, “Fy”, “Fz”, “Tx”, “Ty”, “Tz” (F/T values)


Output: 

returnVal 

integer 

Requested force or torque value. Force values are in 
1/10N, torque values are in 1/100Nm. 


Behavior: 

Get force/torque value from HEX sensors 

Example: 

FT_type = “Fz”


‘get left HEX force value on Z axis


CALL OR_RG2FT_getHex.pc("Fz", retVal) 


Function name: 

OR_RG2FT_getWid.pc(

returnVal


Name 

Type 

Description 

Input: 

Output: 

returnVal 

integer 

Gripper actual width in mm 


Behavior: 

Get gripper fingertip actual width  

Example: 

CALL OR_RG2FT_getWid.pc(retVal) 


Function name: 

OR_RG2FT_isConn.pc(

returnVal


Name 

Type 

Description 

Input: 

Output: 

returnVal 

integer 

0: gripper is not connected 
1: gripper is connected 


Behavior: 

Check the connection to the gripper 

Example: 

CALL OR_RG2FT_isConn.pc(retVal) 


Function name: 

OR_RG2FT_isBusy.pc(

returnVal


Name 

Type 

Description 

Input: 

Output: 

returnVal 

integer 

0: gripper is idle 
1: gripper is busy 


Behavior: 

Check the gripper status 

Example: 

CALL OR_RG2FT_isBusy.pc(retVal) 


Operation 

49 

Function name: 

OR_RG2FT_isGrip.pc(

returnVal


Name 

Type 

Description 

Input: 

Output: 

returnVal 

integer 

0: grip is not detected 
1: grip is detected 


Behavior: 

Check the grip presence 

Example: 


CALL OR_RG2FT_isGrip.pc(retVal) 


Operation 

50 

RG2/6 

Function name: 

OR_RGx_move.pc(

instance, width, force, wait


Name 

Type 

Description 

Input: 

instance 

integer 

1: single or primary - in dual configuration 
2: secondary in dual configuration 

width 

integer 

Define the distance in mm 

force 

integer 

Define the grip force in N 

wait 

integer 

0: return after command is executed (without waiting 
for gripper fingers move) 
1: return after fingers reached the position 

Output: 


Behavior: 

Move the gripper fingers  

Example: 

CALL OR_RGx_move.pc(1, 50, 20, 1) 


Function name: 

OR_RGx_isConn.pc(

instance

returnVal


Name 

Type 

Description 

Input: 

instance 

integer 

1: single or primary - in dual configuration 
2: secondary in dual configuration 

Output: 

returnVal 

integer 

0: gripper is not connected 
1: gripper is connected 


Behavior: 

Check the connection to the gripper 

Example: 

CALL OR_RGx_isConn.pc(1,  retVal) 


Function name: 

OR_RGx_isGrip.pc(

instance

returnVal


Name 

Type 

Description 

Input: 

instance 

integer 

1: single or primary - in dual configuration 
2: secondary in dual configuration 

Output: 

returnVal 

integer 

0: grip not detected 
1: grip detected (something gripped) 


Behavior: 

Check grip 

Example: 

CALL OR_RGx_isGrip.pc(1, retVal) 


Operation 

51 

Function name: 

OR_RGx_isBusy.pc(

instance

returnVal


Name 

Type 

Description 

Input: 

instance 

integer 

1: single or primary - in dual configuration 
2: secondary in dual configuration 

Output: 

returnVal 

integer 

0: idle   
1: busy (fingers still moving) 


Behavior: 

Check, that is gripper busy or not  

Example: 

CALL OR_RGx_isBusy.pc(1, retVal ) 


Function name: 

OR_RGx_isSSOn.pc(

instance

returnVal


Name 

Type 

Description 

Input: 

instance 

integer 

1: single or primary - in dual configuration 
2: secondary in dual configuration 

Output: 

returnVal 

integer 

0: safety switch not triggered, normal operation 
1: safety switch triggered, gripper disabled 


Behavior: 

Check safety switch status  

Example: 

CALL OR_RGx_isSSOn.pc(1,  retVal) 


Operation 

52 

VG10 / VGC10 

Function name: 

OR_VG10_grip.pc(

instance, vacuumA, vaccumB, wait 


Name 

Type 

Description 

Input: 

instance 

integer 

1: single or primary - in dual configuration 
2: secondary in dual configuration 

vacuumA 

integer 

Required vacuum level for channel A in %, set 0 to 
release 

vacuumB 

integer 

Required vacuum level for channel B in %, set 0 to 
release 

wait 

integer 

Wait until the vacuum reach the required level 

0: don’t wait for vacuum


1: wait until the vacuum reach the required level 

Output: 


Behavior: 

Set the required vacuum for channels or release the part gripped 

Example: 

CALL OR_VG10_grip.pc(1, 20 , 20, 1) 


Function name: 

OR_VG10_getVacA.pc(

instance

returnVal


Name 

Type 

Description 

Input: 

instance 

integer 

1: single or primary - in dual configuration 
2: secondary in dual configuration 

Output: 

returnVal 

Integer 

Vacuum level of A channel in % 


Behavior: 

Get actual vacuum level of A channel 

Example: 


CALL OR_VG10_getVacA.pc(1,  retVal) 


Function name: 

OR_VG10_getVacB.pc(

instance

returnVal


Name 

Type 

Description 

Input: 

instance 

integer 

1: single or primary - in dual configuration 
2: secondary in dual configuration 

Output: 

returnVal 

Integer 

Vacuum level of B channel in % 


Behavior: 

Get actual vacuum level of B channel 

Example: 

CALL OR_VG10_getVacB.pc(1, retVal) 


Operation 

53 

Function name: 

OR_VG10_setCur.pc(

instance

current


Name 

Type 

Description 

Input: 

instance 

integer 

1: single or primary - in dual configuration 
2: secondary in dual configuration 

current 

integer 

Current limit for VG10 in mA. Valid in 100-1000  mA 
range. 

Output: 


Behavior: 

Set current limit for VG10 

Example: 

CALL OR_VG10_setCur.pc(1, 600) 


Function name: 

OR_VG10_getLim.pc(

instance

returnVal


Name 

Type 

Description 

Input: 

instance 

integer 

1: single or primary - in dual configuration 
2: secondary in dual configuration 

Output: 

returnVal 

integer 

Current limit in mA 


Behavior: 

Get actual current limit 

Example: 

CALL OR_VG10_getLim.pc(1, retVal) 


Function name: 

OR_VG10_isConn.pc(

instance

returnVal


Name 

Type 

Description 

Input: 

instance 

integer 

1: single or primary - in dual configuration 
2: secondary in dual configuration 

Output: 

returnVal 

integer 

0: gripper is not connected 
1: VG10 is connected 
2: VGC10 is connected 


Behavior: 

Check the connection to the gripper 

Example: 

CALL OR_VG10_isConn.pc(1, retVal) 


Detailed description on the EtherNet/IP Assembly Instances (what values can be read and write) can be 
found in the 

EtherNet/IP

 section. 


Operation 

54 


Mode II - OnRobot WebLogic 


Installation 

55 

6


Installation 

6.1


Overview 

For a successful installation the following steps will be required: 


Mount the components 


Wire the cables 


Setup the software 


In the following sections, these installation steps will be described. 


6.2


Mounting 

Required steps: 


Mount the robot dependent adapter 


Mount the Quick Changer option 


Mount the tool(s) 


In the following three subsections these three mounting steps will be described.  

6.2.1


Adapter(s) 


For RS003N, RS005L,  RS005N models  


Adapter B

 (4 screws) 

M5x8  screws  (ISO14580  A4-
70) 

OnRobot adapter  flange  (ISO 
9409-1-50-4-M6) 

Dowel pin Ø5x6 (ISO2338 h8) 

Robot tool flange (ISO 9409-1-
31.5-4-M5) 

Use 5 Nm tightening torque. 


For  RS007L, RS007N  

Installation 

56 


Adapter B

 (7 screws) 

M5x8  screws  (ISO14580  A4-
70) 

OnRobot adapter  flange  (ISO 
9409-1-50-4-M6) 

Dowel pin Ø5x6 (ISO2338 h8) 

Robot tool flange (ISO 9409-1-
31.5-4-M5) 

Use 5 Nm tightening torque. 


For RS006L, RS010N models  


Adapter C 

M6x8  screws  (ISO14580  A4-
70) 

OnRobot 

adapter 

flange        

(ISO 9409-1-50-4-M6) 

Dowel pin Ø6x10 (ISO2338 h8) 

Robot tool flange (ISO 9409-1-
40-4-M6) 

Use 10 Nm tightening torque. 


For RS0010L,  RS020N, RS015X models  


Adapter D 

M6x8  screws  (ISO14580  A4-
70) 

OnRobot adapter  flange  (ISO 
9409-1-50-4-M6) 

Dowel pin Ø6x10 (ISO2338 h8) 

Robot tool flange (ISO 9409-1-
63-4-M6) 

Use 10 Nm tightening torque. 


For RS030N, RS050N, RS080N models  

Installation 

57 


Adapter E 

M8x10 screws (ISO14580  A4-
70) 

OnRobot adapter flange (ISO 
9409-1-50-4-M6) 

Dowel  pin  Ø8x10  (ISO2338 
h8) 

Robot tool  flange (ISO  9409-
1-80-6-M8) 

Use 25 Nm tightening torque. 


Installation 

58 

6.2.2


Quick Changer options 


Quick Changer  - 

Robot Side   


Quick Changer - Robot Side 


M6x8mm (ISO14580 8.8) 

Quick Changer (ISO 9409-1-50-4-M6) 

Dowel pin Ø6x10 (ISO2338 h8) 

Adapter/ Robot tool flange (ISO 9409-
1-50-4-M6) 

Use 10 Nm tightening torque. 


Dual Quick Changer 


Dual Quick Changer


M6x20mm (ISO14580 8.8) 

Dual Quick Changer  

Dowel pin Ø6x10 (ISO2338 h8) 

Adapter/ Robot tool flange (ISO 
9409-1-50-4-M6) 

Use 10 Nm tightening torque. 


Installation 

59 

HEX-E/H QC 


HEX-E/H QC


HEX-E/H QC sensor 

M4x6mm  (ISO14581  A4-
70) 

M6x8mm (NCN20146 A4-
70) 

HEX-E/H QC adapter 

Adapter/  Robot  tool 
flange  (ISO  9409-1-50-4-
M6) 

Use  1.5  Nm  tightening  torque. 
for M4x6mm  

Use 10 Nm tightening torque. for 
M6x8mm  


Installation 

60 

6.2.3


Tools 


Gecko .............................................. 60 


RG2 ................................................. 61 


RG2-FT ............................................ 62 


RG6 ................................................. 63 


VG10 ............................................... 64 


VGC10 ............................................. 64 


Quick Changer - Tool side ................. 65 


Gecko 


Step 1: 

Move  the  tool  close  to  the  Quick 
Changer as illustrated.  

The  hook  mechanism  (rod  and  hook 
tongue) will keep the lower part locked 
once mounted. 


Step 2: 

Flip  the tool  until it  is  fully mated, and 
you hear a clicking sound. 


To  unmount  the  tool,  press  the  aluminum 
button on  the Quick  Changer and repeat the 
steps in the reverse order. 


CAUTION: 

With a  Dual Quick Changer the Gecko Gripper can only be mounted on 
the Secondary (2) side. Mounting on the Primary (1) side will prevent the 
devices to function correctly.  


Installation 

61 

RG2 


Step 1: 

Move the tool close to the Quick  Changer 
as illustrated.  

The  hook  mechanism  (rod  and  hook 
tongue)  will  keep  the  lower  part  locked 
once mounted. 


Step 2: 

Flip the tool until it is fully mated, and you 
hear a clicking sound. 


To unmount the tool, press the aluminum button 
on the Quick Changer and repeat the steps in the 
reverse order. 


To change the relative angle of the gripper 
to the Quick Changer: 


first remove the four M4x6 screws 


tilt the gripper between -90° and 90° 


then put the four M4x6 screws back 
and  use 1.35  Nm  tightening torque 
to fix it. 


WARNING: 

Never use the device while any of the four M4x6 screws are removed. 


Installation 

62 

RG2-FT 


Step 1: 

Move the tool close to the Quick  Changer 
as illustrated.  

The  hook  mechanism  (rod  and  hook 
tongue)  will  keep  the  lower  part  locked 
once mounted. 


Step 2: 

Flip the tool until it is fully mated, and you 
hear a clicking sound. 


To unmount the tool, press the aluminum button 
on the Quick Changer and repeat the steps in the 
reverse order. 


To change the relative angle of the gripper 
to the Quick Changer: 


first remove the four M4x6 screws 


tilt the gripper between -60° and 90° 


then put the four M4x6 screws back 
and  use 1.35  Nm  tightening torque 
to fix it. 


WARNING: 

Never use the device while any of the four M4x6 screws are removed. 


Installation 

63 

RG6 


Step 1: 

Move  the  tool  close  to  the  Quick 
Changer as illustrated.  

The  hook  mechanism  (rod  and  hook 
tongue) will keep the lower part locked 
once mounted. 


Step 2: 

Flip  the tool  until it  is  fully mated, and 
you hear a clicking sound. 


To  unmount  the  tool,  press  the  aluminum 
button on  the Quick  Changer and repeat the 
steps in the reverse order. 


To change the relative angle of the gripper 
to the Quick Changer: 


first remove the four M4x6 screws 


tilt the gripper between -90° and 90° 


then put the four M4x6 screws back 
and  use 1.35  Nm  tightening torque 
to fix it. 


WARNING: 

Never use the device while any of the four M4x6 screws are removed. 


Installation 

64 

VG10 


Step 1: 

Move  the  tool  close  to  the  Quick 
Changer as illustrated.  

The  hook  mechanism (rod  and  hook 
tongue)  will  keep  the  lower  part 
locked once mounted. 


Step 2: 

Flip the tool until it is fully mated, and 
you hear a clicking sound. 


To  unmount the  tool,  press the  aluminum 
button on the Quick Changer and repeat the 
steps in the reverse order. 


VGC10 


Step 1: 

Move  the  tool  close  to  the  Quick 
Changer as illustrated.  

The  hook  mechanism (rod  and  hook 
tongue)  will  keep  the  lower  part 
locked once mounted. 


Step 2: 

Flip the tool until it is fully mated, and 
you hear a clicking sound. 


To  unmount the  tool,  press the  aluminum 
button on the Quick Changer and repeat the 
steps in the reverse order. 


Installation 

65 

Quick Changer - 

Tool side 


Step 1: 

Move the tool close to the Quick  Changer 
as illustrated.  

The  hook  mechanism  (rod  and  hook 
tongue)  will  keep  the  lower  part  locked 
once mounted. 


Step 2: 

Flip the tool until it is fully mated, and you 
hear a clicking sound. 


To unmount the tool, press the aluminum button 
on the Quick Changer and repeat the steps in the 
reverse order. 


Content      ..      1      2      3      ..