IDEXX Cornerstone. Administrator’s Manual (8.3 NEXT version 8.3.6) - page 11
Chapter 16: Setting Up Vital Signs/Weight
** List Value Descriptions
• Body Score (1-5): 1-Emaciated; 2-Thin; 3-Optimal; 4-Overweight; 5-Obese
• Body Score (1-9): 1-Emaciated; 2-Underweight; 3-Slightly Underwt; 4-Ideal - 4; 5-Ideal - 5;
6-Overweight; 7-Moderate Overwt; 8-Signif Overwt; 9-Obese
• Mucous Membranes: White; Pale/Anemic; Pink/Healthy; Red; Blue/Cyanotic
• Capillary Refill: <2 sec; 2-4 sec; >4 sec
• Dental Score: 1-Excellent; 2-Mild; 3-Moderate; 4-Significant; 5-Severe
• Pain Scale: 0-No Visible Pain; 1-Mild Pain; 2-Moderate Pain; 3-Extreme Pain; 4-Major Pain
• Alert/Attitude: 1-BAR; 2-QAR; 3-QAP; 4-Pain, U; 5-Pain, R; 6-Listless
• Appetite: 1-None; 2-Sm Amt w/ Coaxing; 3-Decreased; 4-Normal; 5-Very Hungry; 6-Voracious
• Urine Output: 1-No Urine Output; 2-0%-20% of Normal; 3 - 20%-50% of Norm; 4 - 50%-80% of
Norm;
5-80%-120%: Normal; 6-120%-150%; 7-150%-200%; 8->200% of Norm
• Fecal Output: Profuse, Bloody; Profuse, Watery; Moderate Diarrh; Soft, Dec Vol; Soft, Norm V/C;
Soft, Inc Vol; Mod Constipat; Severe Constip
• Gut Sounds: 0-Absent; 1-Signif Decrease; 2-Mod Decrease; 3-Slow/Present; 4-Normal;
5-Hyperactive; 6-Extremely Hyper
Tip: For Blood Pressure, if you track only the systolic pressure and you want the ability to graph the
values, you could change the type from Alphanumeric to Numeric (where values would be typed as a
single number without a “/” character).
Special Considerations for Body Score:
• There are two default Body Score vital sign options to choose from—one uses a 1-5 scale and
the other uses a 1-9 scale.
• Only one of the Body Score vital sign options can be activated at any given time in your Vital
Sign List. If you try to activate a Body Score vital sign and the other Body Score vital sign is
already active, Cornerstone verifies that you want to reassign the Body Score, and then
automatically inactivates the other Body Score vital sign.
About the Vital Sign List
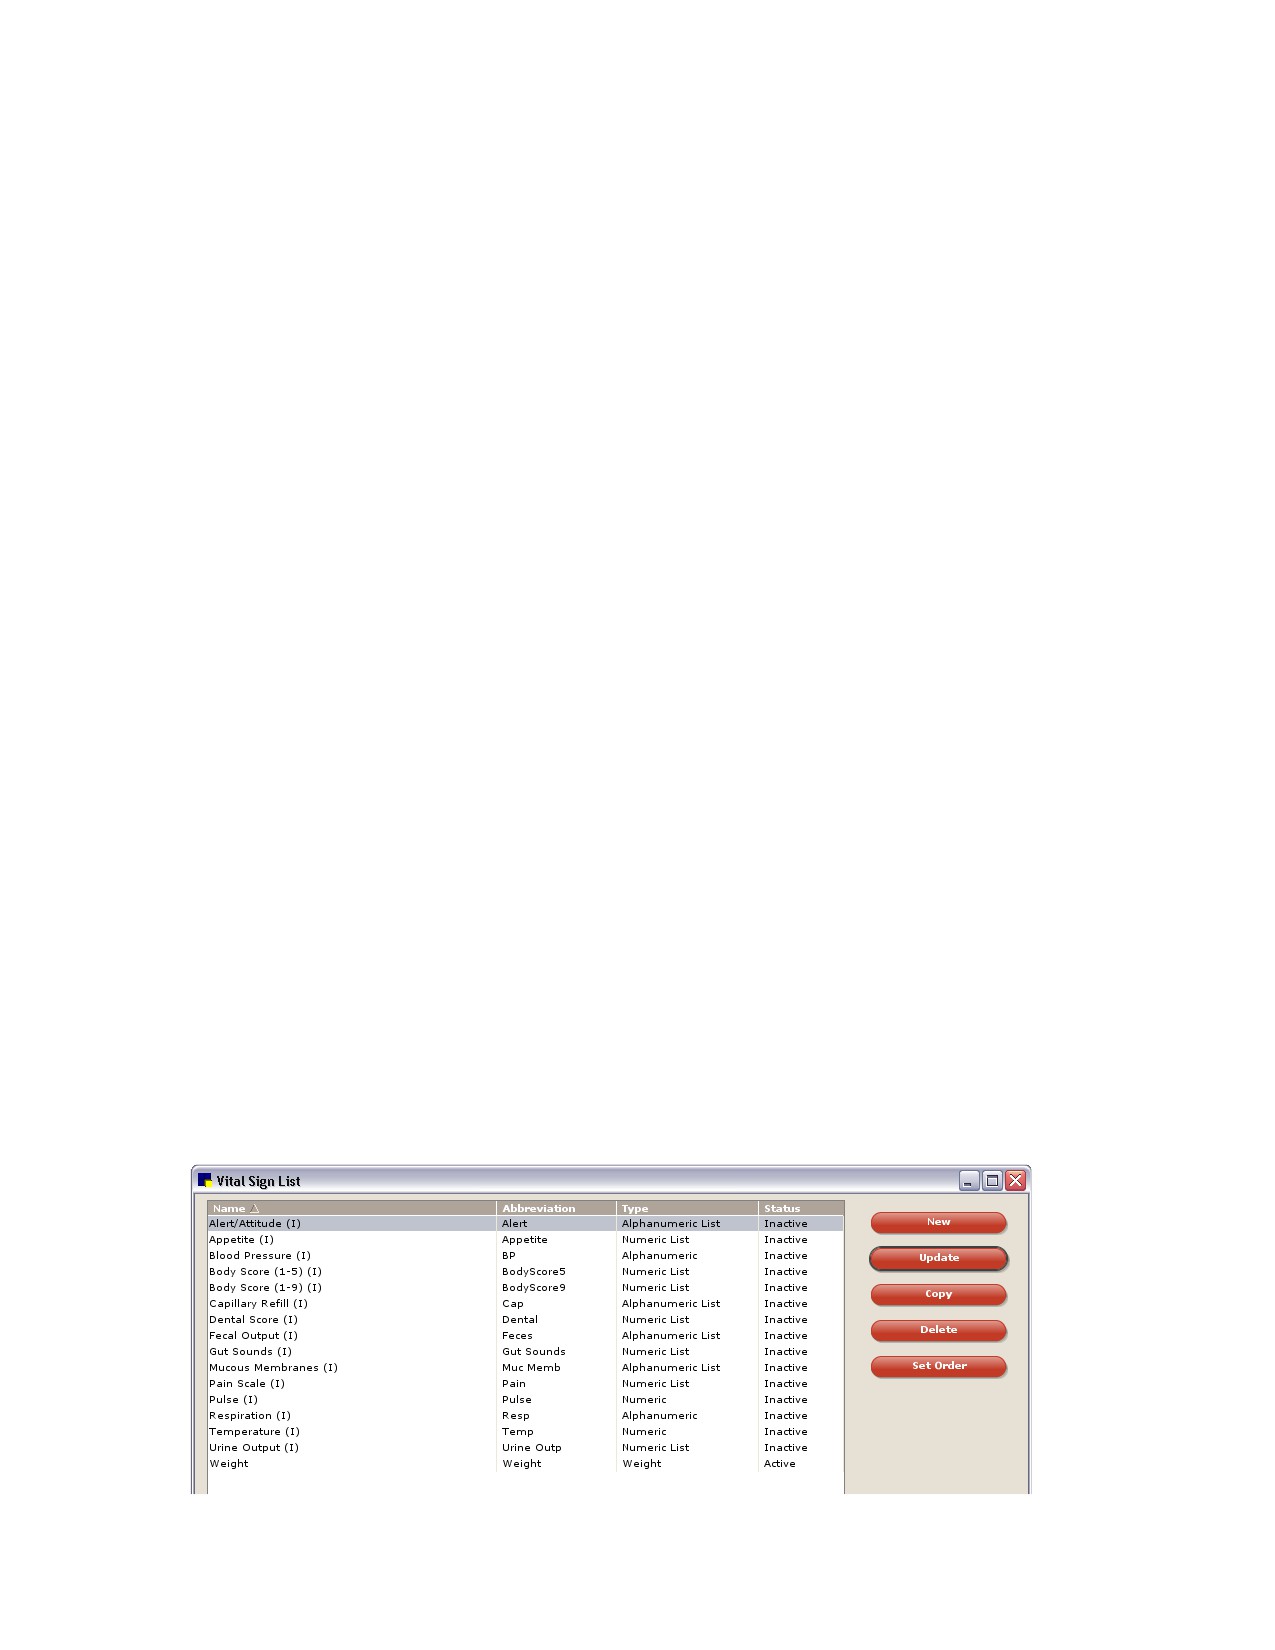
The Vital Sign List window (Lists > Vital Signs/Weight) displays the name, abbreviation, data type and
active/inactive status of all vital signs that have been set up for your practice.
302
Chapter 16: Setting Up Vital Signs/Weight
Using the buttons available on the Vital Sign List window, you can:
• Set up a new vital sign to appear in the practice’s Vital Sign List.
• Update or edit settings for existing vital signs.
• Copy an existing vital sign’s setup and use it as a starting point for creating a new vital sign.
• Delete a vital sign from the practice’s Vital Sign List.
• Set the order of the vital signs displayed on the Vital Signs window at the time of use.
Notes:
• The order of vital signs on the Vital Sign List window does not reflect the order you specify for
the Vital Signs entry and viewing window.
• For Mobile Computing, mobile users can view the Vital Sign List, but cannot perform setup tasks
(add new vital sign, update, copy, delete, etc.).
• For Multi-Location/Single Database configurations, all practices use the same Vital Sign List, but
the order of the vital signs displayed on the Vital Signs entry and viewing window can be
customized for each practice.
Vital Sign Types
If you want to create your own vital signs to use in your practice’s Vital Sign List, think about the way you
want staff members to enter/select values for each vital sign—this will determine the type of vital sign to
select during setup.
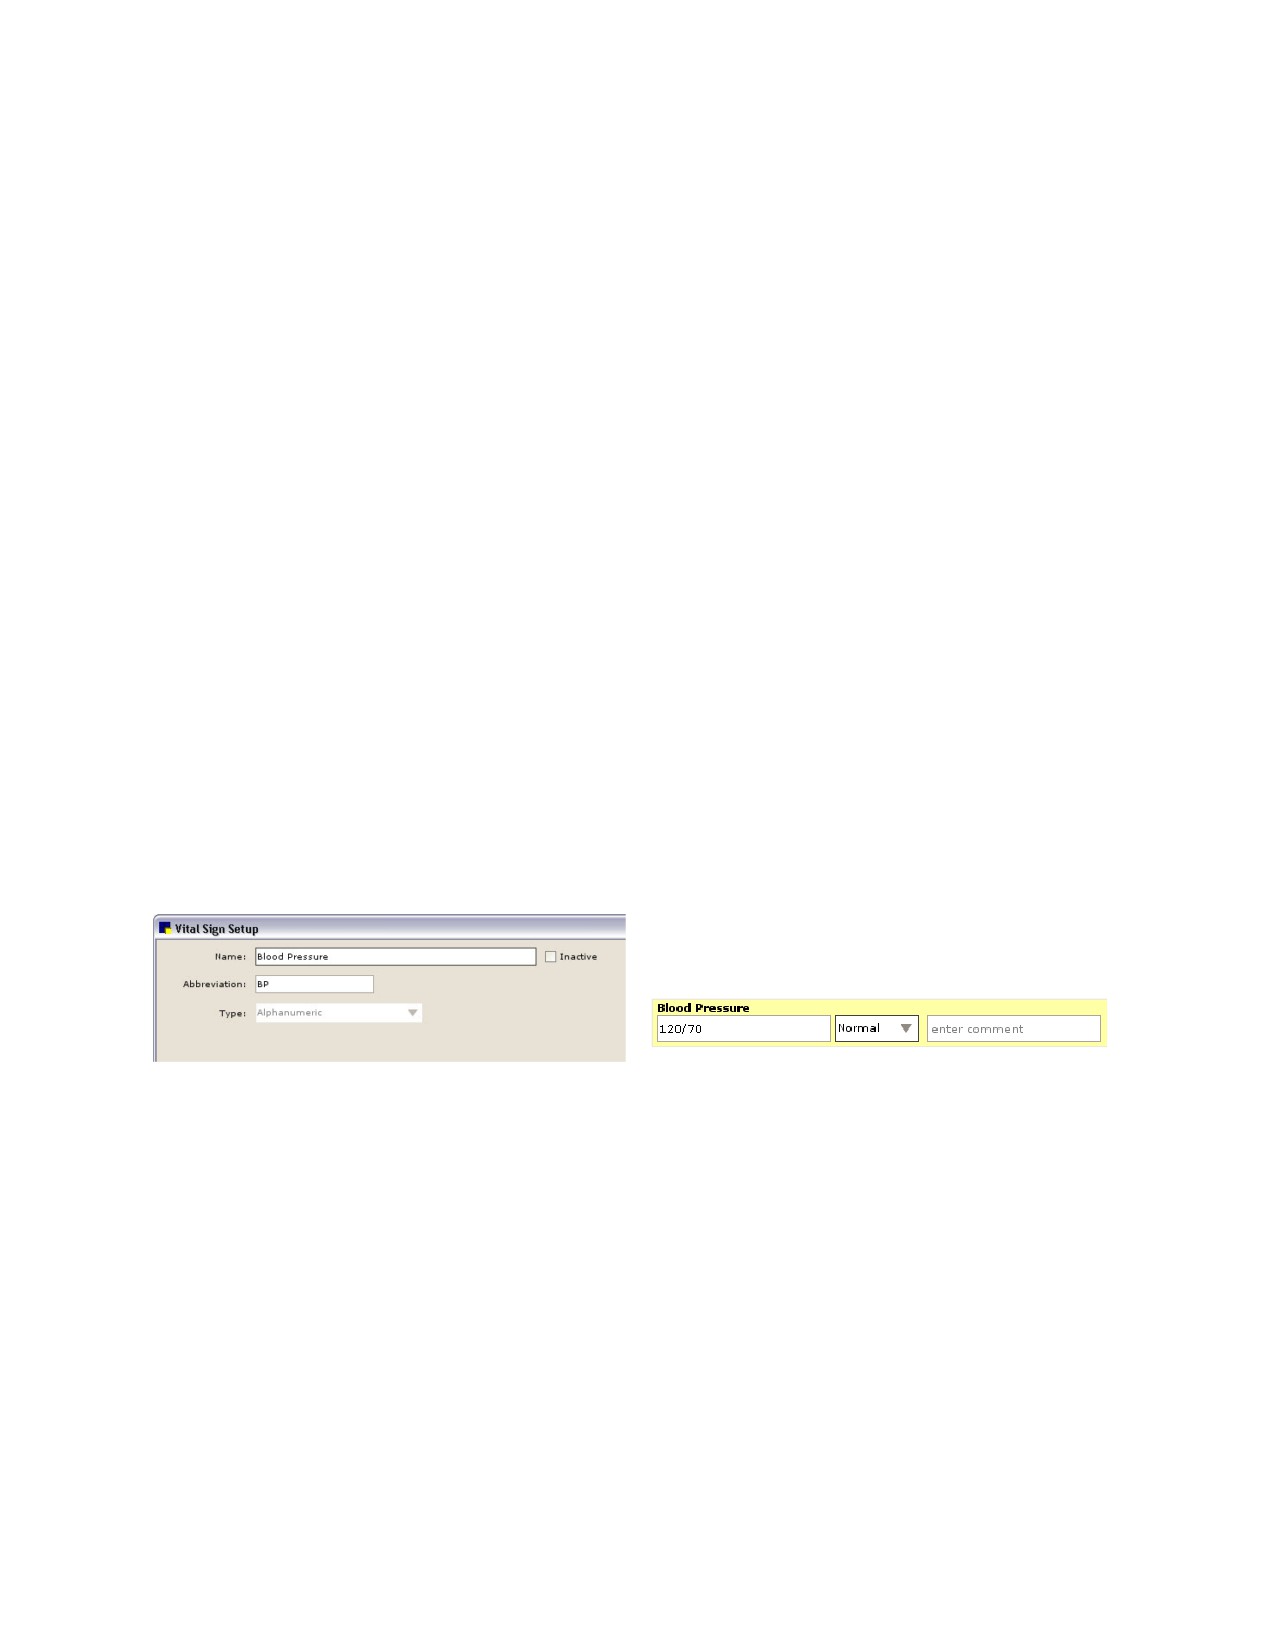
Alphanumeric
With an Alphanumeric vital sign, at the time of use the value is typed as letters and/or numbers. Blood
Pressure is an example of an Alphanumeric vital sign.
Example of the Alphanumeric type during setup
Example of an Alphanumeric type entry
303
Chapter 16: Setting Up Vital Signs/Weight
Alphanumeric List
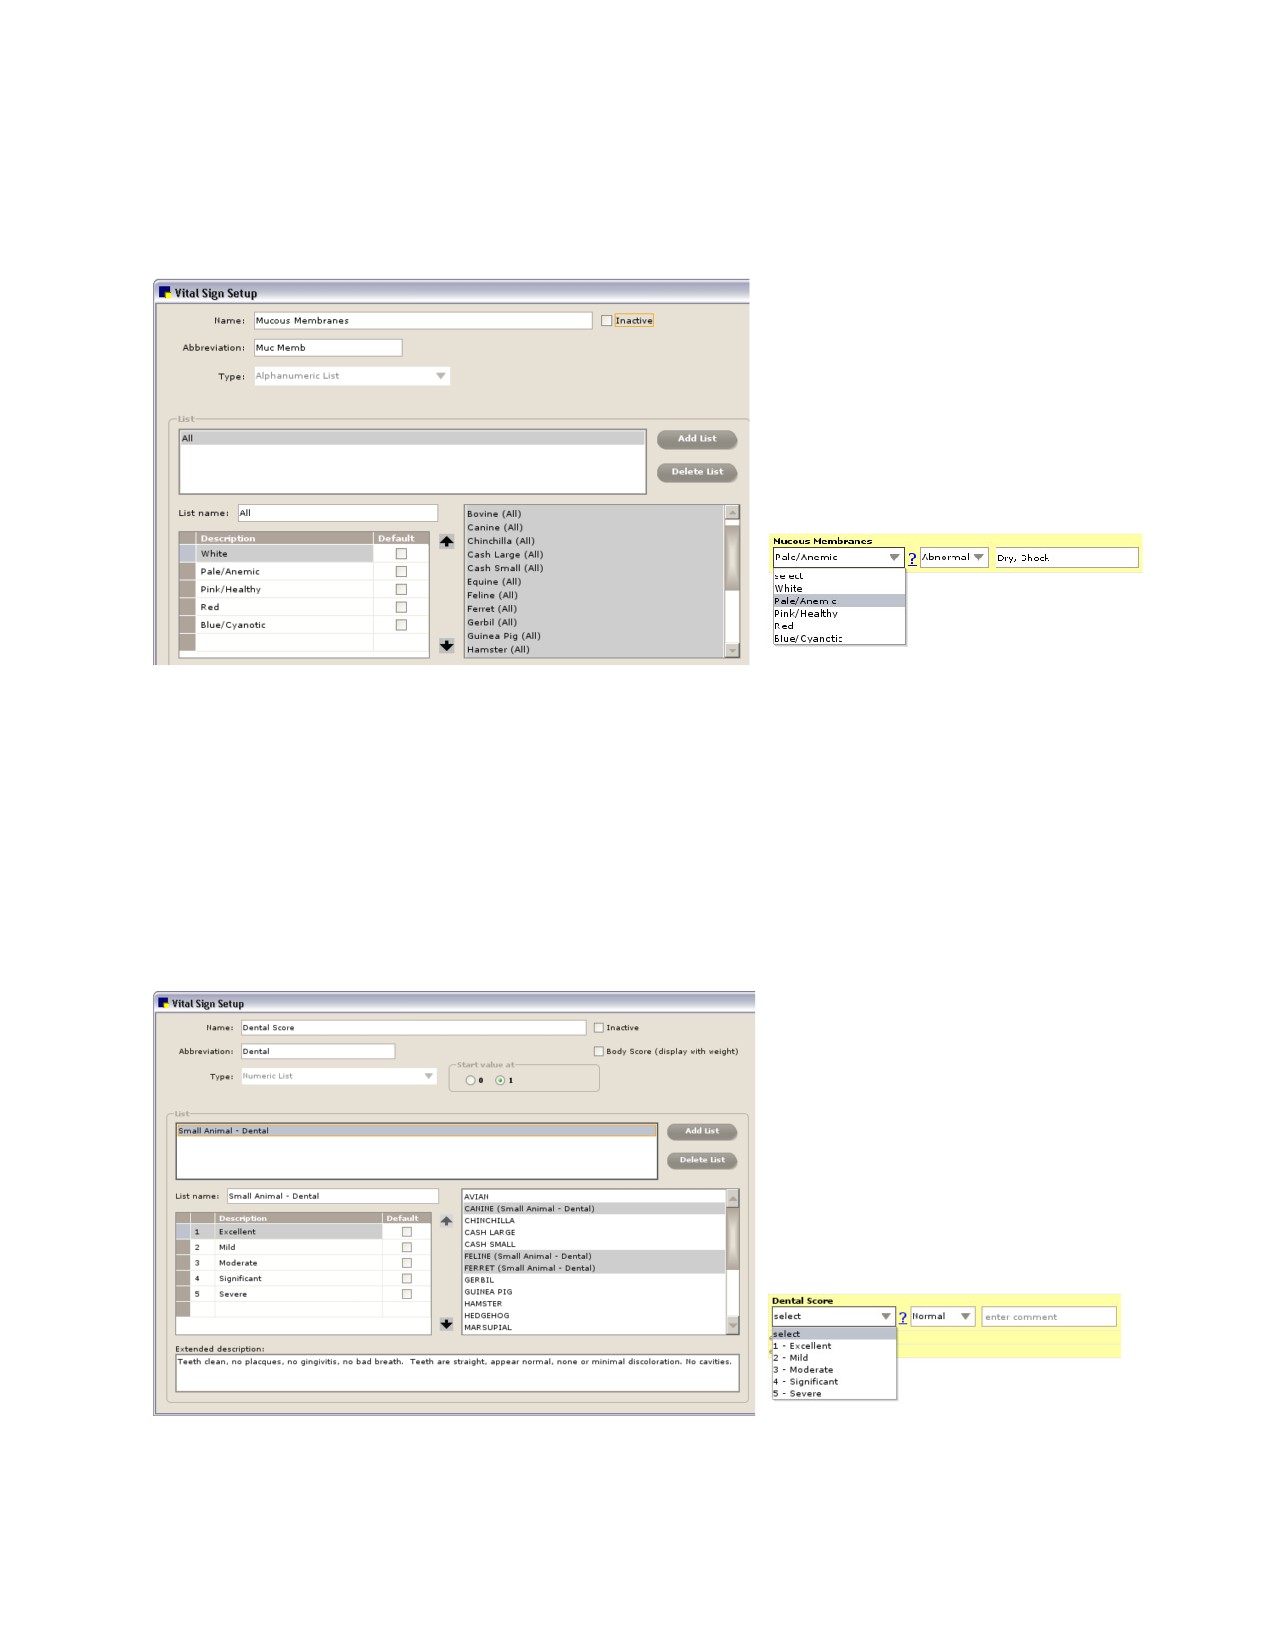
With an Alphanumeric List vital sign, at the time of use a value is selected from a list of preconfigured
answers containing letters and/or numbers. Mucous Membranes is an example of an Alphanumeric List
vital sign.
Example of the Alphanumeric List type during setup
Example of the Alphanumeric List type during use
Numeric List
With a Numeric List vital sign, at the time of use a value is selected from a preconfigured list, where the
values are based on a numeric scale with a start value of 0 or 1. You can also simply type the number to
quickly assign the associated value in the list. For example, for the “3-Optimal” Body Score value, you
can simply type “3” instead of selecting the value from the list.
Dental Score is an example of a Numeric List vital sign.
Note: Numeric List vital signs can be graphed.
Example of the Numeric List type during setup
Example of the Numeric List type during use
304
Chapter 16: Setting Up Vital Signs/Weight
Numeric
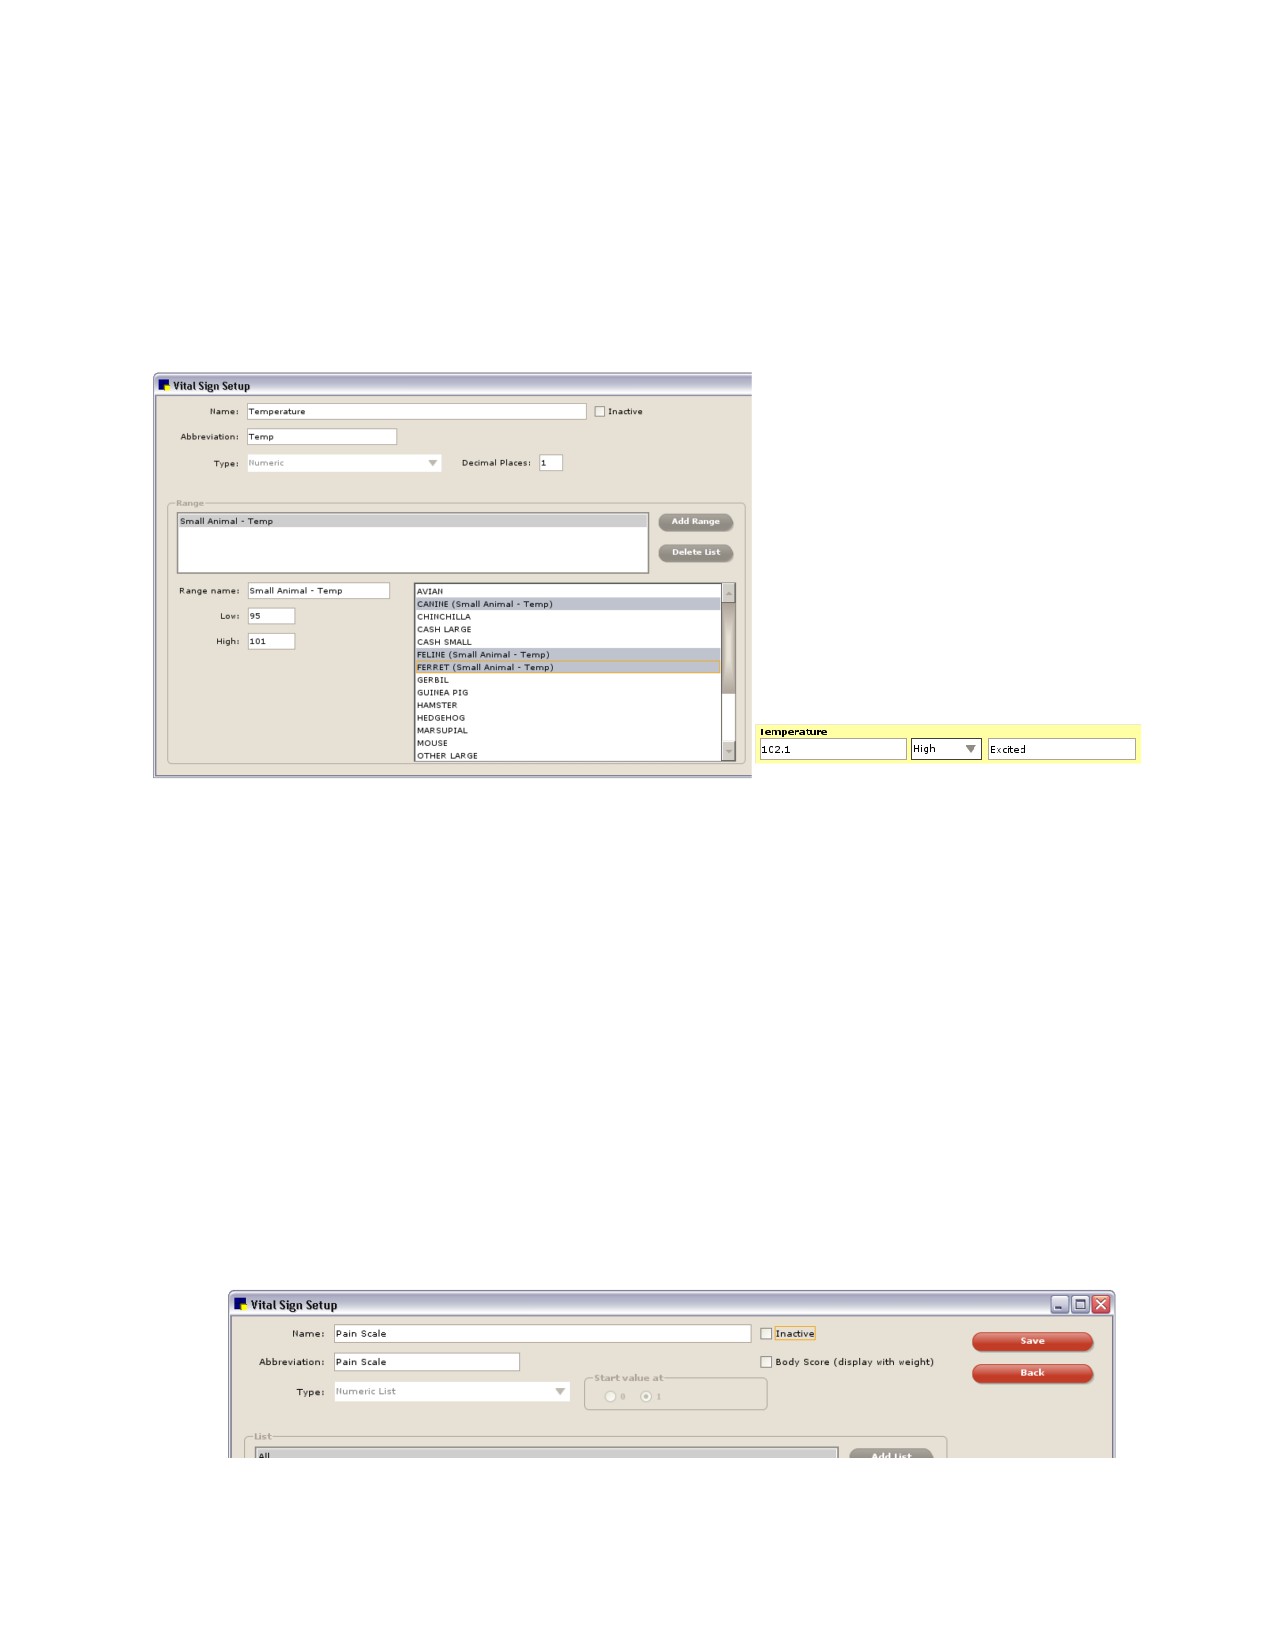
With a Numeric vital sign, you have the option of setting up one or more numeric ranges to serve as a
warning mechanism that alerts you when a value is entered outside the “normal” range for the species.
For example, a Temperature vital sign could be set up to use a range of 95 (low) to 101 (high). If a staff
member accidentally types 966 instead of 96, Cornerstone notifies the staff member that the entry is out
of range and asks the staff member whether to use this value.
Note: Numeric vital signs can be graphed.
Example of the Numeric type during setup
Example of a Numeric type entry
Setting Up the Vital Sign List for Your Practice
Quick-Start Setup—Activating Vital Signs and Assigning Species to Lists
If the default Vital Sign List meets your practice’s needs as is with no customization required, then
consider using the Quick-Start Setup steps. These steps cover the minimum setup required to get up
and running quickly using the default vital signs.
Note: If you plan to edit the default Vital Sign List, add your own vital signs to the list, or set up custom
lists by species or group, do not use the Quick-Start Setup. See “Editing Default Vital Signs or Adding
New Vital Signs” on page 306 for information on standard setup procedures.
To activate vital signs and assign species to lists:
1. On the Lists menu, select Vital Signs/Weight. The Vital Sign List window appears.
2. Double-click a vital sign to edit its settings. The Vital Sign Setup window appears.
3. To activate this vital sign, clear the Inactive check box. (Conversely, to mark it as inactive, select the
Inactive check box.)
Inactive check box in Vital Sign Setup
305
Chapter 16: Setting Up Vital Signs/Weight
4. Do one of the following:
• If the vital sign you are activating is an Alphanumeric or Numeric type, no additional setup is
necessary. Click Save to return to the Vital Sign List.
• If the vital sign you are activating is an Alphanumeric List or Numeric List vital sign, proceed to
step 5.
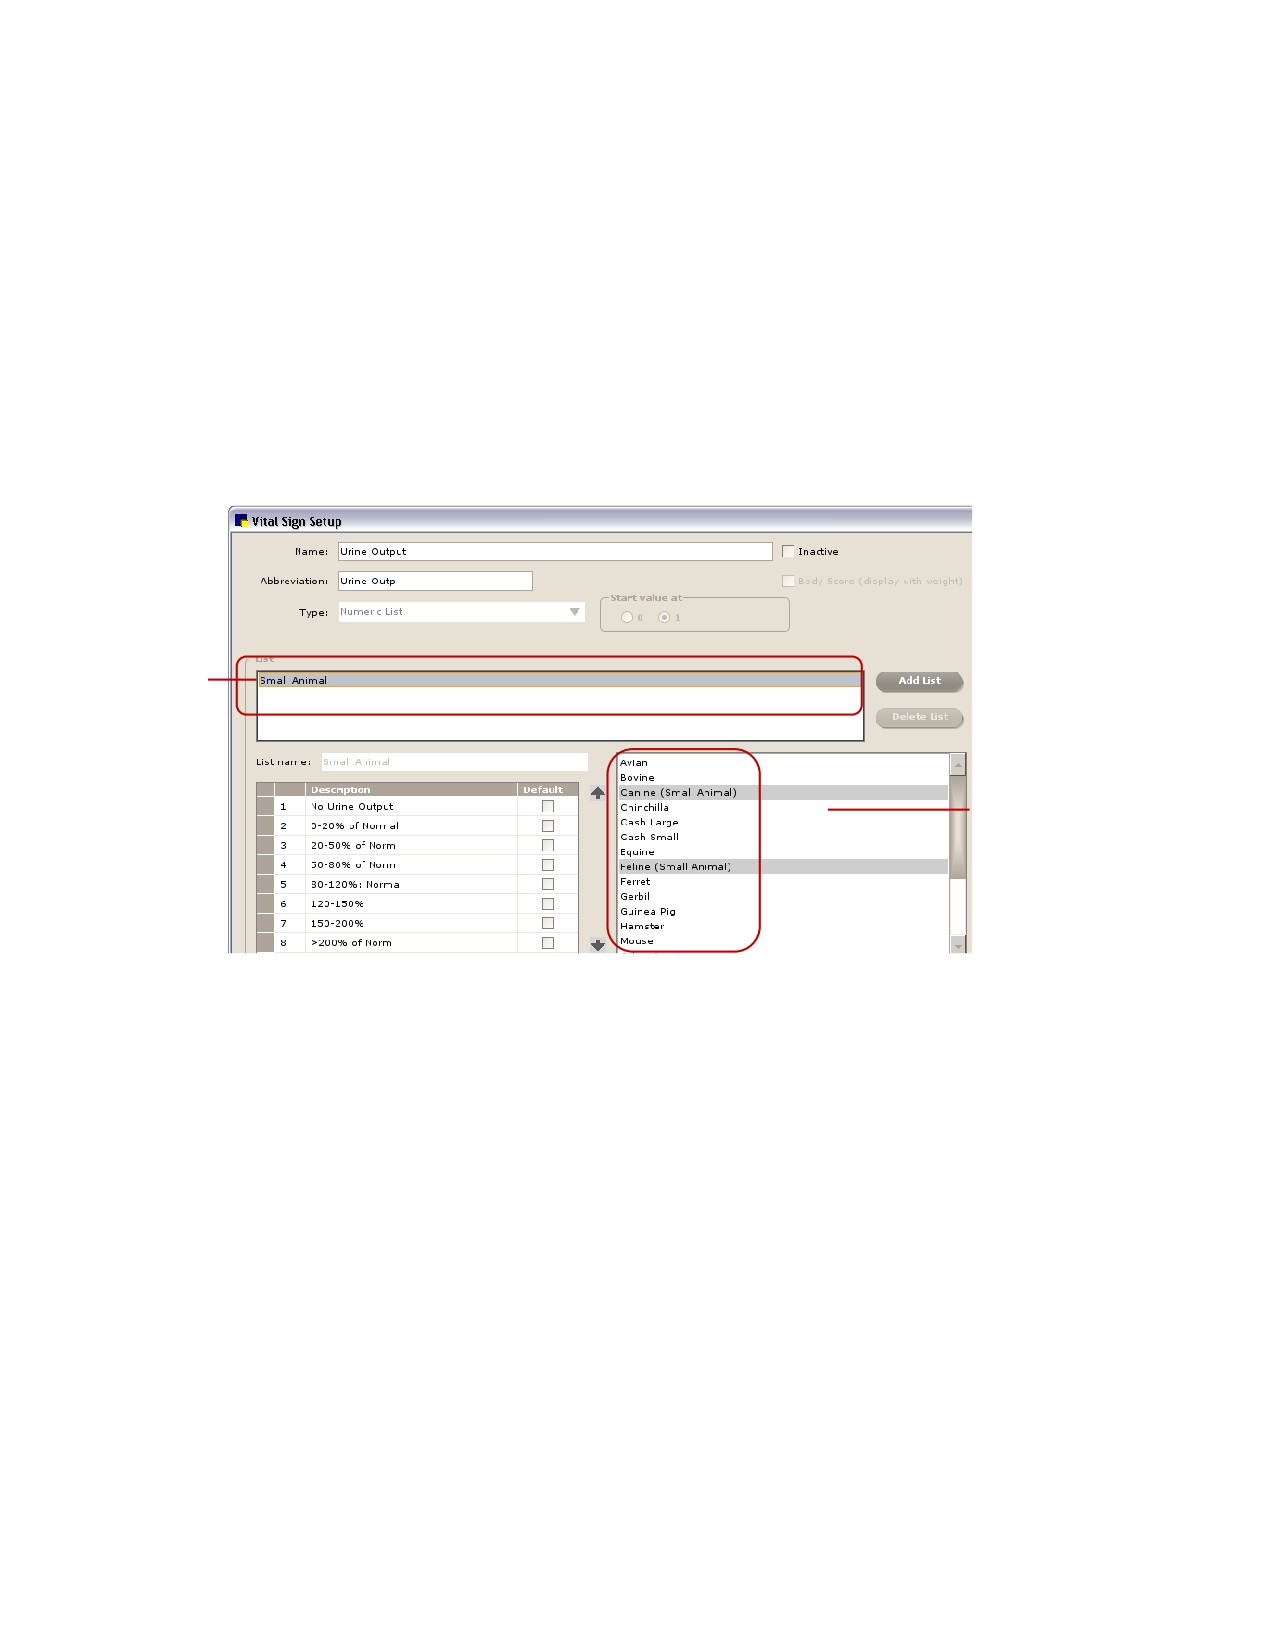
5. To associate one or more species with a list, select the list and then click each desired species to be
associated with it. (Click the species a second time to unlink the species from the list.)
Note: To display this list when adding vital signs for patients, you need to assign the applicable
species to the list here, during vital sign setup. If you do not assign at least one species to the list,
when you try to enter a value for this vital sign, a message displays to remind you that the patient’s
species has not been associated with the list.
Step 1-
select a
list
Step 2-click to select
each species to be
associated with the
list
Associate species with a list
IMPORTANT: Once a list vital sign has been entered for a patient, from that time on, you cannot
add, edit, delete or reorder list values; you cannot change the species associated with the list
(although you can add species to an existing list); and you cannot delete the list. (If necessary, you
can copy the vital sign, inactivate the original version that you copied, then edit the copy as needed
and assign your species as desired.)
6. When you have finished linking all applicable species to a list, click Save to save and return to the
Vital Sign List.
Editing Default Vital Signs or Adding New Vital Signs
To take advantage of the power and flexibility built into the Vital Signs functionality in Cornerstone, you
can customize your practice’s Vital Sign List by doing any of the following:
• Edit the default vital signs
• Add new vital signs
• Add a range of low/high values for one or more species (to have Cornerstone alert staff for
values entered outside the range)
306
Chapter 16: Setting Up Vital Signs/Weight
• Add custom lists for a particular species or group of similar species (Avian, Equine, Small
Animal group, Large Animal group, etc.)
To edit or add a vital sign (all vital sign types):
1.
On the Lists menu, select Vital Signs/Weight. The Vital Sign List window appears.
2.
Do one of the following:
• To edit a vital sign, double-click the vital sign (or select it and click Update).
• To add a new vital sign, click New.
The Vital Sign Setup window appears.
Note: The settings available on the Vital Sign Setup window differ depending on the data type
selected for the vital sign you are configuring.
3.
In the Name text box, type a descriptive name that uniquely identifies this vital sign (maximum 30
characters). The name displays only on setup windows; it does not display on the Vital Signs entry
and viewing window or on the Patient Clipboard* Vital Signs tab.
4.
To activate the vital sign, clear the Inactive check box. (Conversely, to mark it as inactive, select the
Inactive check box.)
5.
In the Abbreviation text box, type to edit or enter a shortened version (maximum 10 characters) of
the vital sign name. This abbreviation will display in the Vital Signs column (static left column) on the
Vital Signs entry and viewing window and in the column headers on the Patient Clipboard Vital
Signs tab.
6.
If setting up a new vital sign, in the Type field, select Alphanumeric, Alphanumeric List, Numeric List
or Numeric. See “Vital Sign Types” on page 303 to view examples of each vital sign type at the time
of setup and use.
7.
Depending on the vital sign type selected, do one of the following:
• For Alphanumeric, the setup is complete. Click Save to save and return to the Vital Sign List.
• For Numeric, proceed to the section for setting up a Numeric vital sign.
• For Numeric List or Alphanumeric List, proceed to the section on setting up a Numeric List or
Alphanumeric List vital sign on page 308.
To set up a Numeric vital sign (and optionally set up one or more low/high ranges):
1. Configure the basic settings on the Vital Sign Setup window according to the steps in the previous
“To edit or add a vital sign (all vital sign types)” section on page 307 and make sure the Numeric
type is selected.
2. In the Decimal Places field, specify whether to use 0, 1 or 2 decimal places for this vital sign.
3. To add a range of low/high values for one or more species (to have Cornerstone alert staff for values
entered outside the range):
a. Click Add Range.
Tip: If you are editing a default vital sign, to save time you could edit the default range instead of
adding a new range. To edit the default range, select it in the Range area and follow steps b-e
to make changes to its settings as necessary.
b. In the Range name field, type an identifying name for the range. Typically you would want a
name that identifies both the vital sign and the type/size of species to be associated with the
307
Chapter 16: Setting Up Vital Signs/Weight
range. For example, for the Pulse vital sign you could set up range names such as “Small
Animal - Pulse” and “Large Animal - Pulse.”
c. In the Low field, enter a numeric value to represent the low end of the “normal” values for this
range.
d. In the High field, enter a numeric value to represent the high end of the “normal” values for this
range.
Note: If desired, you can specify only a low value or only a high value—you are not required to
specify both values.
e. To associate one or more species with the range, select the range and then click each desired
species to be associated with it. (Click the species a second time to unlink the species from the
range.)
Note: A species can be assigned to only one range per vital sign.
f.
Repeat steps a-e as needed to set up each desired range.
4. To delete a range, select it in the Range area and click Delete range.
5. When you are finished, click Save to save and return to the Vital Sign List.
To set up a Numeric List or Alphanumeric List vital sign (and assign species to lists):
1.
Configure the basic settings on the Vital Sign Setup window according to the steps in the “To edit or
add a vital sign (all vital sign types)” section on page 307 and make sure either the Numeric List or
Alphanumeric List type is selected.
2.
If the Numeric List type is selected, the following two additional fields display:
• Body Score (display with weight)-If this is a Body Score vital sign and you want the body
score to display along with the patient weight throughout Cornerstone, select this check box. If
selected and there is already an active Body Score, a message appears to verify that
Cornerstone should inactivate the current Body Score vital sign and reassign to make this the
active Body Score. (There can be only one active Body Score vital sign.)
• Start value at-Specify if you want to use 0 or 1 as the starting value for your Numeric List.
3.
To add a list for this vital sign (so staff can select a value from this drop-down list when recording
this vital sign for a patient):
a. Click Add List.
Tip: If you are editing a default vital sign, to save time you could edit its default list instead of
adding a new list. To edit the default list, select it in the List area and follow steps b-g to make
changes to its settings as necessary.
b. In the List name text box, type an identifying name for the list. For easy identification, use a list
name that includes both the vital sign and the type/size of species to be associated with the list.
For example, you could set up list names such as “Small Animal - Body Score” and “Large
Animal - Body Score.”
c. In the first Description row, type a list value (maximum 15 characters) to appear in a drop-down
list for this vital sign, then press TAB twice. (For Numeric List values, a number is automatically
assigned to the value based on the selected start value.) Repeat this process to add all desired
list values.
Note: A list must have at least one value (description) associated with it.
308
Chapter 16: Setting Up Vital Signs/Weight
d. If desired, select the Default check box next to one of the list values to designate it as the
default selection. This value will be selected by default in the drop-down list for this vital sign at
the time of use on the Vital Signs window. Note that even if you simply click in the entry cell for
this vital sign on the Vital Signs window, the default value will be selected automatically.
e. To order the list values as you want them to display in the drop-down list, select a list value and
then click the up
or down
arrow button to move the value within the list.
f.
To provide a more detailed description of each list value, select the value in the
Description/Default table and then type the description text (maximum of 500 characters) in the
Extended description box located at the bottom of the window. The extended description will
be accessible on the Vital Signs window at the time of use by clicking the “?” link for that vital
sign.
g. To associate one or more species with the list, select the list and then click each desired
species to be associated with it. (Click the species a second time to unlink the species from the
list.)
Note: To display this list when adding vital signs for patients, you need to assign the applicable
species to the list here, during vital sign setup. If you do not assign at least one species to the
list, when you try to enter a value for this vital sign, a message displays to remind you that the
patient’s species has not been associated with the list.
h. Repeat steps a-g as needed to set up each desired list.
IMPORTANT: Once a list vital sign has been entered for a patient, from that time on, only the
Extended description can be changed. You cannot add, edit, delete or reorder list values; you
cannot change the species associated with the list (although you can add species to an existing
list); and you cannot delete the list. (If necessary, you can copy the vital sign, inactivate the original
version that you copied, then edit the copy as needed and assign your species as desired.)
4.
To delete a list, select it in the List area and click Delete List.
5.
When you are finished, click Save to save and return to the Vital Sign List.
Editing the Weight Vital Sign
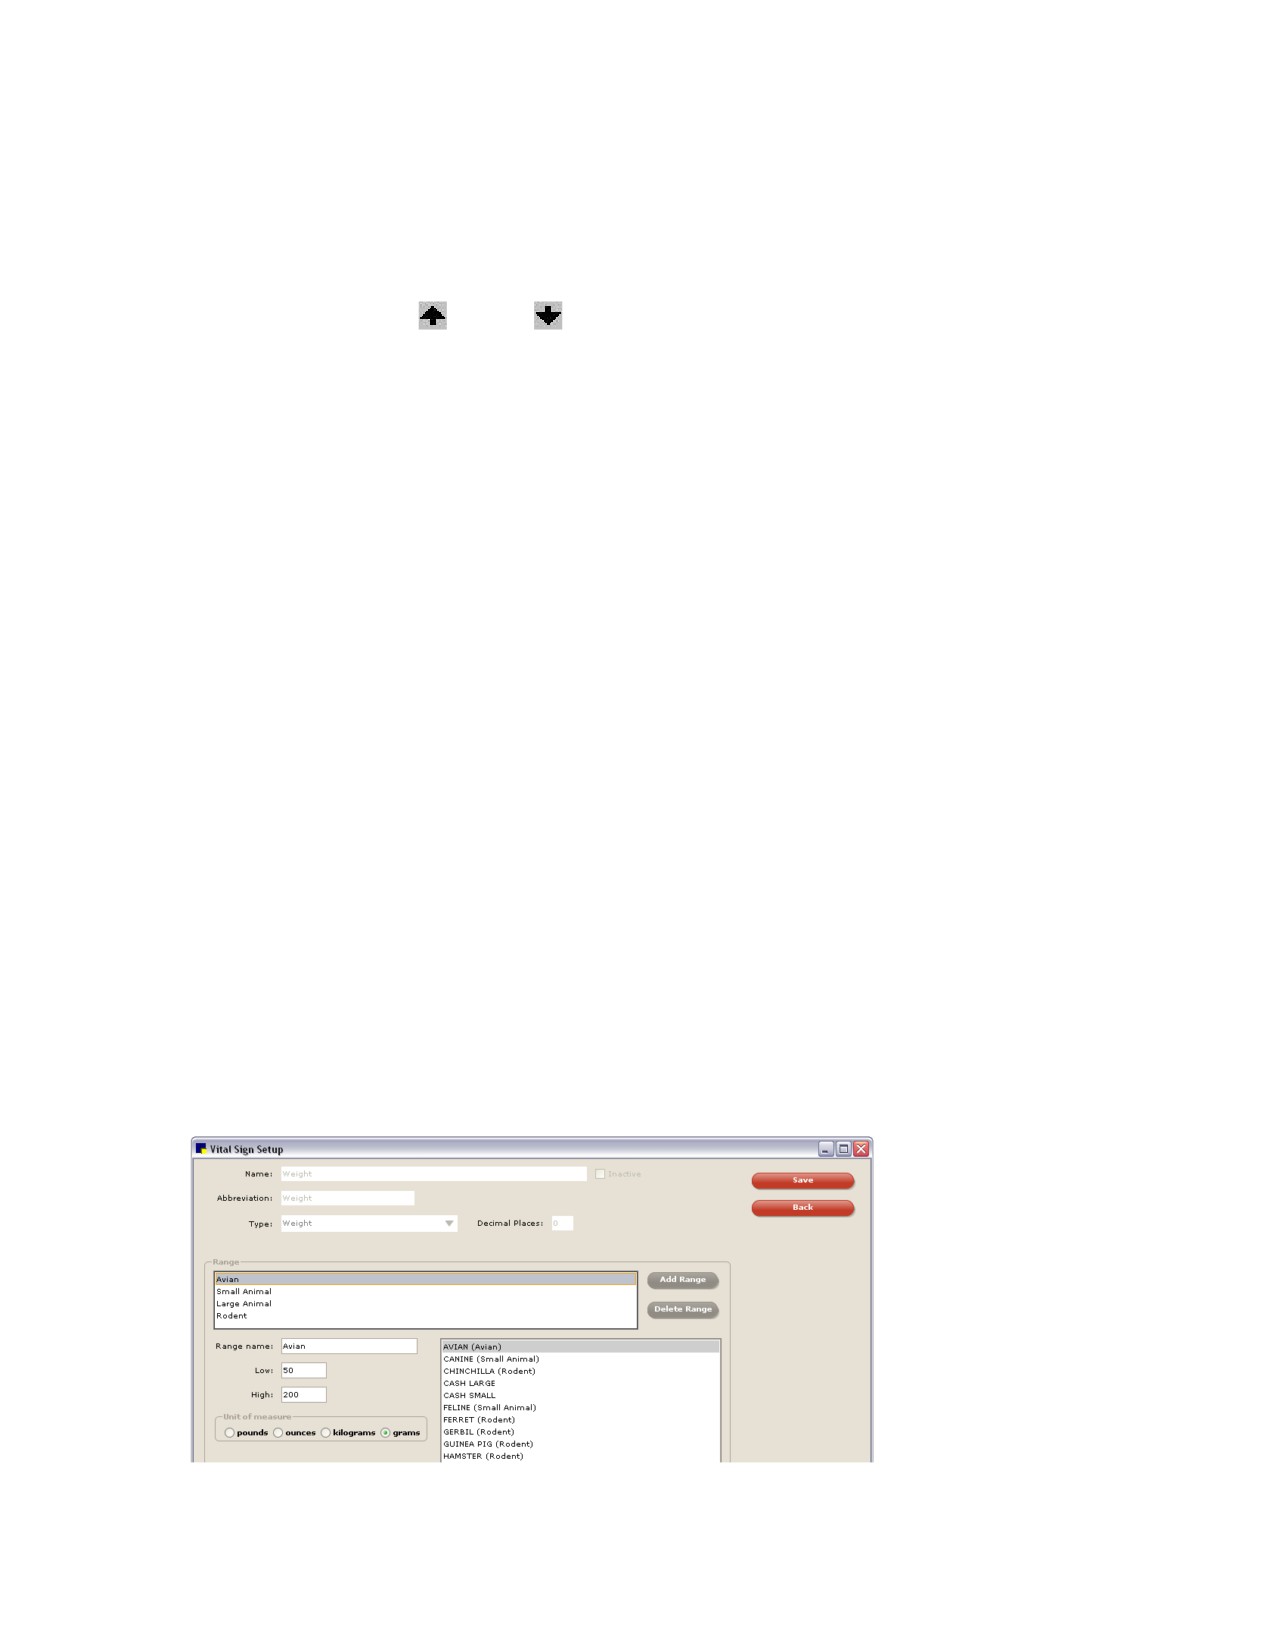
As with Numeric vital signs that allow you to set up low/high value ranges, the Weight vital sign can be
edited to add weight ranges appropriate for the species regularly seen in your practice. In addition, you
can specify different units of measure for each range based on species size. For example, you could set
up a range for the Avian species that has the Unit of measure set to grams.
Vital Sign Setup for Weight
309
Chapter 16: Setting Up Vital Signs/Weight
To edit the Weight vital sign:
1. On the Lists menu, select Vital Signs/Weight, then double-click the Weight vital sign to edit its
settings.
Note: Basic vital sign settings (Name, Inactive check box, Abbreviation and Type) are predefined for
the Weight vital sign and cannot be changed.
2. If desired, change the number of Decimal Places to be used for recording the weight (applies
across all ranges/species/units of measure).
3. If desired, you can set up weight ranges to alert staff for values entered outside the range. See step
3 in the “To set up a Numeric vital sign (and optionally set up one or more low/high ranges)” section
on page 307 for information on setting up a range.
4. For each range, select a Unit of measure appropriate for the range and the associated species.
5. When you are finished, click Save to save and return to the Vital Sign List.
Setting the Vital Signs Display Order
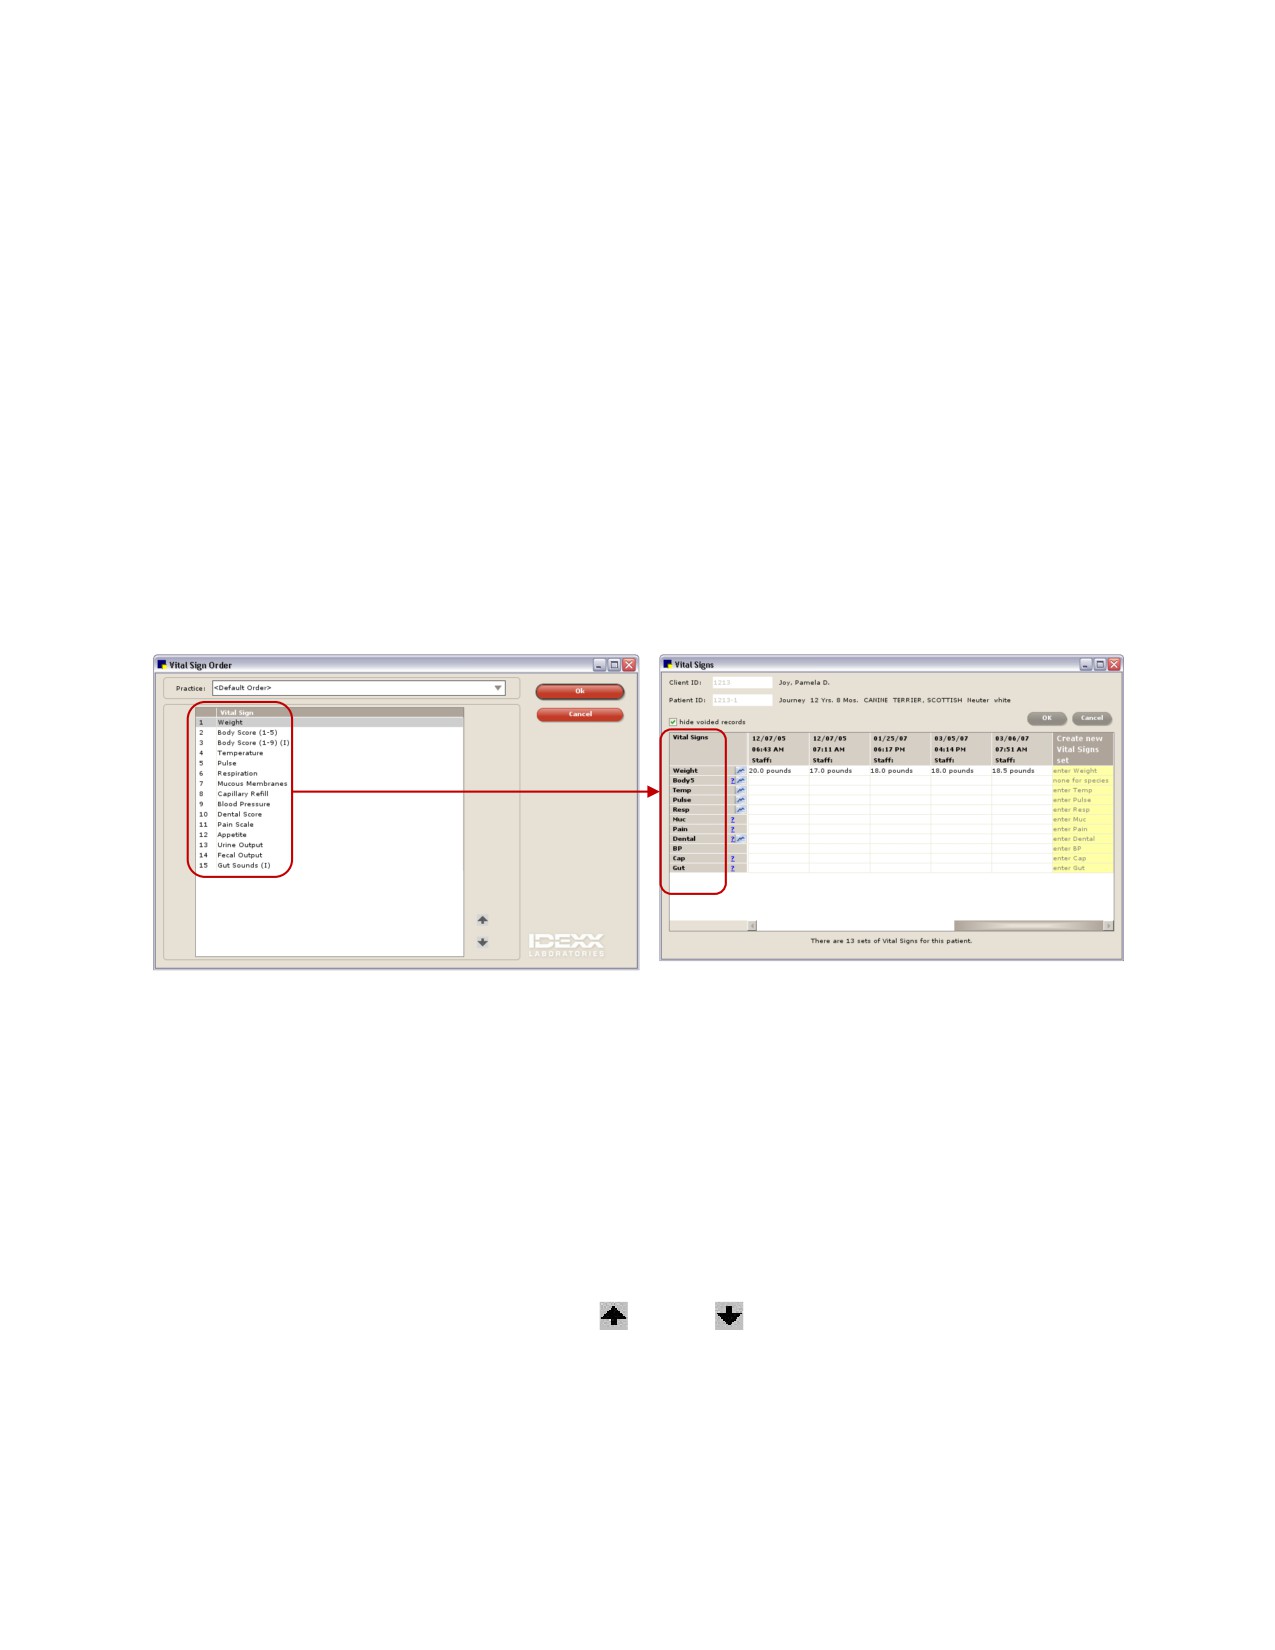
On the Vital Sign Order setup window, you can specify the order of the rows that display in the Vital
Signs column on the Vital Signs entry and viewing window at the time of use.
Example of Vital Sign Order setup
Example of Vital Sign column during use
Note: You cannot move the Weight vital sign—it is locked at the top (first) position in the list. In addition,
if a Body Score vital sign is activated, it is automatically assigned to the second position in the list.
To set the vital sign display order:
1. On the Lists menu, select Vital Signs/Weight, then click Set Order. The Vital Sign Order window
appears.
2. Multi-Location/Single Database configurations only: If desired, you can customize the vital signs
display order for each practice. In the Practice drop-down list, select the practice for which you want
to set up the vital signs display order.
3. Highlight a vital sign and then use the up
or down
arrow button to move the vital sign to the
desired position in the list. Repeat this process until the vital signs are in the desired order.
4. Multi-Location/Single Database configurations only: If you are setting the order differently for each
practice, repeat steps 2-3 for each practice.
5. When you are finished, click OK.
310
Chapter 16: Setting Up Vital Signs/Weight
Copying a Vital Sign from the Vital Sign List
If an existing vital sign includes settings you would like to reuse when creating a new vital sign, you can
take a shortcut and make a copy of the existing vital sign. When setting up a new vital sign in this way,
the Type cannot be changed, but all other settings can be edited as needed.
Note: You cannot copy the Weight vital sign.
To copy a vital sign:
1. On the Lists menu, select Vital Signs/Weight.
2. On the Vital Sign List window, select the desired vital sign and click Copy.
3. On the Vital Sign Setup window, enter a new name and abbreviation for the vital sign, and make
other changes as necessary.
4. When you are finished, click Save to save and return to the Vital Sign List.
Deleting a Vital Sign from the Vital Sign List
You can delete a vital sign from the Vital Sign List only if the vital sign has never been used to record vital
signs for a patient. If the vital sign has been used (even for a test patient), it cannot be deleted.
Note: Regardless of whether they have been used before, the Weight and active Body Score vital signs
cannot be deleted.
Tip: If a vital sign has been used and cannot be deleted, it can still be inactivated (with the exception of
the Weight vital sign). Inactive vital signs are listed on the Vital Signs entry and viewing window only if the
patient has historic values for that vital sign.
To delete a vital sign from the Vital Sign List:
1. On the Lists menu, select Vital Signs/Weight.
2. On the Vital Sign List window, select the desired vital sign and click Delete. You are prompted to
confirm the deletion.
Note: If the Remember my decision check box is selected, the confirmation message will no
longer appear after performing a Delete operation within Vital Sign Setup. We recommend that you
leave this option unchecked.
3. Click Yes to delete the vital sign.
311
Chapter 17: Setting Up Medical Notes and Correspondence
This chapter covers the steps required to set up medical note templates and correspondence
templates in the IDEXX Cornerstone* Practice Management System. For information on adding a
medical note to a patient record or printing a correspondence document, see “Chapter 17: Using
Medical Notes and Correspondence” in the Cornerstone User’s Manual.
Overview
Document templates for both medical notes and correspondence are set up in the Cornerstone Editor.
The Cornerstone Editor provides standard editing and formatting features in a familiar word processing
environment.
Document templates for enhanced medical notes and correspondence can contain elements such as
the following:
• Cornerstone data that is automatically merged with the document using standard bookmarks
• Prompts for situation-specific information using question bookmarks
• Text input fields that can be filled in or “answered” by staff
• Information displayed using design elements such as text boxes, check boxes and tables
• Prompt for inserting patient problem description and details
• Prompt for inserting diagnosis description and details
• Prompt for inserting vital signs information
• Images (e.g., dental chart, eye diagram, etc.)
• Default invoice items
• Signature bookmarks that allow staff members and clients to sign documents electronically
The Cornerstone Editor is used both at the time of setup (when you create or update a document
template) and at the time of use (when you add a medical note to a patient record or print a
correspondence document).
Template Types
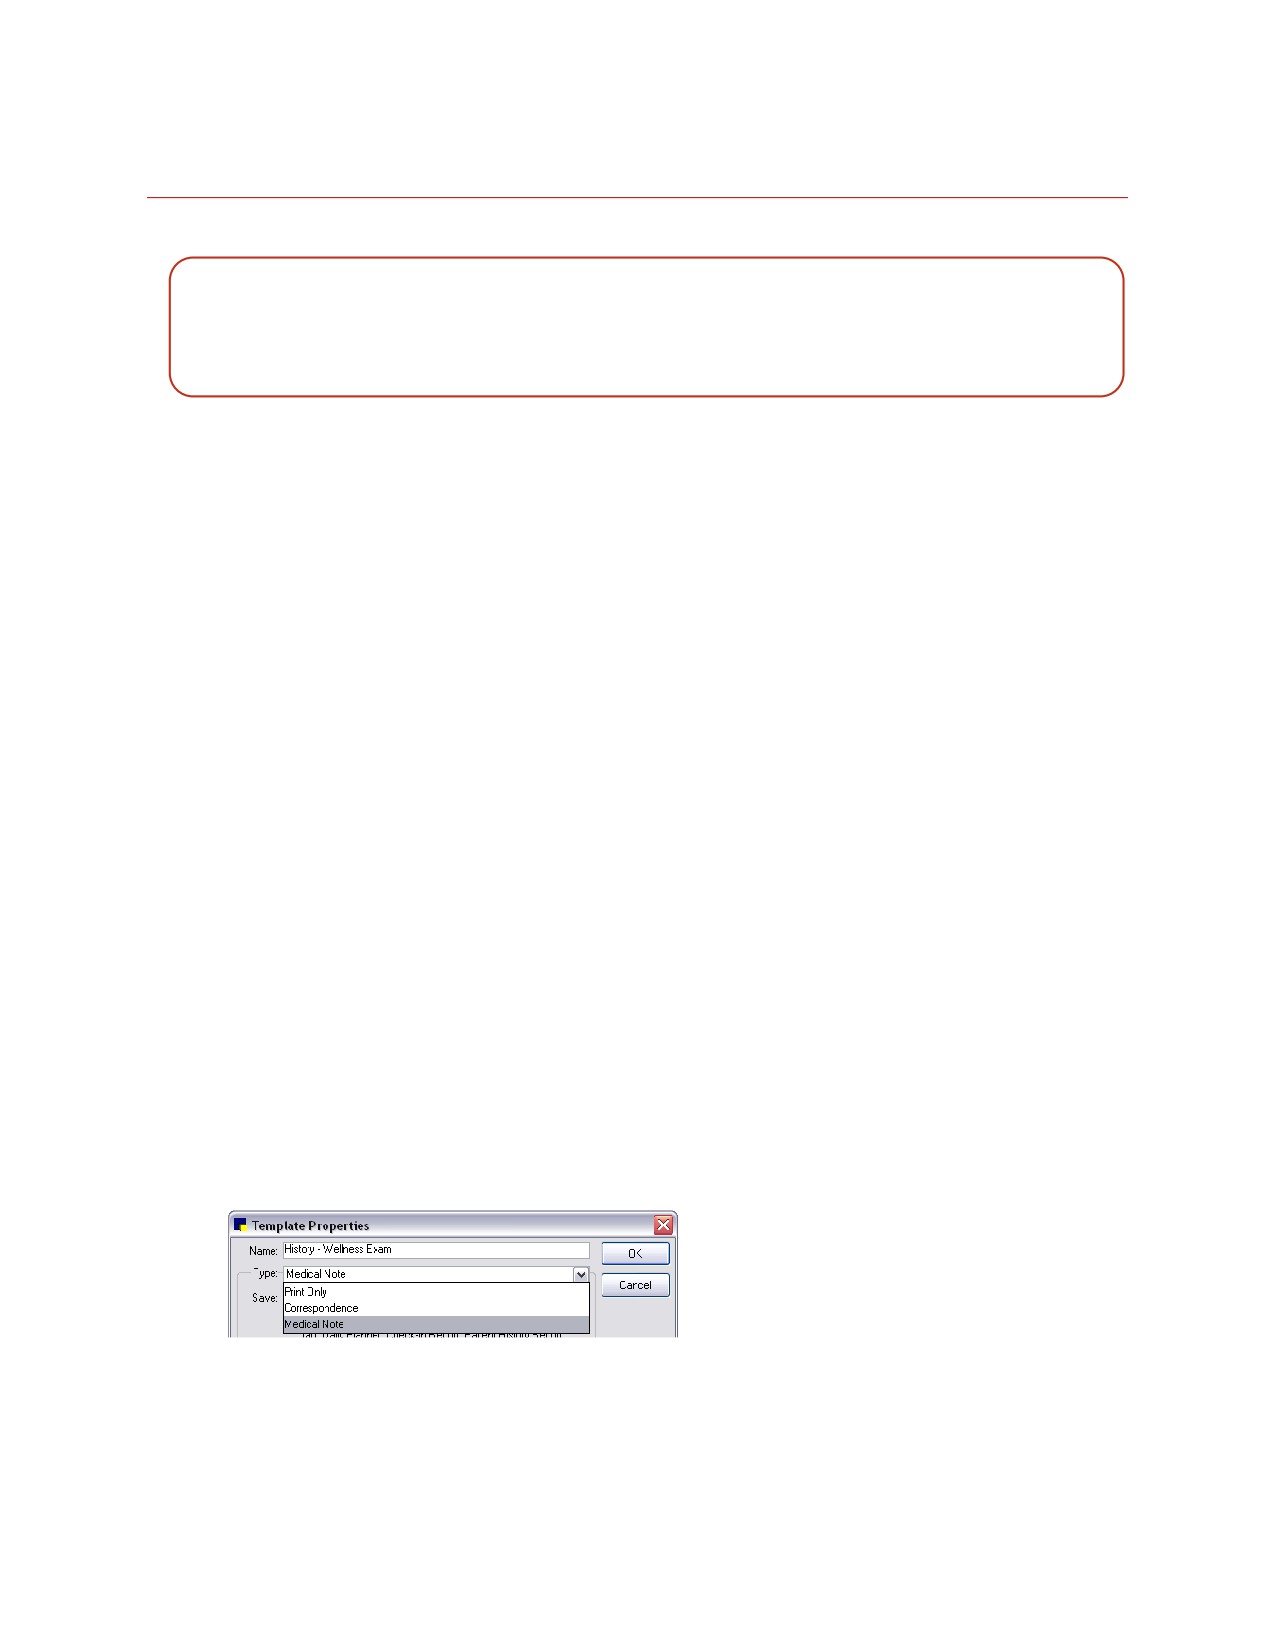
When setting up a new template in the Cornerstone Editor, you specify the template type on the
Template Properties dialog box.
Type text box in Template Properties
Template types include:
• Medical Note-Saved in patient history.
312
Chapter 17: Setting Up Medical Notes and Correspondence
• Correspondence-Allows you to save to a patient’s history as Title only (saves only the title to
history) or Document (saves entire document to history). Some examples of Correspondence
documents are Consent for Euthanasia Forms or Do Not Resuscitate Orders.
When viewing a patient’s history, you can distinguish the two Correspondence-type documents by
the icon appearing next to the line in history:
Entire Document saved to history
Document Title only saved to history
• Print Only-One-time use documents that are not saved to a patient’s history at the time of use.
Some examples of Print Only documents are Boarding Release Forms or Health Certificates.
Note: Any of the above template types can be created as simple text-only templates. Text-only
templates allow only text-based note entry with no formatting, tables, graphics, check boxes, etc.
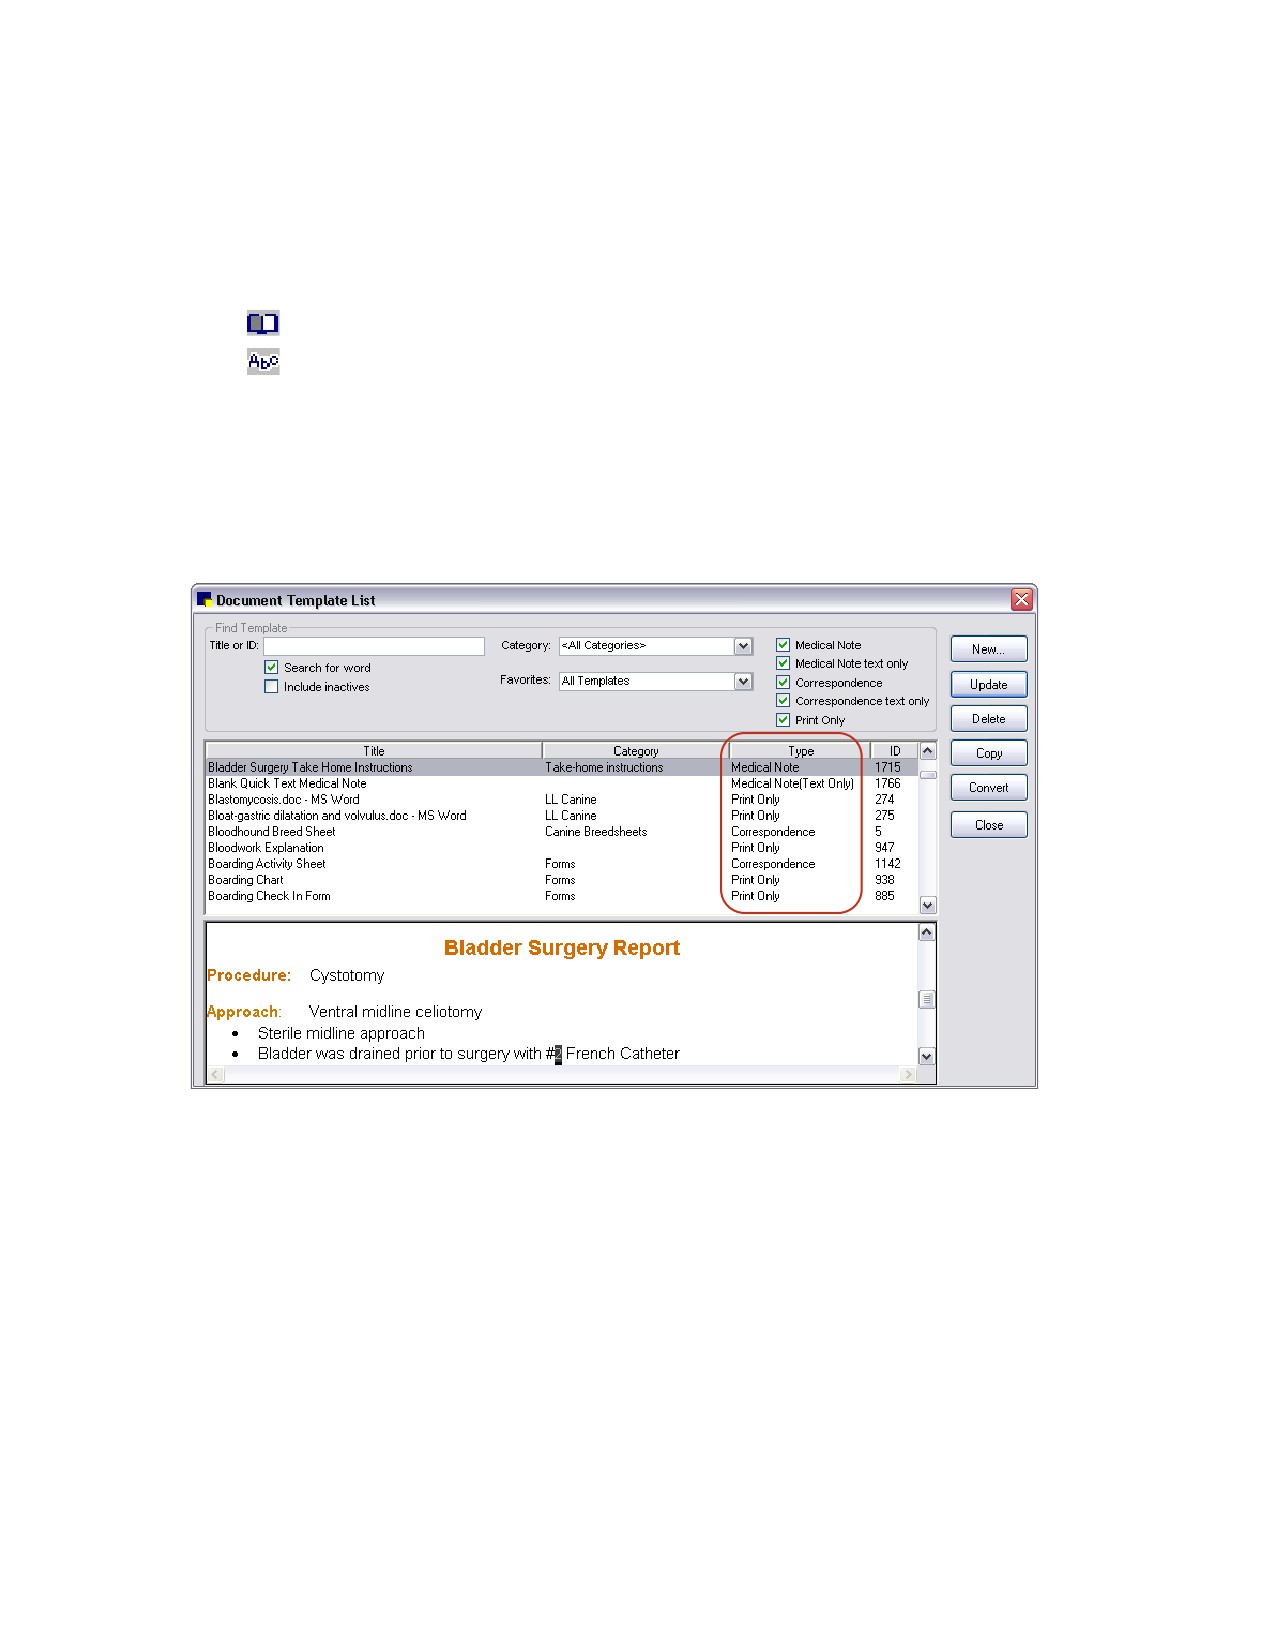
The type selected in Template Properties will determine the Type designation for the template on the
Document Template List window.
Template types shown on the Document Template List window
313
Chapter 17: Setting Up Medical Notes and Correspondence
Uses for Medical Note Templates
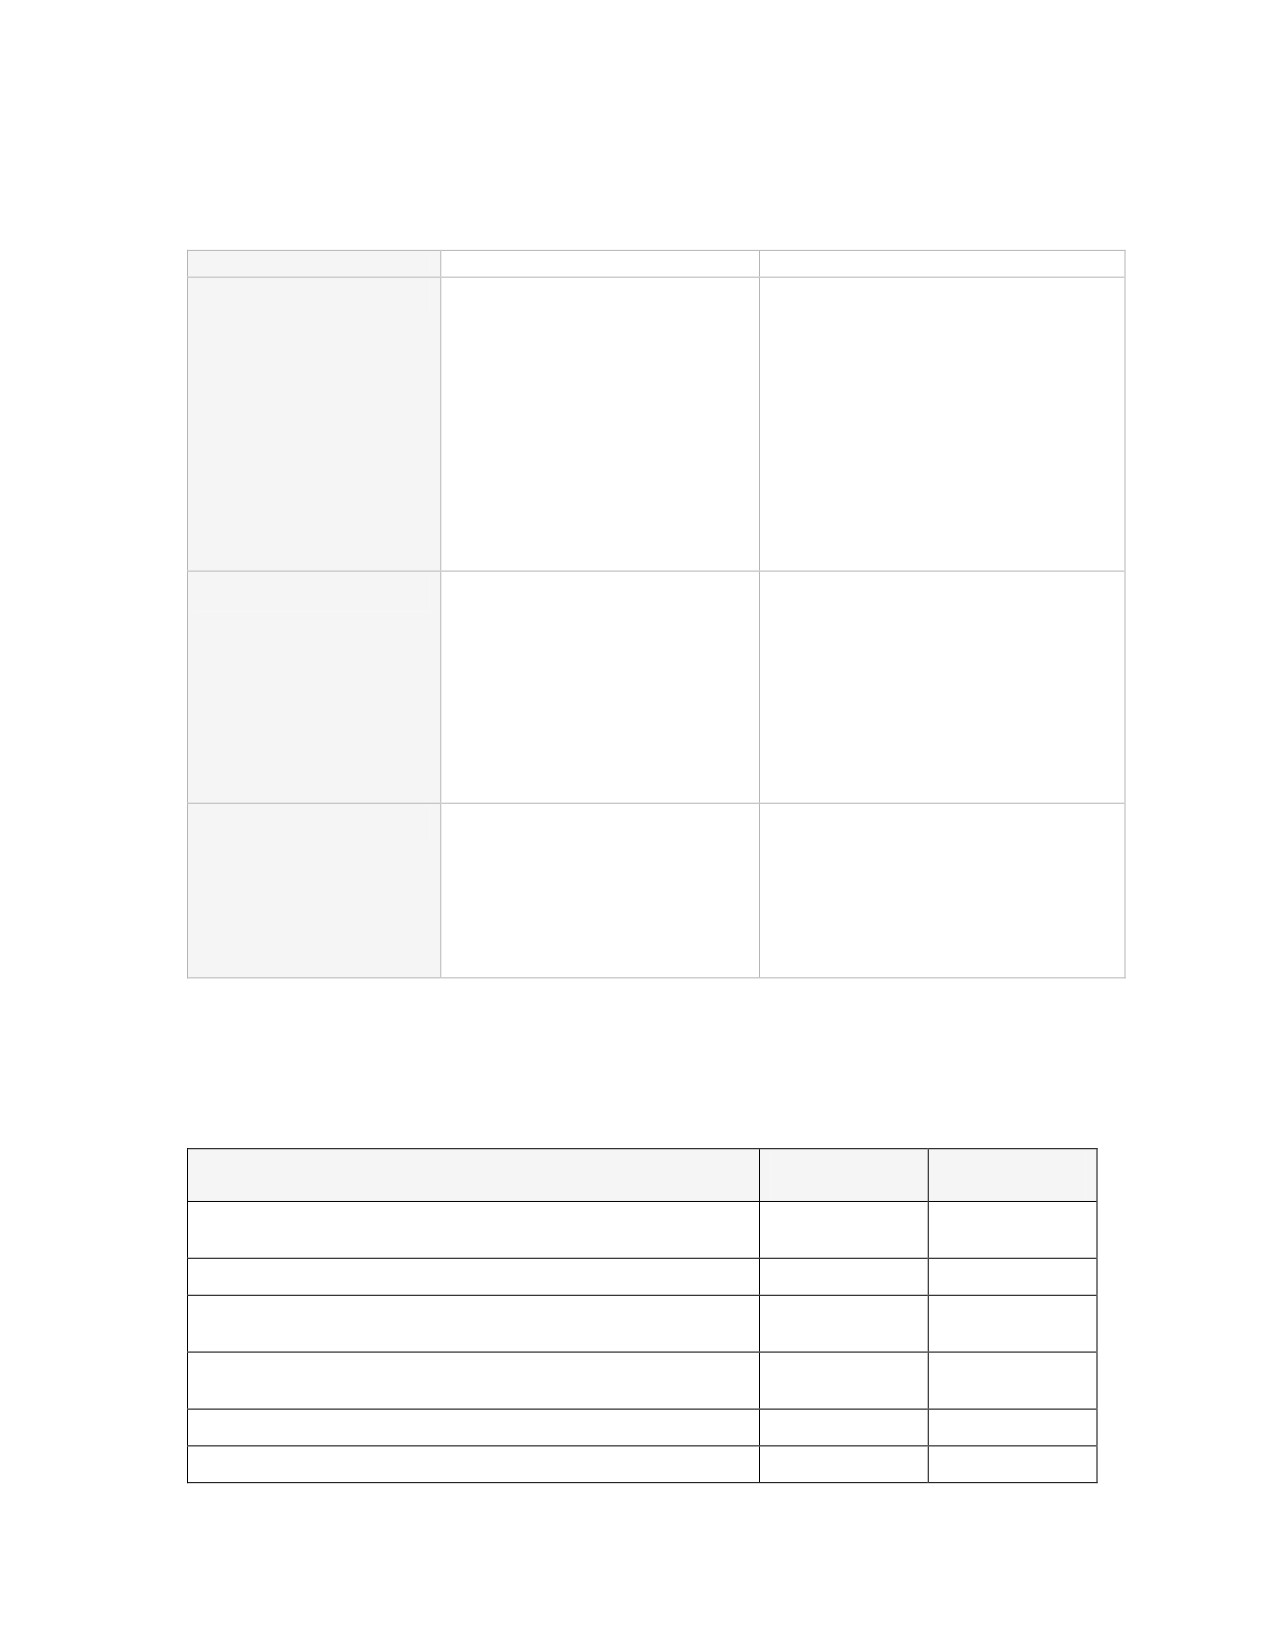
The following table provides brief descriptions and benefits of the various styles of medical note
templates you can create in Cornerstone.
Style of Medical Note
Description
Key Benefits
Enhanced medical note
Allows you to take advantage of the
Apply text styles and formatting, such as
Cornerstone Editor’s full rich-text
font selection, bold, italics, outlining,
feature set to create advanced
numbered/bulleted lists, etc.
medical note documents.
Include check boxes, tables, images, logo
This is the primary style of medical
graphics and electronic signatures.
note that is covered in detail in this
Insert a table of problem details,
chapter.
diagnosis details or vital signs information.
To create: On the Document
Template List, click New and select
Document template.
Text-only medical note
Allows you to use the Cornerstone
You can create and designate a single
Editor in “text-only mode” to create
“Quick Text” text-only template to be used
a simple text-based template (no
to quickly enter a medical note.
formatting or graphical elements).
You can view the full contents of a text-
To create: On the Document
only medical note inline on the Patient
Template List, click New and select
Clipboard* Text tab and Medical Notes
Text only template.
tab without needing to open the note or
use the Preview pane.
Classic medical note
The old medical notes style used in
Classic medical notes are currently the
Cornerstone 7.6 and earlier
only option available for creating
versions.
surgery/anesthesia logs.
See “Chapter 18: Setting Up Classic
Medical Notes” on page 351 for
information.
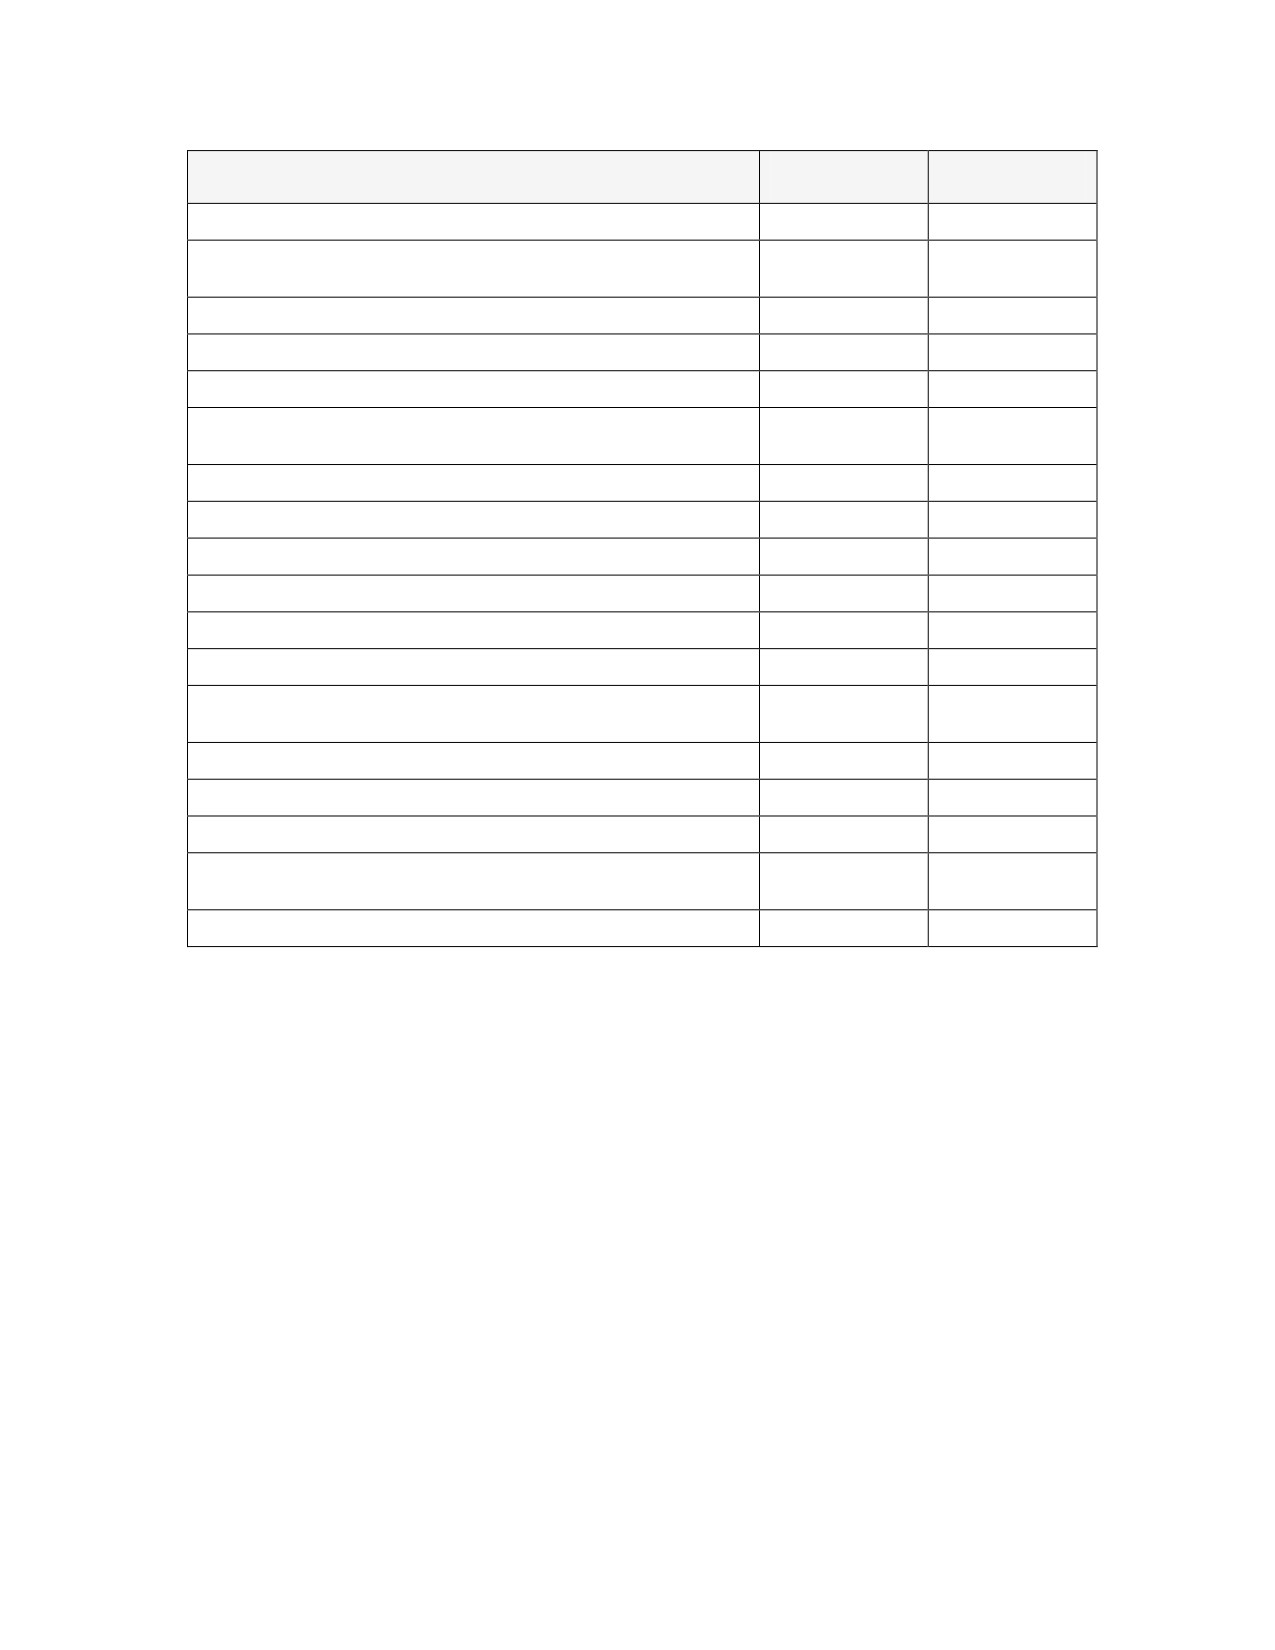
Enhanced Medical Notes vs. Text-Only Medical Notes-Feature Comparison Table
The following table summarizes the main features and functionality available with the two main styles of
medical notes offered in Cornerstone. Keep these differences in mind when deciding on the style of
template to create.
Enhanced
Text-Only
Feature/Functionality
Medical Notes
Medical Notes
Use a designated Medical Note Quick Text document for immediate
•
text entry, bypassing the Start New Document window steps
Apply a single color to all text using the Color All Text option
•
Apply multiple colors to select words or paragraphs throughout a
•
document
Apply text styles and formatting, such as font selection, bold, italics,
•
outlining, numbered/bulleted lists, etc.
Insert check boxes, tables and other design elements
•
Import graphic files, photos and logos
•
314
Chapter 17: Setting Up Medical Notes and Correspondence
Enhanced
Text-Only
Feature/Functionality
Medical Notes
Medical Notes
Add standard text-based bookmarks
•
•
Add image-based bookmarks (bookmarks that include signatures,
•
images, etc. or are inserted in a table format)
Insert a date/time stamp
•
•
Insert a problem description or diagnosis description
•
•
Insert a table of problem details, diagnosis details or vital signs
•
Lock a medical note to create a quick “tab through” form using Text
•
•
Input fields
Use spell check
•
•
Use header/footer features
•
Include attachments
•
•
Include invoice items
•
•
Use options for page setup and margins
•
Email the client directly from the medical note
•
•
Save a document with a Draft, Tentative or Final status and return
•
•
repeatedly to add to or update the document
Void a document
•
•
Add an addendum to a document
•
•
Insert an entire medical note into a correspondence document
•
•
View full contents of the medical note inline on the Patient Clipboard
•
Text tab and Medical Notes tab
View medical note in the Preview pane on the Patient Clipboard
•
•
Uses for Correspondence Templates
Using the Cornerstone Editor, you can create many different types of correspondence document
templates for both internal and external use:
• Referral letters
• Client letters
• Account information letters
• Release/consent forms
• Certificates
• Cage cards
• Breed sheets
• Pet ID cards
• PetDetect* collars
• Patient discharge instructions
315
Chapter 17: Setting Up Medical Notes and Correspondence
Note: You can merge a Cornerstone-generated file (e.g., the namelist.csv file) of client/patient
information with a document to create mass mailings, postcards or labels for a number of clients and
patients. For example, you may want to create geriatric letters and/or mailing labels for senior canine
patients. See “Chapter 17: Using Medical Notes and Correspondence” in the Cornerstone User’s Manual
for more information.
Note: You can also use Microsoft® Word to create some types of correspondence, although the
Cornerstone data available for use in Word bookmarks is rather limited. If you want to use bookmarks
with Word documents, you must link them with the applicable Cornerstone merge fields. See “Chapter
19: Setting Up Correspondence in Microsoft® Word” beginning on page 356 for more information.
Getting Ready Checklist
Before you begin to create document templates in the Cornerstone Editor, you should complete the
following verification and setup tasks.
Step 1-Verify adequate system storage capacity
Step 2-Verify reliable backup of the Cornerstone Share folder
Step 3-Enable staff permissions
Step 4-Set Documents defaults
Step 5-Set up template categories
Step 6-(Optional) Set up a signature capture device
Step 1-Verify Adequate System Storage Capacity
Because medical notes and correspondence can include media-rich elements such as photos and other
images, the file size associated with these documents may be substantial depending on how much you
use these features. You must ensure you have adequate hard drive space to accommodate your
estimated use level. See the Cornerstone Installation Guide for information on recommended hard drive
space for optimal performance.
Step 2-Verify Reliable Backup of the Cornerstone Share Folder
Medical notes and correspondence are saved to the hard drive (in an encrypted, secure format), so you
need to verify that you have a reliable method in place for backing up your Cornerstone system—
specifically the Cornerstone “Share” folder. If you have questions or need assistance, please contact
Cornerstone Support at 1-800-695-2877.
Step 3-Enable Staff Permissions
A Cornerstone Administrator must enable security settings in order for staff members to access and
finalize medical notes and correspondence documents. For more information, see the Cornerstone Staff
Security instructions you received separately when you purchased the Cornerstone program.
Step 4-Set Documents Defaults
The Documents defaults allow you to set preferences for medical note options and specify if document
invoice items should be included when printing. In addition, the Ask for weight if last entry is older
than __ days field determines whether staff members are prompted to enter the patient’s weight upon
starting or opening a medical note. See “Documents Defaults” on page 100 for more information.
Step 5-Set Up Template Categories
The Document Template Categories List (Lists > Documents > Template Categories) allows you to
set up categories that can be used for medical notes and/or correspondence documents.
316
Chapter 17: Setting Up Medical Notes and Correspondence
Step 6-(Optional) Set Up a Signature Capture Device
If desired, you can set up compatible signature capture devices to allow staff members and clients to
sign documents electronically. See “Setting Up a Signature Capture Device” on page 16 for information.
(Note: Electronic signatures are not available with text-only templates.)
Note: You can create an electronic signature for a staff member and store it for later use using the Staff
Information Signature tab (on the Lists menu, select Staff, select a staff member and click Update, and
click the Signature tab). See “Adding Electronic Signatures for Staff” on page 60 for more information.
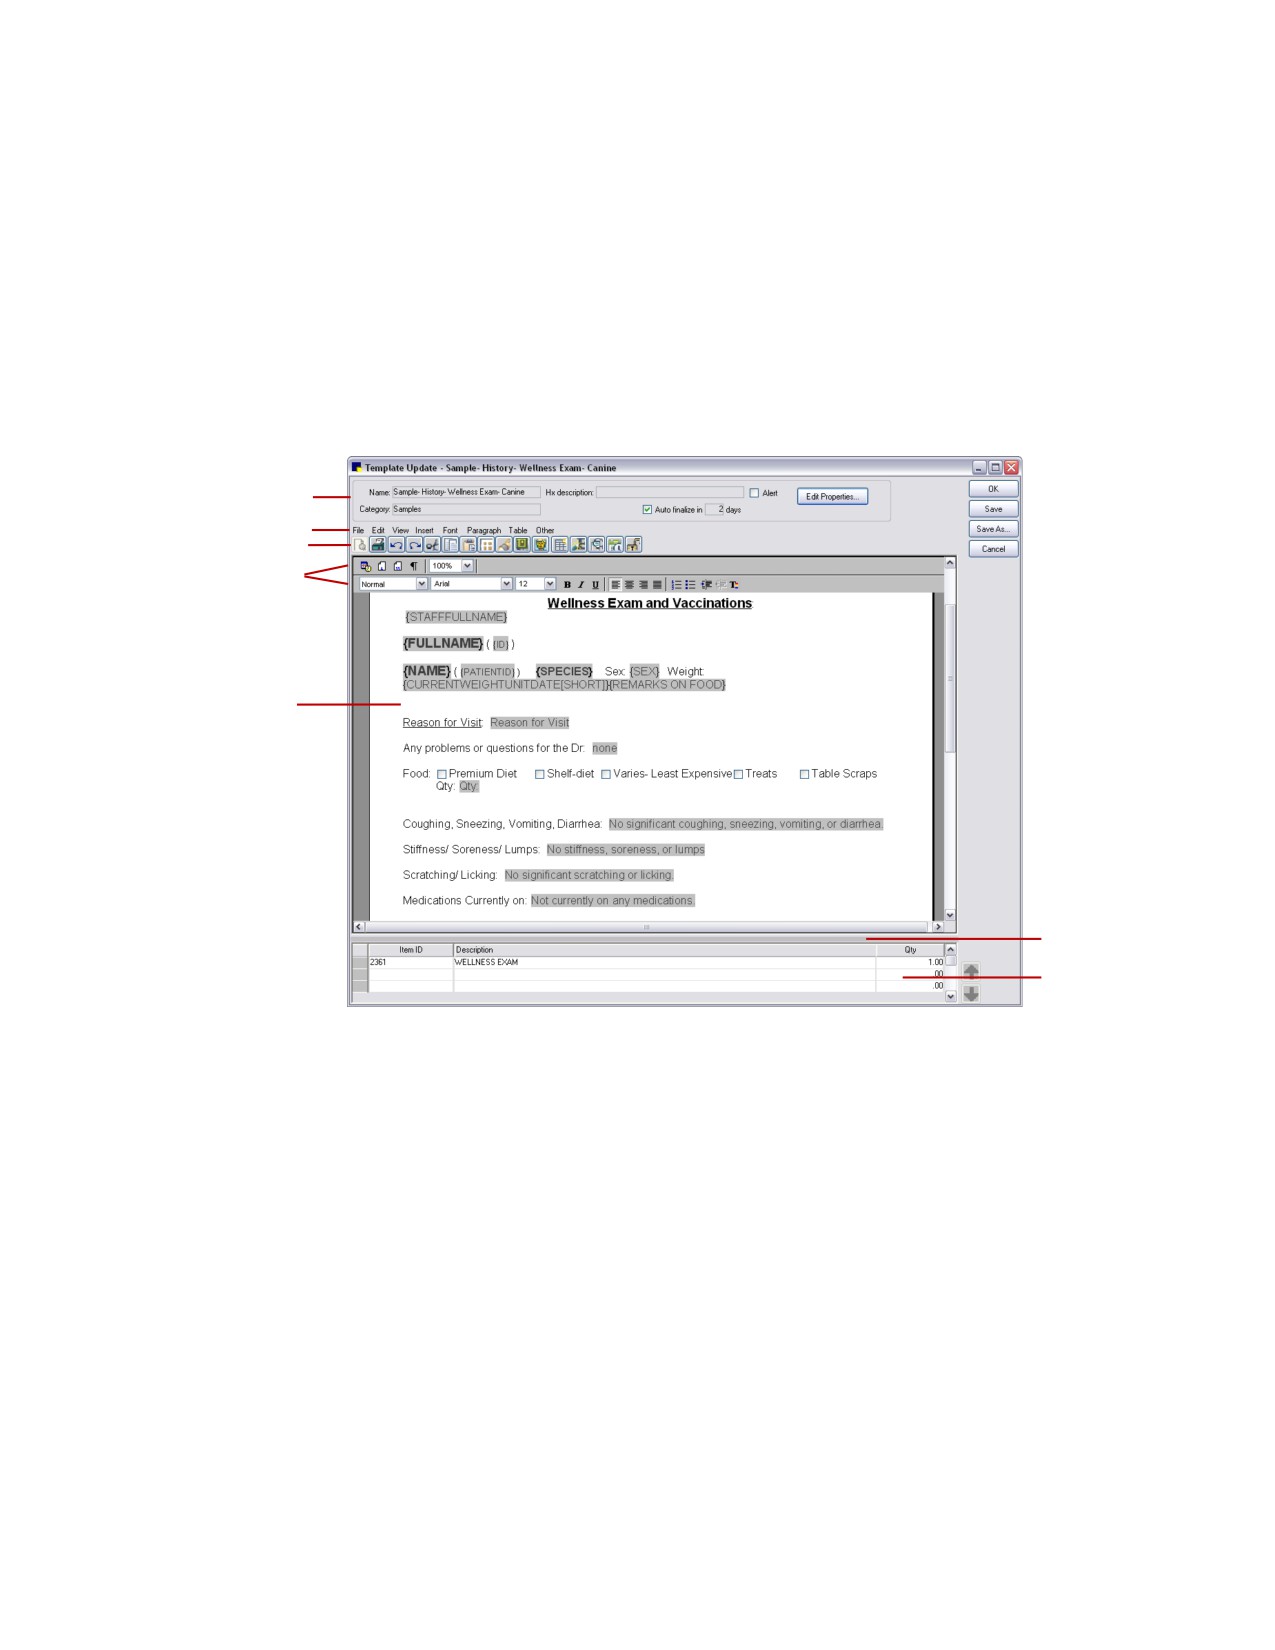
Cornerstone Editor-Template Setup/Update Window
Properties Banner
Menu Bar
Editor Toolbar
Toolbars
Editor pane
Splitter Bar
Invoice Items
pane
Cornerstone Editor-Template Setup/Update window
Note: When creating a text-only template (versus an enhanced document template), the menus, toolbar
buttons and right-click menus available in the Cornerstone Editor are limited to those options that pertain
to text-based data entry. Throughout this section, those features not available in text-only mode will be
marked with an "(Enhanced templates only)" designation.
Properties Banner (Template Properties)
The information that appears in the Properties Banner is specified in the Template Properties dialog box.
Click the Edit Properties button to access these settings.
Note: The Template Properties dialog box also appears automatically if you click Save for the first time,
if you click OK without first setting the properties, or if you click Save As.
317
Chapter 17: Setting Up Medical Notes and Correspondence
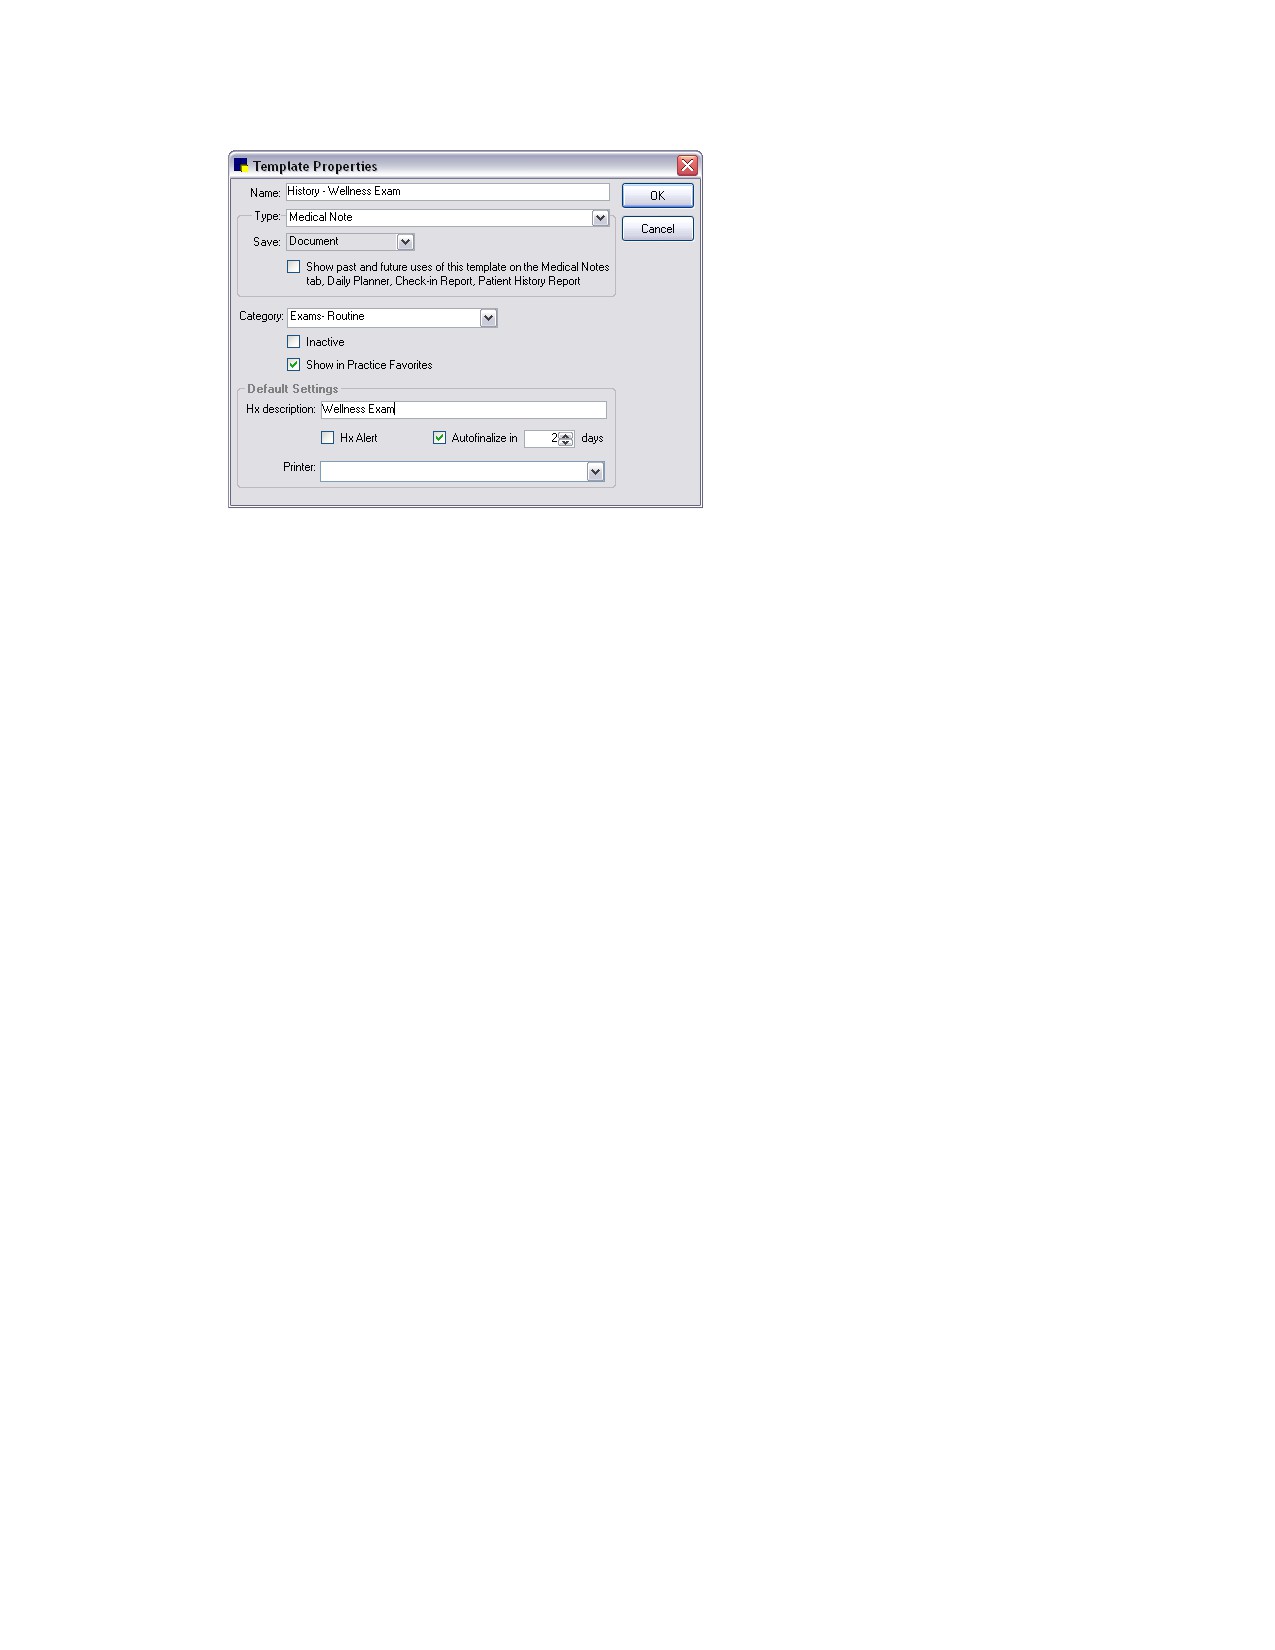
Template Properties dialog box
The Template Properties include:
• Name-Type a brief name to identify the template.
• Type-Set the template type as Medical Note, Print Only, or Correspondence.
• Save-If Correspondence is selected as the document type, specify how the document will be
saved. Title only saves only the title in patient history and Document saves the entire document
in patient history so it can be referred to later if needed.
• Show past & future uses of this template…-If you are creating a Correspondence template,
select this check box if you want documents created from this template to show on the Patient
Clipboard Patient History area Medical Notes tab, Daily Planner, Check-in Report and Patient
History Report. (See “Showing Correspondence with Medical Notes in History” on page 341 for
more information on this option.)
• Category-Select a category for the new template. Categories are optional but recommended
for easier searching so you can quickly locate the template later.
• Show in Practice Favorites-Select this check box if you want to flag the template as a Practice
Favorite.
Default Settings (can be changed or added by staff at time of use)
• Hx description-Type a brief description to be used for a document created from this template.
This is the description that is recorded in the patient’s medical history.
• Hx Alert-Select this check box if you want medical notes created from this template to stand
out in history (line displays in history as white text on a bright red background).
• Autofinalize in __ days-If you want medical notes created from this template to automatically
finalize at End of Day after a certain number of days, select the Autofinalize in check box and
enter the number of days. This default can be set in Documents defaults (see “Documents
Defaults” on page 100).
• Printer-Select a default printer for printing documents created from this template. If documents
created from this template should print to a specific printer (different from the printer selected in
Printer Setup), select it here.
318
Chapter 17: Setting Up Medical Notes and Correspondence
Editor Menu Bar
The Editor menu bar includes the File, Edit, View, Insert, Font, Paragraph, Table and Other menus. (The
menu bar is located within the Cornerstone Editor window, separate from the main Cornerstone menus.)
Note: When using the Cornerstone Editor in text-only mode, the menu options available are limited to
those options that pertain to text-based data entry.
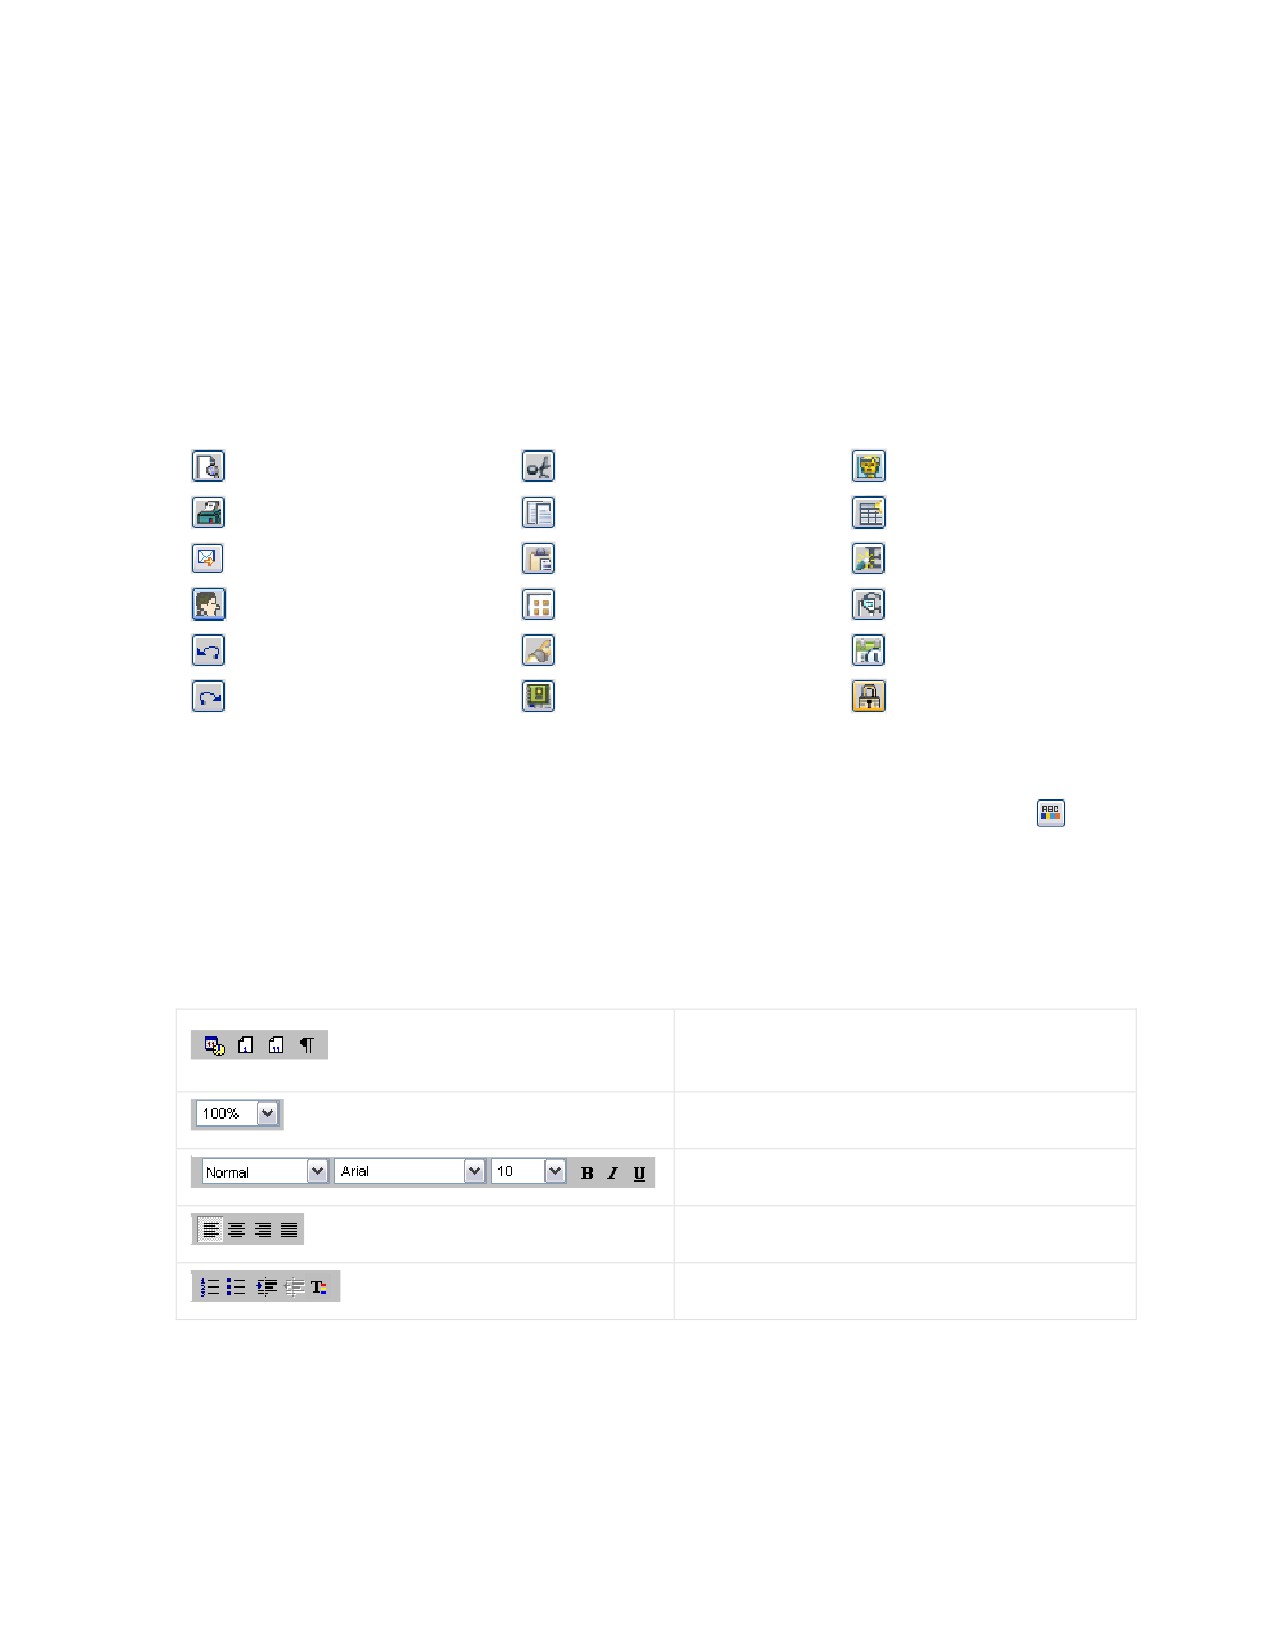
Editor Toolbar
The Editor toolbar buttons provide quick access to commonly used functions within the Cornerstone
Editor. (The Editor toolbar is located within the Cornerstone Editor window, separate from the main
Cornerstone toolbar.)
Print preview
Cut
Picture
Print
Copy
Table
Send email
Paste
Spell check
Client signature†
Select all
Zoom
Undo
Search
Insert date and time
Redo
Bookmark
Lock/Unlock document
† Not available during template setup; available only at the time of use.
Note: When using the Cornerstone Editor in text-only mode, the toolbar buttons available are limited to
those options that pertain to text-based data entry. text-only mode also offers a Color All Text
button that allows you to apply a single color to all text in the template or document.
Toolbars
(Enhanced templates only)
The toolbars include options for frequently used document elements, display settings, style settings and
formatting tools. The toolbar can be turned on/off using the View menu > Tool Bars option.
Insert date/time, page number or number of pages,
and show/hide non-printing characters such as
returns, tabs and spaces
Specify the magnification level for viewing the current
template
Set the paragraph style, font, font size and effect of
selected text (bold, italics, underline)
Set the justification of the paragraph (align left, center,
align right, justify)
Format selected text as a numbered/bulleted list,
increase/decrease the indent, and set the text color
Editor Pane
The Editor pane is the template “page” where you add your desired text, pictures, tables and other
elements. You can add elements within the Editor pane area using the menu bar, Editor toolbar or right-
click menu.
319
Chapter 17: Setting Up Medical Notes and Correspondence
Splitter Bar
You can drag the adjustable splitter bar up or down to increase or decrease the visible area of the Editor
pane and Invoice Items pane. While editing a template, in most cases you would want the splitter bar at
a lower position so that more editing space is available in the Editor pane. If you need to work in the
Invoice Items pane, simply drag the splitter bar upward as needed to increase the working area of the
Invoice Items pane while you are inserting or editing the template’s default items.
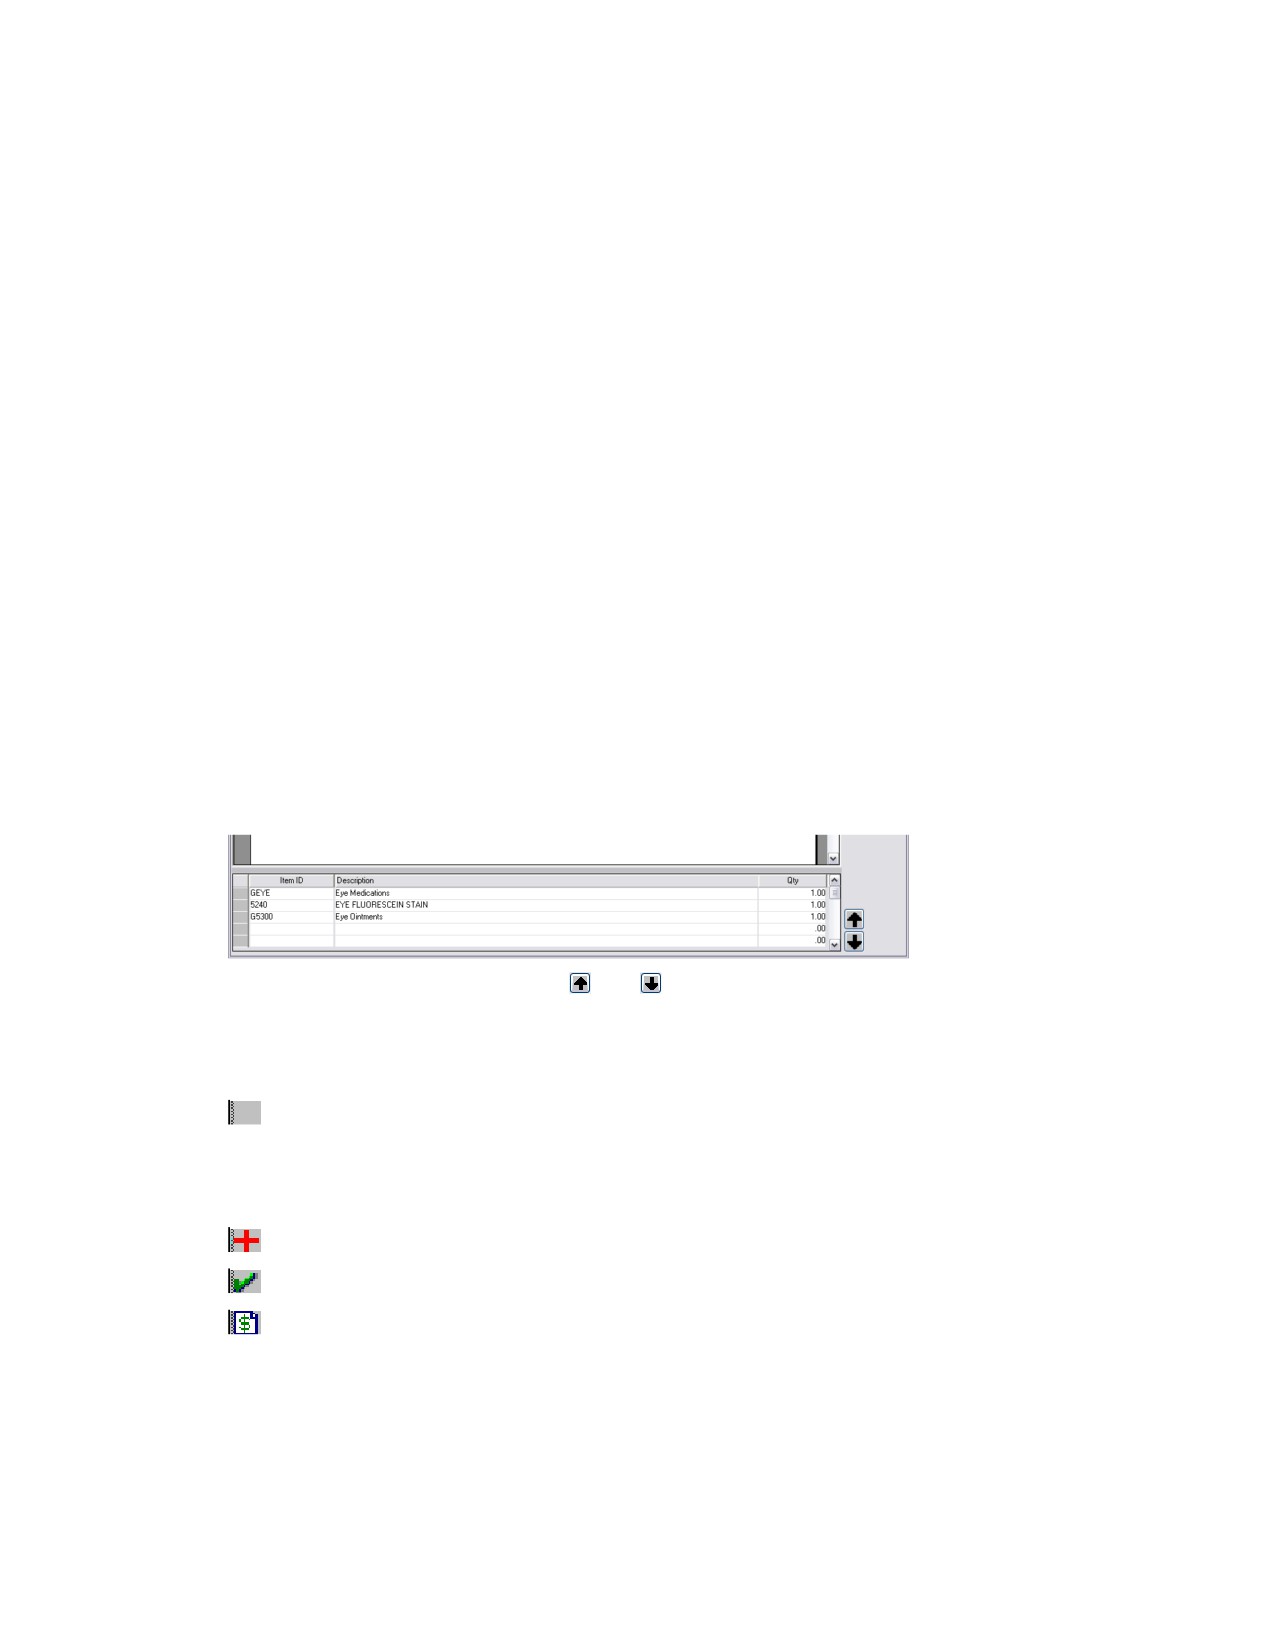
Invoice Items Pane
You can easily add default invoice items to a template using the Invoice Items pane located at the
bottom of the Cornerstone Editor window. In the Cornerstone Editor, all invoice items reside in the
Invoice Items pane, not in the body text of the template.
IMPORTANT: Default invoice items cannot be placed on a template designated as a special action that
prints after an invoice is posted.
Notes:
• The Invoice Items pane does not display for Print Only templates.
• If you are converting from Classic to enhanced medical notes, note that both Consult items and
invoice items from the Classic template are transferred to the Invoice Items pane in the
enhanced template and marked as Accepted.
To add default invoice items to a document template:
1. In the Invoice Items pane, double-click or press F2 in any blank Item ID row to open the Invoice Item
list, allowing you to search for and select the desired item. An empty “add item” row always appears
below the existing item rows.
2. After adding an item, you can use the
and arrow buttons to rearrange the order of the item
lines as needed. (Note: You cannot rearrange the order of item lines that are part of a group code.)
3. You can also change the item status by clicking on the gray box to the left of each item row. Item
status options during template setup include:
Blank-An item assigned a Blank status can be thought of as “sitting dormant” until you decide
to utilize it, which means it will not be sent to the Patient Visit List. In some cases, you may want to
add items to the template with a Blank status and let the staff member decide at the time of use
whether to change the status.
Recommended-This item or service has been recommended for purchase by the client.
Accepted-The client has accepted the item (wants to purchase the service or item).
Performed-The item has been dispensed or the service has been performed.
Note: The Declined or Declined to history statuses are not available when setting up default invoice
items in the template.
320
Chapter 17: Setting Up Medical Notes and Correspondence
Page Setup and Formatting Tools
Tip: For a list of keyboard shortcuts available for use in the Cornerstone Editor, see “Chapter 17: Using
Medical Notes and Correspondence” in the Cornerstone User’s Manual.
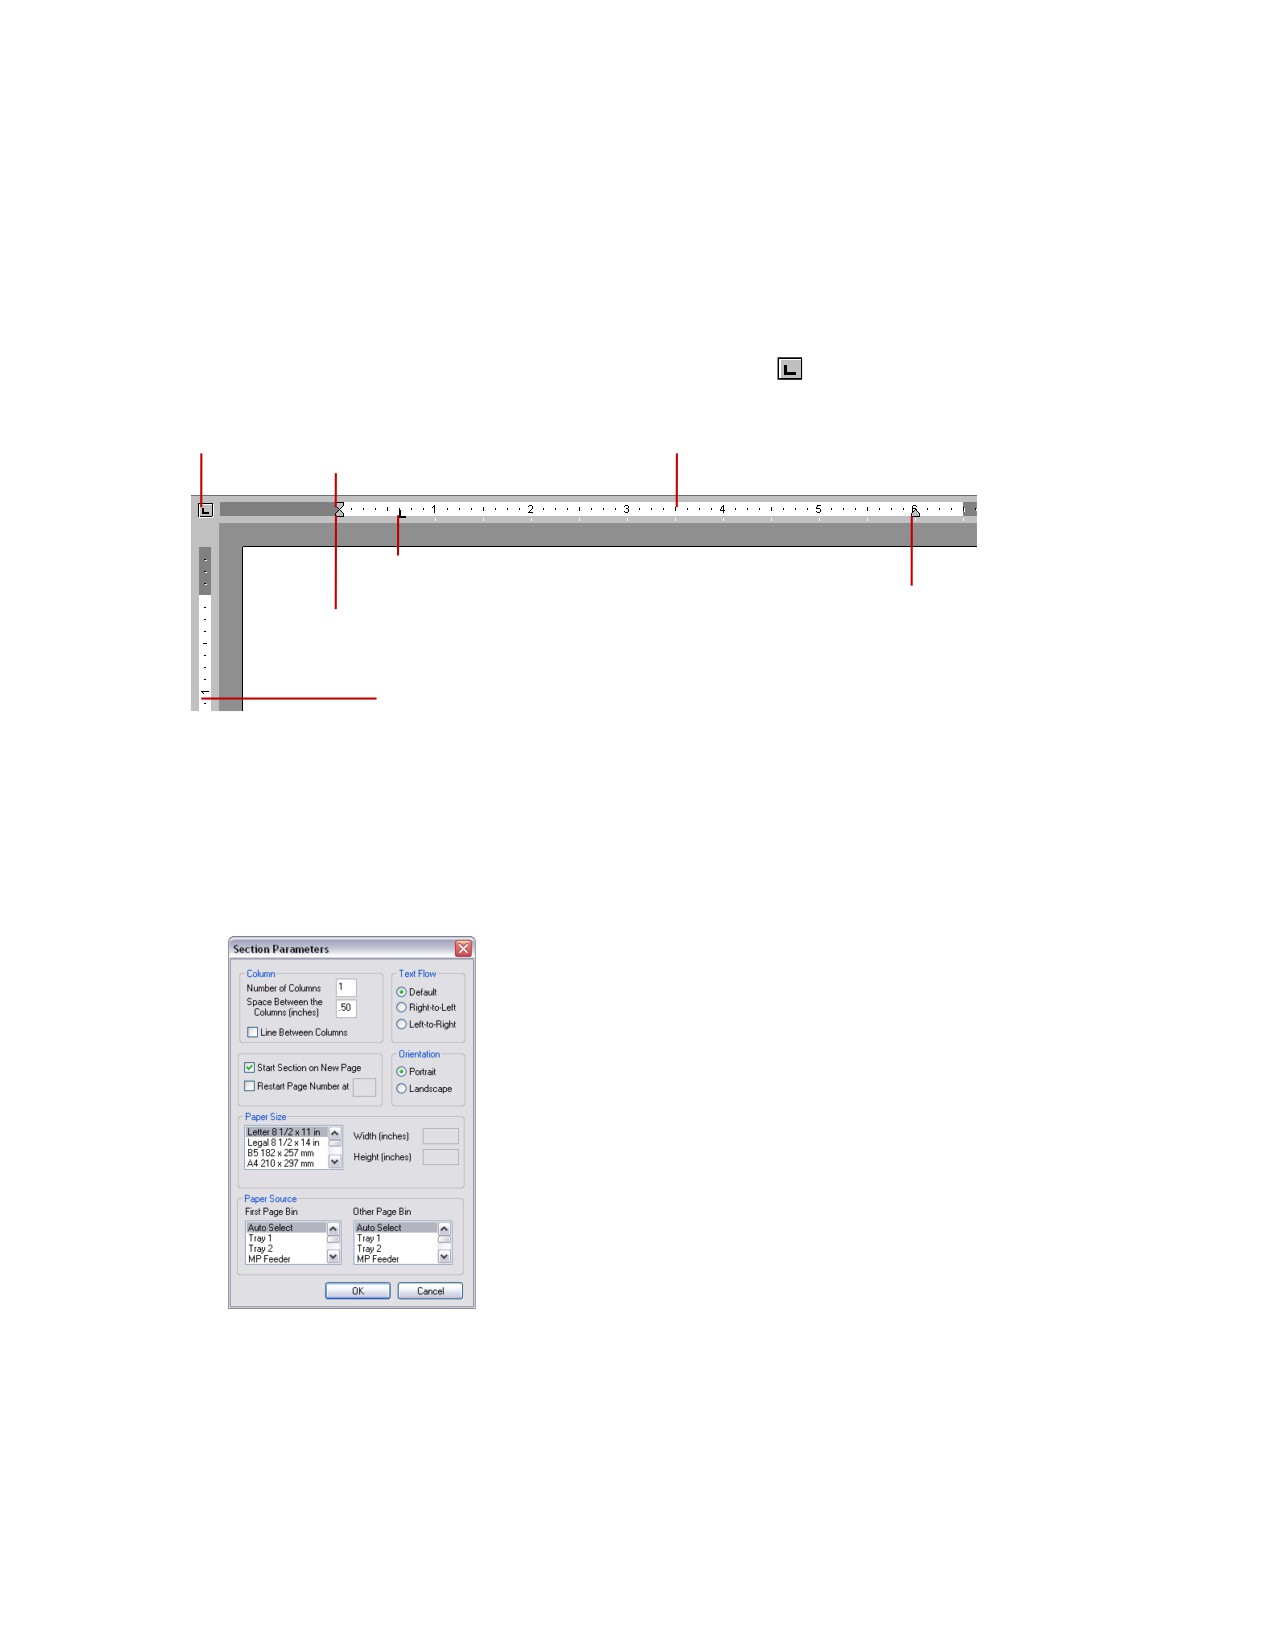
Ruler Bars
Select View > Horizontal Ruler or Vertical Ruler to turn on/off the ruler display. The horizontal ruler
includes indicators for indent settings and tab stops, and allows you to quickly change these settings
directly on the ruler. The vertical ruler includes a tab selector icon
that you can click to change the
tab type.
Left indent
Tab selector
Horizontal ruler
indicator
Tab indicator
Right indent
Hanging indent
indicator
indicator
Vertical ruler
See the “Tab Stops” section that follows for information on setting tab stops on the ruler.
Page Setup Options
(Enhanced templates only)
Use File > Page Setup to set up options such as columns, text flow direction, page orientation (Portrait
or Landscape), paper size, and paper source.
Section Parameters dialog box
Tab Stops
The Cornerstone Editor supports left, right, center and decimal tab stops. The tab stops can be set for
the current paragraph or all lines in a highlighted block of text.
321
Chapter 17: Setting Up Medical Notes and Correspondence
To set/clear tab stops using the rulers:
Tip: To easily set the tab type and add tab stops directly on the rulers, you will need to display both the
horizontal and vertical rulers (the tab selector icon
appears at the top of the vertical ruler only when
both rulers are displayed).
To add this type of tab
Do this
Left tab
Click the left mouse button on the ruler at the desired location
OR
Click the tab selector until it shows
and then click the left mouse button on the
ruler at the desired location
Right tab
Click the right mouse button on the ruler at the desired location
OR
Click the tab selector until it shows
and then click the left mouse button on the
ruler at the desired location
Center tab
Hold the SHIFT key, and click the left mouse button on the ruler at the desired
location
OR
Click the tab selector until it shows
and then click the left mouse button on the
ruler at the desired location
Decimal tab
Hold the SHIFT key, and click the right mouse button on the ruler at the desired
location
OR
Click the tab selector until it shows
and then click the left mouse button on the
ruler at the desired location
To move a tab stop using the rulers:
¾ On the ruler, click on the tab indicator and drag it to the desired location on the ruler.
To clear a tab stop using the rulers:
¾ On the ruler, click on the tab indicator and drag it downward off the ruler.
To set tab stops using the Paragraph menu:
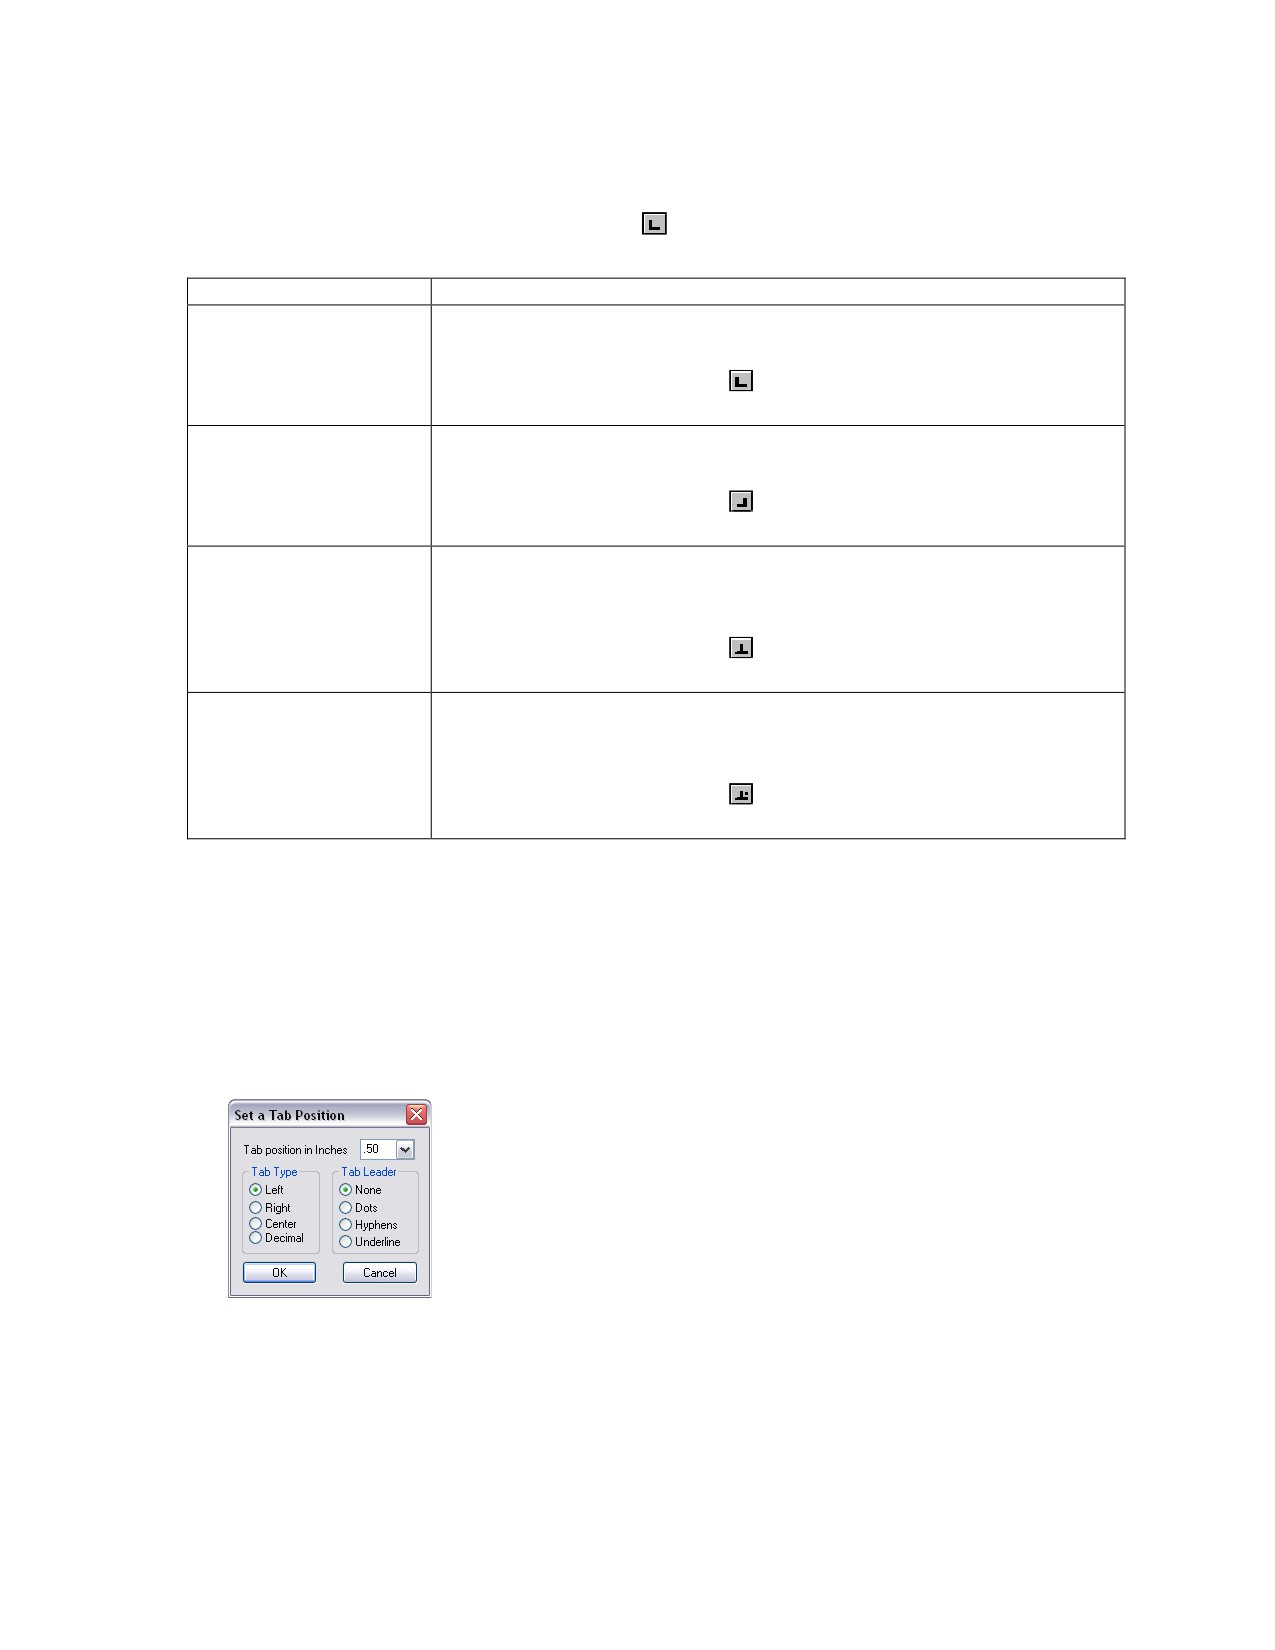
1. On the Paragraph menu, select Set Tab. The Set a Tab Position dialog box appears.
Set a Tab Position dialog box
2. Specify the Tab Type (left, right, center, decimal).
3. If desired, select a Tab Leader (dot, hyphen, or underline).
4. Click OK.
322
Chapter 17: Setting Up Medical Notes and Correspondence
To clear tab stops using the Paragraph menu:
¾ On the Paragraph menu, select Clear All Tabs.
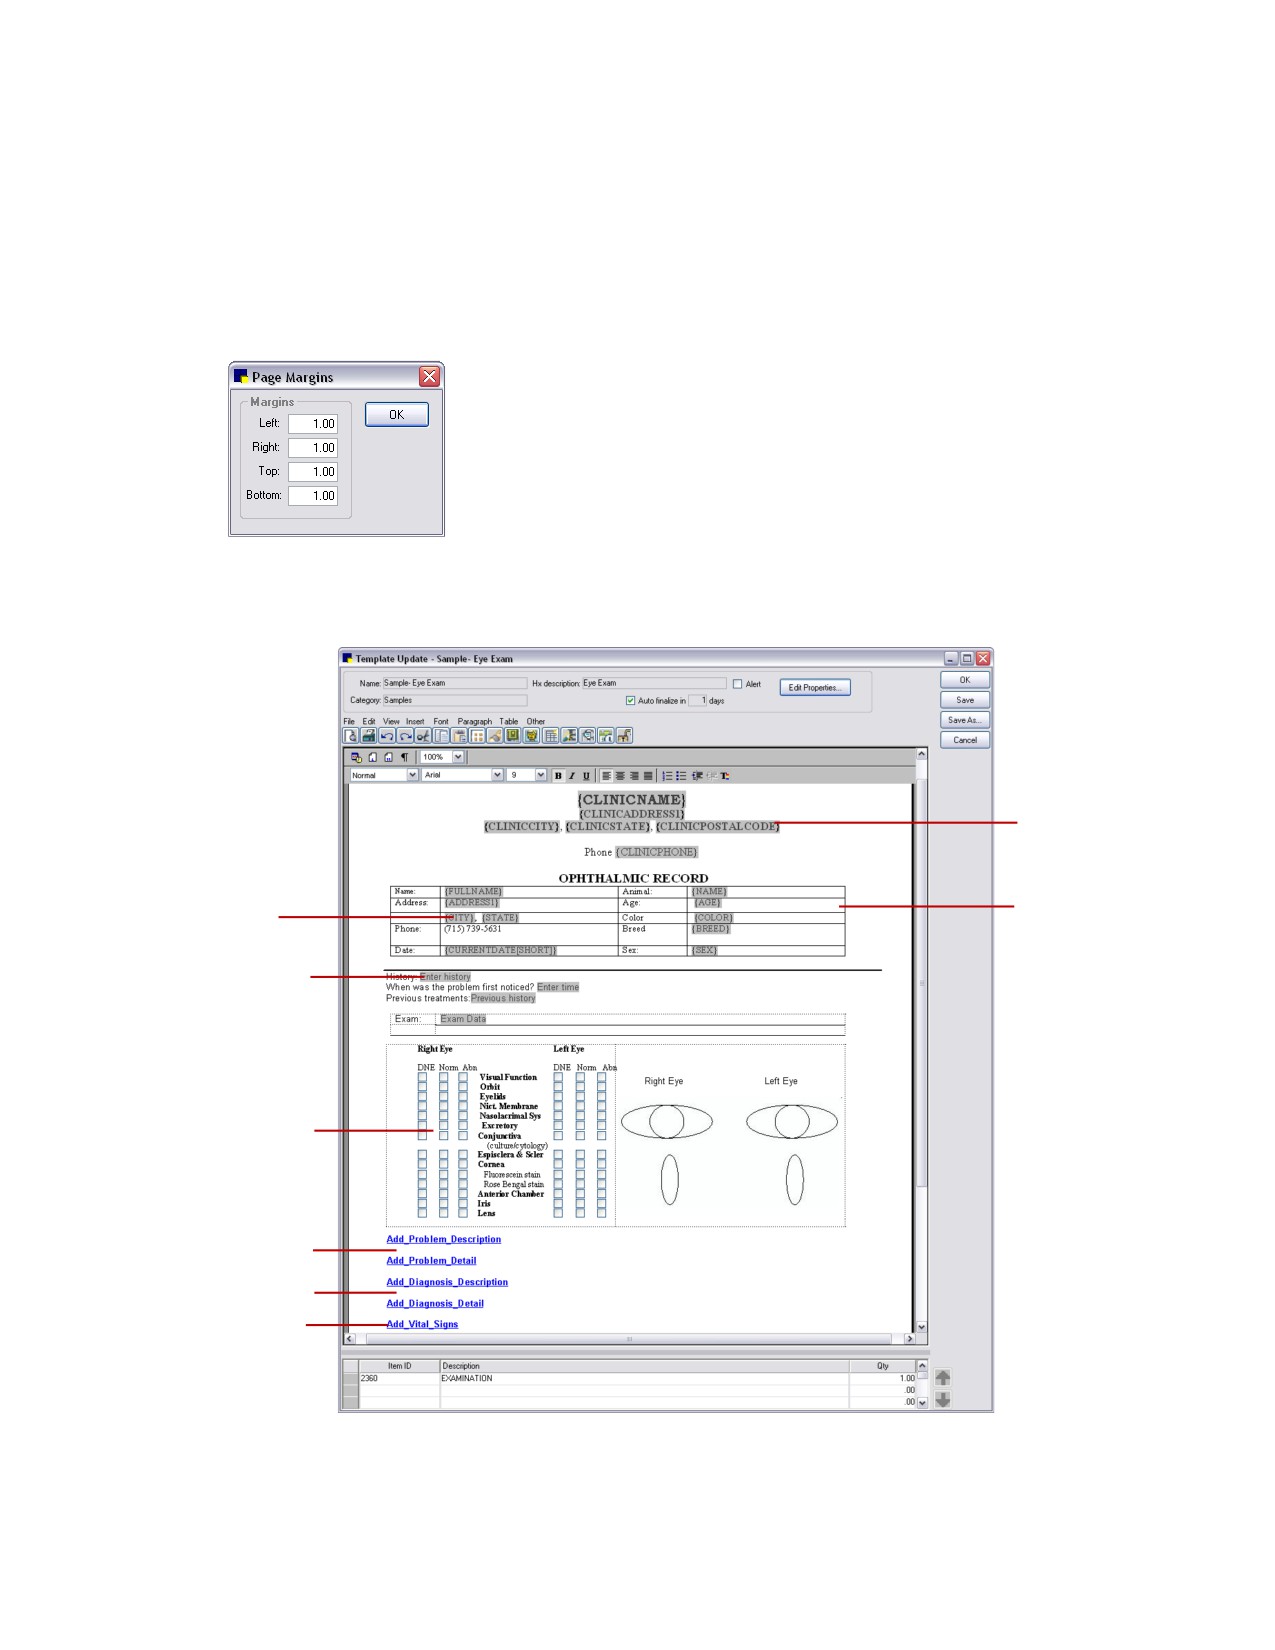
Page Margins
(Enhanced templates/documents only)
Use File > Page Margins or set as you go by moving the margin indicators on the horizontal ruler
(select View > Horizontal Ruler to turn on/off the ruler display).
Page Margins dialog box
Document Template Setup Tools
Header/Footer
Tables
Bookmarks
Text Input Text
Check Boxes
Problem Prompts
Diagnosis Prompts
Vital Signs Prompt
Cornerstone Editor-Document Template Setup Tools
323
Chapter 17: Setting Up Medical Notes and Correspondence
Note: When creating a text-only template (versus an enhanced document template), the menus, toolbar
buttons and right-click menus available in the Cornerstone Editor are limited to those options that pertain
to text-based data entry. Throughout this section, those features not available in text-only mode will be
marked with an ’(Enhanced templates only)’ designation.
Note: The Cornerstone Editor window varies slightly depending on if you are in setup or use mode. Note
that some features covered in this section are available during both template setup and document use.
Additional Cornerstone Editor features are covered in “Chapter 17: Using Medical Notes and
Correspondence” in the Cornerstone User’s Manual.
Note: The Insert menu > OLE Object option is not supported at this time. Although advanced users
may find specific uses for it in certain types of complex documents, it is not recommended for general
use in Cornerstone.
Adding or Editing a Header/Footer
(Enhanced templates only)
You can use the Insert menu > Header/Footer options to insert text, logos, page numbers, etc. at the
top (header) or bottom (footer) of a page to display on each page of the document. For example, you
could add a Header for letterhead-type information, including the practice logo and contact information.
The Footer area could be used for the page number, date or client/patient names and IDs.
Note: All new document templates and converted Classic templates are created using the default setup
document template, which includes a header and footer containing bookmarks for standard information
(clinic information, client information, patient information, date, etc.). See “Customizing the Default Setup
Document Template” on page 335 for more information on changing the default template.
To add, edit or delete header/footer information:
• To add a header/footer-On the Insert menu, select Header/Footer > Insert Header or Insert
Footer. A dotted line displays to show the boundary of the header/footer on the page. Click
within the header/footer area and add text, bookmarks, graphics or other elements as needed.
• To edit a header/footer-On the Insert menu, select Header/Footer > Edit Header Footer. A
dotted line displays to show the boundary of the header/footer on the page. Click within the
header/footer area and make any modifications as needed.
• To delete a header/footer-On the Insert menu, select Header/Footer > Delete Header or
Delete Footer.
Inserting Bookmarks
Bookmarks for Cornerstone data can be included in document templates. At the time of use, when a
document with bookmarks is printed, the bookmarks are replaced with the applicable data. For
example, if the client FullName bookmark is included in the template, the client’s name replaces the
bookmark in the document at the time of use.
See “Cornerstone Bookmarks Available for Use in the Cornerstone Editor” on page 326 for a complete
listing of all bookmarks available when creating a document template in the Cornerstone Editor.
Note: If the Cornerstone data that a field requests is not available (such as a client missing an address),
nothing appears in that space when you print the document.
324
Chapter 17: Setting Up Medical Notes and Correspondence
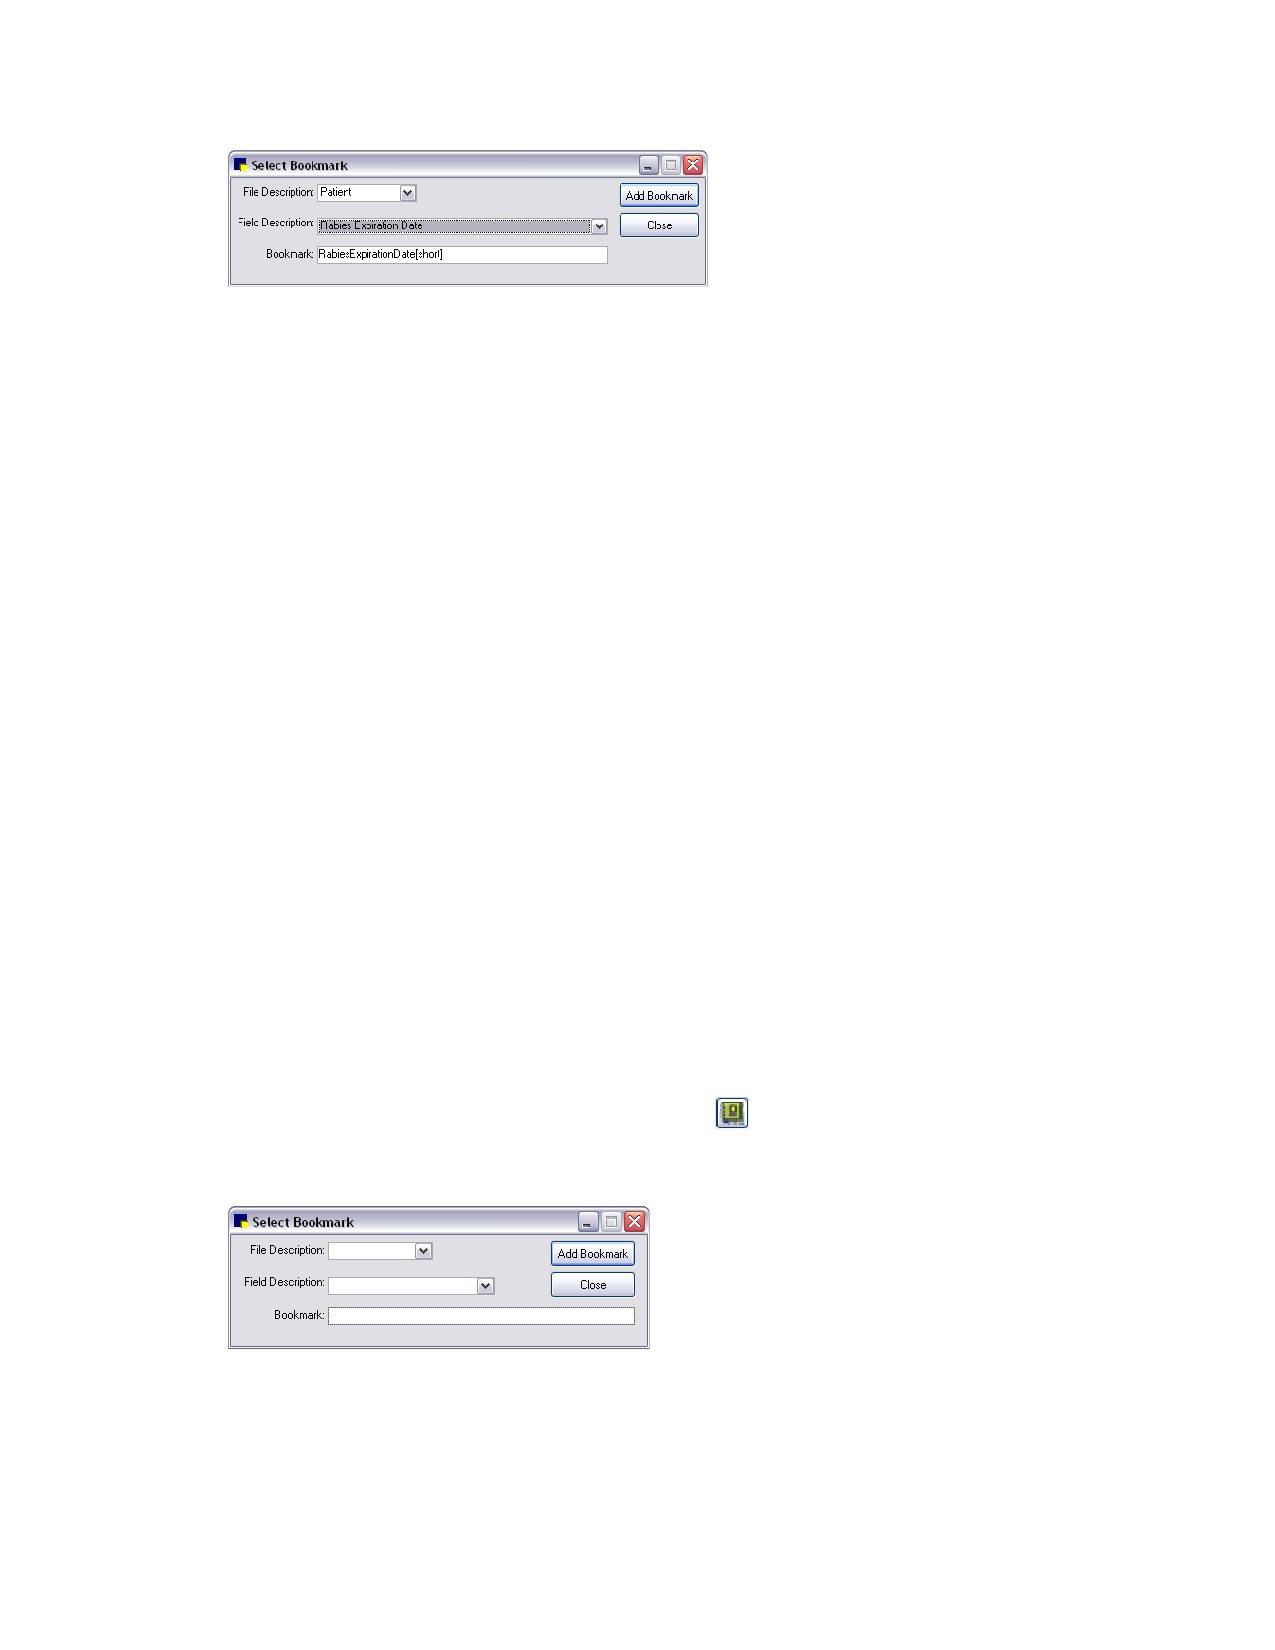
Select Bookmark dialog box
Note: If you convert a Classic medical note to an enhanced medical note, any data fields that were
contained in the Classic medical note will convert to Question bookmarks in the enhanced medical note.
See “Conversion of Existing Data Fields in Classic Template” on page 344 for more information.
Important Guidelines for Inserting Bookmarks
• When adding multiple bookmarks in succession, always add a space between the bookmarks
to separate them and avoid placement issues later (you cannot click between two touching
bookmarks and insert text or punctuation).
• Any bookmarks that are copied from one template and pasted into another template will lose
their functionality and these bookmarks will not work (if pasted into another document
template they will display normally, but they will not function). To reuse bookmarks you must
either use the Document Template List Copy button to create a copy of the template containing
the bookmarks or use Save As to save the template with a different name.
• Depending on their intended use, Question bookmarks added in previous versions of
correspondence may better suit your needs as Text Input Fields. They can be easily identified
within a document and can be filled in at any time while completing the document. See
“Inserting Text Input Fields” on page 330 for more information.
• When adding bookmarks to a text-only template, only text-based bookmarks can be used
(image- or table-based bookmarks are not available for selection).
To insert a bookmark in a document template:
Note: See the “Cornerstone Bookmarks Available for Use in the Cornerstone Editor” section that follows
for information on the bookmarks available when creating a document template in the Cornerstone
Editor. This section also includes information on specific steps required to set up special types of
bookmarks (Medical Notes, Question, Vaccination and Signature bookmarks).
1. Right-click in the document template where you want to insert a bookmark and select Insert >
Bookmark. Alternatively, you can click the Bookmark
button on the editor toolbar or select
Bookmark from the Insert menu. The Select Bookmark dialog box appears.
Note: The right-click option is not available when inserting a bookmark within a table.
Select Bookmark dialog box
2. In the File Description drop-down list, select the type of Cornerstone file to use to create the
bookmark (e.g., Client, Invoice Items, Patient, etc.).
325
Chapter 17: Setting Up Medical Notes and Correspondence
3. In the Text box Description drop-down list, select the type of text box data to pull from the selected
file (e.g., Full Name, Patient ID, Rabies Tag Number, etc.). The corresponding bookmark displays in
the Bookmark text box.
4. Click Add Bookmark. Cornerstone inserts the bookmark into the document template.
5. Click Close to close the Select Bookmark dialog box and return to the document template.
Cornerstone Bookmarks Available for Use in the Cornerstone Editor
Note: When adding bookmarks to a text-only template, only text-based bookmarks can be used (image-
or table-based bookmarks are not available for selection).
Boarding
These bookmarks can be used only if your practice has purchased Cornerstone Boarding and
Grooming module.
Arrival Date
Cage Number
Departure Time
Arrival Time
Cage Type
Patient Information
Boarding Status
Departure Date
Choice
our/your
us/you
we/you
Client
Address 1
Full Name
Note
Referred Postal Code
Address 2
ID
Outstanding Balance
Referred State
All Phones
Last Month A/R
Overdue Balance
Secondary Name
City
Last Name
Phone Description
Sixty Days A/R
Classification
Last Payment Amount
Phone Extension
State
Client Signature
Last Payment Date
Phone Number
Status
Credit Code
LY Sales - Inventory
Postal Code
Thirty Days A/R
Current A/R
LY Sales - Services
Referred Address 1
Title
Date Client Entered
LY Visits
Referred Address 2
YTD Sales - Inventory
Email Address
Middle Initial
Referred By Name
YTD Sales - Services
Finance Charges A/R
Ninety Days A/R
Referred City
YTD Visits
First Name
Note: A/R totals do not include current invoices. Use Current A/R or Outstanding Balance text
boxes to include amounts not yet included in an end-of-day processing.
Imaging
Image
Patient Picture
Invoice Items
Choose any invoice item from the Invoice Item List.
326
Chapter 17: Setting Up Medical Notes and Correspondence
Lab
These bookmarks can be used only if your practice has purchased the Laboratory module.
Lab results
Medical History
Abnormal exam observations only All exam observations
Departing instructions
Patient diagnosis
Medical Notes
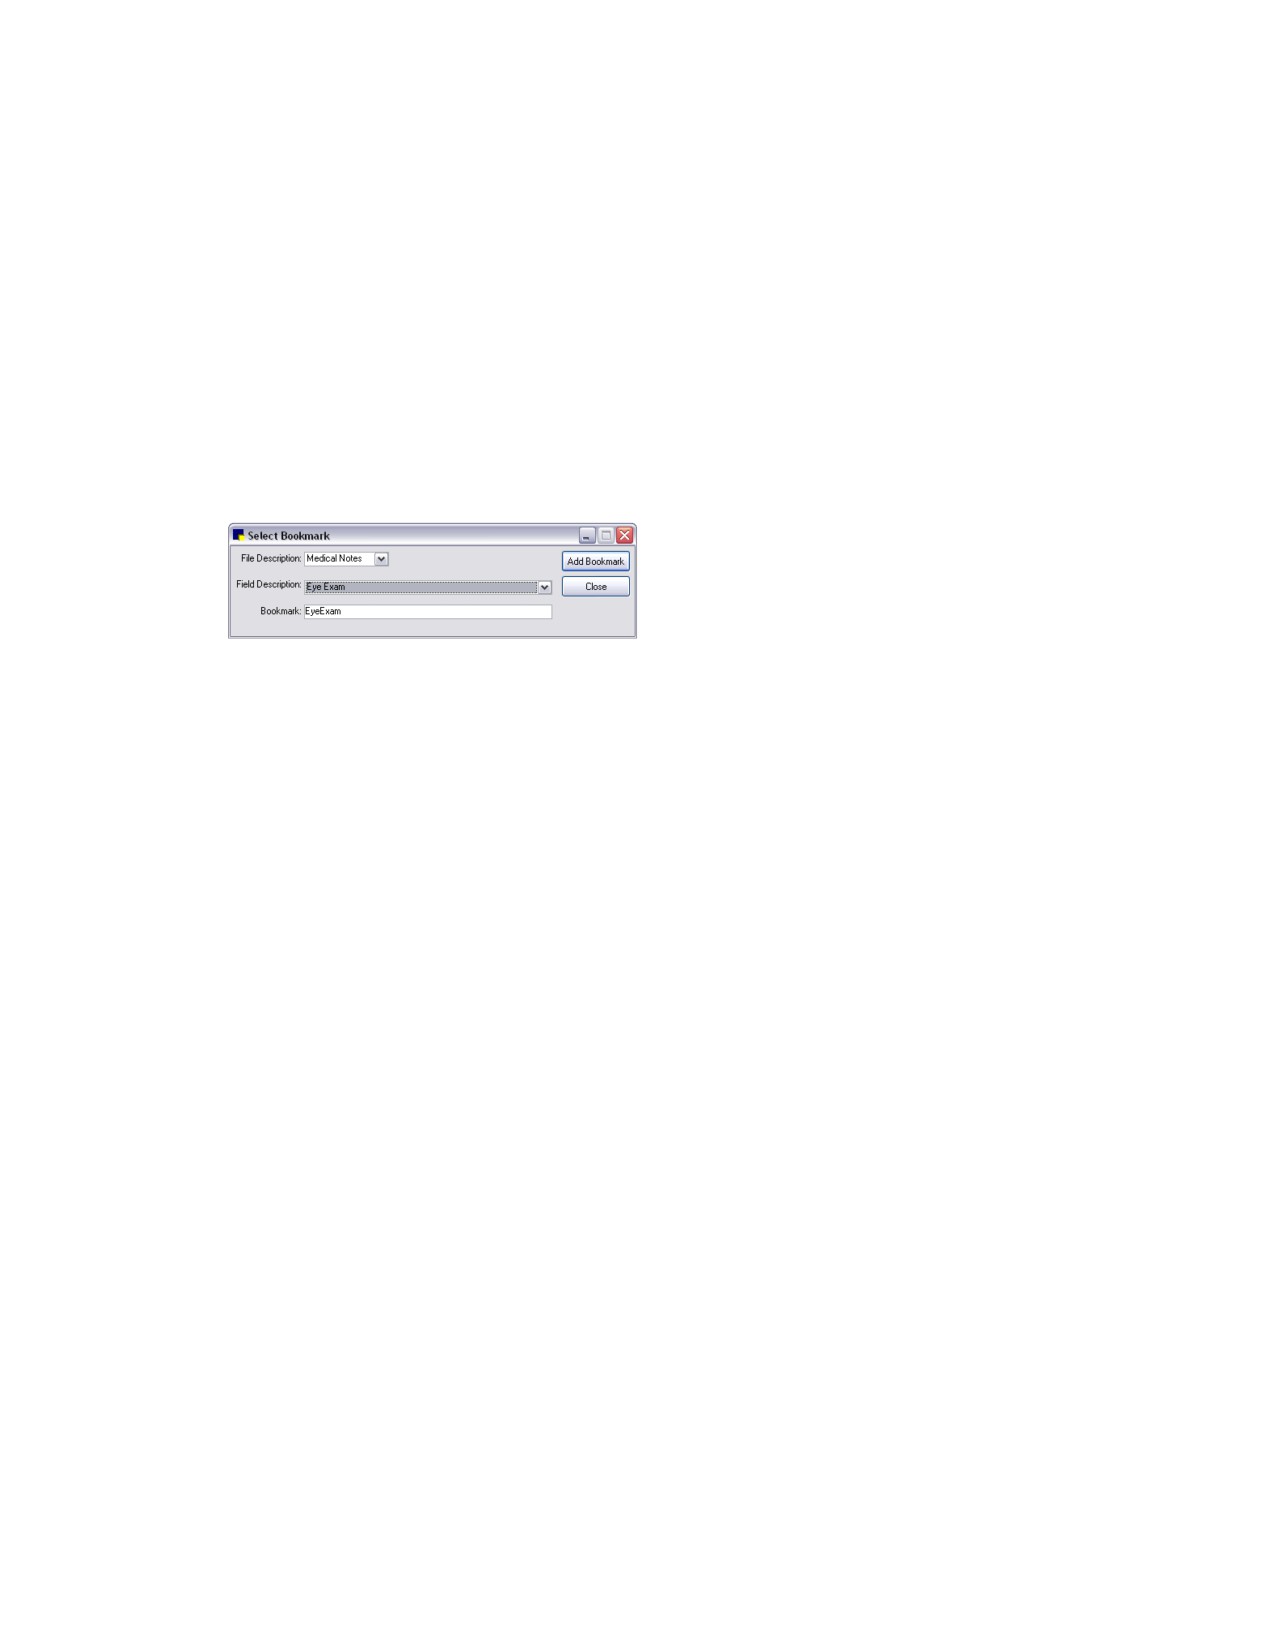
If desired, medical notes can be inserted into a document template (typically a correspondence
template) using a Medical Notes bookmark.
Medical Notes bookmark
IMPORTANT: When selecting the medical notes to include in the template, note the save status of
the document (Draft, Tentative or Final). This save status is important to note, as you would not want
to include a Draft medical note in a referral letter or client handout.
Note: The option to display only part of a medical note in correspondence applies only with Classic
medical notes. You cannot include part of a medical note in a correspondence document with
enhanced medical notes; with enhanced medical notes the entire document is included. You can
then select and delete any included content that is not applicable.
Miscellaneous
Current Date
Patient (Includes Rabies Tag)
Age
Current Weight Unit
Number of Years
Sex
Birth Date
Current Weight Unit Date
Patient Classification
Species
Breed
Date Current Weight
Patient ID
Vaccine Amount
Check In Date (last)
Date Patient Entered
Patient Note
Vaccine Expiration
Check In Time (last)
Deceased Date
Patient Status
Vaccine Lot Number
Check Out Date (last)
Manner of Injection
Rabies Expiration Date
Vaccine Name
Check Out Time (last)
Markings
Rabies Tag Date
Vaccine Producer
Color
Microchip ID
Rabies Tag Number
Vaccine Type
Current Weight
Name
Registration Number
327
Chapter 17: Setting Up Medical Notes and Correspondence
Practice
All Phones
Clinic City
Clinic Name 2
Clinic Postal Code
Clinic Address 1
Clinic Name
Clinic Phone
Clinic State
Clinic Address 2
Prescription Instructions
Choose any prescription instruction from the Prescription Instruction List.
Question
You can use Question bookmarks to prompt staff to answer questions when the document is added
to a patient’s record at the time of use.
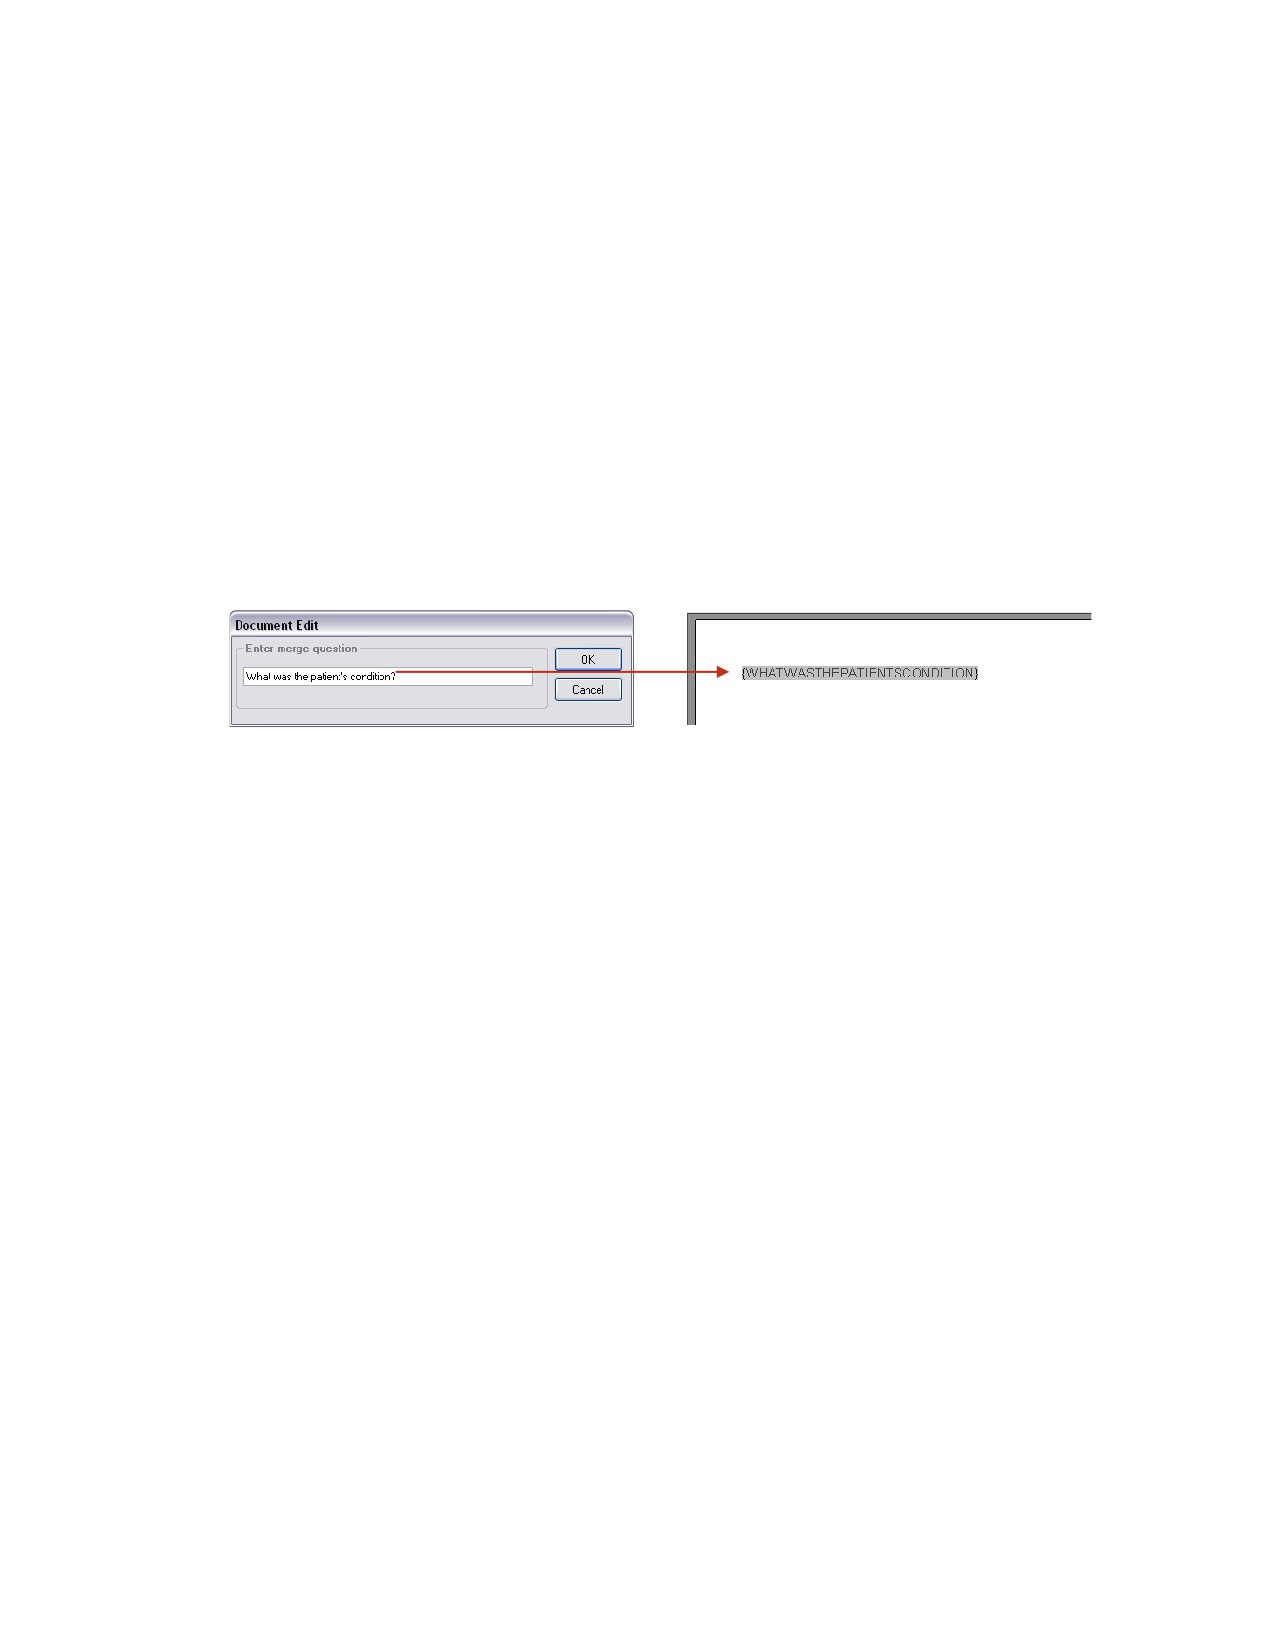
Cornerstone uses the text you enter for your merge question as the name of the question bookmark
that appears in the document template. If desired, you can change the name of the bookmark to
make it more meaningful. A bookmark can be up to 40 characters with no spaces.
Question bookmark
When you select a document template at the time of use, the document opens in the Cornerstone
Editor and you are immediately prompted to answer all of the questions (Question bookmark
prompts) in that document. The questions are asked in the order they appear in the document.
The answer you type is printed in the document. To leave a question unanswered in the document,
type a space or simply click Cancel.
Referral Doctor
All Phones
Ref. Doctor Last Name
Ref. Doctor Postal Code
Ref. Doctor Address 1
Ref. Doctor City
Ref. Doctor State
Ref. Doctor Address 2
Ref. Doctor Email
Ref. Doctor Title
Ref. Doctor First Name
Ref. Doctor Fax
Ref. Doctor Phone Number
Ref. Doctor Full Name
Ref. Doctor License
Ref. Doctor Phone Desc.
Ref. Doctor Phone Extension
Referral Hospital
All Phones
Ref. Hospital City
Ref. Hospital Fax
Ref. Hospital Postal Code
Ref. Hospital Address 1
Ref. Hospital Email
Ref. Hospital Name
Ref. Hospital State
Ref. Hospital Address 2
Ref. Hospital Phone Number Ref. Hospital Phone Desc. Ref. Hospital Phone Extension
328
Chapter 17: Setting Up Medical Notes and Correspondence
Reminder Info
After you select the Invoice Item, the Reminder Information choices display. Specify whether you
want to enter the Description-Reminder Due, Description-Reminder Given, Given Date, Due Date or
Use Pattern.
Staff
All Phones
Staff Extension
Staff License Number
Staff Postal Code
Staff Address 1
Staff First Name
Staff Middle Initial
Staff State
Staff Address 2
Staff Full Name
Staff Note
Staff Status
Staff City
Staff ID
Staff Phone Description
Staff Title
Staff Classification
Staff Last Name
Staff Phone Number
Signature
Signature w/Pwd
Note: In order to use a Staff Signature bookmark (or a Signature w/Pwd bookmark), you must first
set up your system to use a supported signature capture device. See “Setting Up a Signature
Capture Device” on page 16 for more information.
User-Defined Client and Patient Prompts
You can place the answer to a client or patient prompt in the document. The client or patient
prompts that appear as field descriptions are the same prompts that are currently set up in
Cornerstone.
Vaccinations
Vaccinations work in the same way as reminder information. Using vaccination bookmarks
(Description - Reminder Due, Description-Reminder Given, Given Date, Due Date), you can create
health and vaccination certificates.
Before inserting vaccination bookmarks in a template, you must first set up your Vaccination
Bookmarks defaults (see “Vaccination Bookmarks Defaults” on page 138).
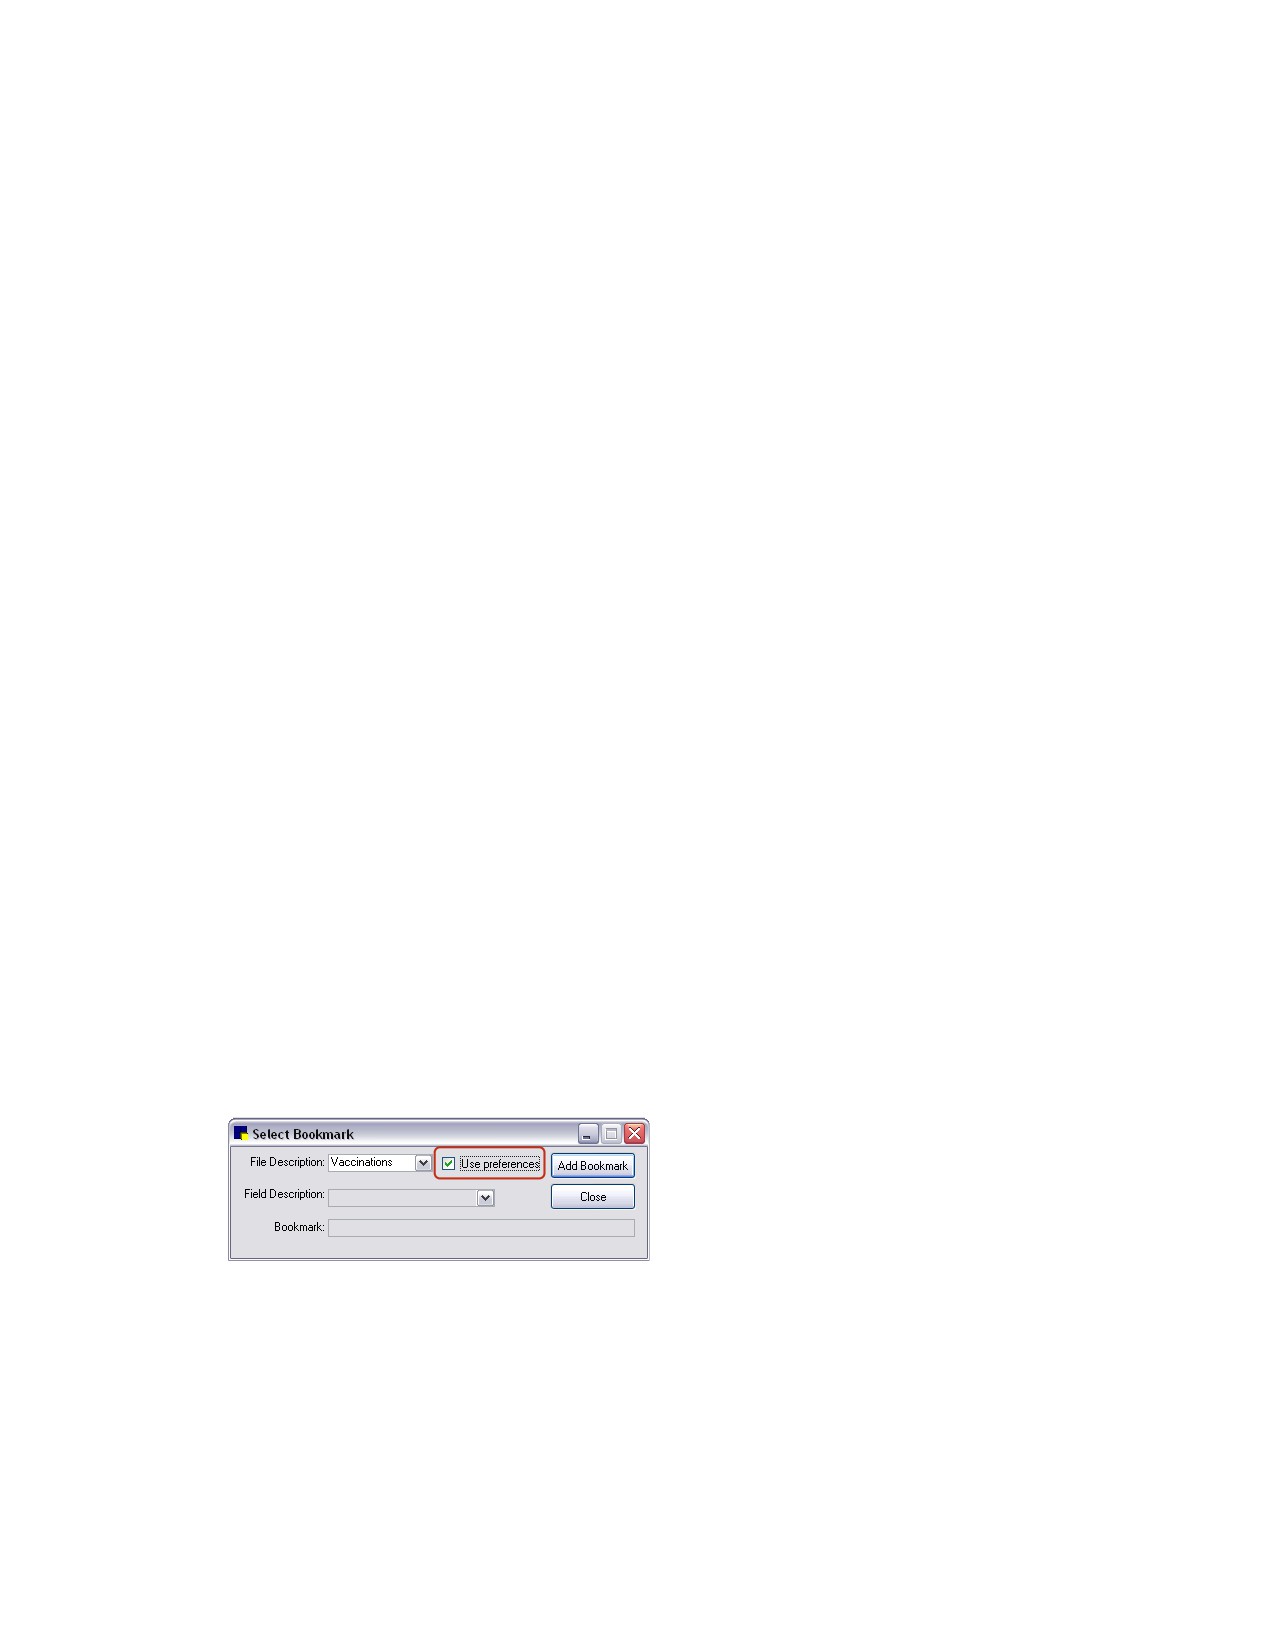
After vaccination preferences and pattern have been selected, bookmarks for the selected
vaccinations can be included in documents. To include vaccination preferences in a document,
select the Use preferences check box when setting up the bookmark.
Vaccinations bookmark
When documents with the bookmarks are printed, the bookmarks are replaced by vaccination
information from the selected patient’s record.
329
Chapter 17: Setting Up Medical Notes and Correspondence
Inserting Text Input Fields
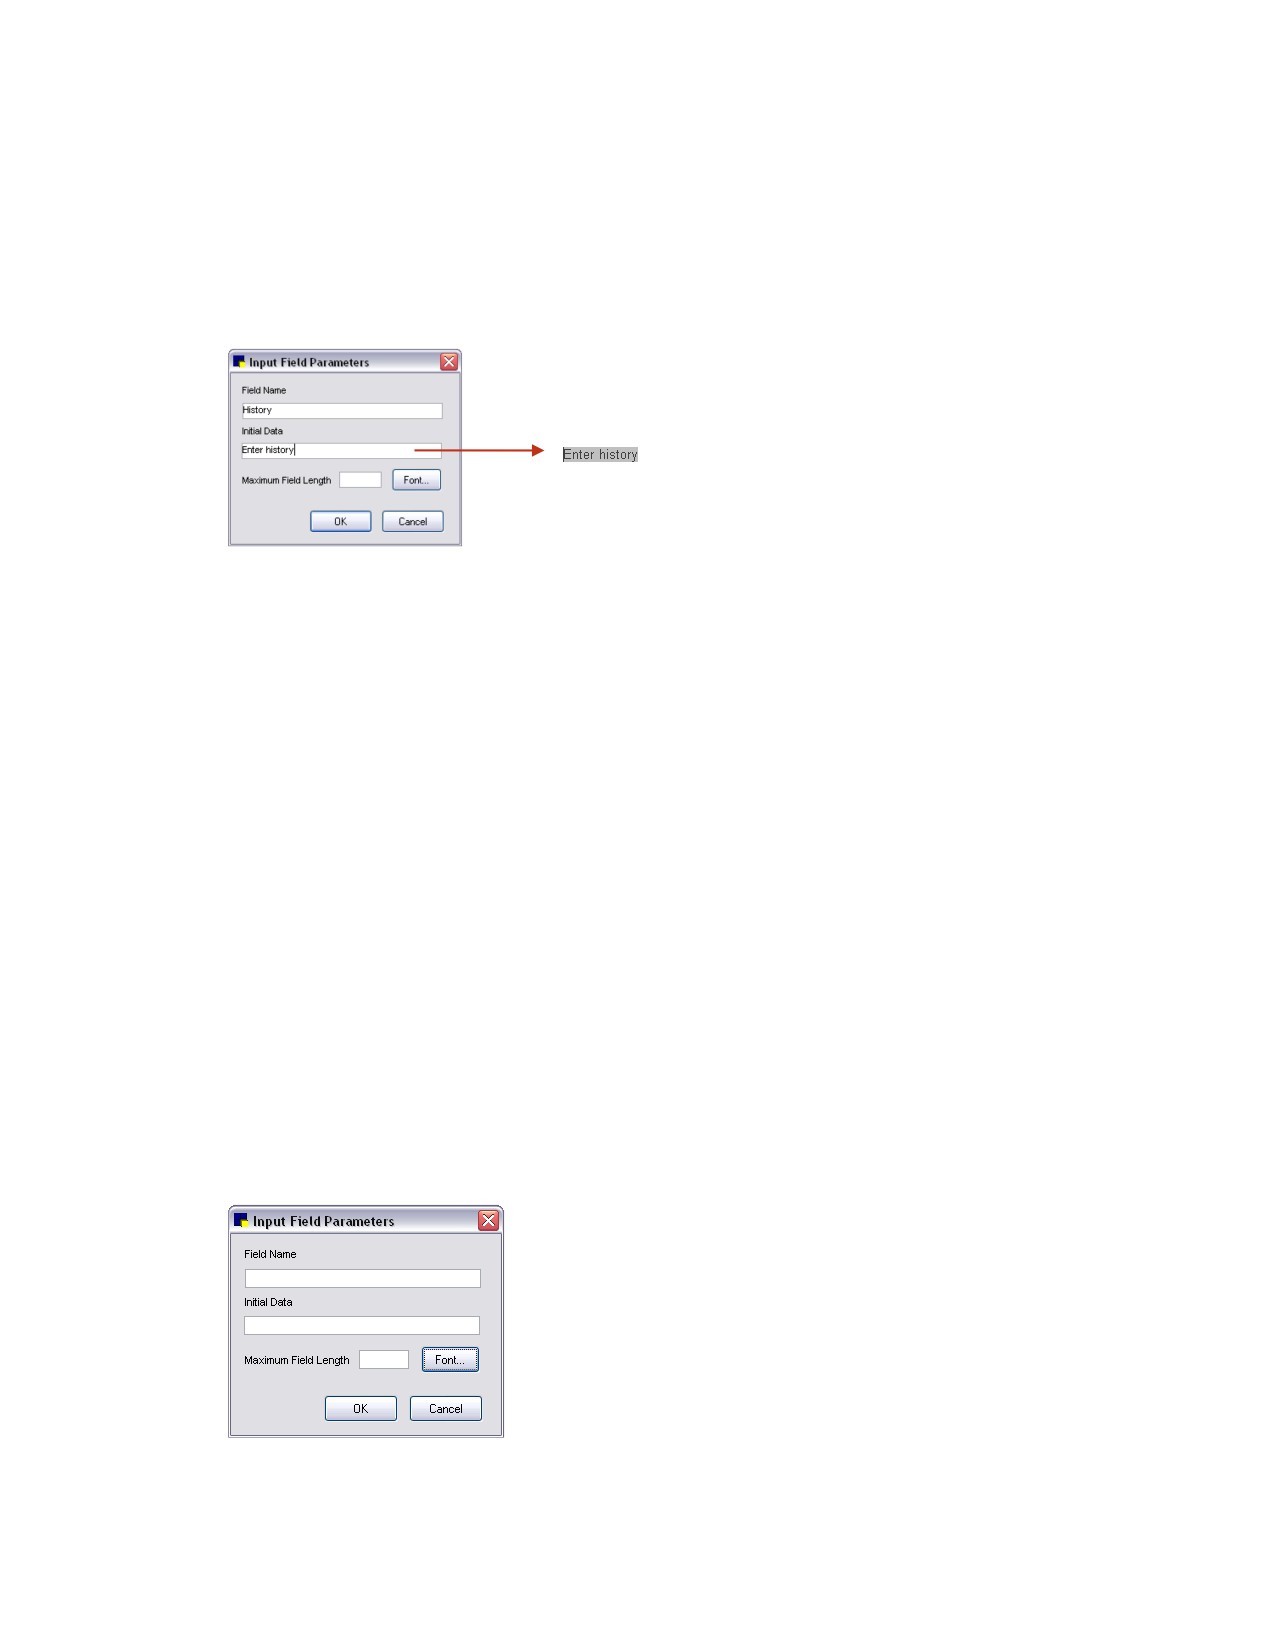
When setting up a document template, you can insert Text Input Fields that allow you to create preset
form fields. These fields can be filled in or “answered” by the staff member at the time the medical note
or correspondence document is added for a patient.
Tip: All Text Input Fields display with a light gray background so they are easily identified at a glance
within the document.
Input Field Parameters dialog box
Once the Text Input Fields are set up, you then have the option of locking the document so that at the
time of use the staff member can easily tab from field to field to fill in the patient-specific data or accept
the default data.
Tips for Inserting Text Input Fields:
• If it is a patient-specific field and does not have a commonly used answer, you may want to
enter a prompt as the Initial Data placeholder text (e.g., [enter Hx here]). If the field needs to be
limited to a small number of characters, you may want to enter XX or something similar (e.g., if
the answer needs to be a 2-digit number, you could enter ## for the Initial Data).
• If your default data (Initial Data) is a paragraph of text, you can insert a placeholder word in the
Initial Data box in the Input Field Parameters dialog box. Then, after clicking OK to create the
field, you can click within it and add additional text or copy/paste text into the field.
• For some form fields where the “answer” is a choice between two or three possible answers,
you may want to insert all possible answers as the Initial Data. At the time of use, the staff
member can leave the chosen answer and delete the unwanted answers. For example, if the
answer is either Left or Right, use “Left/Right” as the Initial Data, and, at time of use, instead of
typing one or the other, you can simply delete the unwanted one.
To insert a Text Input Field in a document template:
1. When setting up or updating a document template, in the Cornerstone Editor, right-click and select
Insert > Text Input Field. The Input Field Parameters dialog box appears.
Input Field Parameters dialog box
330
Chapter 17: Setting Up Medical Notes and Correspondence
2. In the Field Name box, type a name by which to identify this field.
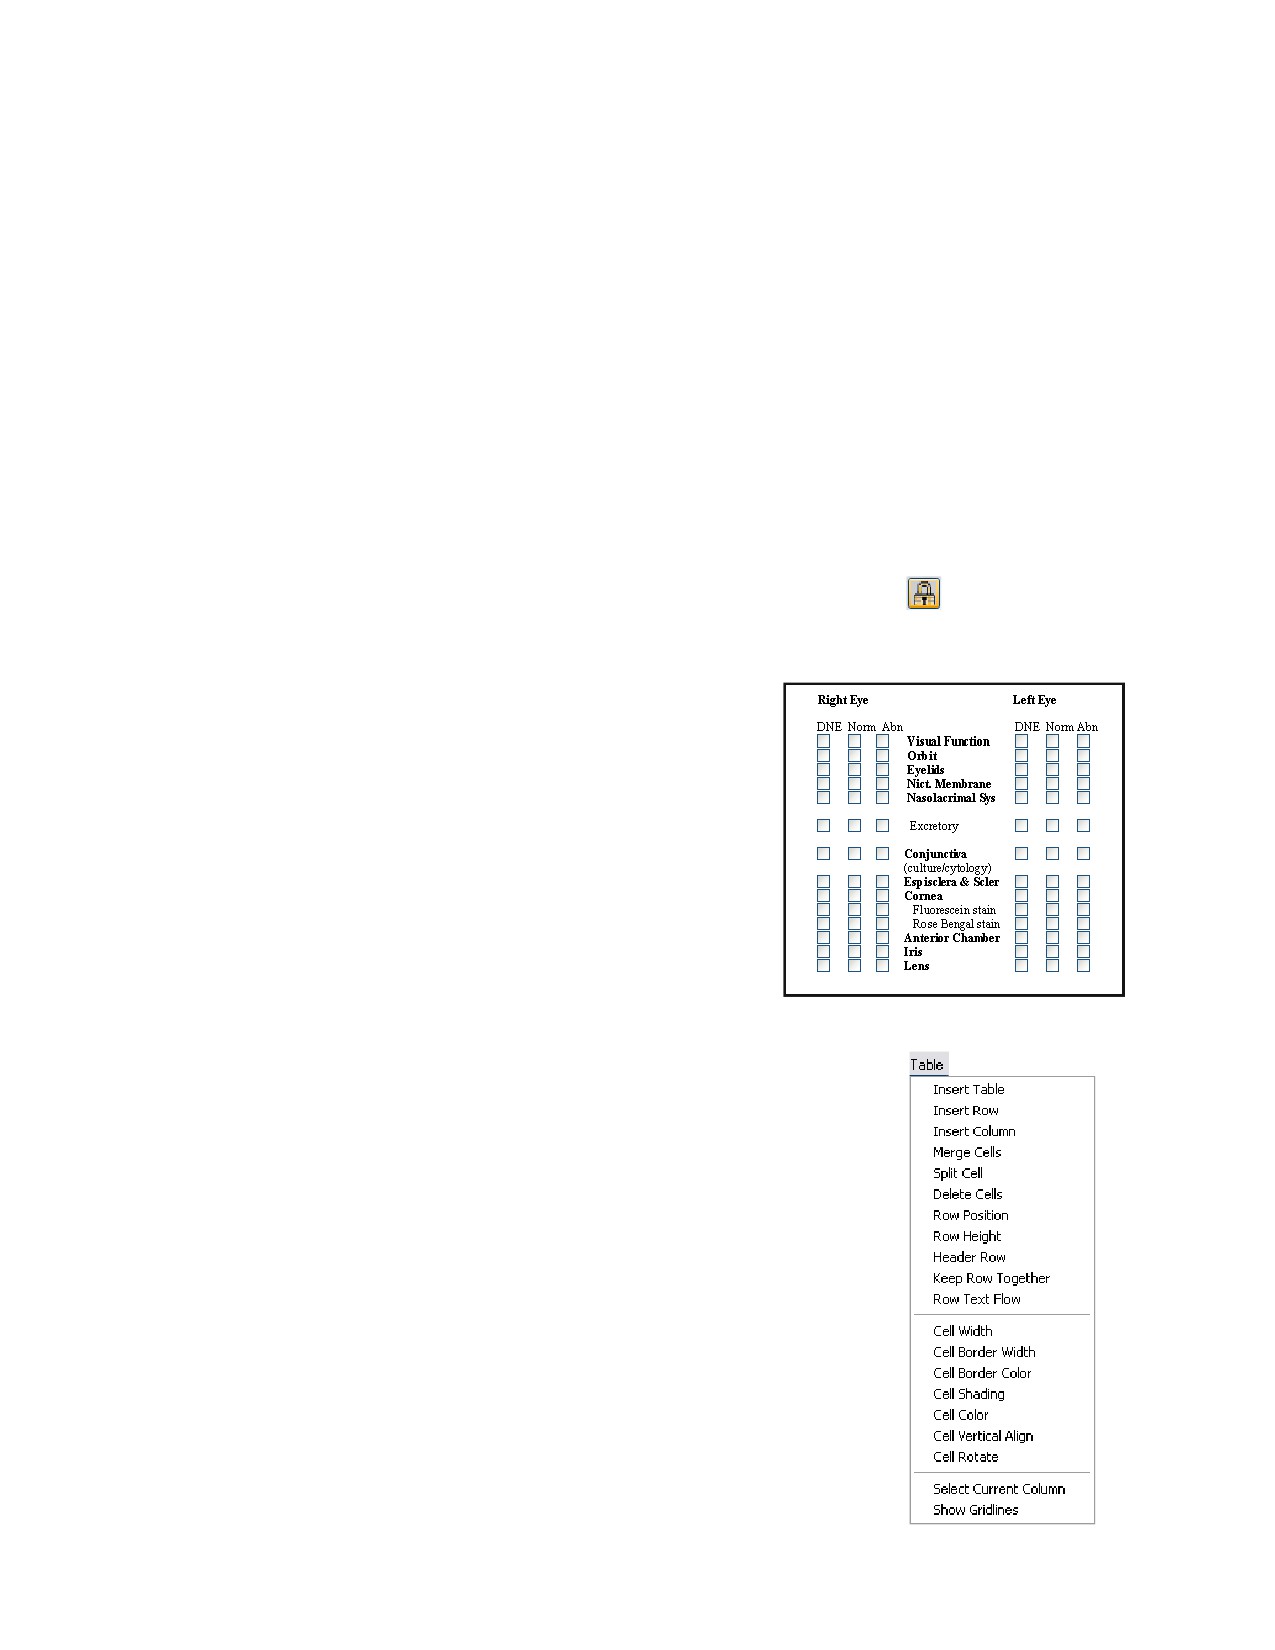
3. In the Initial Data box, type the default “answer” text to appear in the field. In most cases, you would
want to enter the most commonly used answer so that, at the time of use, the staff member can
simply press TAB to accept the default data and move to the next field.
Note: If you do not provide Initial Data to serve as the placeholder text, the document will display
underscore characters “__” for this field at the time of use.
4. In the Maximum Field Length box, type the maximum number of characters to accept in this field.
Tip: In many cases you may want to leave the Maximum Field Length blank to allow text entry in
the template at the time of use.
5. If you want to specify a particular font for the field (e.g., a font that stands out from the other text on
the page), click the Font button to select a font, style, size, color and effects.
6. Click OK.
7. When you are finished with the template setup, if you want to “lock” the document to allow for quick
tab-through data entry at the time of use, click the Lock/Unlock document
button.
Note: The Lock/Unlock setting can be turned on or off at use time if desired.
Inserting Check Boxes
(Enhanced templates only)
You can easily insert a check box that changes state when
clicked—click once to place a check mark in the box, click
again to clear the check mark.
To insert a check box:
¾ Right-click within the editor pane and select Insert >
Check Box. The check box is added at the current cursor
location.
Tip: To get check boxes to line up nicely into straight vertical
columns, use a fixed-size font (e.g., Courier, Lucida Console,
etc.) or use tabs.
Inserting Tables
(Enhanced templates only)
The Cornerstone Editor makes it easy to add simple or complex tables.
Tables can be used to organize or group categories of information within a
document, or can be used to provide a cleaner layout for content-heavy
documents.
The standard Table option inserts a simple table based on the number of
rows and columns you specify. You can then right-click within the table to
insert rows or columns, or to apply formatting like borders and shading. You
can also use the Table menu options to apply detailed table formatting
options for cell positioning, flow, color, rotation, etc.
331